
Butternut Squash Growing Hacks: Ready to unlock the secrets to a bountiful butternut squash harvest right in your own backyard? I know I am! For centuries, squash has been a staple crop, deeply woven into the agricultural tapestry of indigenous cultures across the Americas. From hearty stews to delectable pies, this versatile vegetable has nourished generations. But let’s be honest, sometimes getting those beautiful, tan-skinned squashes to thrive can feel like a real challenge.
Are you tired of spindly vines, disappointing yields, or battling pesky squash bugs? You’re not alone! Many home gardeners struggle to achieve the butternut squash bounty they dream of. That’s why I’ve compiled a collection of tried-and-true butternut squash growing hacks that will transform your gardening game.
This isn’t just about planting seeds and hoping for the best. We’re diving deep into proven techniques that will optimize your soil, protect your plants from pests and diseases, and ultimately, reward you with a harvest overflowing with delicious, homegrown butternut squash. Get ready to roll up your sleeves and discover the simple yet effective DIY tricks that will make you the envy of every gardener on the block!

Butternut Squash Growing Hacks: From Seed to Supper!
Alright, butternut squash lovers! I’m here to share my tried-and-true methods for getting the most amazing butternut squash harvest you’ve ever seen. Forget those tiny, pale squashes from the grocery store – we’re talking about big, beautiful, and bursting-with-flavor butternut squash grown right in your own backyard. Let’s dive in!
Choosing the Right Variety and Starting Seeds
Before we get our hands dirty, let’s talk about the foundation of a successful harvest: the right variety and a strong start.
* Variety Selection: Not all butternut squashes are created equal! Consider your climate and growing space. Waltham Butternut is a classic, reliable choice. If you have limited space, look for bush varieties like Butterbush. They produce smaller vines but still deliver that delicious butternut flavor.
* Starting Seeds Indoors (Optional but Recommended): I highly recommend starting your butternut squash seeds indoors, especially if you have a shorter growing season. This gives them a head start and protects them from early-season pests and unpredictable weather.
Step-by-Step Seed Starting:
1. Gather Your Supplies: You’ll need seed starting trays or small pots (peat pots are great because you can plant them directly into the ground), seed starting mix (not regular potting soil!), butternut squash seeds, a spray bottle, and a warm, sunny location or grow lights.
2. Prepare the Seed Starting Mix: Moisten the seed starting mix with water. It should be damp but not soggy.
3. Plant the Seeds: Make a small hole (about 1 inch deep) in each cell or pot. Place one or two seeds in each hole. Cover with seed starting mix and gently pat down.
4. Water Gently: Use a spray bottle to mist the surface of the soil. Avoid overwatering, which can lead to rot.
5. Provide Warmth and Light: Butternut squash seeds need warmth to germinate. Aim for a soil temperature of 70-80°F (21-27°C). Place the trays in a warm location or use a heat mat. If you don’t have a sunny window, use grow lights. Keep the lights on for 14-16 hours per day.
6. Keep the Soil Moist: Check the soil moisture daily and mist with water as needed.
7. Thin Seedlings (If Necessary): If both seeds in a cell germinate, thin to one seedling per cell by snipping off the weaker seedling at the soil line.
8. Harden Off Seedlings: About a week before you plan to transplant your seedlings outdoors, you’ll need to “harden them off.” This means gradually exposing them to outdoor conditions. Start by placing them outside in a sheltered location for an hour or two each day, gradually increasing the amount of time they spend outdoors. This will help them adjust to the sun, wind, and temperature changes.
Preparing the Garden Bed
Butternut squash are heavy feeders, so preparing the garden bed is crucial for a bountiful harvest. They need plenty of sunshine and well-drained soil.
* Sunlight: Choose a location that receives at least 6-8 hours of direct sunlight per day.
* Soil Preparation: Butternut squash thrives in rich, well-drained soil. Amend your soil with plenty of compost or well-rotted manure. This will improve drainage, add nutrients, and help retain moisture.
* Soil pH: Butternut squash prefers a soil pH of 6.0 to 6.8. You can test your soil pH with a soil testing kit and amend it accordingly.
* Spacing: Give your butternut squash plants plenty of room to grow. Space plants 2-3 feet apart in rows that are 4-6 feet apart. If you’re growing a bush variety, you can space them closer together.
Step-by-Step Garden Bed Preparation:
1. Clear the Area: Remove any weeds, rocks, or debris from the planting area.
2. Amend the Soil: Spread a 2-4 inch layer of compost or well-rotted manure over the soil.
3. Till or Dig: Use a tiller or garden fork to incorporate the compost into the soil to a depth of 6-8 inches.
4. Create Mounds or Rows: You can plant butternut squash in mounds or rows. Mounds help with drainage, especially in heavy clay soils. To create mounds, simply pile up the soil into small hills about 12 inches high and 2-3 feet in diameter. For rows, create raised beds or simply plant directly into the ground.
Transplanting Seedlings and Direct Sowing
Once your seedlings are hardened off or the danger of frost has passed, it’s time to transplant them into the garden. You can also direct sow seeds if you prefer.
* Transplanting Seedlings: Transplant your seedlings in the late afternoon or early evening to minimize stress.
* Direct Sowing: Direct sow seeds after the soil has warmed up to at least 60°F (16°C).
Step-by-Step Transplanting:
1. Dig Holes: Dig holes that are slightly larger than the root balls of your seedlings.
2. Remove Seedlings from Pots: Gently remove the seedlings from their pots, being careful not to damage the roots. If you used peat pots, you can plant the entire pot directly into the ground.
3. Plant Seedlings: Place the seedlings in the holes and backfill with soil. Gently pat down the soil around the base of the plants.
4. Water Thoroughly: Water the seedlings thoroughly after planting.
5. Mulch: Apply a layer of mulch around the plants to help retain moisture, suppress weeds, and regulate soil temperature. I like to use straw or shredded leaves.
Step-by-Step Direct Sowing:
1. Prepare the Soil: Make sure the soil is loose and well-drained.
2. Plant Seeds: Plant seeds about 1 inch deep and 2-3 feet apart.
3. Water Gently: Water the seeds gently after planting.
4. Thin Seedlings: Once the seedlings emerge, thin them to one plant per hill or spacing.
Watering and Fertilizing
Consistent watering and fertilization are essential for healthy butternut squash plants and a good harvest.
* Watering: Water deeply and regularly, especially during dry spells. Aim to keep the soil consistently moist but not waterlogged. Water at the base of the plants to avoid wetting the foliage, which can lead to fungal diseases.
* Fertilizing: Butternut squash are heavy feeders and benefit from regular fertilization.
Watering Tips:
* Water deeply: Water long enough for the water to soak down to the roots.
* Water early in the morning: This allows the foliage to dry before nightfall, reducing the risk of fungal diseases.
* Use a soaker hose or drip irrigation: This delivers water directly to the roots, minimizing water waste and reducing the risk of fungal diseases.
Fertilizing Tips:
* Apply a balanced fertilizer: Use a balanced fertilizer (e.g., 10-10-10) at planting time.
* Side-dress with compost tea or fish emulsion: Side-dress your plants with compost tea or fish emulsion every 2-3 weeks throughout the growing season. This will provide them with a boost of nutrients.
* Avoid over-fertilizing with nitrogen: Too much nitrogen can lead to excessive vine growth and fewer fruits.
Pest and Disease Control
Butternut squash plants can be susceptible to various pests and diseases. Here’s how to keep them healthy and productive.
* Common Pests: Squash bugs, squash vine borers, aphids, and cucumber beetles are common pests of butternut squash.
* Common Diseases: Powdery mildew, downy mildew, and blossom-end rot are common diseases of butternut squash.
Pest Control Tips:
* Handpick pests: Regularly inspect your plants for pests and handpick them off.
* Use insecticidal soap: Insecticidal soap can be effective against aphids and other soft-bodied insects.
* Use row covers: Row covers can protect your plants from pests early in the season.
* Wrap stems with foil: To prevent squash vine borers, wrap the base of the stems with aluminum foil.
* Attract beneficial insects: Plant flowers that attract beneficial insects, such as ladybugs and lacewings, which prey on pests.
Disease Control Tips:
* Provide good air circulation: Space your plants properly to allow for good air circulation.
* Water at the base of the plants: Avoid wetting the foliage when watering.
* Remove infected leaves: Remove any infected leaves promptly to prevent the spread of disease.
*
Conclusion
So, there you have it! These simple yet effective butternut squash growing hacks are your secret weapon to a bountiful harvest. Forget struggling with stunted growth, pest infestations, or disappointing yields. By implementing these strategies, you’re not just growing butternut squash; you’re cultivating a thriving garden ecosystem that rewards you with delicious, nutritious produce.
Why is this a must-try? Because it’s about more than just saving money on store-bought squash. It’s about connecting with nature, understanding the life cycle of your food, and experiencing the satisfaction of nurturing something from seed to table. Plus, homegrown butternut squash tastes infinitely better than anything you can buy – the flavor is richer, the texture is smoother, and you know exactly where it came from.
Consider these variations to personalize your butternut squash growing experience:
* Companion Planting Power-Ups: Experiment with different companion plants. Marigolds are known for repelling nematodes, while nasturtiums attract aphids away from your squash. Basil can also deter pests and improve the overall health of your plants.
* Vertical Growing Adventures: If you’re short on space, try training your butternut squash vines to grow vertically on a trellis or fence. This not only saves space but also improves air circulation, reducing the risk of fungal diseases. Just be sure to provide adequate support for the heavy fruits.
* Seed Starting Strategies: While direct sowing works well in warmer climates, starting your seeds indoors gives you a head start and allows you to control the growing environment. Use biodegradable pots to minimize transplant shock.
* Composting Cuisine: Turn your kitchen scraps into nutrient-rich compost to feed your butternut squash plants. Coffee grounds, eggshells, and vegetable peelings are all excellent additions to your compost pile.
Don’t be afraid to experiment and adapt these techniques to your specific growing conditions. Every garden is unique, and what works for one person may not work for another. The key is to observe your plants, listen to their needs, and adjust your approach accordingly.
We are confident that these butternut squash growing hacks will transform your gardening experience. But the real magic happens when you put them into practice. So, grab your seeds, prepare your soil, and get ready to witness the incredible power of these simple techniques.
We’re eager to hear about your success stories! Share your experiences, tips, and photos in the comments below. Let’s create a community of butternut squash enthusiasts who are passionate about growing their own food. What are you waiting for? Start growing your own delicious butternut squash today!
Frequently Asked Questions (FAQ)
What are the most common problems when growing butternut squash, and how do these hacks address them?
The most common problems include powdery mildew, squash vine borers, blossom end rot, and poor pollination. Our butternut squash growing hacks directly address these issues. For example, proper spacing and pruning improve air circulation, reducing the risk of powdery mildew. Using row covers early in the season prevents squash vine borers from laying eggs on your plants. Ensuring consistent watering and calcium levels in the soil helps prevent blossom end rot. Hand-pollinating your squash blossoms guarantees fruit set, especially in areas with low bee activity. These hacks provide a holistic approach to tackling the most prevalent challenges in butternut squash cultivation.
How often should I water my butternut squash plants, and what’s the best way to do it?
Butternut squash plants need consistent moisture, especially during fruit development. Water deeply and infrequently, aiming for about 1-2 inches of water per week, depending on rainfall. The best way to water is at the base of the plant, avoiding wetting the foliage, which can encourage fungal diseases. Soaker hoses or drip irrigation are ideal for delivering water directly to the roots. Check the soil moisture regularly by sticking your finger about an inch into the soil. If it feels dry, it’s time to water. Avoid overwatering, as this can lead to root rot.
What kind of fertilizer should I use for butternut squash, and when should I apply it?
Butternut squash plants are heavy feeders and benefit from regular fertilization. Start with a soil test to determine the nutrient levels in your soil. In general, a balanced fertilizer with equal parts nitrogen, phosphorus, and potassium (e.g., 10-10-10) is a good starting point. Apply fertilizer at planting time and then again when the plants start to flower and set fruit. You can also supplement with organic fertilizers like compost tea or fish emulsion. Avoid over-fertilizing with nitrogen, as this can promote excessive foliage growth at the expense of fruit production.
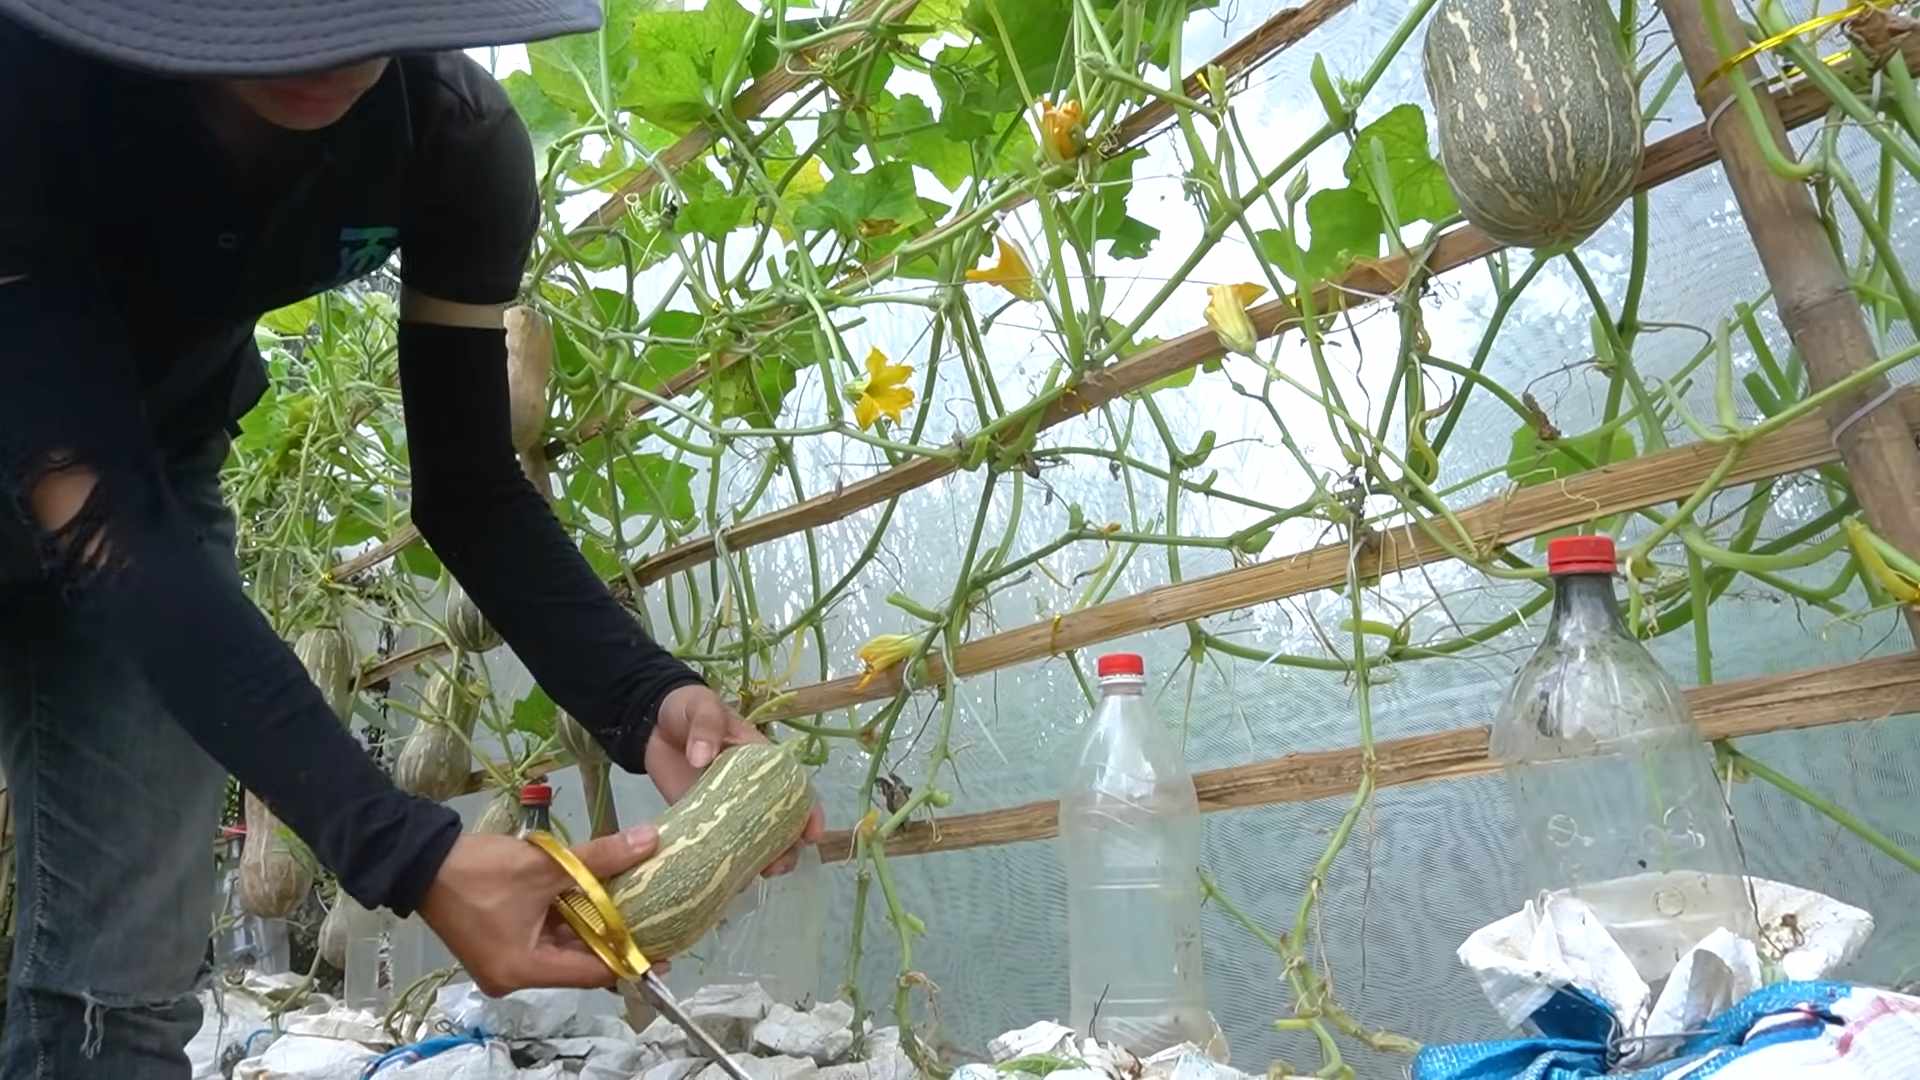
How do I know when my butternut squash is ripe and ready to harvest?
Determining ripeness is crucial for optimal flavor and storage. Butternut squash is typically ready to harvest about 90-100 days after planting. Look for these signs:
* Hard rind: The rind should be hard and resistant to scratching with your fingernail.
* Deep tan color: The skin should be a deep tan or beige color, uniform throughout the squash.
* Dry stem: The stem connecting the squash to the vine should be dry and brown.
Use a sharp knife or pruning shears to cut the squash from the vine, leaving about 2-3 inches of stem attached. This helps prevent rot during storage.
How can I store my harvested butternut squash to keep it fresh for longer?
Proper storage is essential for extending the shelf life of your butternut squash. Cure the squash for 10-14 days in a warm, dry, and well-ventilated area (around 80-85°F). This allows the skin to harden and heal any minor scratches or bruises. After curing, store the squash in a cool, dry, and dark place with good air circulation. Ideal storage temperatures are between 50-55°F. Avoid storing squash near apples or bananas, as these fruits release ethylene gas, which can cause the squash to ripen and spoil more quickly. Properly stored butternut squash can last for several months.
Are there any specific pests or diseases that I should be particularly concerned about when growing butternut squash?
Yes, several pests and diseases can affect butternut squash plants. Squash vine borers are a major threat, as their larvae tunnel into the stems and kill the plants. Use row covers early in the season to prevent adult moths from laying eggs. Squash bugs can also cause significant damage by sucking sap from the leaves. Handpick them off the plants or use insecticidal soap. Powdery mildew is a common fungal disease that appears as a white, powdery coating on the leaves. Improve air circulation and use a fungicide if necessary. Blossom end rot, caused by calcium deficiency, can be prevented by ensuring consistent watering and adding calcium to the soil. Regularly inspect your plants for signs of pests or diseases and take action promptly to prevent widespread damage.
Can I grow butternut squash in containers, and if so, what size container should I use?
Yes, you can grow butternut squash in containers, but you’ll need a large container to accommodate the plant’s extensive root system. Choose a container that is at least 24 inches in diameter and 24 inches deep. Make sure the container has drainage holes to prevent waterlogging. Use a high-quality potting mix that is well-draining and rich in organic matter. Provide a trellis or other support for the vines to climb on. Container-grown butternut squash plants may require more frequent watering and fertilization than those grown in the ground.
What are some good companion plants for butternut squash?
Companion planting can benefit butternut squash by attracting pollinators, repelling pests, and improving soil health. Some good companion plants include:
* Marigolds: Repel nematodes and other soil pests.
* Nasturtiums: Attract aphids away from squash plants.
* Basil: Deters pests and improves plant health.
* Beans: Fix nitrogen in the soil, benefiting the squash plants.
* Corn: Provides shade and support for the squash vines.
Avoid planting butternut squash near potatoes, as they can compete for nutrients.
How can I hand-pollinate my butternut squash blossoms?
Hand-pollination is a great way to ensure fruit set, especially in areas with low bee activity. Butternut squash plants have separate male and female flowers. The male flowers have a long, thin stem, while the female flowers have a small, immature fruit at the base. To hand-pollinate, use a small paintbrush or cotton swab to collect pollen from the male flower and transfer it to the stigma of the female flower. The best time to hand-pollinate is early in the morning, when the flowers are fully open.
What if my butternut squash plants are producing flowers but no fruit?
This is a common problem that can be caused by several factors, including:
* Lack of pollination: Ensure adequate pollination by attracting pollinators or hand-pollinating.
* Nutrient deficiencies: Fertilize your plants with a balanced fertilizer.
* Water stress: Water deeply and consistently, especially during flowering and fruit set.
* High temperatures: High temperatures can interfere with pollination. Provide shade during the hottest part of the day.
By addressing these potential issues, you can increase your chances of getting a bountiful harvest of butternut squash.

Leave a Comment