
Bathroom deep clean with Clorox – sounds intimidating, right? But trust me, it doesn’t have to be! We all know that feeling of walking into a sparkling clean bathroom, the kind that just breathes freshness and hygiene. It’s not just about aesthetics; it’s about creating a healthy and comfortable space for you and your family.
For generations, keeping our homes clean, especially the bathroom, has been a cornerstone of good health and well-being. Think back to your grandmother’s meticulous cleaning rituals – she knew what she was doing! While she might not have had the same products we do today, the principle remains the same: a clean bathroom is a happy bathroom.
Let’s face it, the bathroom is a breeding ground for germs and bacteria. From soap scum to mildew, it can quickly become a less-than-pleasant place. That’s where a bathroom deep clean with Clorox comes in. This isn’t just your regular wipe-down; we’re talking about tackling those stubborn stains, disinfecting surfaces, and leaving your bathroom feeling brand new. I’m going to share some easy-to-follow DIY tricks and hacks that will make your bathroom sparkle, all while using the power of Clorox to ensure a truly deep and effective clean. So, grab your gloves, and let’s get started!

DIY Bathroom Deep Clean with Clorox: My Sparkling Secrets!
Okay, friends, let’s talk bathrooms. We all know they can get… well, let’s just say less than pristine. But fear not! I’m going to share my tried-and-true method for a deep clean using Clorox that will leave your bathroom sparkling and smelling fresh. Get ready to roll up your sleeves – it’s cleaning time!
What You’ll Need: Your Cleaning Arsenal
Before we dive in, let’s gather our supplies. Having everything ready will make the process so much smoother. Here’s my go-to list:
* Clorox Disinfecting Bleach: The star of the show! Make sure you’re using regular Clorox bleach, not the splash-less kind, for optimal disinfecting power.
* Clorox Disinfecting Wipes: Super handy for quick wipe-downs and tackling smaller areas.
* Clorox Toilet Bowl Cleaner: Specifically designed for, you guessed it, the toilet bowl!
* Spray Bottle: For diluting the bleach solution.
* Rubber Gloves: Protect those precious hands!
* Cleaning Rags/Microfiber Cloths: I prefer microfiber cloths because they’re super absorbent and reusable.
* Scrub Brush: A good scrub brush is essential for tackling stubborn grime.
* Toilet Brush: For obvious reasons.
* Sponge: For general cleaning and wiping.
* Old Toothbrush: Perfect for getting into those hard-to-reach crevices.
* Squeegee: For streak-free shower doors and mirrors.
* Glass Cleaner: For extra sparkle on mirrors and glass surfaces.
* Baking Soda: A natural abrasive that’s great for scrubbing.
* Vinegar: Another natural cleaning powerhouse!
* Trash Bags: For disposing of used cleaning supplies and any bathroom clutter.
* Ventilation: Open a window or turn on the exhaust fan. Bleach fumes can be strong, so good ventilation is key.
* Safety Glasses (Optional): If you’re particularly sensitive to bleach, safety glasses are a good idea.
Safety First! Important Precautions
Before we even think about spraying anything, let’s talk safety. Bleach is a powerful disinfectant, but it needs to be handled with care.
* Always wear rubber gloves. Bleach can irritate your skin.
* Ensure proper ventilation. Open a window or turn on the exhaust fan.
* Never mix bleach with ammonia or other cleaning products. This can create dangerous fumes.
* Dilute bleach properly. I’ll give you the exact ratios in the instructions below.
* Keep bleach out of reach of children and pets.
* If bleach comes into contact with your skin or eyes, rinse immediately with plenty of water.
* If you experience any irritation or discomfort while using bleach, stop immediately and seek medical attention.
Phase 1: Prepping the Battlefield (Bathroom)
Okay, now that we’re armed and ready, let’s prep the bathroom for its deep clean transformation.
1. Clear the Clutter: Remove everything from the countertops, shelves, and shower. This includes toiletries, decorations, and anything else that’s not permanently attached. This will give you a clear surface to work with and prevent you from accidentally spraying bleach on your favorite items.
2. Remove Bath Mats and Rugs: Take out any bath mats or rugs and either wash them or set them aside to be cleaned later.
3. Empty the Trash Can: Get rid of any trash and replace the liner.
4. Dust and Sweep: Give the bathroom a quick dust and sweep to remove any loose dirt and debris. This will prevent you from just spreading the dirt around when you start cleaning with liquids.
Phase 2: Tackling the Toilet
Let’s start with the toilet, arguably the dirtiest part of the bathroom.
1. Flush the Toilet: Get rid of any… remnants.
2. Apply Toilet Bowl Cleaner: Squirt Clorox Toilet Bowl Cleaner under the rim of the toilet bowl, making sure to coat the entire surface. Let it sit for at least 10 minutes to allow the cleaner to work its magic. I usually let it sit while I’m cleaning other parts of the bathroom.
3. Clean the Exterior: While the toilet bowl cleaner is doing its thing, use Clorox Disinfecting Wipes to clean the exterior of the toilet, including the tank, seat, lid, and base. Pay special attention to areas that are frequently touched, like the handle.
4. Scrub the Bowl: After the toilet bowl cleaner has had time to sit, use a toilet brush to scrub the inside of the bowl thoroughly. Pay attention to any stains or buildup.
5. Flush Again: Flush the toilet to rinse away the cleaner and any loosened debris.
6. Wipe Down Again: Give the exterior of the toilet one last wipe-down with Clorox Disinfecting Wipes to ensure it’s sparkling clean.
Phase 3: Shower and Tub Transformation
Next up, the shower and tub. These areas can be breeding grounds for mold and mildew, so we’re going to give them a good scrub.
1. Rinse the Surfaces: Start by rinsing the shower walls, tub, and any shower doors or curtains with warm water. This will help to loosen any dirt and grime.
2. Prepare Bleach Solution: In your spray bottle, mix a solution of 1 part Clorox Disinfecting Bleach to 10 parts water. Important: Always add the bleach to the water, not the other way around, to prevent splashing.
3. Spray the Surfaces: Spray the bleach solution onto the shower walls, tub, and any shower doors or curtains. Make sure to cover all surfaces thoroughly.
4. Let it Sit: Allow the bleach solution to sit for at least 10 minutes to disinfect and kill any mold or mildew.
5. Scrub, Scrub, Scrub!: Use a scrub brush or sponge to scrub the surfaces thoroughly. Pay special attention to grout lines, corners, and any areas with visible mold or mildew. For stubborn stains, you can make a paste of baking soda and water and apply it to the area before scrubbing.
6. Rinse Thoroughly: Rinse all surfaces thoroughly with warm water to remove any remaining bleach solution and loosened dirt.
7. Squeegee Shower Doors: Use a squeegee to remove excess water from shower doors and walls. This will help to prevent water spots and streaks.
8. Clean Showerhead: To clean the showerhead, fill a plastic bag with vinegar and secure it around the showerhead with a rubber band. Make sure the showerhead is submerged in the vinegar. Let it soak for at least an hour, or preferably overnight. Then, remove the bag and run the shower for a few minutes to flush out any remaining vinegar.
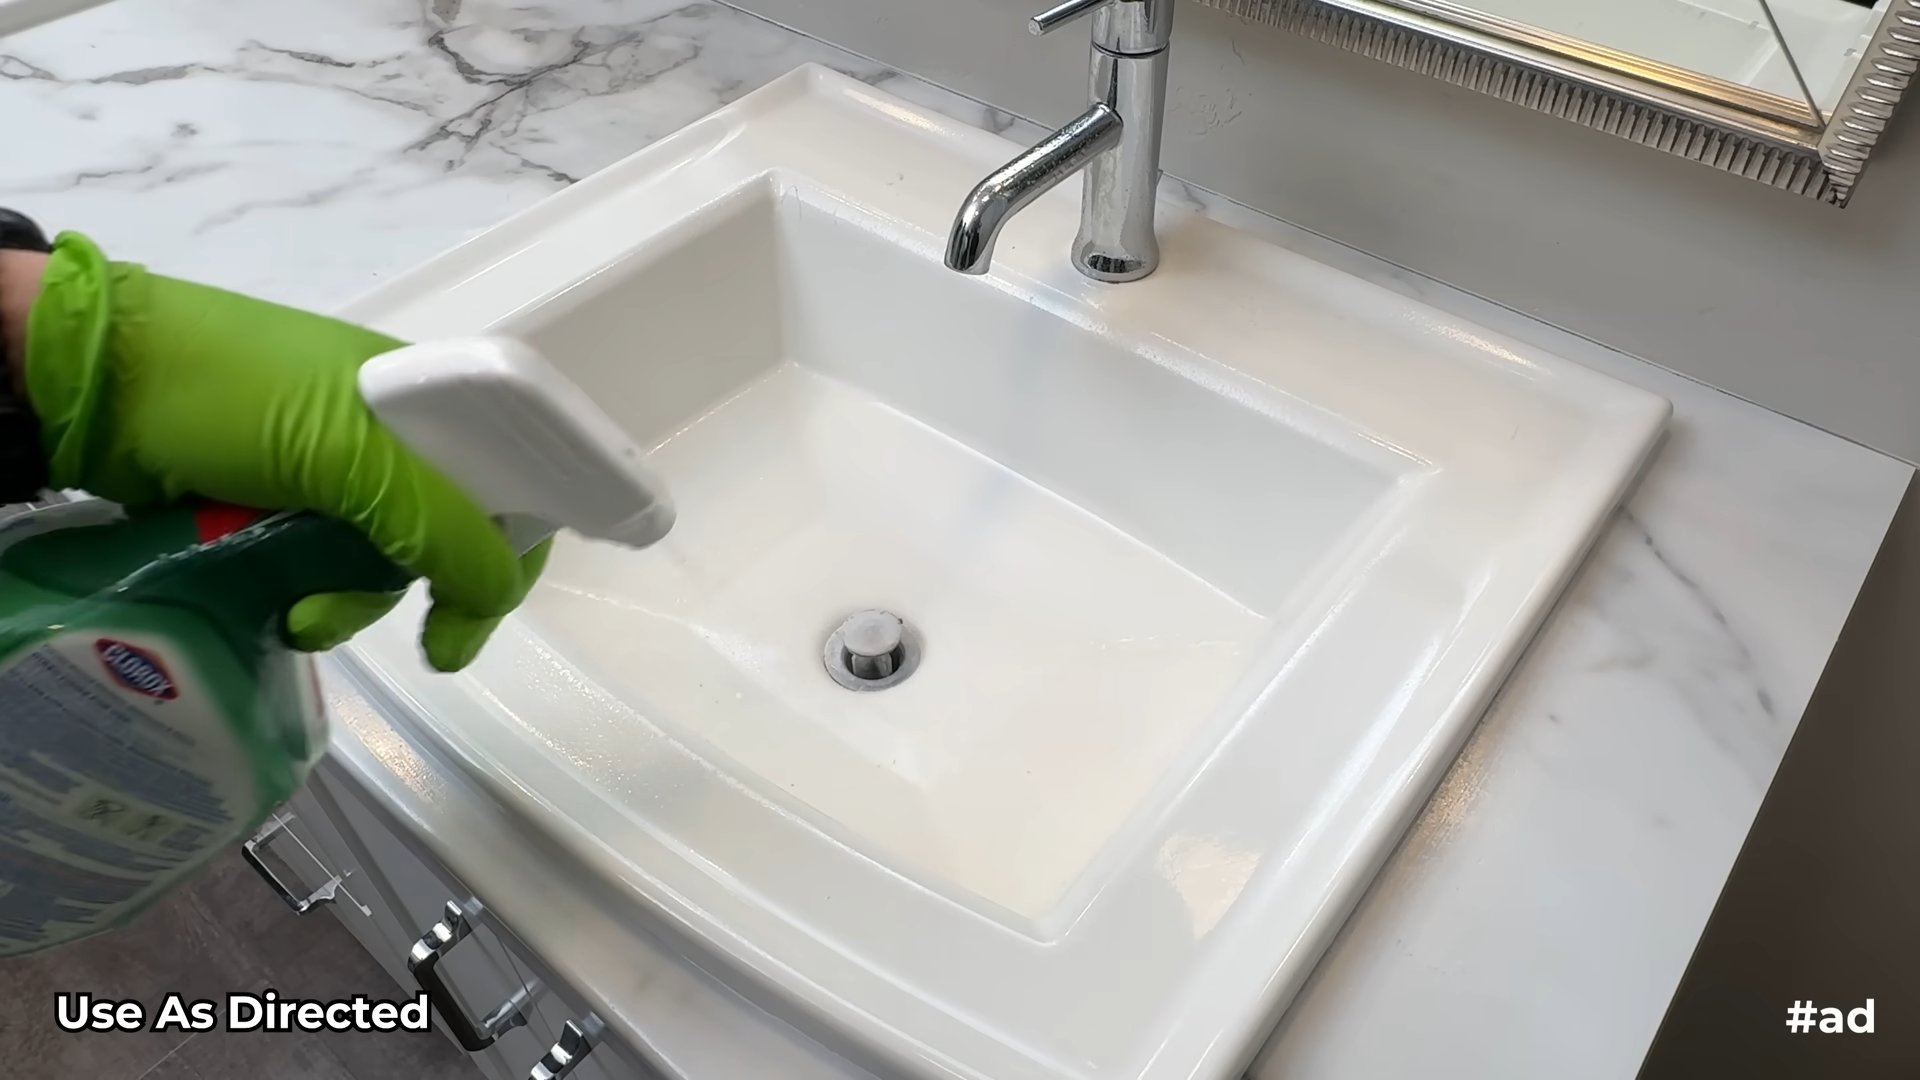
Phase 4: Sink and Countertop Cleaning
Now, let’s move on to the sink and countertops.
1. Clear the Area: Make sure the countertops are completely clear of any items.
2. Prepare Bleach Solution: Use the same bleach solution (1 part bleach to 10 parts water) that you used for the shower and tub.
3. Spray the Surfaces: Spray the bleach solution onto the sink and countertops.
4. Let it Sit: Allow the bleach solution to sit for a few minutes to disinfect.
5. Wipe Clean: Wipe the surfaces clean with a damp cleaning rag or microfiber cloth.
6. Rinse Thoroughly: Rinse the surfaces thoroughly with water to remove any remaining bleach solution.
7. Clean the Faucet: Use an old toothbrush and some baking soda to scrub around the base of the faucet and remove any buildup.
8. Shine the Sink: For a sparkling sink, sprinkle some baking soda into the sink and scrub it with a damp sponge. Rinse thoroughly.
Phase 5: Mirror and Glass Sparkle
Time to make those mirrors and glass surfaces shine!
1. Spray with Glass Cleaner: Spray the mirrors and glass surfaces with your favorite glass cleaner.
2. Wipe Clean: Wipe the surfaces clean with a clean microfiber cloth.
3. Buff for Shine: For an extra shine, buff the surfaces with a dry microfiber cloth.
Phase 6: Floor Scrubbing Fun (Not Really, But Necessary!)
Finally, let’s tackle the floor.
1. Sweep or Vacuum: Sweep or vacuum the floor to remove any loose dirt and debris.
2. Prepare Bleach Solution: Use the same bleach solution (1 part bleach to 10 parts water) that you’ve been using.
3. Mop the Floor:
Conclusion
So, there you have it! Transforming your bathroom into a sparkling oasis doesn’t require expensive professional cleaners or hours of back-breaking labor. This simple, yet incredibly effective, DIY trick using Clorox is a game-changer for anyone seeking a deep clean without the hefty price tag or harsh chemical smells of some commercial alternatives. The power of Clorox, when used correctly and safely, is undeniable in its ability to banish grime, soap scum, and mildew, leaving your bathroom feeling fresh, sanitized, and inviting.
Why is this a must-try? Because it’s efficient, economical, and delivers visible results. You’ll be amazed at how easily stubborn stains lift away and how much brighter your bathroom appears after just one application. Plus, knowing you’ve achieved this level of cleanliness with a readily available product is incredibly satisfying.
Looking to personalize your cleaning routine? Consider these variations:
* For extra stubborn mildew stains: Create a paste of Clorox and baking soda, apply it to the affected area, let it sit for a few minutes, and then scrub gently. The baking soda adds a mild abrasive action that can help lift the stain.
* Scent boost: Add a few drops of your favorite essential oil (tea tree, eucalyptus, or lavender are great choices for bathrooms) to your cleaning solution for a more pleasant aroma. Just be sure the essential oil is compatible with bleach and won’t create harmful fumes. Always test in an inconspicuous area first.
* Targeted cleaning: For grout lines, use an old toothbrush dipped in the Clorox solution to scrub away grime. The small bristles can reach into those hard-to-reach areas.
* Gentle approach: If you have sensitive surfaces or are concerned about discoloration, dilute the Clorox solution even further. Always test a small, hidden area first to ensure compatibility.
We’re confident that this DIY bathroom deep clean with Clorox will become a staple in your cleaning arsenal. It’s a simple, effective, and affordable way to maintain a sparkling clean and healthy bathroom environment.
Now, it’s your turn! We encourage you to try this DIY trick and experience the difference for yourself. Don’t forget to take before-and-after photos – we’d love to see your results! Share your experiences, tips, and variations in the comments below. Let’s build a community of clean bathroom enthusiasts! Your insights could help others discover the joy of a sparkling clean bathroom, achieved with the power of a simple DIY solution. Let us know if you have any questions, and we will be happy to help.
Frequently Asked Questions (FAQs)
Q: Is it safe to use Clorox for bathroom cleaning?
A: Yes, Clorox is generally safe for bathroom cleaning when used according to the manufacturer’s instructions. Always dilute Clorox with water as directed on the label. Never mix Clorox with ammonia or other household cleaners, as this can create dangerous and potentially deadly fumes. Ensure adequate ventilation by opening windows and doors while cleaning. Wear gloves to protect your skin and eye protection to prevent splashes. If you have any respiratory sensitivities, consider wearing a mask. Keep Clorox out of reach of children and pets.
Q: What surfaces can I safely clean with Clorox in the bathroom?
A: Clorox is generally safe for use on non-porous surfaces such as ceramic tile, porcelain, fiberglass, vinyl, and sealed grout. However, it’s crucial to test the solution in an inconspicuous area first to ensure it doesn’t cause discoloration or damage, especially on colored grout or older fixtures. Avoid using Clorox on natural stone surfaces like marble or granite, as it can etch and damage them. Be cautious when using Clorox on metal fixtures, as prolonged exposure can cause corrosion. Rinse thoroughly with water after cleaning to remove any residue.
Q: How much Clorox should I use for bathroom cleaning?
A: The recommended dilution ratio for general bathroom cleaning is typically 1/2 cup of Clorox bleach per gallon of water. Always follow the instructions on the Clorox label for specific dilution guidelines. For heavily soiled areas or mildew stains, you can use a slightly stronger solution, but always test it in an inconspicuous area first. Avoid using undiluted Clorox, as it can be too harsh and may damage surfaces.
Q: How long should I let the Clorox solution sit on surfaces before rinsing?
A: Allow the Clorox solution to sit on surfaces for approximately 5-10 minutes to disinfect and loosen grime. For stubborn stains or mildew, you can let it sit for a slightly longer period, but no more than 15 minutes. Avoid letting the solution dry on surfaces, as this can leave a residue. After the allotted time, thoroughly rinse the surfaces with clean water to remove any remaining Clorox.
Q: Can I use Clorox to clean my toilet?
A: Yes, Clorox can be used to clean and disinfect your toilet bowl. Pour about 1/2 cup of Clorox directly into the toilet bowl and let it sit for 10-15 minutes. Scrub the bowl with a toilet brush and then flush. Avoid using Clorox in the toilet tank, as it can damage the rubber components. Never mix Clorox with toilet bowl cleaners containing ammonia, as this can create dangerous fumes.
Q: How do I get rid of the Clorox smell after cleaning?
A: The Clorox smell should dissipate relatively quickly after rinsing the surfaces with clean water and ventilating the bathroom. To further reduce the odor, you can open windows and doors to allow fresh air to circulate. You can also place a bowl of baking soda in the bathroom to absorb odors. If the smell persists, try wiping down the surfaces with a solution of vinegar and water.
Q: Can I use Clorox to clean mold and mildew in my bathroom?
A: Yes, Clorox is effective at killing mold and mildew. Dilute Clorox with water as directed on the label and apply it to the affected areas. Let it sit for 5-10 minutes, then scrub with a brush and rinse thoroughly. For stubborn mold or mildew, you may need to repeat the process. Ensure adequate ventilation while cleaning to avoid inhaling fumes. If you have a severe mold problem, it’s best to consult with a professional mold remediation service.
Q: What precautions should I take when using Clorox around children and pets?
A: Keep Clorox and the cleaning solution out of reach of children and pets at all times. Never leave Clorox unattended while cleaning. Ensure that the bathroom is well-ventilated to prevent inhalation of fumes. Keep children and pets out of the bathroom while cleaning and until the surfaces are completely dry. Store Clorox in a secure location where children and pets cannot access it.
Q: Can I use Clorox on colored grout?
A: Clorox can potentially discolor colored grout, so it’s essential to test the solution in an inconspicuous area first. Dilute the Clorox solution as directed on the label and apply it to a small area of the grout. Let it sit for a few minutes, then rinse with water and check for any discoloration. If the grout appears unaffected, you can proceed with cleaning the rest of the grout. If you notice any discoloration, consider using a grout cleaner specifically designed for colored grout.
Q: What are some alternatives to Clorox for bathroom cleaning?
A: If you prefer not to use Clorox, there are several alternative cleaning products you can use. Vinegar is a natural disinfectant and can be used to clean many bathroom surfaces. Baking soda is a mild abrasive that can help remove grime and soap scum. Hydrogen peroxide is another effective disinfectant. You can also find a variety of commercially available bathroom cleaners that are formulated to be safe and effective. Always follow the manufacturer’s instructions when using any cleaning product.
Leave a Comment