
Growing Sweet Potatoes at Home might seem like a challenge reserved for seasoned farmers, but I’m here to tell you it’s totally achievable, even if you’ve only got a small backyard or a sunny balcony! Forget those bland, store-bought spuds – imagine sinking your teeth into a homegrown sweet potato, bursting with flavor and packed with nutrients.
Sweet potatoes have a rich history, dating back thousands of years in Central and South America. They were a staple food for the Incas and other ancient civilizations, and their cultivation gradually spread across the globe. Today, they’re enjoyed in countless dishes, from savory stews to sweet pies. But why settle for just eating them when you can experience the joy of nurturing your own sweet potato crop?
In this DIY guide, I’ll share my favorite tricks and hacks for successfully growing sweet potatoes at home. We’ll cover everything from sprouting slips (those little shoots that grow from the potato) to choosing the right soil and providing the perfect amount of sunlight. With a little patience and these simple techniques, you’ll be harvesting your own delicious sweet potatoes in no time. Plus, it’s a fantastic way to connect with nature, reduce your carbon footprint, and impress your friends with your green thumb! Let’s get started!
Growing Sweet Potatoes at Home: A Comprehensive DIY Guide
Hello dear garden friends! Have you ever wondered how you can grow those delicious, orange sweet potatoes right in your own garden? I’ll show you how! It’s easier than you might think, and the result is incredibly satisfying. Let’s dive into the world of sweet potato cultivation together!
What you need for growing sweet potatoes:
- Sweet potatoes: Organic sweet potatoes are ideal as they have not been treated with growth inhibitors.
- A jar of water: A glass, vase, or similar container large enough to partially submerge the sweet potato.
- Toothpicks: To stabilize the sweet potato in the jar of water.
- Potting soil: High-quality potting soil for growing the slips.
- Pots or seed trays: For starting the slips.
- A garden bed or large planter: For the final planting of the sweet potatoes.
- Garden tools: Spade, shovel, watering can.
- Mulch (optional): Straw or other organic materials to retain moisture in the soil and suppress weeds.
Phase 1: Getting the Sweet Potato to Sprout (Slip Production)
First things first: We need to grow the so-called “slips.” These are the small shoots that grow from the sweet potato, which we will plant later. Don’t worry, it’s very simple!
- Prepare the sweet potato: Choose a healthy, firm sweet potato. Wash it thoroughly to remove any dirt.
- Insert toothpicks: Stick four toothpicks evenly into the middle of the sweet potato. These will serve to stabilize the potato in the jar of water.
- Place in water: Fill your water container with water. The sweet potato should be about halfway submerged in the water. Make sure the bottom end of the potato is in the water.
- The right location: Place the container in a warm, bright place, but not in direct sunlight. A windowsill is ideal.
- Patience is required: Now it’s time to wait! Change the water every few days to keep it clean. After a few weeks (approx. 2-4), small shoots (slips) and roots should form.
- Harvest the slips: Once the slips are about 15-20 cm (6-8 inches) long, you can gently twist or cut them off the sweet potato. Be careful not to damage the roots.
Phase 2: Rooting the Slips
Now we have our slips, but they still need their own roots before we can plant them in the soil.
- Place the slips in water: Fill a glass or vase with water and place the slips inside. Make sure the bottom ends of the slips are in the water.
- Another bright location: Place the glass with the slips in a bright spot, but avoid direct sunlight.
- Wait for roots: Within a few days, small roots should form on the slips. Change the water regularly to keep it clean.
- Ready to plant: Once the roots are about 2-3 cm (about 1 inch) long, the slips are ready to be planted.
Phase 3: Planting the Sweet Potatoes
Now comes the exciting part: We’re putting our little sweet potato plants in the ground!
- Prepare the soil: Sweet potatoes love loose, well-draining soil. Thoroughly loosen the soil in your garden bed or planter. Mix in compost or other organic materials to improve the soil quality.
- Dig planting holes: Dig planting holes about 30-45 cm (12-18 inches) apart. The holes should be deep enough to accommodate the roots of the slips.
- Plant the slips: Carefully place the slips in the planting holes and cover the roots with soil. Press the soil down lightly.
- Don’t forget to water: Water the freshly planted slips thoroughly.
- Mulching (optional): A layer of mulch made of straw or other organic materials helps to retain moisture in the soil and suppress weeds.
Phase 4: Caring for the Sweet Potato Plants
Now that our sweet potatoes are in the ground, we need to take good care of them so they can thrive.
- Water regularly: Sweet potatoes need regular watering, especially during dry periods. Make sure the soil is moist but not waterlogged.
- Remove weeds: Keep the bed or planter free of weeds. Weeds compete with the sweet potatoes for nutrients and water.
- Fertilizing (optional): If the soil is not very nutrient-rich, you can fertilize the sweet potatoes with an organic fertilizer. Be sure to choose a fertilizer that is high in potassium, as this promotes tuber formation.
- Pests and diseases: Watch out for pests like potato beetles or aphids. If necessary, you can use organic pesticides. Sweet potatoes are relatively resistant to diseases, but look for signs of fungal infections.
Phase 5: The Harvest
The moment we’ve all been waiting for: Harvesting our homegrown sweet potatoes!
- The right time: Sweet potatoes are generally ready to harvest about 90-120 days after planting. A sign that they are ripe is when the leaves turn yellow and die back.
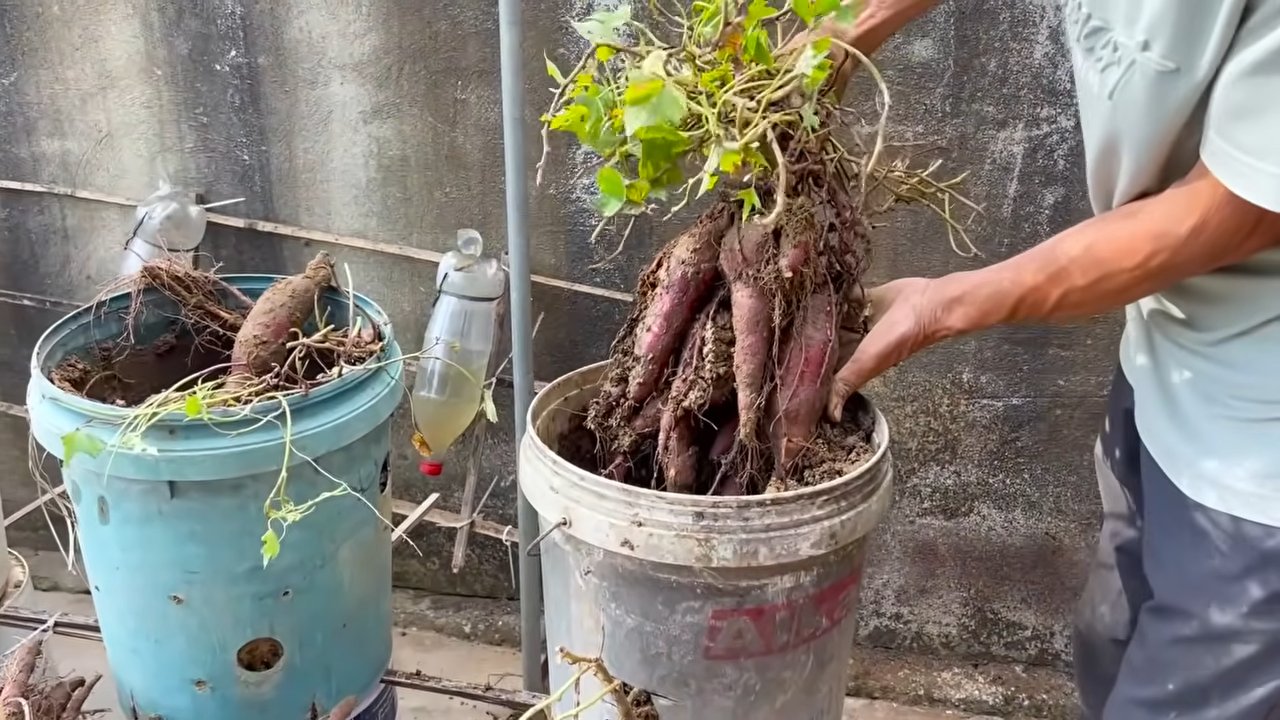
- Dig carefully: Carefully dig up the sweet potatoes with a spade or a digging fork. Be careful not to damage the tubers.
- Let them dry: Let the harvested sweet potatoes dry for a few days in a warm, dry place. This helps to harden the skin and improve storage life.
- Store: Store the dried sweet potatoes in a cool, dark, and dry place. They should last for several months.
Additional Tips and Tricks
- Variety selection: There are many different varieties of sweet potatoes. Find out which varieties grow best in your region.
- Sunshine: Sweet potatoes love the sun! Make sure they get at least 6 hours of sunlight per day.
- Soil improvement: Well-draining soil is crucial for success. Mix sand or gravel into the soil to improve drainage.
- Starting indoors: You can also start the slips in pots before planting them outdoors. This gives them a head start.
- Protection from frost: Sweet potatoes are sensitive to frost. If frost is a threat, cover the plants with fleece or straw.
I hope this guide helps you to successfully grow your own sweet potatoes. It’s a rewarding project that will reward you with delicious and healthy tubers. Happy gardening!
Conclusion
So, there you have it! Growing sweet potatoes at home is not only achievable, but it’s also a deeply rewarding experience. Forget those bland, store-bought sweet potatoes – imagine sinking your teeth into a freshly harvested, vibrant orange sweet potato that you nurtured from sprout to tuber. The taste difference alone is enough to convince anyone to give this a try. But beyond the superior flavor, you’re also gaining control over the entire growing process, ensuring your sweet potatoes are free from unwanted chemicals and pesticides. You know exactly what went into them, from the soil they grew in to the water they received.
This DIY trick, as we’ve outlined, simplifies the process, making it accessible even for those with limited space or gardening experience. Starting with slips from a store-bought sweet potato is a fantastic way to dip your toes into the world of sweet potato cultivation without the initial investment of seeds or specialized equipment. It’s a budget-friendly and surprisingly effective method.
But don’t stop there! Experiment with different varieties of sweet potatoes to discover your personal favorite. Beauregard, with its classic orange flesh and sweet flavor, is a reliable choice. For something a little different, try a Japanese sweet potato with its purple skin and creamy white flesh. Or perhaps a Garnet sweet potato, known for its deep red skin and moist, sweet interior. Each variety offers a unique flavor profile and texture, adding exciting diversity to your homegrown harvest.
Consider also experimenting with different growing mediums. While we’ve focused on using water to sprout the slips, you can also try using a damp potting mix. Some gardeners find this method encourages stronger root development. Once you transplant your slips, explore different soil amendments to optimize growth. Compost, well-rotted manure, and even coffee grounds can provide valuable nutrients to your sweet potato plants.
Furthermore, think about vertical gardening techniques if space is a constraint. Sweet potato vines can be trained to grow up trellises or fences, maximizing your yield in a small area. This also improves air circulation around the plants, reducing the risk of fungal diseases.
We wholeheartedly encourage you to embark on this sweet potato growing adventure. It’s a fantastic way to connect with nature, learn new skills, and enjoy the fruits (or rather, tubers) of your labor. And most importantly, don’t be afraid to experiment and adapt the techniques to suit your specific environment and preferences.
Once you’ve harvested your bounty, we’d love to hear about your experience! Share your photos, tips, and challenges in the comments section below. Let’s build a community of home gardeners who are passionate about growing their own delicious and nutritious sweet potatoes. Your insights could inspire others to take the plunge and discover the joys of homegrown produce. So, grab a sweet potato, a jar of water, and get ready to witness the magic of nature unfold! Your journey to delicious, homegrown sweet potatoes starts now!
Frequently Asked Questions (FAQ)
Q: How long does it take to grow sweet potatoes from slips?
A: The entire process, from sprouting slips to harvesting mature sweet potatoes, typically takes around 3 to 4 months. Sprouting the slips themselves usually takes 3 to 4 weeks. Once transplanted, the sweet potatoes need about 90 to 120 days to mature underground. Factors like climate, soil conditions, and the specific variety of sweet potato can influence the growth rate. Warmer climates generally lead to faster growth.
Q: What kind of soil is best for growing sweet potatoes?
A: Sweet potatoes thrive in well-drained, sandy loam soil. This type of soil allows for good aeration and drainage, which is crucial for preventing root rot. Heavy clay soils can be amended with organic matter, such as compost or well-rotted manure, to improve drainage and texture. The ideal soil pH for sweet potatoes is between 5.5 and 6.5.
Q: How much sunlight do sweet potatoes need?
A: Sweet potatoes require at least 6 to 8 hours of direct sunlight per day. Ample sunlight is essential for photosynthesis, which fuels the growth of the vines and the development of the tubers. If you’re growing sweet potatoes indoors, supplement with grow lights if necessary.
Q: How often should I water my sweet potato plants?
A: Water sweet potato plants regularly, especially during dry periods. Aim to keep the soil consistently moist, but not waterlogged. Overwatering can lead to root rot. A good rule of thumb is to water deeply when the top inch of soil feels dry to the touch. Reduce watering as the harvest approaches to prevent the sweet potatoes from splitting.
Q: What are some common pests and diseases that affect sweet potatoes?
A: Common pests that can affect sweet potatoes include sweet potato weevils, flea beetles, and aphids. Diseases include stem rot, fusarium wilt, and black rot. Regularly inspect your plants for signs of pests or diseases. Use organic pest control methods, such as insecticidal soap or neem oil, to manage infestations. Ensure good air circulation around the plants to prevent fungal diseases. Crop rotation can also help to reduce the risk of soilborne diseases.
Q: How do I know when my sweet potatoes are ready to harvest?
A: Sweet potatoes are typically ready to harvest when the vines start to yellow and die back, usually around 90 to 120 days after transplanting. You can also gently dig around a plant to check the size of the tubers. Harvest on a dry day to prevent the sweet potatoes from rotting. Handle them carefully to avoid bruising the skin.
Q: How should I cure and store my sweet potatoes after harvesting?
A: Curing sweet potatoes is essential for improving their flavor and storage life. After harvesting, gently brush off any excess soil and allow the sweet potatoes to dry in a warm, humid place (around 80-85°F and 85-90% humidity) for 7 to 10 days. This process allows the skins to harden and any minor wounds to heal. After curing, store the sweet potatoes in a cool, dark, and well-ventilated place (around 55-60°F). Avoid storing them in the refrigerator, as this can cause them to develop a hard core. Properly cured and stored sweet potatoes can last for several months.
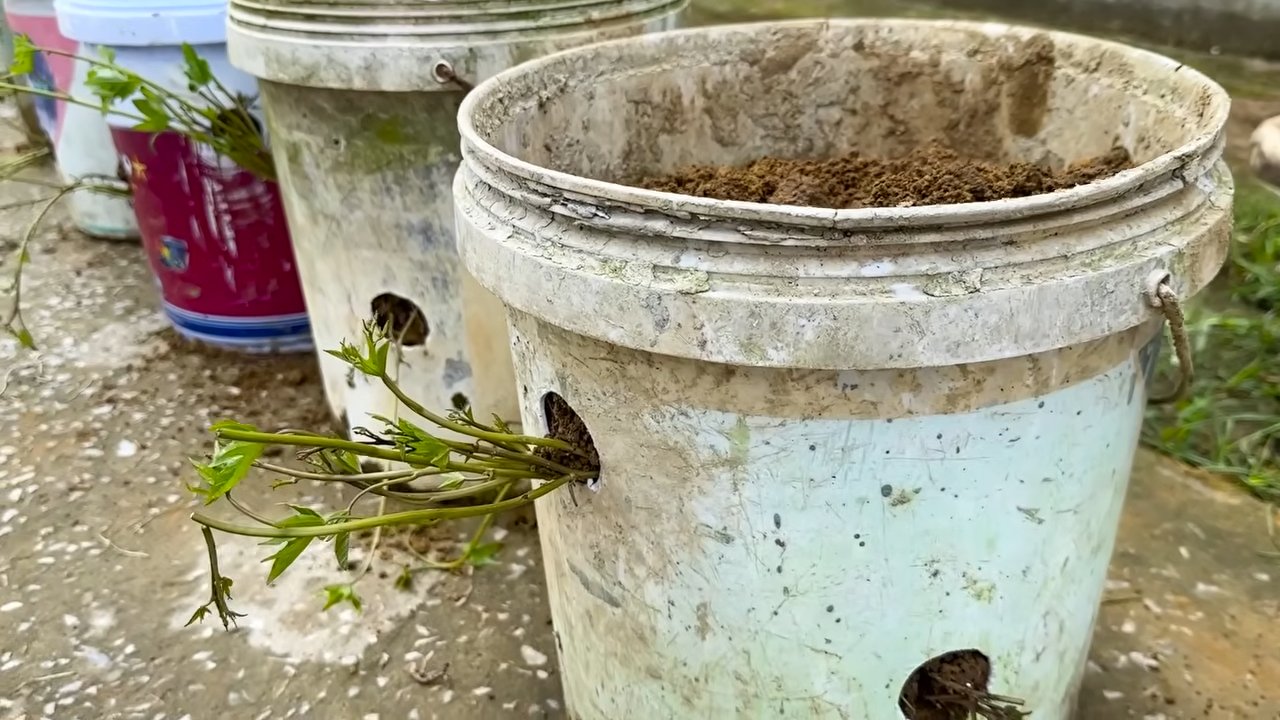
Q: Can I grow sweet potatoes in containers?
A: Yes, you can grow sweet potatoes in containers, but you’ll need a large container (at least 20 gallons) with good drainage. Choose a pot that is wide and deep enough to accommodate the developing tubers. Fill the container with a well-draining potting mix amended with compost. Provide adequate sunlight and water regularly. Container-grown sweet potatoes may not produce as large a yield as those grown in the ground, but it’s a great option for gardeners with limited space.
Q: Are sweet potato leaves edible?
A: Yes, sweet potato leaves are edible and nutritious! They can be eaten raw or cooked, similar to spinach or other leafy greens. Choose young, tender leaves for the best flavor and texture. Sweet potato leaves are a good source of vitamins A and C, as well as fiber and antioxidants. They can be added to salads, stir-fries, soups, and stews.
Leave a Comment