
Grow Snap Peas Kitchen: Imagine stepping into your kitchen, not just to cook, but to harvest fresh, crisp snap peas right from your windowsill! Sounds like a dream, right? Well, it doesn’t have to be! For centuries, humans have cultivated food in their homes, from ancient Roman herb gardens to the modern-day victory gardens of World War II. This connection to the earth, even on a small scale, is deeply ingrained in our history.
But let’s be honest, in today’s busy world, who has the time or space for a sprawling garden? That’s where this DIY guide comes in. I’m going to show you how to grow snap peas kitchen style, even if you have limited space or gardening experience. We’ll explore simple, effective techniques to bring the joy of fresh, homegrown produce right into your home.
Why snap peas? They’re delicious, nutritious, and surprisingly easy to grow indoors. Plus, there’s nothing quite like the satisfaction of snacking on something you’ve nurtured from seed to pod. So, ditch the store-bought veggies and let’s embark on this exciting journey to create your very own indoor snap pea haven! Get ready to discover the secrets to a thriving kitchen garden, one snap pea at a time.
Growing Snap Peas Indoors: A DIY Guide to Freshness All Year Round
Hey there, fellow plant enthusiasts! Ever crave the sweet crunch of fresh snap peas in the dead of winter? Well, I’m here to tell you that you don’t have to wait for spring! With a little DIY magic, you can grow your own delicious snap peas right in your kitchen. I’ve been doing this for a while now, and trust me, it’s easier than you think and incredibly rewarding. Let’s dive in!
What You’ll Need
Before we get our hands dirty, let’s gather all the necessary supplies. This is crucial for a smooth and successful snap pea growing experience.
* Snap Pea Seeds: Choose a variety that’s known for its compact growth, like ‘Sugar Ann’ or ‘Bush Champion’. These are ideal for indoor containers.
* Containers: You’ll need pots or containers that are at least 6 inches deep and wide. I personally prefer using fabric pots because they allow for better drainage and aeration.
* Potting Mix: Use a high-quality, well-draining potting mix. Avoid using garden soil, as it can compact and hinder root growth.
* Grow Lights (Optional but Recommended): While snap peas can grow indoors with sufficient natural light, grow lights will significantly improve your yield and ensure healthy growth, especially during the darker months.
* Trellis or Support System: Snap peas are climbers, so you’ll need a trellis, stakes, or netting to support their growth. I’ve used everything from bamboo stakes to repurposed tomato cages with great success.
* Watering Can or Spray Bottle: For gentle and even watering.
* Small Shovel or Trowel: For planting the seeds.
* Spray Bottle with Water: For misting seedlings.
* Fertilizer (Optional): A balanced liquid fertilizer can help boost growth, but it’s not essential.
Phase 1: Planting Your Snap Pea Seeds
This is where the magic begins! Getting the planting right is key to a healthy start for your snap peas.
1. Prepare Your Containers: Fill your chosen containers with the potting mix, leaving about an inch of space at the top. Gently pat down the soil to remove any large air pockets.
2. Sow the Seeds: Sow the snap pea seeds about 1 inch deep and 2 inches apart. I usually plant 3-4 seeds per container to increase the chances of germination.
3. Water Thoroughly: After planting, water the soil thoroughly until it’s evenly moist but not waterlogged.
4. Find a Sunny Spot: Place your containers in a location that receives at least 6 hours of direct sunlight per day. If you’re using grow lights, position them about 6-12 inches above the soil surface.
5. Maintain Moisture: Keep the soil consistently moist but not soggy. Check the soil moisture daily and water as needed. I usually stick my finger about an inch into the soil to check. If it feels dry, it’s time to water.
6. Germination Time: Be patient! Snap pea seeds typically germinate within 7-14 days, depending on the temperature and moisture levels.
Phase 2: Nurturing Your Growing Snap Peas
Once your seedlings emerge, it’s time to provide them with the care they need to thrive.
1. Thinning (If Necessary): If multiple seeds germinate in the same spot, thin them out by snipping off the weakest seedlings at the soil level. This will give the remaining seedlings more space and resources to grow.
2. Provide Support: As your snap peas grow, they’ll start to climb. Install your trellis, stakes, or netting to provide them with support. Gently guide the tendrils towards the support structure.
3. Watering: Continue to water regularly, keeping the soil consistently moist. Avoid overwatering, as this can lead to root rot.
4. Fertilizing (Optional): If you choose to fertilize, use a balanced liquid fertilizer diluted to half strength. Apply it every 2-3 weeks.
5. Pruning: Prune away any yellowing or dead leaves to encourage healthy growth and prevent disease.
6. Pest Control: Keep an eye out for common pests like aphids or spider mites. If you spot any, you can try spraying them with a mixture of water and dish soap or using an insecticidal soap.
7. Light Management: If you’re using grow lights, adjust their height as your plants grow to ensure they’re receiving adequate light.
Phase 3: Harvesting Your Delicious Snap Peas
The moment you’ve been waiting for! Harvesting your own homegrown snap peas is incredibly satisfying.
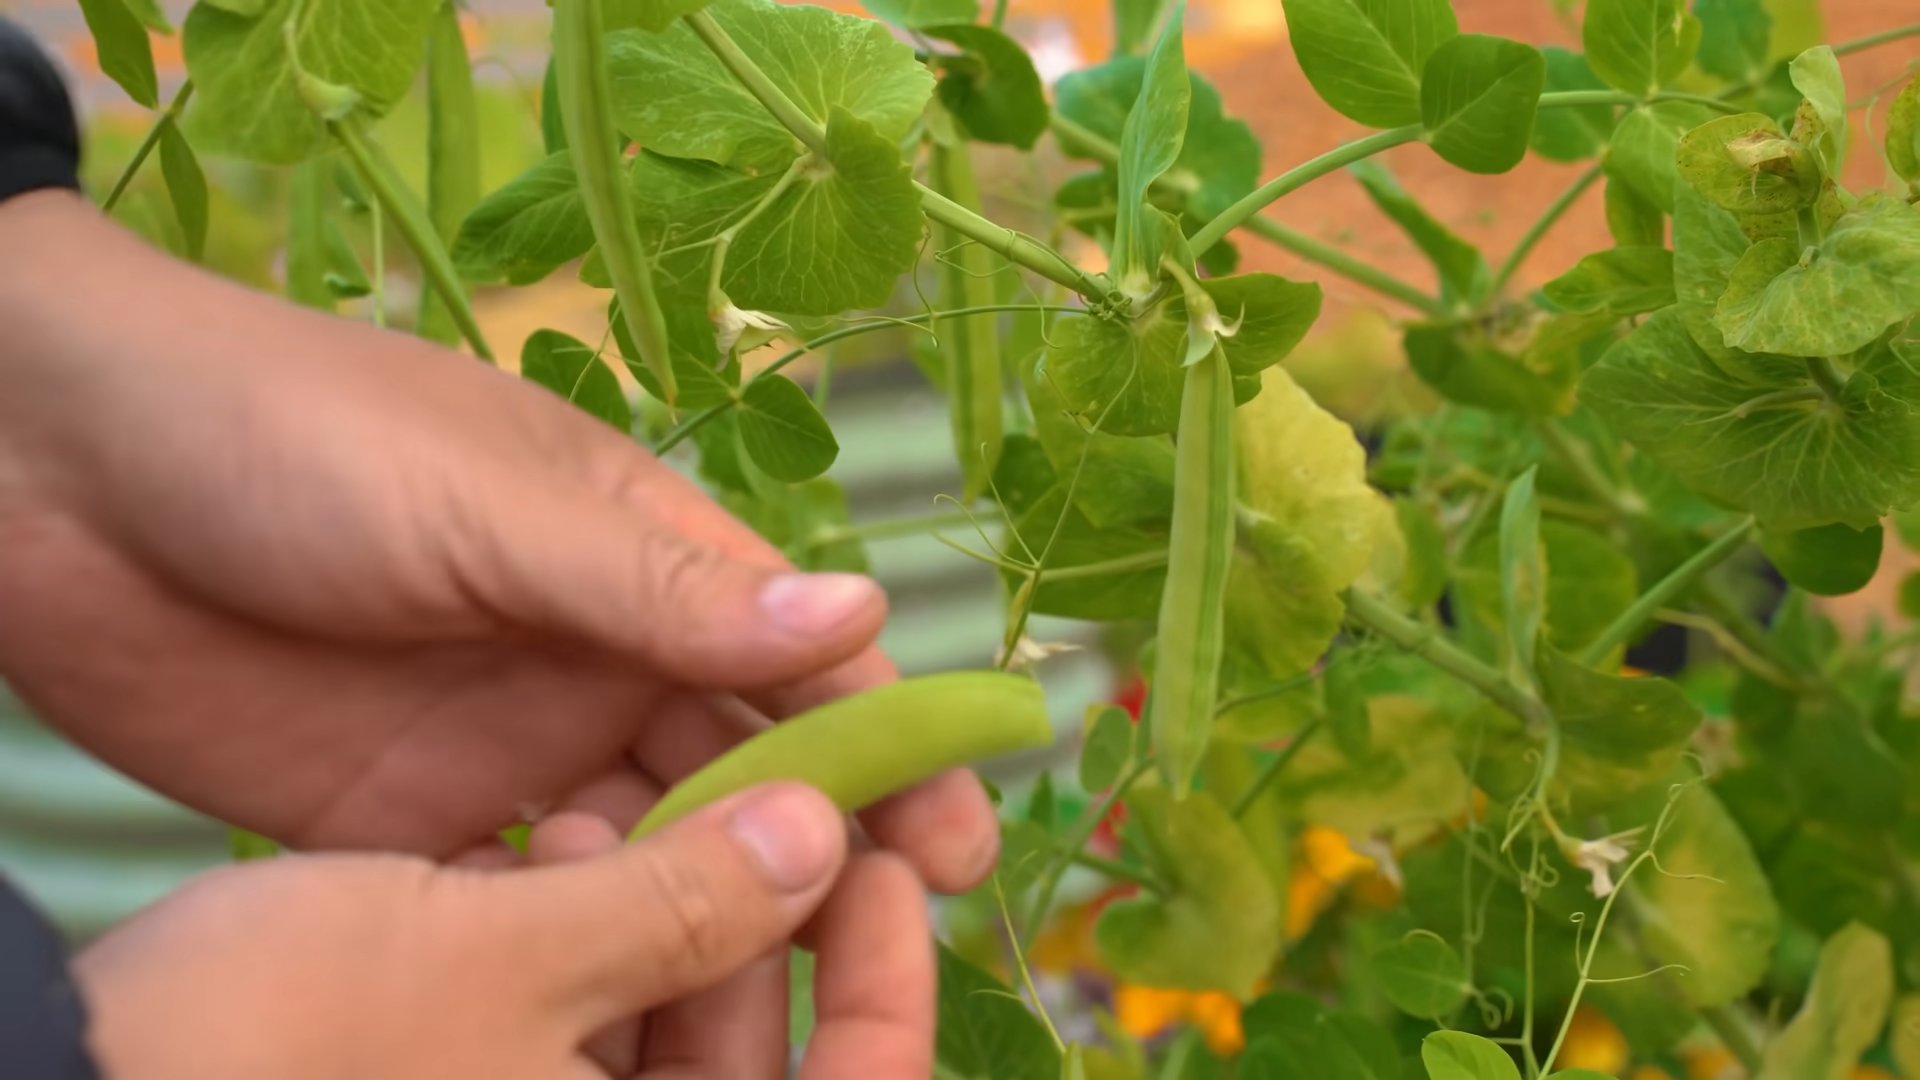
1. Harvest Time: Snap peas are typically ready to harvest about 60-70 days after planting. The pods should be plump and filled with peas, but still tender and crisp.
2. Harvesting Technique: Gently snap the pods off the vine, being careful not to damage the plant.
3. Regular Harvesting: Harvest your snap peas regularly to encourage continued production. The more you harvest, the more the plant will produce.
4. Enjoy Your Harvest: Eat your snap peas fresh, add them to salads, stir-fries, or enjoy them as a healthy snack. They’re also delicious steamed or lightly sautéed.
5. Successive Planting: To ensure a continuous supply of snap peas, consider planting new seeds every few weeks. This is called successive planting.
Troubleshooting Tips
Even with the best care, you might encounter some challenges along the way. Here are a few common issues and how to address them:
* Poor Germination: If your seeds aren’t germinating, make sure the soil is consistently moist and the temperature is warm enough (around 65-75°F). You can also try soaking the seeds in water for 24 hours before planting to improve germination rates.
* Yellowing Leaves: Yellowing leaves can be a sign of overwatering, underwatering, or nutrient deficiency. Check the soil moisture and adjust your watering accordingly. If you suspect a nutrient deficiency, try fertilizing with a balanced liquid fertilizer.
* Leggy Growth: Leggy growth (tall, spindly plants) is usually caused by insufficient light. Make sure your plants are receiving enough sunlight or grow light.
* Pest Infestations: Keep an eye out for common pests like aphids, spider mites, or whiteflies. Treat infestations promptly with insecticidal soap or other appropriate methods.
* Powdery Mildew: Powdery mildew is a fungal disease that can affect snap peas. It appears as a white, powdery coating on the leaves. To prevent powdery mildew, ensure good air circulation and avoid overhead watering. If you spot powdery mildew, you can try spraying the affected areas with a fungicide.
Hey there, fellow plant enthusiasts! Ever crave the sweet crunch of fresh snap peas in the dead of winter? Well, I’m here to tell you that you don’t have to wait for spring! With a little DIY magic, you can grow your own delicious snap peas right in your kitchen. I’ve been doing this for a while now, and trust me, it’s easier than you think and incredibly rewarding. Let’s dive in!
What You’ll Need
Before we get our hands dirty, let’s gather all the necessary supplies. This is crucial for a smooth and successful snap pea growing experience.
* Snap Pea Seeds: Choose a variety that’s known for its compact growth, like ‘Sugar Ann’ or ‘Bush Champion’. These are ideal for indoor containers.
* Containers: You’ll need pots or containers that are at least 6 inches deep and wide. I personally prefer using fabric pots because they allow for better drainage and aeration.
* Potting Mix: Use a high-quality, well-draining potting mix. Avoid using garden soil, as it can compact and hinder root growth.
* Grow Lights (Optional but Recommended): While snap peas can grow indoors with sufficient natural light, grow lights will significantly improve your yield and ensure healthy growth, especially during the darker months.
* Trellis or Support System: Snap peas are climbers, so you’ll need a trellis, stakes, or netting to support their growth. I’ve used everything from bamboo stakes to repurposed tomato cages with great success.
* Watering Can or Spray Bottle: For gentle and even watering.
* Small Shovel or Trowel: For planting the seeds.
* Spray Bottle with Water: For misting seedlings.
* Fertilizer (Optional): A balanced liquid fertilizer can help boost growth, but it’s not essential.
Phase 1: Planting Your Snap Pea Seeds
This is where the magic begins! Getting the planting right is key to a healthy start for your snap peas.
1. Prepare Your Containers: Fill your chosen containers with the potting mix, leaving about an inch of space at the top. Gently pat down the soil to remove any large air pockets.
2. Sow the Seeds: Sow the snap pea seeds about 1 inch deep and 2 inches apart. I usually plant 3-4 seeds per container to increase the chances of germination.
3. Water Thoroughly: After planting, water the soil thoroughly until it’s evenly moist but not waterlogged.
4. Find a Sunny Spot: Place your containers in a location that receives at least 6 hours of direct sunlight per day. If you’re using grow lights, position them about 6-12 inches above the soil surface.
5. Maintain Moisture: Keep the soil consistently moist but not soggy. Check the soil moisture daily and water as needed. I usually stick my finger about an inch into the soil to check. If it feels dry, it’s time to water.
6. Germination Time: Be patient! Snap pea seeds typically germinate within 7-14 days, depending on the temperature and moisture levels.
Phase 2: Nurturing Your Growing Snap Peas
Once your seedlings emerge, it’s time to provide them with the care they need to thrive.
1. Thinning (If Necessary): If multiple seeds germinate in the same spot, thin them out by snipping off the weakest seedlings at the soil level. This will give the remaining seedlings more space and resources to grow.
2. Provide Support: As your snap peas grow, they’ll start to climb. Install your trellis, stakes, or netting to provide them with support. Gently guide the tendrils towards the support structure.
3. Watering: Continue to water regularly, keeping the soil consistently moist. Avoid overwatering, as this can lead to root rot.
4. Fertilizing (Optional): If you choose to fertilize, use a balanced liquid fertilizer diluted to half strength. Apply it every 2-3 weeks.
5. Pruning: Prune away any yellowing or dead leaves to encourage healthy growth and prevent disease.
6. Pest Control: Keep an eye out for common pests like aphids or spider mites. If you spot any, you can try spraying them with a mixture of water and dish soap or using an insecticidal soap.
7. Light Management: If you’re using grow lights, adjust their height as your plants grow to ensure they’re receiving adequate light.
Phase 3: Harvesting Your Delicious Snap Peas
The moment you’ve been waiting for! Harvesting your own homegrown snap peas is incredibly satisfying.
1. Harvest Time: Snap peas are typically ready to harvest about 60-70 days after planting. The pods should be plump and filled with peas, but still tender and crisp.
2. Harvesting Technique: Gently snap the pods off the vine, being careful not to damage the plant.
3. Regular Harvesting: Harvest your snap peas regularly to encourage continued production. The more you harvest, the more the plant will produce.
4. Enjoy Your Harvest: Eat your snap peas fresh, add them to salads, stir-fries, or enjoy them as a healthy snack. They’re also delicious steamed or lightly sautéed.
5. Successive Planting: To ensure a continuous supply of snap peas, consider planting new seeds every few weeks. This is called successive planting.
Troubleshooting Tips
Even with the best care, you might encounter some challenges along the way. Here are a few common issues and how to address them:
* Poor Germination: If your seeds aren’t germinating, make sure the soil is consistently moist and the temperature is warm enough (around 65-75°F). You can also try soaking the seeds in water for 24 hours before planting to improve germination rates.
* Yellowing Leaves: Yellowing leaves can be a sign of overwatering, underwatering, or nutrient deficiency. Check the soil moisture and adjust your watering accordingly. If you suspect a nutrient deficiency, try fertilizing with a balanced liquid fertilizer.
* Leggy Growth: Leggy growth (tall, spindly plants) is usually caused by insufficient light. Make sure your plants are receiving enough sunlight or grow light.
* Pest Infestations: Keep an eye out for common pests like aphids, spider mites, or whiteflies. Treat infestations promptly with insecticidal soap or other appropriate methods.
* Powdery Mildew: Powdery mildew is a fungal disease that can affect snap peas. It appears as a white, powdery coating on the leaves. To prevent powdery mildew, ensure good air circulation and avoid overhead watering. If you spot powdery mildew, you can try spraying the affected areas with a fungicide.
Choosing the Right Snap Pea Variety
Selecting the right variety is crucial for indoor growing. Here are a few of my favorites:
* Sugar Ann: This is a bush variety that’s perfect for containers. It produces sweet, crisp pods early in the season.
* Bush Champion: Another excellent bush variety that’s well-suited for indoor growing. It’s known for its high yields and disease resistance.
* Sugar Snap: While technically a vining variety, Sugar Snap can still be grown indoors with proper support. It’s a classic snap pea with a sweet, crunchy flavor.
* Little Sweetie: A compact, early-maturing variety that’s ideal for small spaces.
Optimizing Your Indoor Growing Environment
Creating the right environment is key to success. Here are some tips to optimize your indoor growing space:
* Temperature: Snap peas prefer temperatures between 60-75°F. Avoid exposing them to extreme temperatures.
* Humidity: Maintain a moderate humidity level (around 40-60%). You can increase humidity by using a humidifier or placing a tray of water near your plants.
* Air Circulation: Good air circulation is essential for preventing fungal diseases. Use a fan to circulate air around your plants.
* Light: Provide at least 6 hours of direct sunlight per day or use grow lights to supplement natural light.
* Watering: Water regularly, keeping the soil consistently moist but not soggy.
* Fertilizing: Fertilize every 2-3 weeks with a balanced liquid fertilizer.
Why Grow Snap Peas Indoors?
There are so many reasons to grow snap peas indoors!
* Year-Round Harvest: Enjoy fresh snap peas even in the winter months.
* Convenience: Have fresh produce right at your fingertips.
* Control: Control the growing environment and minimize pests and diseases.
* Sustainability: Reduce your carbon footprint by growing your own food.
* Fun and Rewarding: It’s a fun and rewarding hobby that connects you with nature.

Conclusion
So, there you have it! Growing your own snap peas right in your kitchen is not just a fun project; it’s a rewarding experience that brings fresh, crisp goodness directly to your table. Forget those limp, flavorless snap peas from the grocery store. With this simple DIY trick, you can enjoy the vibrant taste and satisfying crunch of homegrown snap peas whenever you crave them.
Why is this a must-try? Because it’s incredibly easy, even for those without a green thumb. It’s also a fantastic way to reduce your carbon footprint by minimizing trips to the store and supporting sustainable practices. Plus, imagine the satisfaction of serving a salad or stir-fry featuring snap peas you nurtured from seed to pod, all within the cozy confines of your kitchen. It’s a conversation starter, a learning opportunity, and a delicious way to connect with nature, all rolled into one.
But the fun doesn’t stop there! Feel free to experiment with different varieties of snap peas. ‘Sugar Ann’ is a classic choice known for its early maturity, while ‘Super Sugar Snap’ offers extra-large pods. You can also try growing them in different containers – from repurposed yogurt containers to stylish terracotta pots – to see what works best for you. Consider adding a small trellis or support system as your snap peas grow taller, providing them with the structure they need to thrive.
For a unique twist, try adding companion plants to your indoor snap pea garden. Herbs like basil or mint can deter pests and enhance the flavor of your snap peas. Marigolds are also a great option, adding a pop of color and further discouraging unwanted insects.
Don’t be afraid to get creative with your indoor snap pea setup. Place your containers near a sunny window, or supplement with a grow light if natural light is limited. Remember to rotate your containers regularly to ensure even growth. And most importantly, have fun with it!
We wholeheartedly encourage you to try this DIY trick for growing snap peas in your kitchen. It’s a simple, satisfying, and delicious way to bring a touch of nature indoors. Once you’ve harvested your first batch of homegrown snap peas, we’d love to hear about your experience! Share your photos, tips, and variations in the comments below. Let’s create a community of indoor gardeners and inspire others to discover the joy of growing their own food. Happy growing!
Frequently Asked Questions (FAQ)
What kind of snap pea seeds should I use?
The best snap pea seeds for indoor growing are bush varieties, as they tend to be more compact and manageable in containers. ‘Sugar Ann’ and ‘Sugar Sprint’ are popular choices. However, you can also grow vining varieties if you provide them with adequate support, such as a trellis or stakes. Ensure you purchase seeds from a reputable source to guarantee germination and healthy growth. Organic seeds are always a good option if you prefer to avoid pesticides.
How much sunlight do snap peas need indoors?
Snap peas need at least 6-8 hours of direct sunlight per day to thrive. If you don’t have a sunny window, you can supplement with a grow light. Place the grow light about 6-12 inches above the plants and keep it on for 12-14 hours a day. Rotate your plants regularly to ensure even light exposure. A lack of sufficient light can result in leggy growth and reduced pod production.
What kind of soil should I use for growing snap peas in containers?
Use a well-draining potting mix specifically formulated for containers. Avoid using garden soil, as it can become compacted and doesn’t drain well in pots. A good potting mix will retain moisture while allowing excess water to drain away, preventing root rot. You can also amend your potting mix with compost or other organic matter to provide additional nutrients.
How often should I water my indoor snap peas?
Water your snap peas regularly, keeping the soil consistently moist but not waterlogged. Check the soil moisture by sticking your finger about an inch deep. If the soil feels dry, it’s time to water. Water deeply, allowing the excess water to drain out of the bottom of the container. Avoid overwatering, as this can lead to root rot. The frequency of watering will depend on factors such as temperature, humidity, and the size of your container.
Do I need to fertilize my snap peas?
Yes, snap peas benefit from regular fertilization, especially during the flowering and pod-forming stages. Use a balanced liquid fertilizer diluted to half strength, and apply it every 2-3 weeks. Look for a fertilizer with a higher phosphorus content, as this promotes flowering and pod development. Avoid over-fertilizing, as this can lead to excessive foliage growth at the expense of pod production.
How long does it take for snap peas to mature?
Snap peas typically mature in 50-70 days from planting. However, this can vary depending on the variety, growing conditions, and climate. You can start harvesting snap peas when the pods are plump and the peas inside are well-developed. The pods should be firm and crisp, not mushy or stringy. Regular harvesting encourages continued pod production.
What are some common pests and diseases that affect snap peas?
Common pests that can affect snap peas include aphids, spider mites, and pea weevils. You can control these pests by spraying your plants with insecticidal soap or neem oil. Diseases that can affect snap peas include powdery mildew and root rot. Prevent powdery mildew by ensuring good air circulation and avoiding overhead watering. Prevent root rot by using well-draining soil and avoiding overwatering.
Can I grow snap peas indoors year-round?
Yes, you can grow snap peas indoors year-round, provided you have adequate light and temperature control. Snap peas prefer cooler temperatures, so avoid placing them near heat sources. If you live in a climate with hot summers, you may need to provide shade or air conditioning to keep your snap peas from overheating.
How do I know when to harvest my snap peas?
The best time to harvest snap peas is when the pods are plump, bright green, and the peas inside are well-developed but not too large. The pods should be firm and crisp, not mushy or stringy. Snap off the pods from the vine carefully, being careful not to damage the plant. Regular harvesting encourages continued pod production.
What can I do with my homegrown snap peas?
The possibilities are endless! You can eat them raw as a healthy snack, add them to salads, stir-fries, or soups. They’re also delicious steamed, sautéed, or roasted. Snap peas are a versatile and nutritious addition to any meal. You can also freeze them for later use.
Leave a Comment