
Vertical Gardening Easy Guide: Unleash Your Inner Green Thumb, No Matter the Space!
Ever dreamed of a lush, green oasis but thought your tiny balcony or limited yard space made it impossible? I get it! I used to think the same thing. But guess what? There’s a fantastic solution that’s been around for centuries, and it’s called vertical gardening! From the Hanging Gardens of Babylon (one of the Seven Wonders of the Ancient World!) to the ingenious plant walls popping up in modern cities, growing upwards has always been a clever way to maximize greenery.
But why is vertical gardening so popular now? Well, besides being incredibly space-saving, it’s also a fantastic way to add beauty, improve air quality, and even grow your own food! In today’s busy world, we all crave a connection with nature, and a vertical garden brings that connection right to your doorstep. Plus, let’s be honest, it looks amazing!
This vertical gardening easy guide is designed to break down the process into simple, manageable steps. I’ll share my favorite DIY tricks and hacks to help you create a stunning vertical garden, regardless of your experience level. Whether you’re a seasoned gardener or a complete beginner, I’m here to show you how to transform any space into a thriving vertical paradise. Get ready to get your hands dirty and discover the joy of growing up!
DIY Vertical Garden: A Beginner’s Guide to Green Walls
Hey there, fellow plant enthusiasts! I’m so excited to share my experience with creating a vertical garden. It’s a fantastic way to bring greenery into small spaces, add a unique touch to your home, and even grow your own herbs and veggies. Don’t be intimidated; it’s easier than you think! I’ll walk you through everything step-by-step.
Choosing Your Vertical Garden Style
Before we dive into the nitty-gritty, let’s talk about the different types of vertical gardens you can create. This will help you decide what materials you need and how much space you’ll need to dedicate.
* **Pallet Garden:** This is a super popular and budget-friendly option. You repurpose a wooden pallet, adding fabric or plastic lining to create pockets for planting.
* **Pocket Garden:** These are made from fabric or felt and have individual pockets sewn in to hold plants. You can buy pre-made pocket gardens or DIY your own.
* **Stacked Planter Garden:** This involves stacking planters on top of each other, creating a tiered effect. It’s great for herbs and strawberries.
* **Hanging Gutter Garden:** Repurpose old gutters by hanging them vertically and filling them with soil. This is ideal for shallow-rooted plants like lettuce and herbs.
* **Living Wall Panel System:** These are more advanced systems that use modular panels with built-in irrigation. They’re more expensive but offer a professional look.
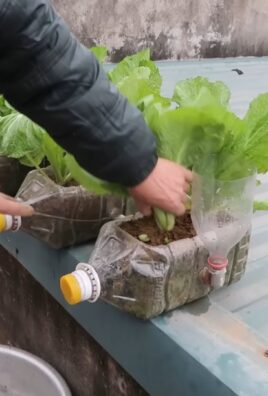
* **Repurposed Item Garden:** Get creative! Use old shoe organizers, plastic bottles, or even picture frames to create unique vertical planters.
For this guide, I’m going to focus on creating a **pallet garden**, as it’s a great starting point for beginners and offers a rustic, charming aesthetic.
Materials You’ll Need
Okay, let’s gather our supplies. Here’s what you’ll need to build your own pallet vertical garden:
* **A Wooden Pallet:** Look for a clean, sturdy pallet that hasn’t been treated with harmful chemicals. You can often find them for free at local businesses or online marketplaces. *Important: Check for an “HT” stamp, which means it was heat-treated and is safe to use. Avoid pallets marked with “MB,” which indicates methyl bromide fumigation.*
* **Heavy-Duty Landscape Fabric or Thick Plastic Sheeting:** This will line the back and bottom of the pallet to create pockets for the soil.
* **Staple Gun and Staples:** To secure the landscape fabric to the pallet.
* **Scissors or Utility Knife:** For cutting the landscape fabric.
* **Gloves:** To protect your hands.
* **Potting Soil:** Choose a good quality potting mix that drains well.
* **Plants:** Select plants that are suitable for vertical gardening and the amount of sunlight your garden will receive.
* **Measuring Tape:** To measure and cut the fabric accurately.
* **Sandpaper (Optional):** To smooth out any rough edges on the pallet.
* **Wood Stain or Paint (Optional):** To customize the look of your pallet.
* **Safety Glasses:** To protect your eyes when stapling.
* **Gardening Trowel:** For planting.
* **Watering Can or Hose:** For watering your plants.
Step-by-Step Instructions: Building Your Pallet Vertical Garden
Alright, let’s get our hands dirty! Follow these steps to create your own beautiful pallet vertical garden:
1. Pallet Preparation
1. **Inspect the Pallet:** Carefully examine the pallet for any loose nails, splinters, or damage. Remove any loose nails or staples.
2. **Sand the Pallet (Optional):** If the pallet has rough edges, use sandpaper to smooth them down. This will make it safer to handle and give it a more polished look.
3. **Clean the Pallet:** Use a brush or hose to clean the pallet and remove any dirt or debris. Let it dry completely.
4. **Stain or Paint the Pallet (Optional):** If you want to customize the look of your pallet, now’s the time to stain or paint it. Choose a color that complements your home’s exterior or your personal style. Let the stain or paint dry completely before moving on to the next step. I personally love a natural wood look, so I usually skip this step.
2. Creating the Planting Pockets
1. **Measure the Pallet:** Measure the width and depth of the pallet openings where you’ll be creating the planting pockets. This will help you determine how much landscape fabric you need.
2. **Cut the Landscape Fabric:** Cut the landscape fabric into pieces that are large enough to line the back and bottom of each pallet opening, creating a pocket. You’ll need enough fabric to overlap the edges of the pallet. I usually add about 4-6 inches extra on each side to be safe.
3. **Attach the Landscape Fabric:** Starting with the bottom row of openings, staple the landscape fabric to the back and bottom of the pallet, creating a secure pocket. Make sure the fabric is taut and there are no gaps where soil can escape. Overlap the fabric generously to ensure a strong seal.
4. **Repeat for Each Pocket:** Repeat the process for each row of openings, creating individual planting pockets. Ensure each pocket is securely lined with landscape fabric.
5. **Reinforce the Bottom (Important!):** For extra support, especially for larger plants, consider adding an extra layer of landscape fabric to the bottom of each pocket. This will prevent the fabric from sagging and help retain moisture.
3. Planting Your Vertical Garden
1. **Choose Your Plants:** Select plants that are well-suited for vertical gardening. Consider factors like sunlight exposure, watering needs, and mature size. Some good options include:
* **Herbs:** Mint, basil, thyme, oregano, rosemary
* **Lettuce and Salad Greens:** Spinach, arugula, kale
* **Strawberries:** Alpine strawberries are a great choice for vertical gardens.
* **Succulents:** Sedum, echeveria, sempervivum
* **Flowers:** Petunias, impatiens, pansies, verbena
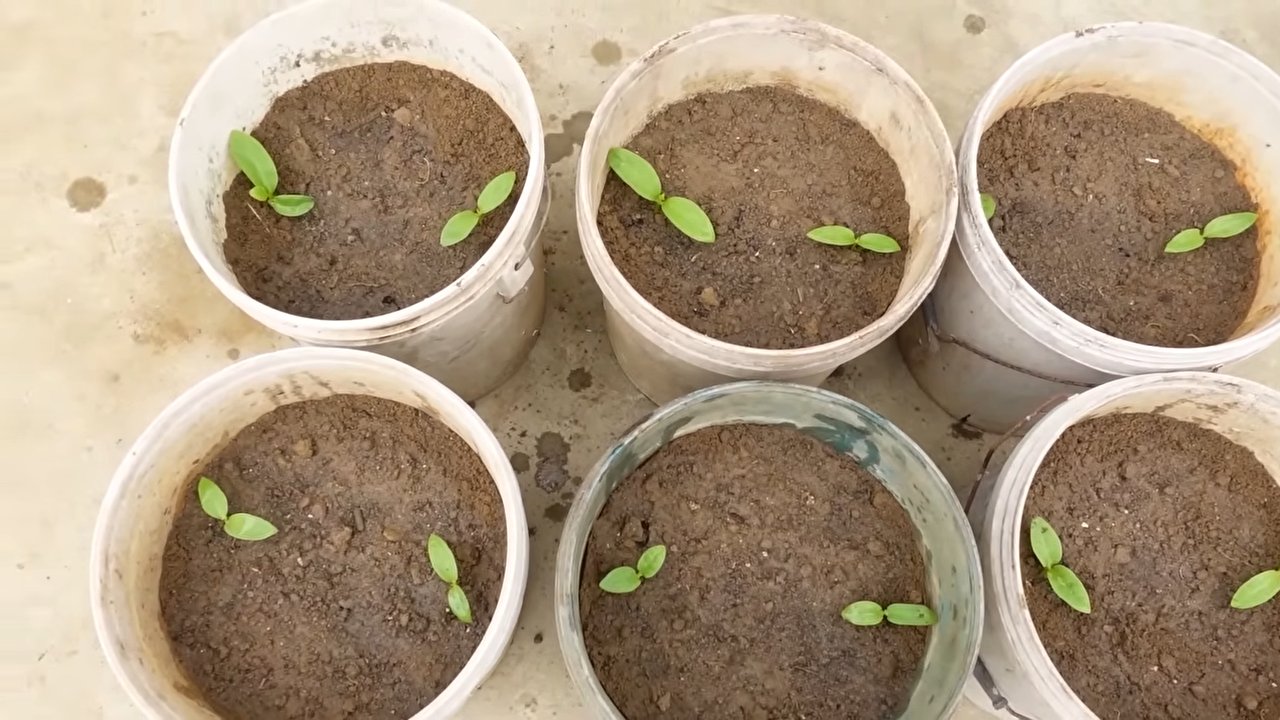
2. **Fill the Pockets with Soil:** Carefully fill each planting pocket with potting soil, leaving about an inch of space at the top.
3. **Plant Your Plants:** Gently remove your plants from their containers and loosen the roots slightly. Plant them in the prepared pockets, making sure the roots are well-covered with soil.
4. **Water Thoroughly:** Water your newly planted vertical garden thoroughly, allowing the water to drain through the pockets. This will help settle the soil and encourage root growth.
4. Maintaining Your Vertical Garden
1. **Water Regularly:** Vertical gardens tend to dry out more quickly than traditional gardens, so it’s important to water them regularly. Check the soil moisture daily and water when the top inch feels dry.
2. **Fertilize Regularly:** Vertical gardens also require regular fertilization to provide the plants with the nutrients they need. Use a balanced liquid fertilizer every 2-4 weeks, following the instructions on the label.
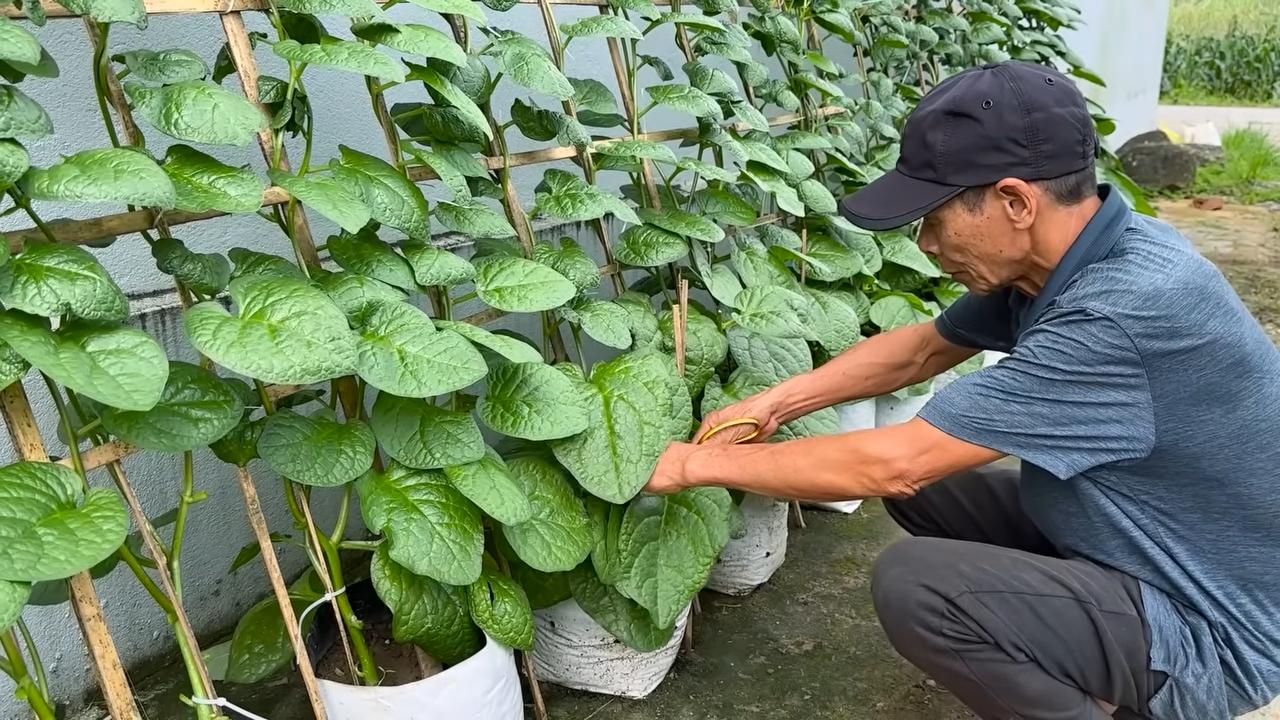
3. **Prune and Trim:** Prune and trim your plants as needed to maintain their shape and encourage healthy growth. Remove any dead or yellowing leaves.
4. **Monitor for Pests and Diseases:** Keep an eye out for pests and diseases and take action promptly if you notice any problems. Use organic pest control methods whenever possible.
5. **Rotate Plants (Optional):** If you have a variety of plants in your vertical garden, consider rotating them periodically to ensure they all receive adequate sunlight.
6. **Winter Protection (If Applicable):** If you live in a cold climate, you may need to protect your vertical garden from frost and freezing temperatures. Consider moving it indoors or covering it with a frost blanket.
Tips and Tricks for a Thriving Vertical Garden
Here are a few extra tips to help you create a successful and beautiful vertical garden:
* **Choose the Right Location:** Consider the amount of sunlight your plants need when choosing a location for your vertical garden. Most herbs and vegetables need at least 6 hours of sunlight per day.
* **Use a Drip Irrigation System:** To make watering easier and more efficient, consider installing a drip irrigation system. This will deliver water directly to the roots of your plants, reducing water waste and promoting healthy growth.
* **Add Drainage:** Make sure your planting pockets have adequate drainage to prevent waterlogging. You can add a layer of gravel or perlite to the bottom of each pocket to improve drainage.
* **Use a Soil Moisture Meter:** A soil moisture meter can help you determine when your plants need watering. Simply insert the meter into the soil and it will give you a reading of the moisture level.
* **Get Creative with Design:** Don’t be afraid to experiment with different plant combinations and arrangements to create a unique and eye-catching vertical garden.
* **Consider the Weight:** Remember that a fully planted vertical garden can be quite heavy, so make sure your support structure is strong enough to handle the weight.
* **Start Small:** If you’re new
Conclusion
So, there you have it! Creating your own vertical garden isn’t just a trendy gardening fad; it’s a game-changer for anyone looking to maximize space, beautify their surroundings, and enjoy the therapeutic benefits of gardening, regardless of their property size. This DIY approach to vertical gardening empowers you to take control of your green space, tailoring it to your specific needs and aesthetic preferences.
Why is this a must-try? Because it’s incredibly versatile. Whether you live in a sprawling suburban home or a compact city apartment, a vertical garden can transform a bare wall, balcony railing, or even an unused corner into a vibrant oasis. It’s also a fantastic way to grow your own herbs, vegetables, and flowers, providing fresh, healthy produce right at your fingertips. Plus, let’s be honest, a lush vertical garden is a stunning visual statement that will impress your neighbors and boost your curb appeal.
But the benefits extend beyond aesthetics and practicality. Gardening, in general, is known to reduce stress, improve mood, and provide a sense of accomplishment. Vertical gardening takes these benefits to the next level by making gardening more accessible and manageable, especially for those with limited mobility or time. No more back-breaking bending or weeding – just easy access to your plants at eye level.
Ready to take your vertical garden to the next level? Consider these variations:
* Herb Spiral: Adapt the vertical concept to create a stunning herb spiral, maximizing sunlight exposure for different herbs.
* Pallet Garden: Repurpose an old wooden pallet into a rustic vertical garden, perfect for succulents or trailing plants.
* Living Wall Art: Create a living piece of art by arranging different colored foliage plants in a visually appealing pattern.
* Hydroponic Vertical Garden: Explore the world of hydroponics by creating a soil-less vertical garden system for even greater efficiency and control.
* Seasonal Rotation: Plan your planting schedule to rotate plants seasonally, ensuring year-round greenery and blooms.
Don’t be afraid to experiment with different materials, plant combinations, and design layouts to create a vertical garden that truly reflects your personal style. The possibilities are endless!
We’re confident that once you experience the joy and satisfaction of creating your own vertical garden, you’ll be hooked. It’s a rewarding project that will bring beauty, freshness, and a touch of nature into your life.
So, what are you waiting for? Grab your tools, gather your supplies, and get ready to embark on your vertical gardening adventure! We can’t wait to see what you create. Share your photos and experiences with us on social media using #DIYVerticalGarden. We’re eager to learn from your successes and inspire others to embrace the vertical gardening revolution. Let’s grow together!
Frequently Asked Questions (FAQ)
What exactly is vertical gardening, and why is it so popular?
Vertical gardening is a method of growing plants upwards on a vertically suspended panel or structure, rather than on the ground. Its popularity stems from several factors: space efficiency (ideal for small homes and apartments), aesthetic appeal (creating living walls and green spaces), improved air quality, and the ability to grow food in urban environments. It’s a modern solution for bringing nature into our lives, regardless of our living situation.
What types of plants are best suited for vertical gardens?
The best plants for vertical gardens are those that are relatively compact, have shallow root systems, and can tolerate the conditions of the specific location (sunlight, moisture, etc.). Some popular choices include:
* Herbs: Mint, basil, thyme, oregano, rosemary, and parsley are all excellent choices.
* Lettuce and Salad Greens: Easy to grow and harvest, providing fresh greens right at your fingertips.
* Strawberries: A delightful addition, especially in hanging baskets or pockets.
* Succulents: Low-maintenance and drought-tolerant, perfect for sunny locations.
* Trailing Plants: Pothos, ivy, and creeping Jenny add a cascading effect.
* Flowers: Petunias, impatiens, and begonias provide vibrant color.
* Small Vegetables: Cherry tomatoes, peppers, and bush beans can also thrive in vertical gardens.
Consider the mature size of the plants and choose varieties that won’t become too large or heavy for your structure.
What kind of structure do I need for a vertical garden?
There are many options for vertical garden structures, ranging from simple DIY projects to commercially available systems. Some popular choices include:
* Pallets: Repurposed pallets are a cost-effective and rustic option.
* Pocket Planters: Fabric or plastic pockets attached to a frame or wall.
* Hanging Baskets: A classic choice for trailing plants and flowers.
* Trellises: Provide support for climbing plants.
* Living Walls: More complex systems with built-in irrigation and drainage.
* Repurposed Items: Old gutters, plastic bottles, or even shoe organizers can be transformed into vertical gardens.
Choose a structure that suits your space, budget, and desired aesthetic. Ensure it’s sturdy enough to support the weight of the plants and soil.
How do I water and fertilize a vertical garden?
Watering and fertilizing vertical gardens requires a bit more attention than traditional gardens, as the plants are often more exposed and the soil can dry out more quickly. Here are some tips:
* Water Regularly: Check the soil moisture daily and water when the top inch feels dry.
* Use a Watering Can or Hose: Water gently to avoid washing away the soil.
* Consider Drip Irrigation: For larger vertical gardens, a drip irrigation system can automate watering and ensure even distribution.
* Fertilize Regularly: Use a balanced liquid fertilizer diluted to half strength every 2-4 weeks.
* Choose Slow-Release Fertilizer: Incorporate slow-release fertilizer granules into the soil at planting time for sustained nutrient release.
Pay attention to the specific needs of your plants and adjust your watering and fertilizing schedule accordingly.
How do I deal with pests and diseases in a vertical garden?
Pests and diseases can be a concern in any garden, but there are several steps you can take to prevent and manage them in your vertical garden:
* Choose Disease-Resistant Varieties: Select plants that are known to be resistant to common pests and diseases.
* Inspect Plants Regularly: Check your plants frequently for signs of pests or diseases.
* Remove Infested Leaves: Prune away any leaves that show signs of infestation or disease.
* Use Organic Pest Control: Consider using organic pest control methods, such as insecticidal soap or neem oil.
* Ensure Good Air Circulation: Proper air circulation can help prevent fungal diseases.
* Avoid Overwatering: Overwatering can create conditions that are favorable for pests and diseases.
By taking these preventative measures, you can minimize the risk of pests and diseases in your vertical garden.
Can I grow a vertical garden indoors?
Yes, you can absolutely grow a vertical garden indoors! However, you’ll need to consider a few additional factors:
* Light: Ensure your plants receive adequate light, either from a sunny window or grow lights.
* Humidity: Indoor air can be dry, so consider using a humidifier or misting your plants regularly.
* Watering: Be careful not to overwater, as indoor plants tend to dry out more slowly.
* Drainage: Choose a structure with good drainage to prevent water from pooling and damaging your floors.
* Plant Selection: Select plants that are well-suited to indoor conditions, such as low-light tolerant varieties.
With proper planning and care, you can create a thriving indoor vertical garden that brings beauty and freshness to your home.
How do I prepare for winter with my vertical garden?
Preparing your vertical garden for winter depends on your climate and the types of plants you’re growing. Here are some general tips:
* Bring Tender Plants Indoors: Move any plants that are not frost-hardy indoors to a protected location.
* Protect Hardy Plants: Wrap the roots of hardy plants with burlap or mulch to protect them from freezing temperatures.
* Reduce Watering: Water less frequently during the winter months, as plants require less moisture.
* Remove Dead Foliage: Prune away any dead or diseased foliage to prevent the spread of disease.
* Consider a Greenhouse: If you have a greenhouse, you can overwinter your vertical garden plants in a protected environment.
By taking these steps, you can help your vertical garden survive the winter and thrive again in the spring.


Leave a Comment