
Grow Kale No Garden? Absolutely! I know what you’re thinking: “Kale? Without a garden? Impossible!” But trust me, it’s not only possible, it’s surprisingly easy and rewarding. Forget sprawling vegetable patches and back-breaking labor; we’re talking about bringing the goodness of kale right to your doorstep, balcony, or even windowsill!
For centuries, kale has been a nutritional powerhouse, a staple in diets around the world. From ancient Roman gardens to modern-day superfood smoothies, this leafy green has proven its resilience and versatility. But you don’t need to be a seasoned farmer to enjoy its benefits.
In today’s busy world, finding time for a traditional garden can be a challenge. That’s where these ingenious DIY tricks come in. I’m going to show you how to grow kale no garden required, using simple, affordable methods that anyone can master. Imagine fresh, organic kale just steps away, ready to add a healthy boost to your meals. No more expensive grocery store trips or worrying about pesticides. This guide will empower you to cultivate your own thriving kale crop, regardless of your space or experience. Let’s get started and unlock the secrets to growing kale, even without a traditional garden!
Grow Kale Indoors: A Garden-Free Guide
Hey there, fellow plant enthusiasts! Ever dreamt of having fresh, vibrant kale at your fingertips, even without a sprawling garden? Well, you’re in luck! I’m going to walk you through a super easy and rewarding DIY project: growing kale indoors. It’s simpler than you think, and the satisfaction of harvesting your own leafy greens is truly unbeatable. Let’s get started!
What You’ll Need
Before we dive in, let’s gather our supplies. This is a pretty low-cost project, and you probably have some of these items already.
* **Kale Seeds:** Choose your favorite variety! Curly kale, Lacinato (dinosaur) kale, and Red Russian kale are all great options. I personally love Lacinato for its slightly sweeter flavor.
* **Seed Starting Tray or Small Pots:** These will be our nurseries for the baby kale plants.
* **Seed Starting Mix:** This is a light, fluffy soil mix specifically designed for seedlings. It provides the perfect environment for germination.
* **Larger Pots (at least 6 inches in diameter):** Once the seedlings are big enough, they’ll need more space to grow.
* **Potting Soil:** A good quality potting soil is essential for healthy kale growth.
* **Grow Lights (optional, but highly recommended):** Kale needs plenty of light, especially indoors. Grow lights will ensure they get enough.
* **Watering Can or Spray Bottle:** For gentle watering.
* **Fertilizer (optional):** A balanced liquid fertilizer can give your kale a boost.
* **Spray Bottle with Water:** For misting the leaves.
* **A Sunny Windowsill or Dedicated Grow Space:** Choose a spot that gets at least 6 hours of sunlight (or supplement with grow lights).
Phase 1: Starting Your Kale Seeds
This is where the magic begins! We’re going to coax those tiny seeds into becoming thriving kale plants.
1. **Prepare Your Seed Starting Tray or Pots:** Fill your seed starting tray or small pots with seed starting mix. Gently pat it down to remove any air pockets.
2. **Sow the Seeds:** Sprinkle a few kale seeds (2-3) on top of the soil in each cell or pot. Don’t bury them too deep – about ¼ inch is perfect.
3. **Cover the Seeds:** Lightly cover the seeds with more seed starting mix.
4. **Water Gently:** Use a spray bottle or watering can with a gentle nozzle to moisten the soil. You want it damp, but not soggy.
5. **Create a Humid Environment:** Cover the seed starting tray or pots with a clear plastic lid or plastic wrap. This will help retain moisture and create a humid environment that’s ideal for germination.
6. **Place in a Warm Location:** Put the tray or pots in a warm spot, around 70-75°F (21-24°C). A heat mat can be helpful if your home is cooler.
7. **Monitor and Water:** Check the soil moisture daily. Keep it consistently damp, but not waterlogged. Remove the plastic lid or wrap for a few hours each day to allow for air circulation and prevent mold growth.
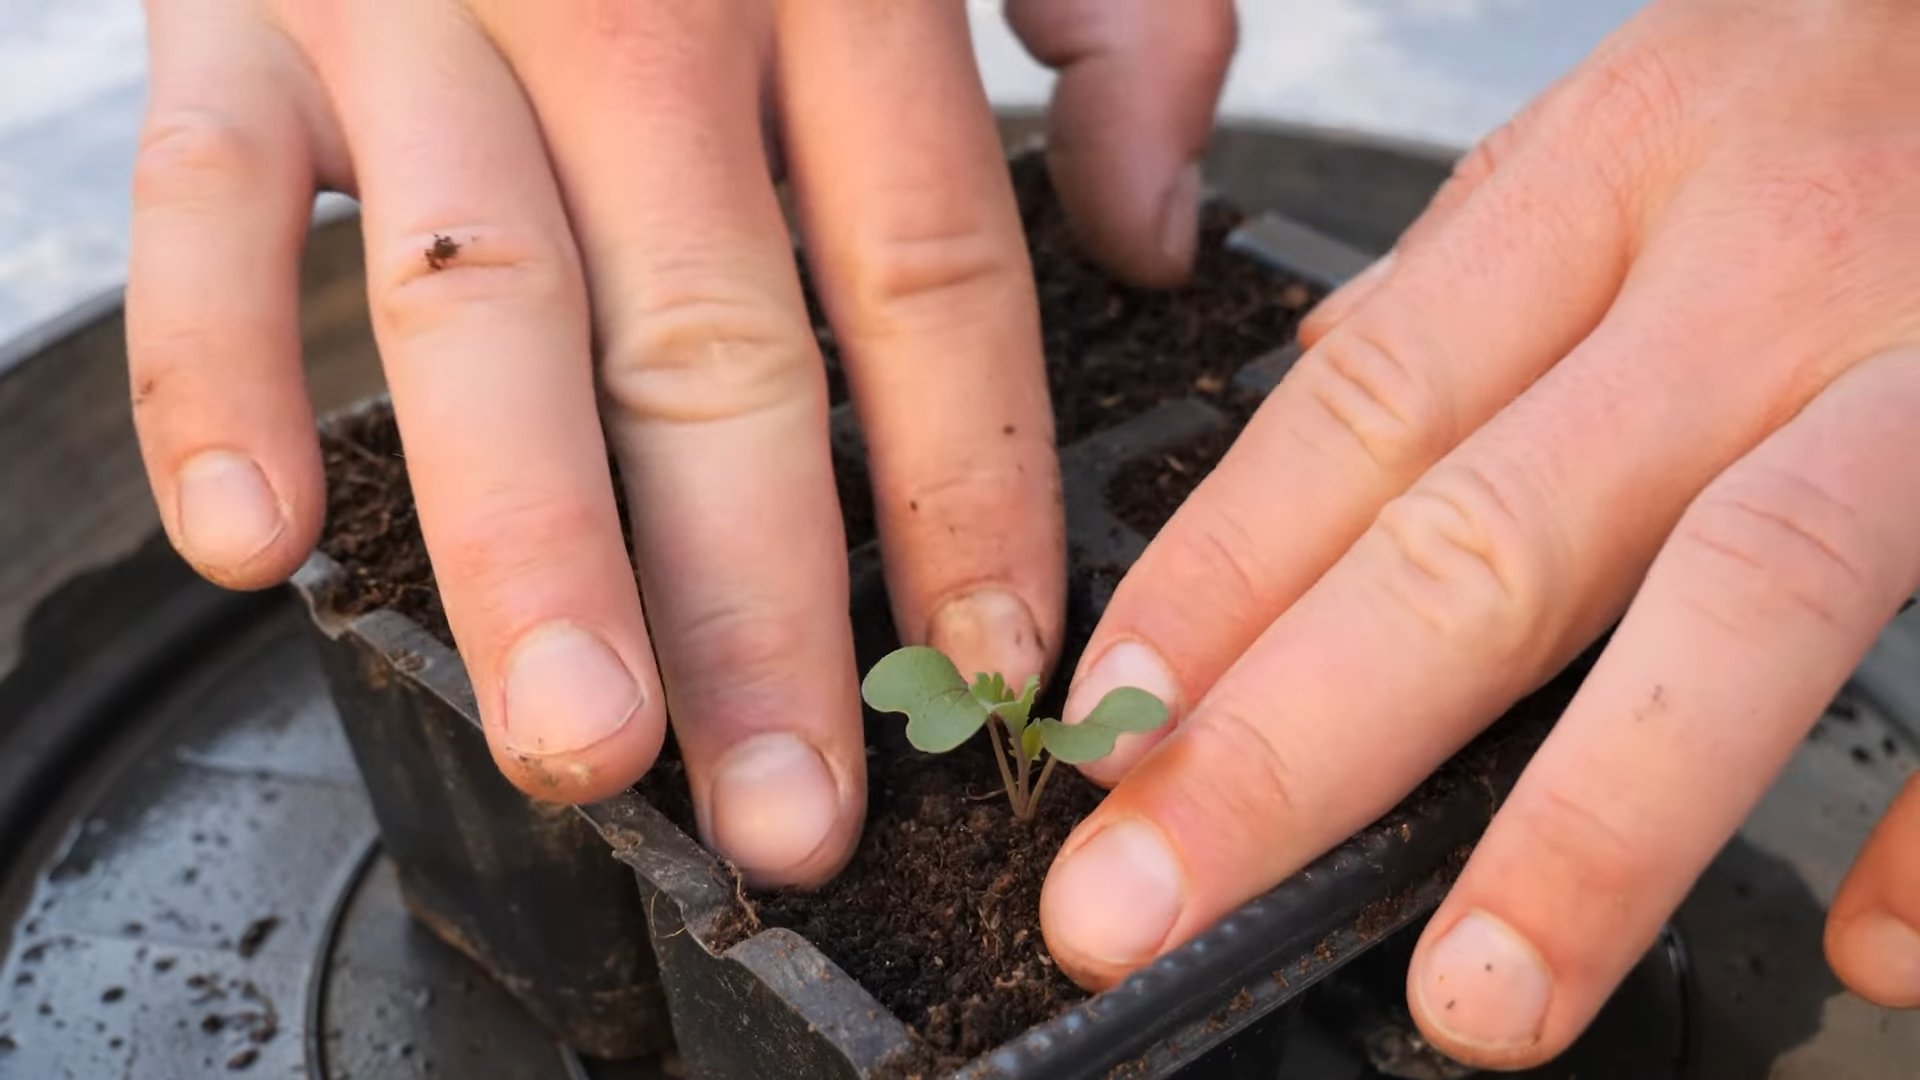
8. **Wait for Germination:** Kale seeds typically germinate in 5-10 days. Once you see sprouts, remove the plastic lid or wrap completely.
Phase 2: Nurturing the Seedlings
Now that your kale seeds have sprouted, it’s time to give them the care they need to grow strong and healthy.
1. **Provide Adequate Light:** Seedlings need plenty of light to prevent them from becoming leggy and weak. Place them in a sunny windowsill that gets at least 6 hours of direct sunlight per day. If you don’t have enough natural light, use grow lights. Position the grow lights a few inches above the seedlings and keep them on for 12-16 hours per day.
2. **Thin the Seedlings:** Once the seedlings have their first true leaves (the second set of leaves that appear after the initial seed leaves), thin them out. This means removing the weaker seedlings from each cell or pot, leaving only the strongest one. Use small scissors to snip the unwanted seedlings at the soil level. Don’t pull them out, as this can disturb the roots of the remaining seedling.
3. **Water Regularly:** Keep the soil consistently moist, but not soggy. Water when the top inch of soil feels dry to the touch.
4. **Fertilize (Optional):** If you want to give your seedlings a boost, you can start fertilizing them with a diluted liquid fertilizer. Follow the instructions on the fertilizer package. I usually use a balanced fertilizer diluted to half strength.
5. **Monitor for Pests and Diseases:** Keep an eye out for any signs of pests or diseases. Aphids and whiteflies are common pests that can affect kale. If you spot any pests, you can try spraying them with insecticidal soap or neem oil.
Phase 3: Transplanting to Larger Pots
Once your seedlings have grown a few inches tall and have a well-developed root system, it’s time to transplant them to larger pots.
1. **Prepare the Larger Pots:** Fill the larger pots (at least 6 inches in diameter) with potting soil.
2. **Gently Remove the Seedlings:** Carefully remove the seedlings from their seed starting tray or pots. Gently loosen the soil around the roots and lift the seedling out. Be careful not to damage the roots.
3. **Plant the Seedlings:** Make a hole in the potting soil in the larger pot that’s big enough to accommodate the seedling’s root ball. Place the seedling in the hole and gently backfill with potting soil.
4. **Water Thoroughly:** Water the newly transplanted seedlings thoroughly.
5. **Provide Adequate Light and Care:** Place the pots in a sunny windowsill or under grow lights. Continue to water regularly and fertilize as needed.
Phase 4: Ongoing Care and Harvesting
Now that your kale plants are established in their larger pots, it’s time to provide ongoing care and wait for the harvest!
1. **Watering:** Water your kale plants regularly, keeping the soil consistently moist but not soggy. Check the soil moisture daily and water when the top inch feels dry to the touch.
2. **Fertilizing:** Fertilize your kale plants every 2-3 weeks with a balanced liquid fertilizer. Follow the instructions on the fertilizer package.
3. **Light:** Kale needs plenty of light to thrive. If you’re growing your kale indoors, make sure it gets at least 6 hours of direct sunlight per day. If you don’t have enough natural light, use grow lights.
4. **Temperature:** Kale prefers cooler temperatures, around 60-70°F (15-21°C). Avoid placing your kale plants in direct sunlight during the hottest part of the day, as this can cause them to overheat.
5. **Humidity:** Kale prefers moderate humidity. You can increase the humidity around your plants by misting them with water regularly.
6. **Pest and Disease Control:** Keep an eye out for any signs of pests or diseases. Aphids, whiteflies, and cabbage worms are common pests that can affect kale. If you spot any pests, you can try spraying them with insecticidal soap or neem oil.
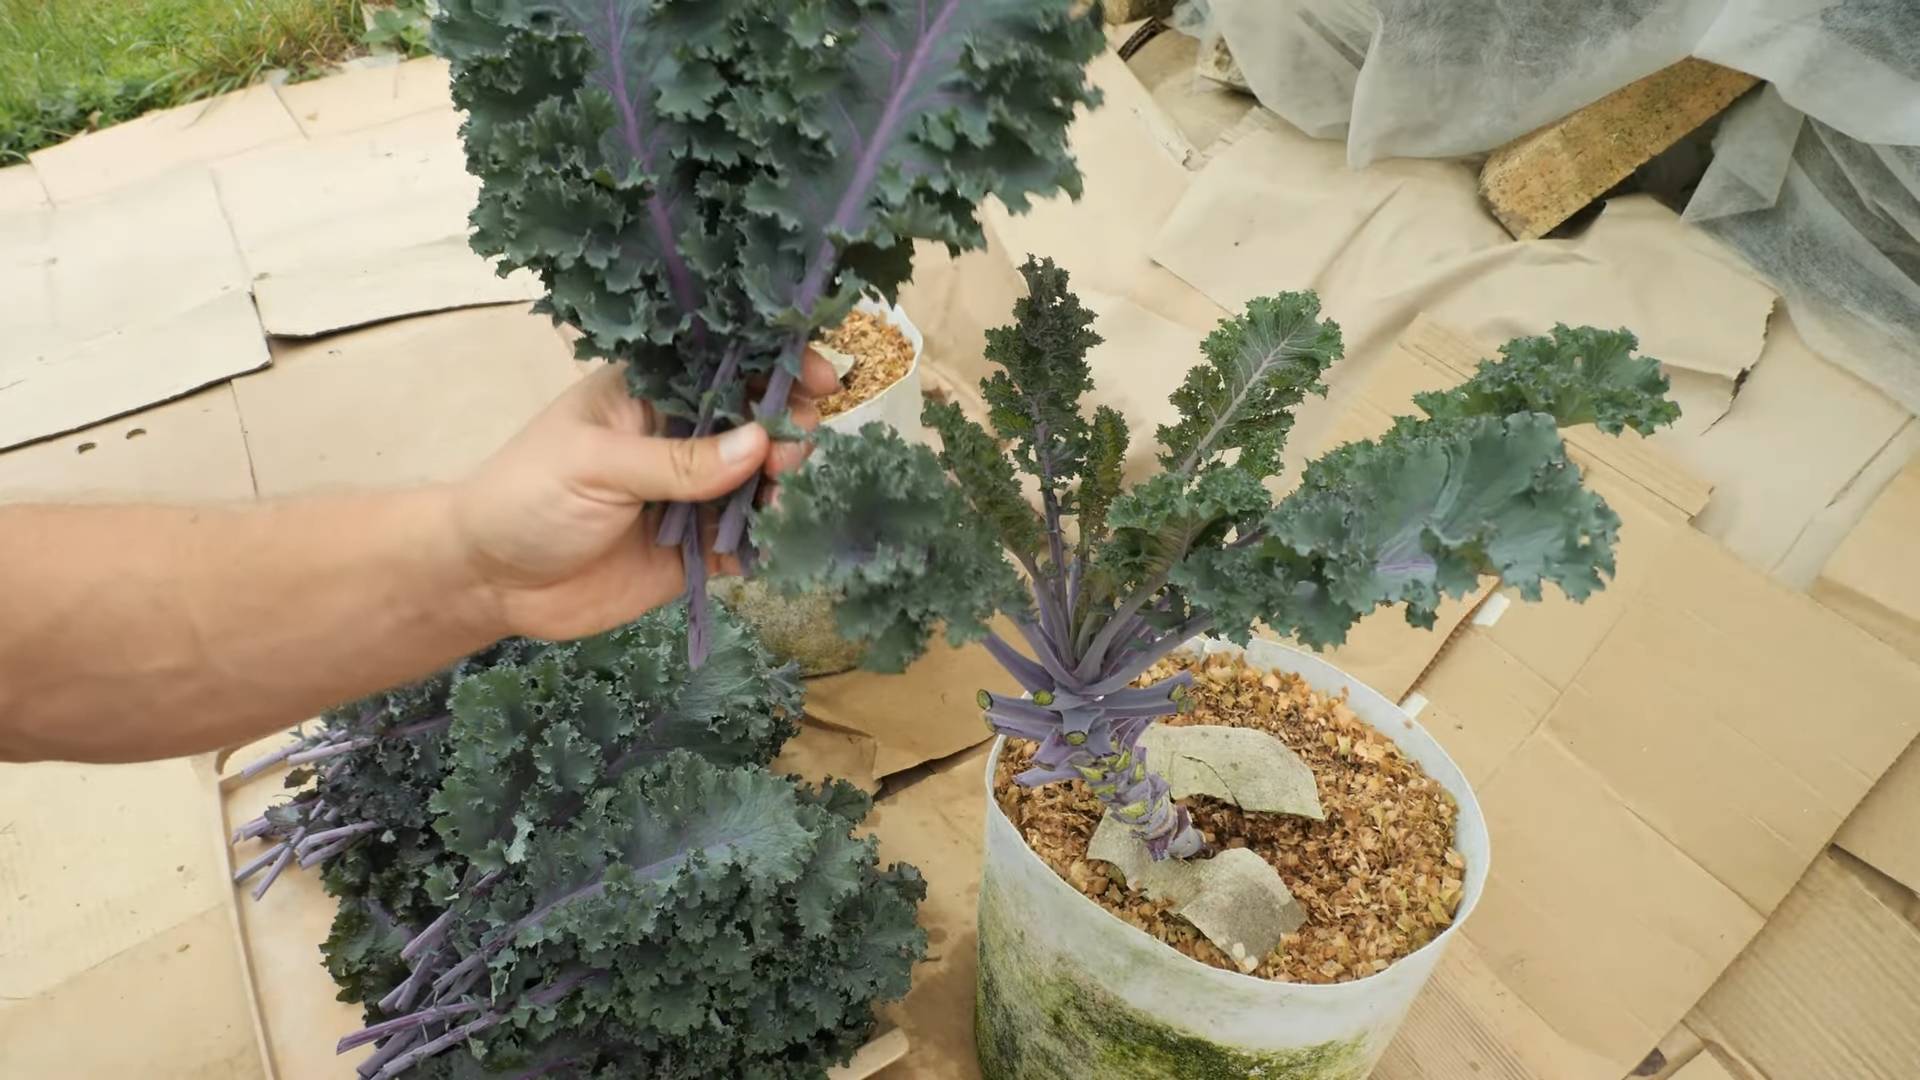
7. **Harvesting:** You can start harvesting your kale leaves once they are about 4-6 inches long. Harvest the outer leaves first, leaving the inner leaves to continue growing. To harvest, simply snip the leaves off at the base of the stem with scissors or a knife.
8. **Successive Planting:** To ensure a continuous supply of kale, you can start new seeds every few weeks. This is called successive planting.
Tips for Success
Here are a few extra tips to help you succeed in growing kale indoors:
* Choose the right variety: Some kale varieties are better suited for indoor growing than others. Dwarf varieties, such as Dwarf Blue Curled Vates, are a good choice for smaller spaces.
* Use a good quality potting soil: A good quality potting soil will provide your kale plants with the nutrients they need to grow healthy and strong.
* Provide adequate drainage: Make sure your pots have drainage holes to prevent the soil from becoming waterlogged.
* Rotate your plants: Rotate your plants regularly to ensure that all sides get equal exposure to light.
* Pinch off flower buds: If you see any flower buds forming, pinch them off. This will encourage the plant to produce more leaves.
* Be patient: It takes time for kale to grow, so be patient and don’t get discouraged if you don’t see results immediately.
Growing kale indoors is a fun and rewarding project that anyone can do. With a little bit of care and attention, you can enjoy fresh, homegrown kale all year round! Happy gardening!
Conclusion
So, there you have it! Growing kale without a garden isn’t just a possibility; it’s a surprisingly simple and rewarding endeavor. We’ve walked through the steps, from selecting the right container and soil to nurturing your leafy greens to their full potential. But why should you bother with this DIY project?
First and foremost, it’s about accessibility. No sprawling backyard? No problem! This method democratizes fresh, healthy produce, bringing the joy of gardening to apartment dwellers, balcony enthusiasts, and anyone with limited outdoor space. Imagine stepping onto your patio and harvesting vibrant, nutrient-rich kale for your morning smoothie or evening salad. The convenience is unparalleled.
Secondly, it’s about control. You dictate the growing environment, shielding your kale from harsh weather, pests, and soil contaminants that might plague traditional gardens. This translates to healthier, more flavorful kale, grown exactly to your liking. You know precisely what goes into your food, fostering a deeper connection to your meals and promoting a more sustainable lifestyle.
Thirdly, it’s about the sheer satisfaction of nurturing something from seed (or seedling) to harvest. There’s a unique sense of accomplishment that comes with watching your kale thrive, knowing that you played an integral role in its growth. It’s a therapeutic and educational experience, perfect for individuals, families, and even classrooms.
But don’t stop there! This method is incredibly versatile. Experiment with different kale varieties, from the classic curly kale to the Tuscan (lacinato) or Russian red. Try companion planting herbs like rosemary or thyme in the same container to deter pests and enhance flavor. Consider succession planting, sowing new seeds every few weeks to ensure a continuous harvest throughout the growing season. You can even explore hydroponic or aquaponic systems for an even more innovative approach to container gardening.
And speaking of innovation, consider using recycled materials for your containers. Old buckets, plastic tubs, or even repurposed shopping bags can be transformed into thriving kale gardens. This not only reduces waste but also adds a unique, personal touch to your project.
The key takeaway is this: growing kale without a garden is an empowering and accessible way to enjoy fresh, healthy produce, regardless of your living situation. It’s a chance to connect with nature, learn new skills, and cultivate a more sustainable lifestyle.
We urge you to give this DIY trick a try. Start small, experiment with different techniques, and don’t be afraid to make mistakes. Gardening is a learning process, and every challenge is an opportunity to grow, both literally and figuratively.
Most importantly, we want to hear about your experiences! Share your photos, tips, and triumphs in the comments below. Let’s build a community of container kale growers, supporting each other and inspiring others to embrace the joy of homegrown goodness. What are you waiting for? Get your hands dirty and start growing your own delicious, nutritious kale today! This method of growing kale no garden is a game changer.
Frequently Asked Questions (FAQ)
What kind of container is best for growing kale?
The ideal container for growing kale should be at least 12 inches deep and 12 inches wide to accommodate the plant’s root system. Larger containers are generally better, as they provide more room for growth and retain moisture more effectively. You can use plastic pots, terracotta pots, fabric pots, or even repurposed containers like buckets or tubs. Ensure the container has drainage holes to prevent waterlogging, which can lead to root rot. If you’re using a dark-colored container, be mindful that it can absorb heat and potentially overheat the soil, especially in warmer climates. Consider using a lighter-colored container or providing shade during the hottest part of the day.
What type of soil should I use for container-grown kale?
Kale thrives in well-draining, nutrient-rich soil. Avoid using garden soil directly in containers, as it can become compacted and hinder drainage. Instead, opt for a high-quality potting mix specifically formulated for container gardening. Look for a mix that contains ingredients like peat moss, perlite, vermiculite, and compost. These components provide good drainage, aeration, and nutrient retention. You can also amend your potting mix with additional compost or aged manure to boost its fertility. A slightly acidic to neutral pH (around 6.0 to 7.0) is ideal for kale growth.
How much sunlight does kale need when grown in a container?
Kale requires at least 6 hours of direct sunlight per day to thrive. Choose a location for your container that receives ample sunlight, such as a south-facing balcony or patio. If you live in a particularly hot climate, providing some afternoon shade can help prevent the leaves from scorching. If you don’t have access to enough natural sunlight, you can supplement with grow lights. Position the grow lights a few inches above the plants and provide 12-14 hours of light per day. Rotate the container regularly to ensure that all sides of the plant receive adequate sunlight.
How often should I water my container-grown kale?
Water your kale regularly, especially during hot and dry weather. The frequency of watering will depend on factors like the size of the container, the type of soil, and the weather conditions. Check the soil moisture by sticking your finger about an inch deep into the soil. If the soil feels dry to the touch, it’s time to water. Water deeply until the water drains out of the drainage holes. Avoid overwatering, as this can lead to root rot. In general, you may need to water your kale every day or every other day during the summer months. Reduce watering frequency during cooler weather.
How do I fertilize my container-grown kale?
Kale is a heavy feeder and benefits from regular fertilization. Start fertilizing your kale seedlings a few weeks after they emerge. Use a balanced, water-soluble fertilizer diluted to half strength. Apply the fertilizer every 2-3 weeks, following the instructions on the fertilizer package. You can also use organic fertilizers like compost tea or fish emulsion. These fertilizers provide essential nutrients and also improve the soil health. Avoid over-fertilizing, as this can lead to excessive foliage growth and reduced flavor.
What are some common pests and diseases that affect container-grown kale?
Common pests that can affect container-grown kale include aphids, cabbage worms, flea beetles, and slugs. Regularly inspect your plants for signs of infestation. You can control aphids with a strong spray of water or by introducing beneficial insects like ladybugs. Cabbage worms can be handpicked or controlled with Bacillus thuringiensis (Bt), a natural insecticide. Flea beetles can be deterred with row covers or insecticidal soap. Slugs can be trapped with beer traps or handpicked at night. Common diseases that can affect kale include downy mildew and clubroot. Ensure good air circulation around your plants to prevent fungal diseases. Remove any infected leaves promptly.
When and how do I harvest my container-grown kale?
You can start harvesting kale leaves when they are about 6-8 inches long. Harvest the outer leaves first, leaving the inner leaves to continue growing. Use a sharp knife or scissors to cut the leaves near the base of the plant. Avoid tearing the leaves, as this can damage the plant. You can harvest kale continuously throughout the growing season. Regular harvesting encourages the plant to produce more leaves.
Can I grow kale in a container indoors?
Yes, you can grow kale in a container indoors, but you’ll need to provide adequate light. Place the container near a sunny window that receives at least 6 hours of direct sunlight per day. If you don’t have enough natural light, you’ll need to supplement with grow lights. Use full-spectrum LED grow lights and position them a few inches above the plants. Provide 12-14 hours of light per day. Ensure good air circulation around your plants to prevent fungal diseases.
What are some variations I can try when growing kale in a container?
Experiment with different kale varieties, such as curly kale, Tuscan kale (lacinato), or Russian red kale. Try companion planting herbs like rosemary, thyme, or sage in the same container to deter pests and enhance flavor. Consider succession planting, sowing new seeds every few weeks to ensure a continuous harvest. You can also explore hydroponic or aquaponic systems for an even more innovative approach to container gardening. Try adding coffee grounds to the soil to increase acidity.
How do I overwinter my container-grown kale?
In mild climates, kale can survive the winter outdoors. In colder climates, you can overwinter your kale by bringing the container indoors or providing protection from frost. If you bring the container indoors, place it near a sunny window or under grow lights. Water sparingly during the winter months. If you leave the container outdoors, protect the plant from frost with a layer of mulch or a frost blanket.
Leave a Comment