
DIY Hydroponic Vegetable Garden: Ever dreamed of harvesting fresh, vibrant vegetables right from your own home, without the hassle of soil? I know I have! Imagine plump tomatoes, crisp lettuce, and flavorful herbs, all grown indoors, year-round. Sounds like something out of a futuristic movie, right? Well, it’s not! It’s the magic of hydroponics, and I’m here to show you how to create your very own DIY hydroponic vegetable garden.
Hydroponics, the art of growing plants without soil, has a surprisingly rich history. While its modern form has taken off in recent decades, the principles date back to ancient civilizations, from the Hanging Gardens of Babylon to the floating gardens of the Aztecs. These early pioneers understood the power of providing plants with nutrient-rich water directly to their roots.
In today’s world, where space is often limited and concerns about food security are growing, a DIY hydroponic vegetable garden offers a fantastic solution. It’s perfect for apartment dwellers, busy professionals, or anyone looking to reduce their environmental footprint. Plus, it’s incredibly rewarding to nurture your own food source. This guide will provide you with simple, step-by-step instructions and helpful tips to get you started on your hydroponic journey. Let’s ditch the dirt and dive into the world of soilless gardening!
DIY Hydroponic Vegetable Garden: Grow Your Own Food, No Soil Required!
Hey there, fellow gardening enthusiasts! Ever dreamed of growing your own fresh veggies but lack the space or the perfect soil? Well, I’ve got just the project for you: a DIY hydroponic vegetable garden! It’s easier than you think, and the results are incredibly rewarding. I’m going to walk you through building your own system, step-by-step. Get ready to ditch the dirt and embrace the future of gardening!
What is Hydroponics, Anyway?
Before we dive in, let’s quickly cover what hydroponics actually is. Simply put, it’s growing plants without soil, using mineral nutrient solutions in water. Plants get everything they need directly from the water, making it a super efficient way to grow. Plus, it minimizes pests and diseases, and you can grow more in a smaller space. Sounds good, right?
Choosing Your Hydroponic System: The Kratky Method
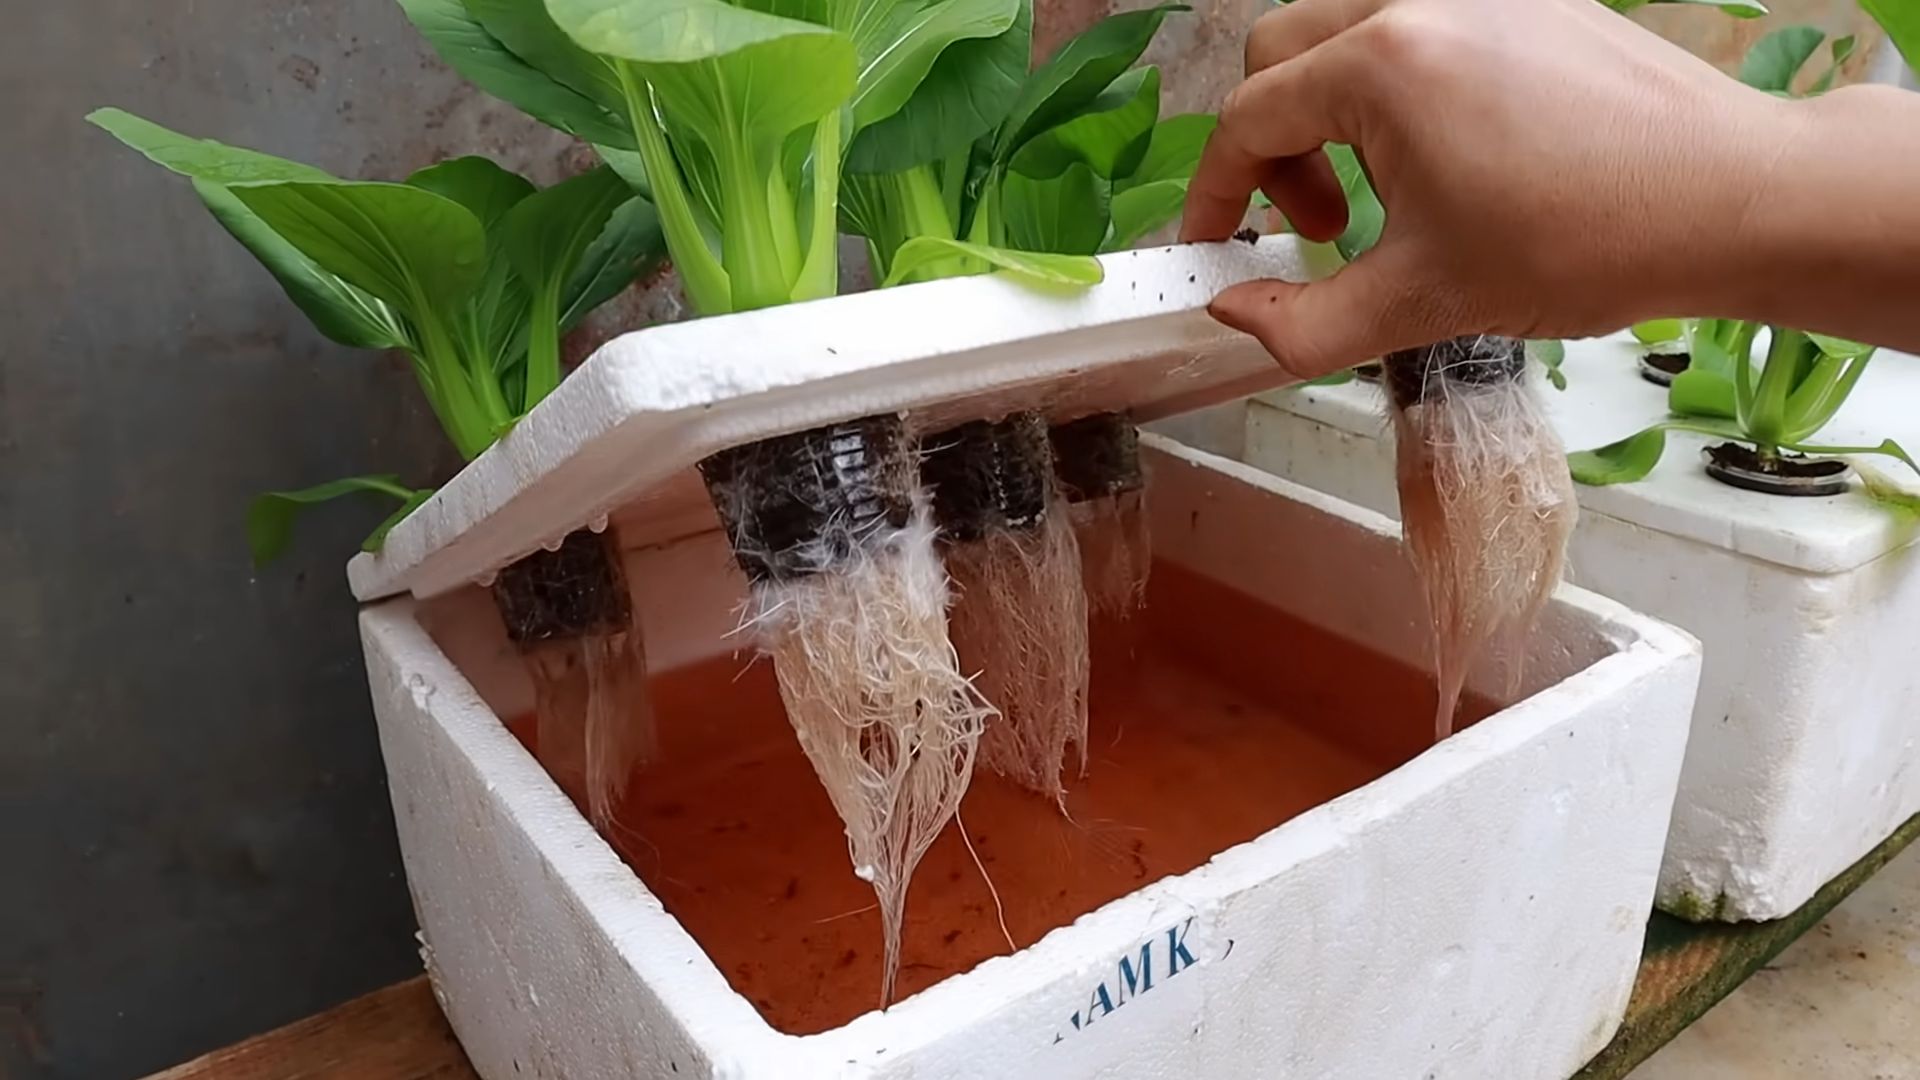
There are several hydroponic methods out there, but for this DIY project, we’re going to focus on the Kratky method. Why? Because it’s incredibly simple, requires minimal maintenance, and is perfect for beginners. The Kratky method is a passive system, meaning it doesn’t require pumps or electricity after the initial setup. The plant’s roots grow down into the nutrient solution, and as the plant consumes the water, an air gap forms, providing the roots with oxygen. Genius!
Materials You’ll Need
Okay, let’s gather our supplies. Here’s what you’ll need to build your Kratky hydroponic garden:
* Opaque Container: A dark-colored plastic tote, bucket, or even a large storage container will work. The darker the container, the better, as it prevents algae growth. I recommend a container that holds at least 5 gallons per plant.
* Net Pots: These are small, slotted pots that will hold your plants and growing medium. You can find them at most garden centers or online. Choose a size that fits comfortably in the holes you’ll be making in your container lid.
* Growing Medium: This is what will support your plant’s roots. I like to use coco coir, rockwool cubes, or clay pebbles (hydroton). They’re all inert and provide good drainage and aeration.
* Hydroponic Nutrients: You’ll need a balanced hydroponic nutrient solution specifically formulated for vegetables. Look for a two-part or three-part nutrient system for best results.
* Seeds or Seedlings: Choose your favorite vegetables! Lettuce, spinach, herbs, strawberries, and peppers are all great choices for hydroponics. Starting with seedlings can speed up the process.
* Drill with Hole Saw Attachment: You’ll need this to create holes in the container lid for the net pots. Choose a hole saw size that matches the diameter of your net pots.
* Measuring Cups and Spoons: For accurately measuring your nutrient solution.
* pH Meter (Optional but Recommended): This will help you monitor the pH of your nutrient solution, which is crucial for plant health.
* pH Up and pH Down (Optional but Recommended): To adjust the pH of your nutrient solution if needed.
* Water: Tap water is usually fine, but if your tap water is heavily chlorinated, let it sit out for 24 hours to allow the chlorine to dissipate.
* Marker: To mark the lid for drilling.
* Ruler or Measuring Tape: To ensure even spacing of the net pots.
Step-by-Step Instructions: Building Your Kratky System
Alright, let’s get building! Follow these steps, and you’ll have your hydroponic garden up and running in no time.
1. Prepare the Container Lid:
* First, decide how many plants you want to grow in your container. Remember to give each plant enough space to grow. I usually aim for at least 6 inches between plants.
* Using your ruler and marker, mark the locations for your net pot holes on the container lid. Make sure they are evenly spaced.
* Attach the appropriate size hole saw to your drill.
* Carefully drill the holes in the lid at the marked locations. Be sure to wear safety glasses!
* Clean up any rough edges around the holes with a utility knife or sandpaper.
2. Prepare the Nutrient Solution:
* Fill your container with water, leaving a few inches of space at the top.
* Using your measuring cups and spoons, add the hydroponic nutrients according to the manufacturer’s instructions. Be precise! Too much or too little can harm your plants.
* Stir the solution thoroughly to ensure the nutrients are fully dissolved.
* If you have a pH meter, test the pH of the solution. The ideal pH range for most vegetables is between 5.5 and 6.5.
* If the pH is too high or too low, use pH Up or pH Down to adjust it accordingly. Add small amounts at a time and retest until you reach the desired range.
3. Prepare the Net Pots:
* If you’re starting with seeds, sow them directly into your chosen growing medium (coco coir, rockwool, etc.) in the net pots. Keep the growing medium moist until the seeds germinate.
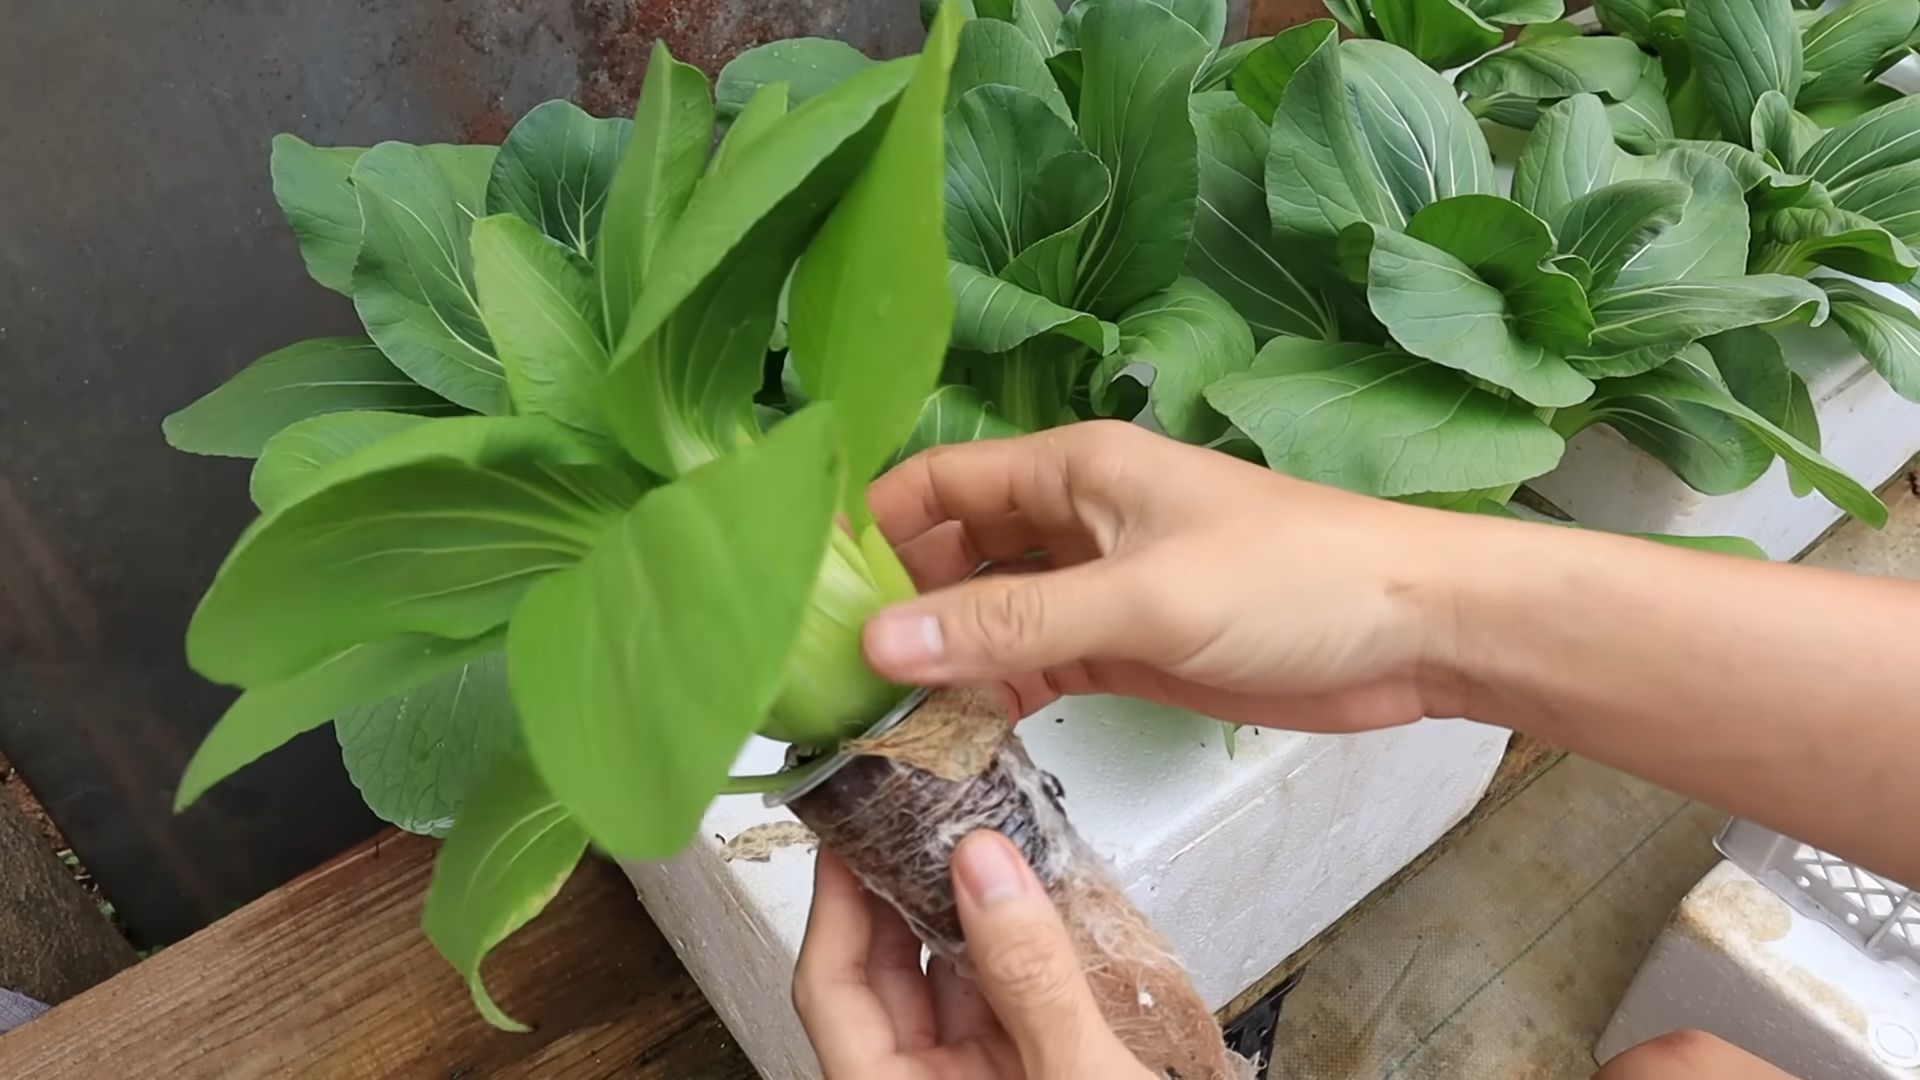
* If you’re using seedlings, gently remove them from their original containers and carefully place them into the net pots, surrounding the roots with your growing medium.
* Make sure the roots are well-supported and that the plant is stable in the net pot.
4. Assemble the System:
* Carefully place the net pots with your plants or seedlings into the holes in the container lid.
* Make sure the bottom of the net pots are submerged in the nutrient solution. This is crucial for the Kratky method to work.
* Place the lid securely on the container.
5. Find the Right Location:
* Your hydroponic garden needs plenty of light. A sunny windowsill, a greenhouse, or even under grow lights will work.
* If you’re using natural sunlight, rotate the container regularly to ensure even growth.
* If you’re using grow lights, follow the manufacturer’s instructions for optimal light exposure.
Maintaining Your Hydroponic Garden
Now that your garden is set up, here’s how to keep it thriving:
* Monitor the Water Level: As your plants grow, they’ll consume the nutrient solution. Check the water level regularly and add more nutrient solution as needed to keep the roots submerged.
* Check the pH: Periodically check the pH of the nutrient solution and adjust it if necessary.
* Observe Your Plants: Keep an eye out for any signs of nutrient deficiencies or pests. Yellowing leaves, stunted growth, or spots on the leaves could indicate a problem.
* Change the Nutrient Solution: Every few weeks, it’s a good idea to completely change the nutrient solution to prevent the buildup of salts and maintain optimal nutrient levels.
* Clean the Container: When you change the nutrient solution, take the opportunity to clean the container to prevent algae growth.
Troubleshooting Tips
Even with the best planning, you might encounter some challenges. Here are a few common issues and how to address them:
* Algae Growth: Algae can compete with your plants for nutrients and oxygen. To prevent algae growth, use an opaque container, keep the system out of direct sunlight, and consider adding a small amount of hydrogen peroxide to the nutrient solution.
* Nutrient Deficiencies: If your plants show signs of nutrient deficiencies, double-check your nutrient solution and make sure you’re using the correct concentration. You may also need to adjust the pH.
* Pests: While hydroponics minimizes pests, they can still occur. Inspect your plants regularly and treat any infestations promptly with organic pest control methods.
* Root Rot: Root rot is a fungal disease that can occur if the roots are not getting enough oxygen. Ensure there is an adequate air gap between the water level and the bottom of the net pot.
Harvesting Your Bounty
The best part of hydroponics is, of course, harvesting your own fresh vegetables! Harvest your crops when they are ripe and ready to eat. Lettuce and spinach can be harvested leaf by leaf, while peppers and tomatoes should be allowed to ripen fully on the plant.
Expanding Your Hydroponic Garden
Once you’ve mastered the basics of the Kratky method, you can experiment with other hydroponic techniques, such as deep water culture (DWC) or nutrient film technique (NFT). You can also expand your garden by adding more containers or building a larger, more complex system. The possibilities are endless!
I hope this guide has inspired you to try your hand at hydroponics. It’s a fun, rewarding, and sustainable way to grow your own food. Happy gardening!
Conclusion
So, there you have it! Creating your own DIY hydroponic vegetable garden isn’t just a fun project; it’s a gateway to fresher, healthier, and more sustainable eating. We’ve walked you through the steps, demystified the process, and hopefully, ignited a spark of inspiration to get your hands dirty (or rather, wet!).
Why is this DIY trick a must-try? Because it empowers you to take control of your food source. Imagine plucking ripe tomatoes or crisp lettuce directly from your indoor garden, knowing exactly where they came from and what went into growing them. No more questionable supermarket produce laden with pesticides. No more relying on long supply chains that deplete resources. This is about bringing the farm to your home, regardless of your space constraints or gardening experience.
Beyond the practical benefits, building a hydroponic system is incredibly rewarding. It’s a fascinating blend of science and nature, a chance to learn about plant physiology and nutrient cycles firsthand. Watching your seedlings sprout and flourish in a soilless environment is a truly magical experience.
But the best part? The possibilities are endless! Once you’ve mastered the basic setup, you can experiment with different vegetables, herbs, and even fruits. Try growing leafy greens like spinach, kale, and arugula. Branch out into fruiting vegetables like peppers, cucumbers, and strawberries. The only limit is your imagination.
Consider these variations to personalize your hydroponic garden:
* Vertical Gardens: If space is truly limited, build a vertical hydroponic system using PVC pipes or stacked containers. This maximizes your growing area without taking up valuable floor space.
* Aquaponics Integration: Take your system to the next level by incorporating fish! Aquaponics combines hydroponics with aquaculture, using fish waste as a natural fertilizer for your plants.
* Automated Systems: For the tech-savvy gardener, consider automating your system with timers, sensors, and pumps. This can help regulate nutrient levels, water flow, and lighting, making your garden even more efficient.
* Different Hydroponic Methods: Explore different hydroponic methods like Deep Water Culture (DWC), Nutrient Film Technique (NFT), or Ebb and Flow (Flood and Drain) to find the one that best suits your needs and preferences. Each method has its own advantages and disadvantages in terms of cost, complexity, and efficiency.
We understand that embarking on a new DIY project can be daunting. But trust us, with a little research, planning, and patience, you can create a thriving hydroponic garden that will provide you with fresh, delicious produce for years to come.
So, what are you waiting for? Gather your supplies, follow our instructions, and get ready to experience the joy of growing your own food, the hydroponic way! We are confident that you will find the process rewarding and the results delicious.
We’re eager to hear about your experiences! Share your photos, tips, and challenges in the comments below. Let’s build a community of hydroponic enthusiasts and inspire others to embrace this innovative and sustainable way of gardening. Don’t forget to use the hashtag #DIYHydroponics so we can all see your amazing creations! Happy growing!
Frequently Asked Questions (FAQ)
What exactly is hydroponics, and why should I consider it?
Hydroponics is a method of growing plants without soil, using water-based nutrient solutions. Instead of relying on soil to provide nutrients, the plants receive everything they need directly from the water. This offers several advantages: faster growth rates, higher yields, reduced water consumption, and the ability to grow plants in areas with poor soil or limited space. It’s a fantastic way to enjoy fresh produce year-round, regardless of your location or gardening experience. Plus, it significantly reduces the risk of soilborne diseases and pests.
What are the basic components of a DIY hydroponic system?
A basic DIY hydroponic system typically includes a container to hold the nutrient solution, a growing medium (like perlite, coco coir, or rockwool) to support the plant roots, a water pump or air pump to circulate or aerate the nutrient solution, and a light source (either natural sunlight or grow lights). You’ll also need a nutrient solution specifically formulated for hydroponics, which contains all the essential minerals and trace elements that plants need to thrive. The specific components and their complexity will vary depending on the type of hydroponic system you choose to build.
What kind of vegetables can I grow in a hydroponic garden?
The possibilities are vast! Many vegetables thrive in hydroponic systems. Leafy greens like lettuce, spinach, kale, and arugula are excellent choices for beginners. Fruiting vegetables like tomatoes, peppers, cucumbers, and strawberries also do well, but they may require more attention and a more robust system. Herbs like basil, mint, and cilantro are also easy to grow hydroponically. Experiment and see what works best for you and your growing environment. Consider factors like light requirements, space needs, and nutrient preferences when selecting your plants.
How often do I need to change the nutrient solution?
The frequency of nutrient solution changes depends on several factors, including the size of your system, the type of plants you’re growing, and the environmental conditions. As a general rule, you should change the nutrient solution every 1-2 weeks. However, it’s essential to monitor the pH and nutrient levels of your solution regularly using a pH meter and a TDS (Total Dissolved Solids) meter. If the pH drifts too far from the optimal range (typically 5.5-6.5), or if the nutrient levels become depleted, you’ll need to change the solution more frequently.
What kind of lighting do I need for my hydroponic garden?
The amount and type of lighting you need will depend on the type of plants you’re growing and the amount of natural light available. Leafy greens generally require less light than fruiting vegetables. If you have a sunny window, you may be able to supplement with a simple fluorescent grow light. However, for optimal growth, especially for fruiting vegetables, consider using LED grow lights. LED lights are energy-efficient, long-lasting, and provide the full spectrum of light that plants need for photosynthesis. Research the specific light requirements of the plants you’re growing to determine the appropriate wattage and spectrum.
How do I prevent algae growth in my hydroponic system?
Algae growth can be a common problem in hydroponic systems, especially those exposed to sunlight. Algae compete with your plants for nutrients and can clog your system. To prevent algae growth, keep your nutrient solution covered and shielded from light. Use opaque containers and tubing whenever possible. You can also add a small amount of hydrogen peroxide to your nutrient solution to kill algae. Regularly clean your system to remove any algae buildup.
What are some common problems I might encounter, and how do I fix them?
Some common problems include nutrient deficiencies, pH imbalances, pest infestations, and root rot. Nutrient deficiencies can be identified by yellowing leaves, stunted growth, or other abnormal symptoms. Adjust the nutrient solution accordingly. pH imbalances can be corrected by adding pH up or pH down solutions. Pest infestations can be treated with organic pesticides or by introducing beneficial insects. Root rot is often caused by poor aeration or overwatering. Ensure proper aeration and drainage, and avoid overwatering. Regularly inspect your plants for any signs of problems and address them promptly.
Is hydroponics expensive?
The initial cost of setting up a hydroponic system can vary depending on the size and complexity of the system. However, DIY hydroponics can be very affordable, especially if you use recycled materials and build your own components. Over time, hydroponics can actually save you money compared to traditional gardening, as you’ll need less water, fertilizer, and pesticides. Plus, you’ll be able to grow your own fresh produce, reducing your grocery bill.
Where can I find more information and resources about hydroponics?
There are many excellent resources available online and in libraries. Search for hydroponics forums, blogs, and websites. Look for books and articles on hydroponic gardening. Contact your local agricultural extension office for advice and support. Don’t be afraid to experiment and learn from your mistakes. The more you learn about hydroponics, the more successful you’ll be. Remember that the journey of creating a thriving DIY hydroponic vegetable garden is as rewarding as the harvest itself.

Leave a Comment