
Bean Sprouts Container Gardening: Unlock the secrets to growing your own crunchy, delicious bean sprouts right in your kitchen! Forget those bland, store-bought sprouts – I’m going to show you how incredibly easy and rewarding it is to cultivate your own fresh supply. For centuries, bean sprouts have been a staple in Asian cuisine, prized not only for their delicate flavor and satisfying crunch but also for their impressive nutritional value. From stir-fries to salads, they add a burst of freshness and vitality to any dish.
But why should you bother with DIY bean sprouts? Well, for starters, you’ll have complete control over the growing process, ensuring they’re free from harmful chemicals and pesticides. Plus, it’s a fantastic way to save money and reduce your reliance on grocery store produce. Imagine the satisfaction of harvesting your own sprouts, knowing exactly where they came from and how they were grown. I’ve found that mastering bean sprouts container gardening is not only a fun and educational project, but also a fantastic way to add a healthy and sustainable element to your diet. So, let’s dive in and discover the simple steps to creating your own thriving bean sprout garden, even if you have limited space or gardening experience!
DIY Bean Sprouts Container Gardening: A Beginner’s Guide
Hey there, fellow gardening enthusiasts! Ever thought about growing your own bean sprouts? It’s surprisingly easy, incredibly rewarding, and a fantastic way to add fresh, crunchy goodness to your meals. Plus, you don’t need a huge garden – a simple container will do! I’m going to walk you through the whole process, step-by-step, so you can enjoy homegrown bean sprouts in just a few days.
What You’ll Need
Before we dive in, let’s gather our supplies. This is a pretty low-cost project, which is always a win!
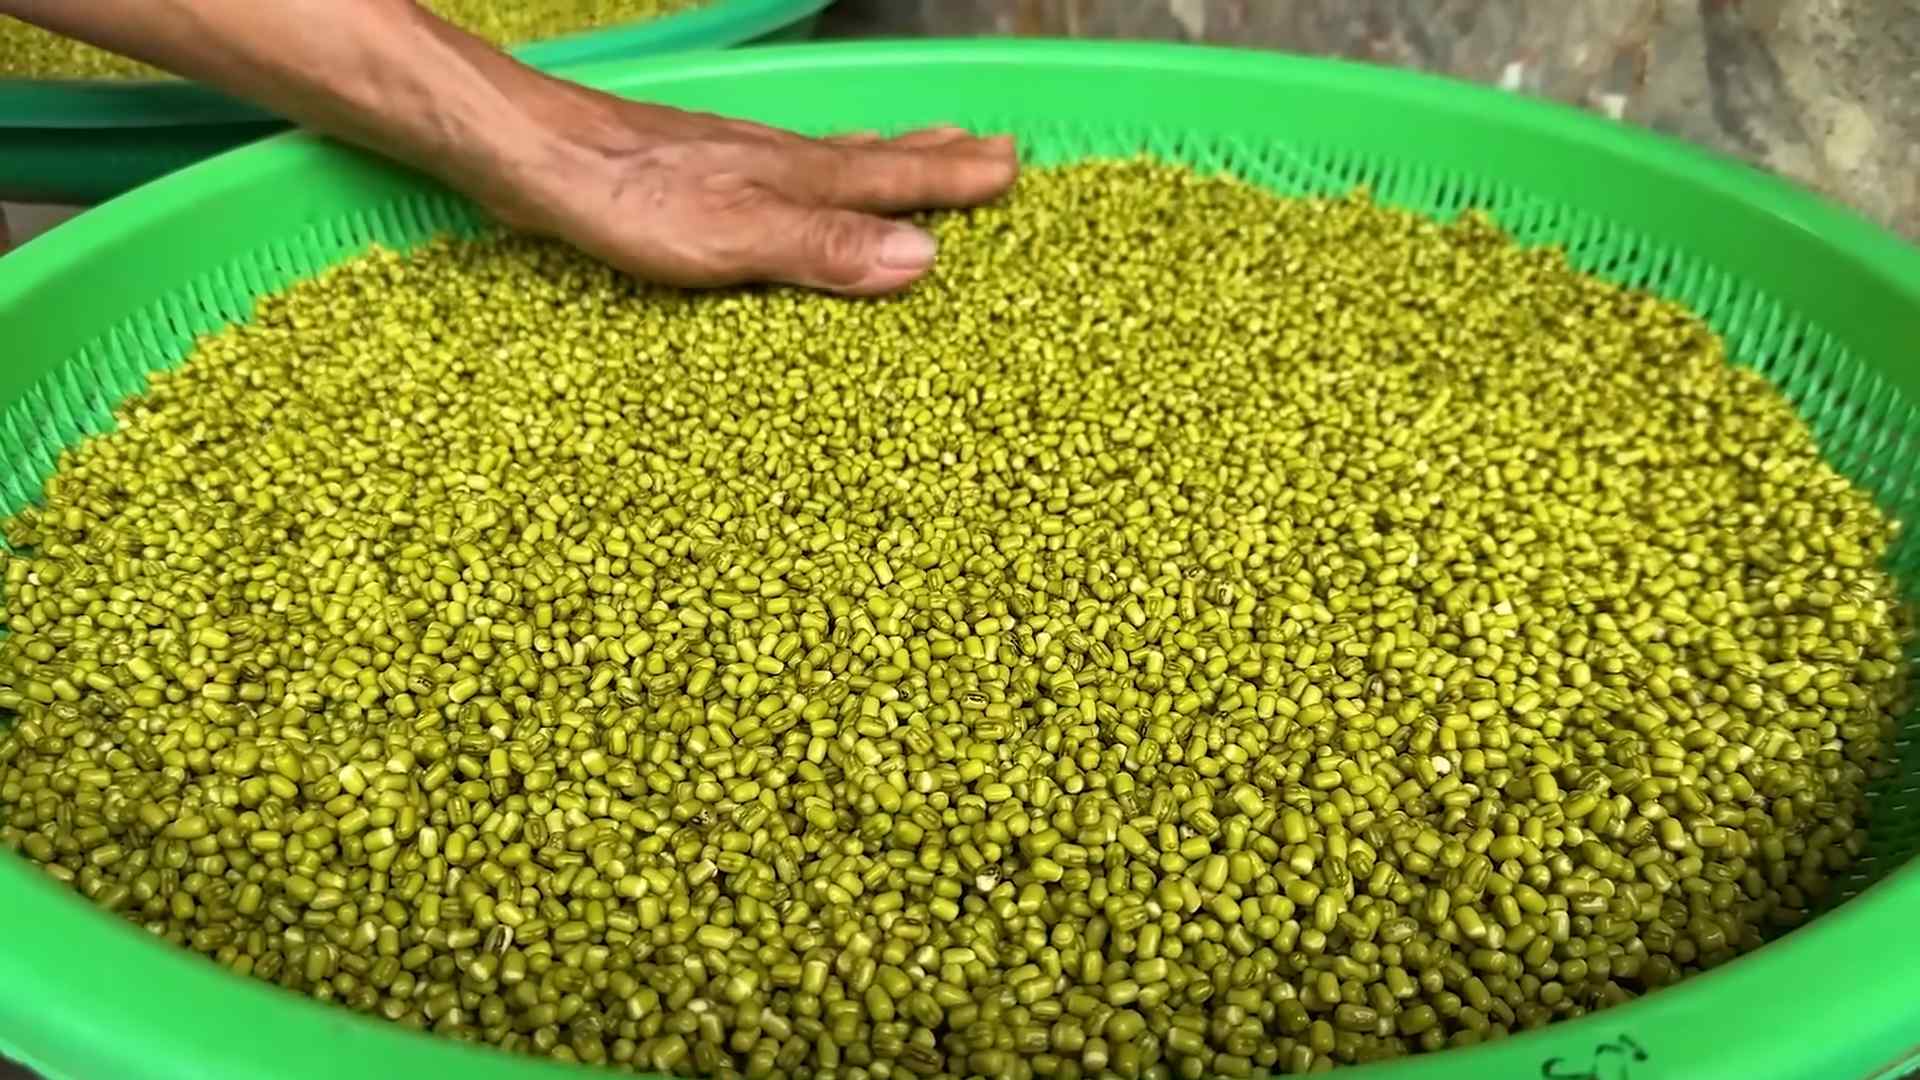
* **Bean Seeds:** Mung beans are the most common and easiest to sprout, but you can also use adzuki beans, lentils, or even chickpeas. Just make sure they’re specifically labeled for sprouting or food use, not treated for planting.
* **Sprouting Container:** You have a few options here. I personally love using a wide-mouth mason jar with a sprouting lid (the kind with a mesh screen). You can also use a plastic container with holes drilled in the bottom for drainage, or even a store-bought sprouting kit.
* **Sprouting Lid or Cheesecloth:** If you’re using a mason jar, a sprouting lid is ideal. If you’re using a regular jar or container, you can use a piece of cheesecloth secured with a rubber band.
* **Water:** Clean, filtered water is best.
* **Dark Place:** A cupboard, pantry, or even a covered box will work. Bean sprouts need darkness to grow properly.
* **Bowl or Tray:** To catch any excess water that drains from your container.
Preparing Your Beans
This is a crucial step, so pay close attention!
1. **Rinse the Beans:** Place your bean seeds in a bowl and rinse them thoroughly with cool water. This removes any dirt or debris.
2. **Remove Damaged Beans:** Discard any broken, discolored, or shriveled beans. These won’t sprout well and could potentially contaminate the batch.
3. **Soak the Beans:** Transfer the rinsed beans to your sprouting container. Add enough cool water to completely cover them, plus an inch or two extra. Beans will absorb water and expand during soaking.
4. **Soaking Time:** Let the beans soak for 8-12 hours, or even overnight. This softens the outer shell and activates the germination process. I usually soak mine before I go to bed and they’re ready to go in the morning.
The Sprouting Process
Now for the fun part!
1. **Drain and Rinse:** After soaking, drain the water completely from the container. Rinse the beans thoroughly with fresh, cool water. This is important to prevent mold and bacteria growth.
2. **Secure the Lid:** If you’re using a mason jar with a sprouting lid, screw it on tightly. If you’re using cheesecloth, secure it tightly with a rubber band.
3. **Invert and Drain:** Invert the container over a bowl or tray to allow any excess water to drain out. This prevents the beans from sitting in water, which can lead to rot.
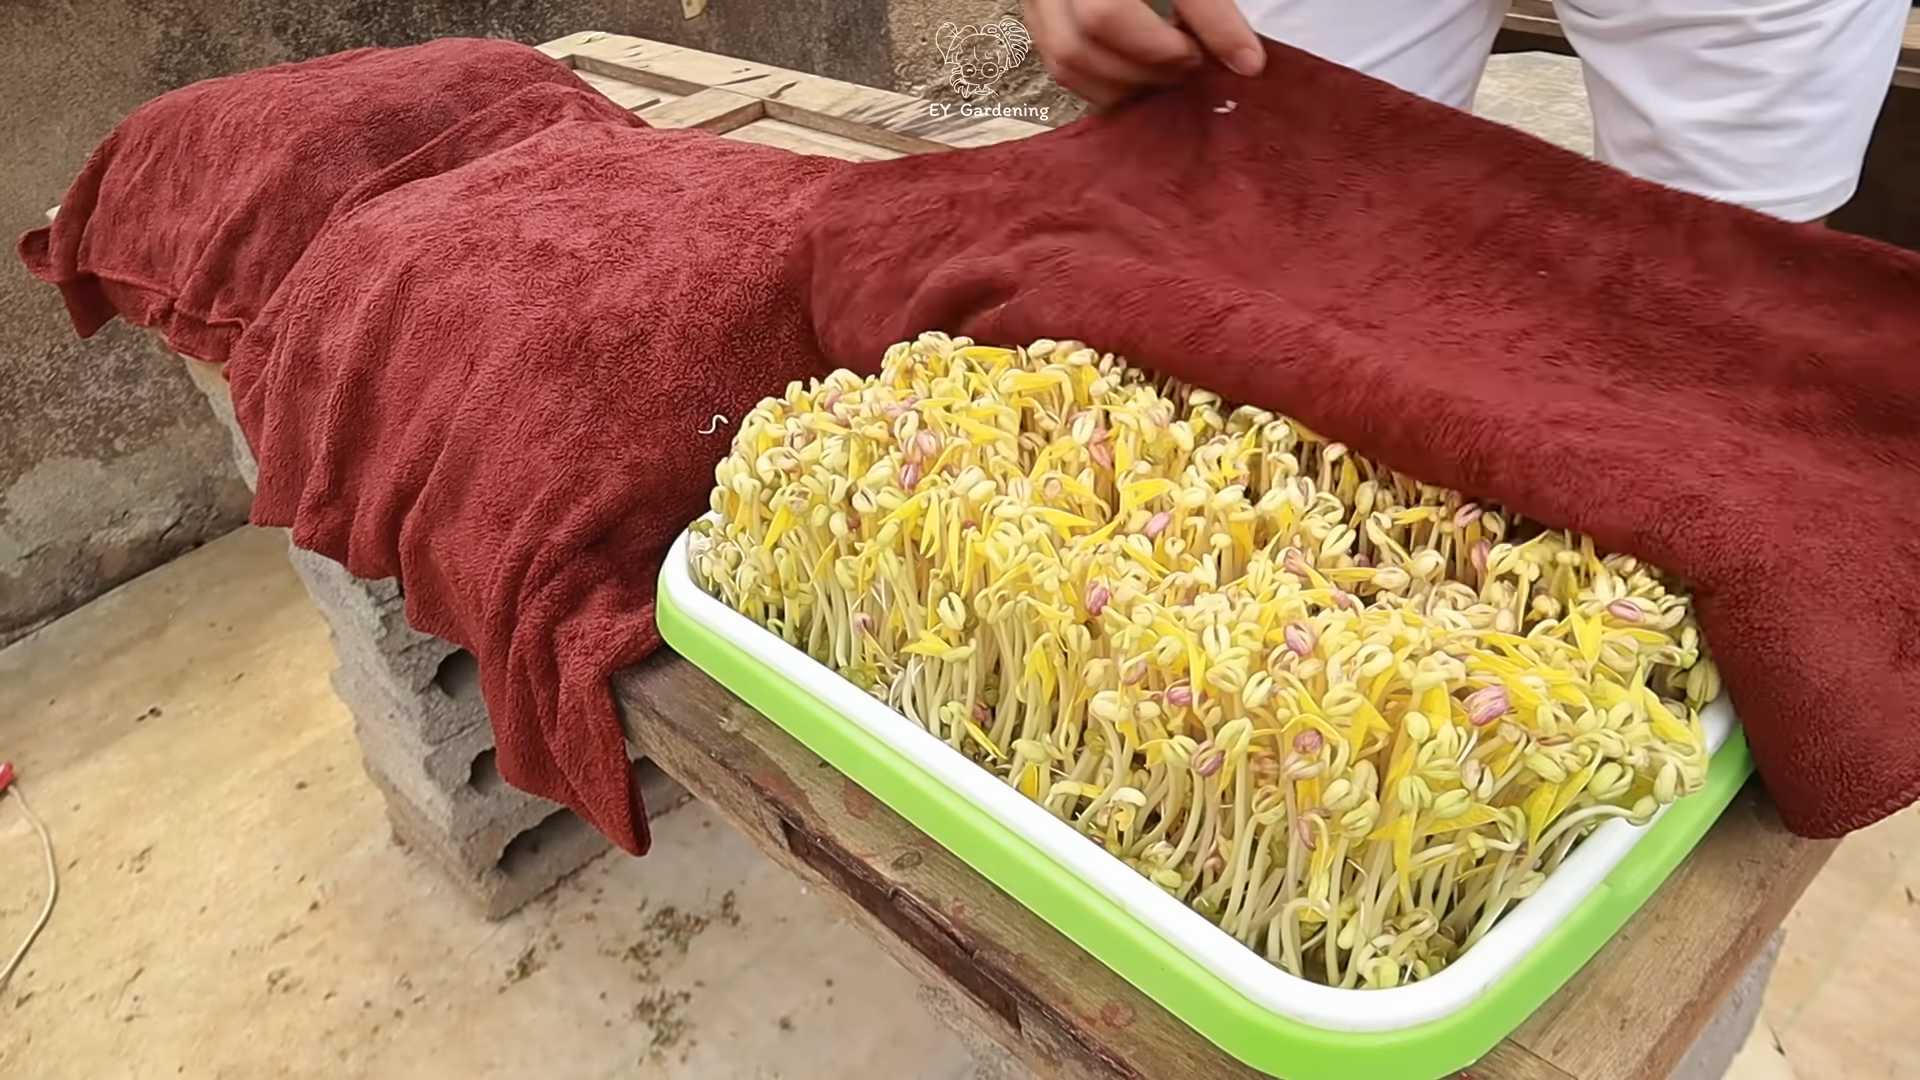
4. **Darkness is Key:** Place the container in a dark, well-ventilated place. A cupboard or pantry works perfectly.
5. **Rinse and Drain (Twice a Day!):** This is the most important part of the sprouting process. Rinse and drain the beans thoroughly with fresh, cool water at least twice a day – morning and evening. This keeps them hydrated and prevents mold growth. Make sure to invert the container after each rinse to drain excess water.
6. **Observe and Adjust:** Keep an eye on your bean sprouts. You should start to see tiny sprouts emerging within 24-48 hours. If you notice any mold or unpleasant smells, discard the entire batch.
7. **Maintain Ventilation:** Ensure your sprouting container has adequate ventilation. This helps prevent moisture buildup and mold growth. If you’re using a container with small drainage holes, make sure they’re not blocked.
Harvesting Your Bean Sprouts
Almost there!
1. **Ready to Harvest:** Your bean sprouts are ready to harvest when they’re about 1-2 inches long, usually after 3-5 days. The exact time will depend on the type of bean and the temperature. I like mine when they have a nice, crunchy texture.
2. **Final Rinse:** Give your bean sprouts a final rinse with cool water. This removes any remaining seed husks.
3. **Sunlight Exposure (Optional):** If you want to green up your bean sprouts, you can expose them to indirect sunlight for a few hours before harvesting. This will increase their chlorophyll content and give them a slightly sweeter flavor. Be careful not to expose them to direct sunlight, as this can overheat them.
4. **Harvest and Drain:** Gently remove the bean sprouts from the container. Drain them thoroughly to remove any excess water.
Storing Your Bean Sprouts
Proper storage is essential to keep your bean sprouts fresh and crunchy.
1. **Dry Thoroughly:** The key to long-lasting bean sprouts is to dry them as much as possible. Spread them out on a clean kitchen towel or paper towels and gently pat them dry.
2. **Storage Container:** Store the dried bean sprouts in an airtight container lined with a paper towel. The paper towel will absorb any excess moisture.
3. **Refrigerate:** Store the container in the refrigerator.
4. **Shelf Life:** Properly stored bean sprouts will last for about 5-7 days in the refrigerator. Check them regularly for any signs of spoilage.
Troubleshooting
Sometimes things don’t go exactly as planned. Here are a few common issues and how to address them:
* **Mold Growth:** Mold is usually caused by insufficient rinsing or poor ventilation. If you see mold, discard the entire batch. To prevent mold, make sure to rinse and drain the beans thoroughly at least twice a day, and ensure your container has adequate ventilation.
* **Slow Sprouting:** Slow sprouting can be caused by cold temperatures or old seeds. Try moving your sprouting container to a warmer location. If your seeds are old, they may have a lower germination rate.
* **Rotting Beans:** Rotting beans are usually caused by overwatering or poor drainage. Make sure to drain the beans thoroughly after each rinse.
* **Bitter Taste:** A bitter taste can be caused by exposing the bean sprouts to too much sunlight. Keep them in a dark place during the sprouting process.
Tips and Tricks for Sprouting Success
Here are a few extra tips to help you grow the best bean sprouts ever!
* **Use Fresh Seeds:** Fresh seeds have a higher germination rate.
* **Maintain Consistent Temperatures:** Bean sprouts prefer a temperature of around 70-75°F (21-24°C).
* **Don’t Overcrowd:** Don’t overcrowd your sprouting container. Give the beans enough space to expand.
* **Experiment with Different Beans:** Try sprouting different types of beans to find your favorite.
* **Use Filtered Water:** Filtered water helps prevent mineral buildup and keeps your sprouts clean.
* **Enjoy Your Harvest!** Add your homegrown bean sprouts to salads, sandwiches, stir-fries, soups, and more!
Section: Choosing the Right Container
Let’s delve a bit deeper into selecting the perfect container for your bean sprouting adventure. As I mentioned earlier, you have several options, each with its own pros and cons.
Mason Jars with Sprouting Lids
Hey there, fellow gardening enthusiasts! Ever thought about growing your own bean sprouts? It’s surprisingly easy, incredibly rewarding, and a fantastic way to add fresh, crunchy goodness to your meals. Plus, you don’t need a huge garden – a simple container will do! I’m going to walk you through the whole process, step-by-step, so you can enjoy homegrown bean sprouts in just a few days.
What You’ll Need
Before we dive in, let’s gather our supplies. This is a pretty low-cost project, which is always a win!
* **Bean Seeds:** Mung beans are the most common and easiest to sprout, but you can also use adzuki beans, lentils, or even chickpeas. Just make sure they’re specifically labeled for sprouting or food use, not treated for planting.
* **Sprouting Container:** You have a few options here. I personally love using a wide-mouth mason jar with a sprouting lid (the kind with a mesh screen). You can also use a plastic container with holes drilled in the bottom for drainage, or even a store-bought sprouting kit.
* **Sprouting Lid or Cheesecloth:** If you’re using a mason jar, a sprouting lid is ideal. If you’re using a regular jar or container, you can use a piece of cheesecloth secured with a rubber band.
* **Water:** Clean, filtered water is best.
* **Dark Place:** A cupboard, pantry, or even a covered box will work. Bean sprouts need darkness to grow properly.
* **Bowl or Tray:** To catch any excess water that drains from your container.
Preparing Your Beans
This is a crucial step, so pay close attention!
1. **Rinse the Beans:** Place your bean seeds in a bowl and rinse them thoroughly with cool water. This removes any dirt or debris.
2. **Remove Damaged Beans:** Discard any broken, discolored, or shriveled beans. These won’t sprout well and could potentially contaminate the batch.
3. **Soak the Beans:** Transfer the rinsed beans to your sprouting container. Add enough cool water to completely cover them, plus an inch or two extra. Beans will absorb water and expand during soaking.
4. **Soaking Time:** Let the beans soak for 8-12 hours, or even overnight. This softens the outer shell and activates the germination process. I usually soak mine before I go to bed and they’re ready to go in the morning.
The Sprouting Process
Now for the fun part!
1. **Drain and Rinse:** After soaking, drain the water completely from the container. Rinse the beans thoroughly with fresh, cool water. This is important to prevent mold and bacteria growth.
2. **Secure the Lid:** If you’re using a mason jar with a sprouting lid, screw it on tightly. If you’re using cheesecloth, secure it tightly with a rubber band.
3. **Invert and Drain:** Invert the container over a bowl or tray to allow any excess water to drain out. This prevents the beans from sitting in water, which can lead to rot.
4. **Darkness is Key:** Place the container in a dark, well-ventilated place. A cupboard or pantry works perfectly.
5. **Rinse and Drain (Twice a Day!):** This is the most important part of the sprouting process. Rinse and drain the beans thoroughly with fresh, cool water at least twice a day – morning and evening. This keeps them hydrated and prevents mold growth. Make sure to invert the container after each rinse to drain excess water.
6. **Observe and Adjust:** Keep an eye on your bean sprouts. You should start to see tiny sprouts emerging within 24-48 hours. If you notice any mold or unpleasant smells, discard the entire batch.
7. **Maintain Ventilation:** Ensure your sprouting container has adequate ventilation. This helps prevent moisture buildup and mold growth. If you’re using a container with small drainage holes, make sure they’re not blocked.
Harvesting Your Bean Sprouts
Almost there!
1. **Ready to Harvest:** Your bean sprouts are ready to harvest when they’re about 1-2 inches long, usually after 3-5 days. The exact time will depend on the type of bean and the temperature. I like mine when they have a nice, crunchy texture.
2. **Final Rinse:** Give your bean sprouts a final rinse with cool water. This removes any remaining seed husks.
3. **Sunlight Exposure (Optional):** If you want to green up your bean sprouts, you can expose them to indirect sunlight for a few hours before harvesting. This will increase their chlorophyll content and give them a slightly sweeter flavor. Be careful not to expose them to direct sunlight, as this can overheat them.
4. **Harvest and Drain:** Gently remove the bean sprouts from the container. Drain them thoroughly to remove any excess water.
Storing Your Bean Sprouts
Proper storage is essential to keep your bean sprouts fresh and crunchy.
1. **Dry Thoroughly:** The key to long-lasting bean sprouts is to dry them as much as possible. Spread them out on a clean kitchen towel or paper towels and gently pat them dry.
2. **Storage Container:** Store the dried bean sprouts in an airtight container lined with a paper towel. The paper towel will absorb any excess moisture.
3. **Refrigerate:** Store the container in the refrigerator.
4. **Shelf Life:** Properly stored bean sprouts will last for about 5-7 days in the refrigerator. Check them regularly for any signs of spoilage.
Troubleshooting
Sometimes things don’t go exactly as planned. Here are a few common issues and how to address them:
* **Mold Growth:** Mold is usually caused by insufficient rinsing or poor ventilation. If you see mold, discard the entire batch. To prevent mold, make sure to rinse and drain the beans thoroughly at least twice a day, and ensure your container has adequate ventilation.
* **Slow Sprouting:** Slow sprouting can be caused by cold temperatures or old seeds. Try moving your sprouting container to a warmer location. If your seeds are old, they may have a lower germination rate.
* **Rotting Beans:** Rotting beans are usually caused by overwatering or poor drainage. Make sure to drain the beans thoroughly after each rinse.
* **Bitter Taste:** A bitter taste can be caused by exposing the bean sprouts to too much sunlight. Keep them in a dark place during the sprouting process.
Tips and Tricks for Sprouting Success
Here are a few extra tips to help you grow the best bean sprouts ever!
* **Use Fresh Seeds:** Fresh seeds have a higher germination rate.
* **Maintain Consistent Temperatures:** Bean sprouts prefer a temperature of around 70-75°F (21-24°C).
* **Don’t Overcrowd:** Don’t overcrowd your sprouting container. Give the beans enough space to expand.
* **Experiment with Different Beans:** Try sprouting different types of beans to find your favorite.
* **Use Filtered Water:** Filtered water helps prevent mineral buildup and keeps your sprouts clean.
* **Enjoy Your Harvest!** Add your homegrown bean sprouts to salads, sandwiches, stir-fries, soups, and more!
Section: Choosing the Right Container
Let’s delve a bit deeper into selecting the perfect container for your bean sprouting adventure. As I mentioned earlier, you have several options, each with its own pros and cons.
Mason Jars with Sprouting Lids
This is my personal favorite. Mason jars are readily available, easy to clean, and the sprouting lids provide excellent drainage and ventilation.
* **Pros:** Easy to find, affordable, reusable, good drainage and ventilation.
* **Cons:** Can be a bit small for larger batches of sprouts.
Plastic Containers with Drainage Holes
These are a good option if you want to grow larger batches of sprouts. Just make sure the plastic is food-grade and BPA-free.
* **Pros:** Can accommodate larger batches, often more affordable than sprouting kits.
* **Cons:** Requires drilling drainage holes, can be difficult to clean thoroughly.
Store-Bought Sprouting Kits
These kits often come with multiple tiers, allowing you to sprout different types of beans at the same time.
* **Pros:** Convenient, often include multiple tiers, good drainage and ventilation.
* **Cons:** Can be more expensive than other options, may take up more space.
DIY Colander Method
This is a very simple and affordable method. You can use a regular kitchen colander lined with cheesecloth or a clean kitchen towel.
* **Pros:** Very affordable, readily available.
* **Cons:** Requires more attention to ensure proper drainage and prevent drying out.
No matter which container you choose, make sure it’s clean and provides adequate drainage and ventilation.
Section: Bean Selection Deep Dive
While mung beans are the classic choice for sprouting, don’t be afraid to experiment! Different beans offer unique flavors and textures.
Mung Beans
The most common and easiest to sprout. They have a mild,
Conclusion
So, there you have it! Growing your own bean sprouts at home is not only incredibly easy and cost-effective, but it also provides you with a constant supply of fresh, nutritious sprouts right at your fingertips. Forget those limp, sad-looking sprouts from the grocery store – with this simple container gardening method, you’ll be enjoying crisp, flavorful bean sprouts in just a few days.
This DIY trick is a must-try for several reasons. First, it’s incredibly sustainable. You’re reducing your reliance on commercially grown produce, minimizing transportation costs, and cutting down on plastic packaging. Second, you have complete control over the growing environment, ensuring that your sprouts are free from harmful pesticides and chemicals. Third, it’s a fantastic way to introduce children to the wonders of gardening and where their food comes from. Finally, and perhaps most importantly, the taste and texture of homegrown bean sprouts are simply superior.
Looking for variations? Absolutely! While mung beans are the most common choice for sprouting, you can experiment with other types of beans and seeds. Try sprouting adzuki beans for a slightly sweeter flavor, or alfalfa seeds for a delicate, grassy taste. You can also adjust the sprouting time to achieve your desired level of crunchiness. For a milder flavor, harvest the sprouts a day or two earlier. For a more intense flavor, let them grow a bit longer. Consider adding a small amount of organic fertilizer to the water during the later stages of sprouting to boost nutrient content. You can also try sprouting in different types of containers. While a jar or plastic container works well, you can also use a sprouting tray or even a colander lined with cheesecloth. The key is to ensure proper drainage and ventilation.
Don’t be intimidated by the process! It’s much simpler than it sounds. With just a few basic supplies and a little bit of patience, you’ll be harvesting your own delicious bean sprouts in no time. This method of bean sprouts container gardening is truly a game-changer for anyone who loves fresh, healthy food.
We highly encourage you to give this DIY bean sprouts container gardening method a try. It’s a rewarding experience that will not only save you money but also provide you with a constant supply of fresh, nutritious sprouts. Once you’ve tried it, we’d love to hear about your experience! Share your tips, tricks, and variations in the comments below. Let’s build a community of sprout enthusiasts and spread the word about this amazing way to grow your own food. Happy sprouting!
Frequently Asked Questions (FAQ)
What kind of beans are best for sprouting?
Mung beans are the most popular and readily available choice for sprouting, and they produce the classic bean sprouts you find in many Asian dishes. However, you can also sprout other types of beans and seeds, such as adzuki beans, alfalfa seeds, radish seeds, broccoli seeds, and even lentils. Each type of bean or seed will have a slightly different flavor and texture, so experiment to find your favorites. Just be sure to use beans and seeds that are specifically intended for sprouting, as some commercially available beans may be treated with chemicals that are not safe for consumption.
How long does it take to grow bean sprouts?
The sprouting process typically takes between 3 to 5 days, depending on the type of bean, the temperature, and the humidity. Mung beans usually sprout within 3 to 4 days. You’ll know they’re ready to harvest when the sprouts are about 2 to 3 inches long and have a small root and a developing leaf. Keep in mind that warmer temperatures will speed up the sprouting process, while cooler temperatures will slow it down.
What if my bean sprouts start to smell bad?
A foul odor is a sign that your bean sprouts are contaminated with bacteria or mold. This can happen if the sprouts are not rinsed frequently enough or if the container is not properly cleaned. If you notice a bad smell, discard the sprouts immediately and start over with a fresh batch. To prevent this from happening, rinse your sprouts at least twice a day with fresh, cool water and make sure your container is clean and well-drained.
How do I store bean sprouts?
Once your bean sprouts are ready to harvest, rinse them thoroughly and drain them well. Store them in an airtight container lined with a paper towel in the refrigerator. The paper towel will help absorb excess moisture and keep the sprouts fresh for up to a week. Be sure to check the sprouts regularly and discard any that show signs of spoilage.
Can I eat the bean sprout roots?
Yes, the roots of bean sprouts are perfectly edible and nutritious. They have a slightly nutty flavor and a crunchy texture. Some people prefer to trim the roots before eating the sprouts, but this is purely a matter of personal preference.
Why are my bean sprouts not sprouting?
There are several reasons why your bean sprouts might not be sprouting. First, make sure you are using fresh, viable beans that are specifically intended for sprouting. Old or damaged beans may not germinate properly. Second, ensure that the beans are properly soaked before sprouting. Soaking helps to soften the outer shell and activate the germination process. Third, make sure the beans are kept moist but not waterlogged during the sprouting process. Overwatering can lead to rot, while underwatering can prevent germination. Finally, ensure that the beans are kept in a dark, well-ventilated location. Light can inhibit germination, while poor ventilation can lead to mold growth.
Are bean sprouts healthy?
Yes, bean sprouts are a very healthy food. They are low in calories and fat and high in vitamins, minerals, and fiber. They are a good source of vitamin C, vitamin K, folate, and manganese. Bean sprouts also contain antioxidants, which can help protect your body against damage from free radicals.
Can I sprout other seeds besides beans?
Yes, you can sprout a wide variety of seeds, including alfalfa, radish, broccoli, clover, and sunflower seeds. Each type of seed will have a different flavor and nutritional profile. The sprouting process is generally the same for all types of seeds, but the soaking and sprouting times may vary.
How do I prevent mold from growing on my bean sprouts?
The key to preventing mold growth is to ensure proper ventilation and drainage. Rinse your sprouts at least twice a day with fresh, cool water and make sure the container is well-drained. Avoid overcrowding the container, as this can restrict airflow. You can also add a small amount of vinegar to the rinsing water to help inhibit mold growth. If you notice any signs of mold, discard the sprouts immediately.
Can I grow bean sprouts in direct sunlight?
No, bean sprouts should be grown in a dark or dimly lit location. Direct sunlight can inhibit germination and cause the sprouts to become bitter. A cupboard, pantry, or even a covered container will work well.
What is the best temperature for sprouting bean sprouts?
The ideal temperature for sprouting bean sprouts is between 70 and 80 degrees Fahrenheit (21 to 27 degrees Celsius). Warmer temperatures will speed up the sprouting process, while cooler temperatures will slow it down. Avoid exposing the sprouts to extreme temperatures, as this can inhibit germination or lead to spoilage.
How do I use bean sprouts in cooking?
Bean sprouts can be used in a variety of dishes, both raw and cooked. They are a popular addition to salads, sandwiches, and wraps. They can also be stir-fried, steamed, or added to soups and stews. Bean sprouts add a crunchy texture and a mild, slightly nutty flavor to any dish. Be sure to wash them thoroughly before using them.
Leave a Comment