
Potato gardening bags are your secret weapon to unlocking a bountiful harvest, even if you’re short on space or lack a traditional garden! Have you ever dreamed of digging up your own homegrown potatoes, bursting with flavor and freshness? Well, dream no more! This DIY guide will walk you through creating your very own potato gardening bags, a simple and effective method that’s been gaining popularity among urban gardeners and seasoned pros alike.
While the exact origins of potato gardening bags are a bit hazy, the concept of container gardening itself has deep roots, dating back to ancient civilizations who utilized pots and raised beds to cultivate plants in challenging environments. Today, the spirit of innovation lives on! We’re constantly seeking clever ways to maximize our yields and connect with nature, even in the smallest of spaces.
Why should you embrace this DIY trick? Because potato gardening bags offer a fantastic solution for anyone facing limited space, poor soil conditions, or simply wanting a more controlled growing environment. Imagine the satisfaction of harvesting fresh, organic potatoes right from your balcony or patio! Plus, it’s a fun and rewarding project that the whole family can enjoy. I’m excited to share these easy-to-follow steps, so you can start growing your own delicious potatoes in no time!
DIY Potato Gardening Bags: Grow Your Own Spuds Anywhere!
Hey there, fellow gardening enthusiasts! I’m so excited to share one of my favorite DIY projects with you: creating your own potato gardening bags! This is a fantastic way to grow potatoes, even if you don’t have a traditional garden plot. It’s perfect for balconies, patios, or even small yards. Plus, it’s a super rewarding experience to harvest your own homegrown potatoes. Let’s get started!
What You’ll Need:
Before we dive in, let’s gather all the necessary materials. This will make the process smoother and more enjoyable.
* Heavy-duty Woven Polypropylene Bags (Grow Bags): These are the ideal choice. Look for bags that are at least 20 gallons in size. The bigger, the better, as potatoes need room to grow. You can find these at most garden centers or online. Avoid using thin plastic bags, as they won’t hold up well and won’t provide adequate drainage.
* Potting Mix: Use a high-quality potting mix specifically formulated for vegetables. Avoid using garden soil directly, as it can compact and hinder drainage. A mix of peat moss, perlite, and compost works wonders.
* Seed Potatoes (Certified Disease-Free): These are potatoes specifically grown for planting. You can find them at garden centers in early spring. Choose varieties that are well-suited to your climate. Popular choices include Yukon Gold, Russet, and Red Pontiac.
* Sharp Knife or Pruning Shears: For cutting the seed potatoes.
* Watering Can or Hose: For watering your potato plants.
* Fertilizer (Optional): A balanced slow-release fertilizer can help boost potato growth.
* Gloves: To protect your hands.
* Trowel or Small Shovel: For planting the potatoes.
Preparing Your Seed Potatoes:
This step is crucial for maximizing your potato yield.
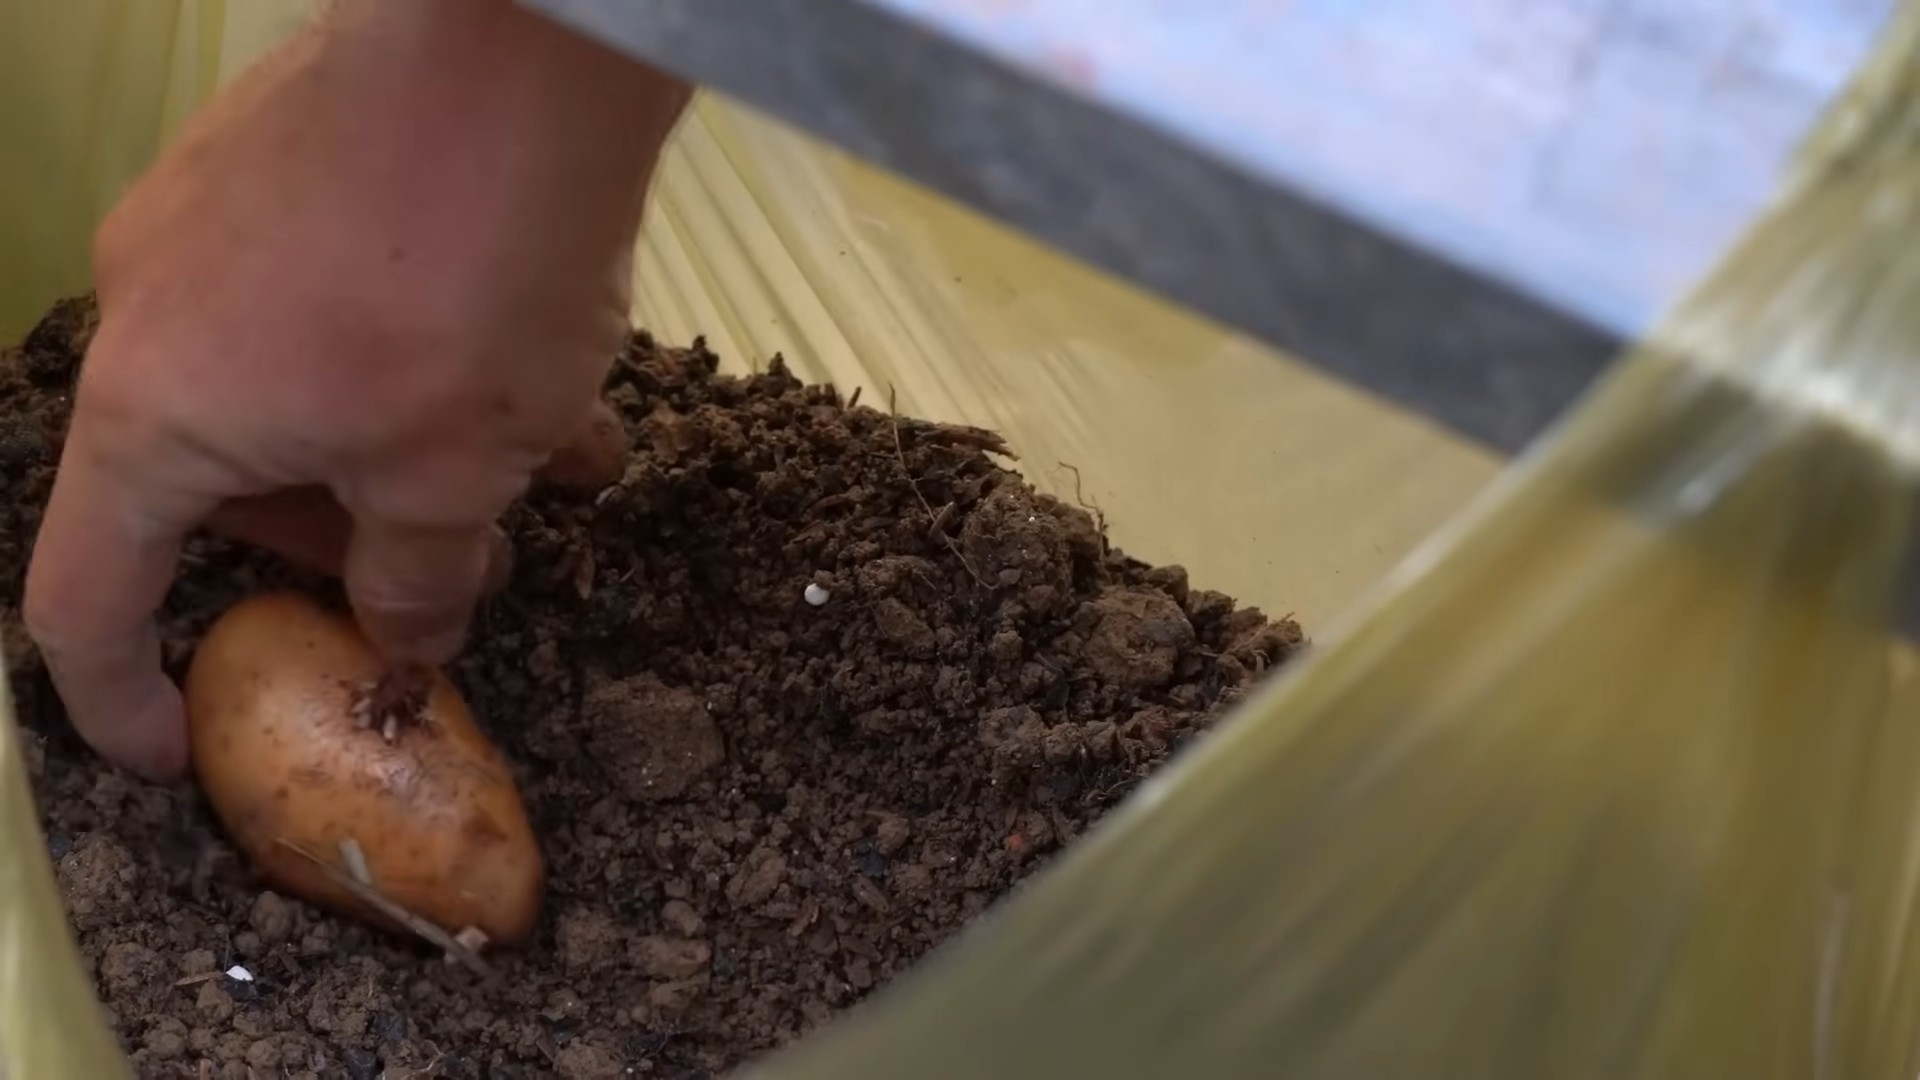
* Chitting (Sprouting): This process encourages the seed potatoes to sprout before planting. Place the seed potatoes in a cool, bright location (but not direct sunlight) for a few weeks before planting. You’ll notice small “eyes” or sprouts starting to emerge. This gives your potatoes a head start.
* Cutting (If Necessary): If your seed potatoes are large (bigger than an egg), you can cut them into smaller pieces. Each piece should have at least 2-3 “eyes” or sprouts. Let the cut pieces dry for a day or two to callous over. This helps prevent rotting. I usually cut mine into pieces about the size of a golf ball.
Step-by-Step Instructions: Planting Your Potatoes
Now for the fun part! Let’s get those potatoes in the ground (or, in this case, in the bag!).
1. Prepare the Bag: Roll down the top edge of the grow bag a few times to create a sturdy rim. This will make it easier to add soil and manage the plant as it grows.
2. Add Initial Soil Layer: Fill the bottom of the bag with about 4-6 inches of potting mix. This will provide a base for the potato roots to grow.
3. Plant the Seed Potatoes: Place the seed potato pieces (sprout-side up) on top of the soil layer, spacing them evenly. If you’re using a large bag, you can plant 3-4 seed potatoes.
4. Cover with Soil: Cover the seed potatoes with another 4-6 inches of potting mix. Gently pat down the soil.
5. Water Thoroughly: Water the bag thoroughly until the water drains out of the bottom. This will help settle the soil and encourage root growth.
6. Place in a Sunny Location: Potatoes need at least 6-8 hours of sunlight per day. Choose a location that receives plenty of sunshine.
7. Wait for Sprouts: Be patient! It may take a week or two for the potato plants to emerge from the soil.
“Hilling” Your Potatoes: The Secret to a Bountiful Harvest
This is where the magic happens! “Hilling” is the process of adding more soil to the bag as the potato plants grow. This encourages the plant to produce more potatoes along the stem.
1. Observe Growth: Once the potato plants have grown about 6-8 inches tall, it’s time to start hilling.
2. Add More Soil: Add more potting mix to the bag, covering the stem of the plant, leaving only the top few leaves exposed.
3. Repeat the Process: Continue to add soil every 2-3 weeks as the plants grow taller. You’ll essentially be burying the stem of the plant each time. This encourages the plant to produce more potatoes along the buried stem.
4. Water Regularly: Keep the soil consistently moist, but not waterlogged. Water deeply whenever the top inch of soil feels dry.
5. Fertilize (Optional): If you choose to fertilize, apply a balanced slow-release fertilizer according to the package directions. I usually fertilize every 4-6 weeks.
Caring for Your Potato Plants:
A little TLC goes a long way!
* Watering: Potatoes need consistent moisture, especially during hot weather. Check the soil moisture regularly and water deeply when needed.
* Sunlight: Ensure your potato plants receive at least 6-8 hours of sunlight per day.
* Pest Control: Keep an eye out for common potato pests, such as aphids and potato beetles. If you notice any pests, treat them with an appropriate insecticide or organic pest control method. I prefer using neem oil for pest control.
* Weeding: Remove any weeds that may grow in the bag. Weeds can compete with the potato plants for nutrients and water.
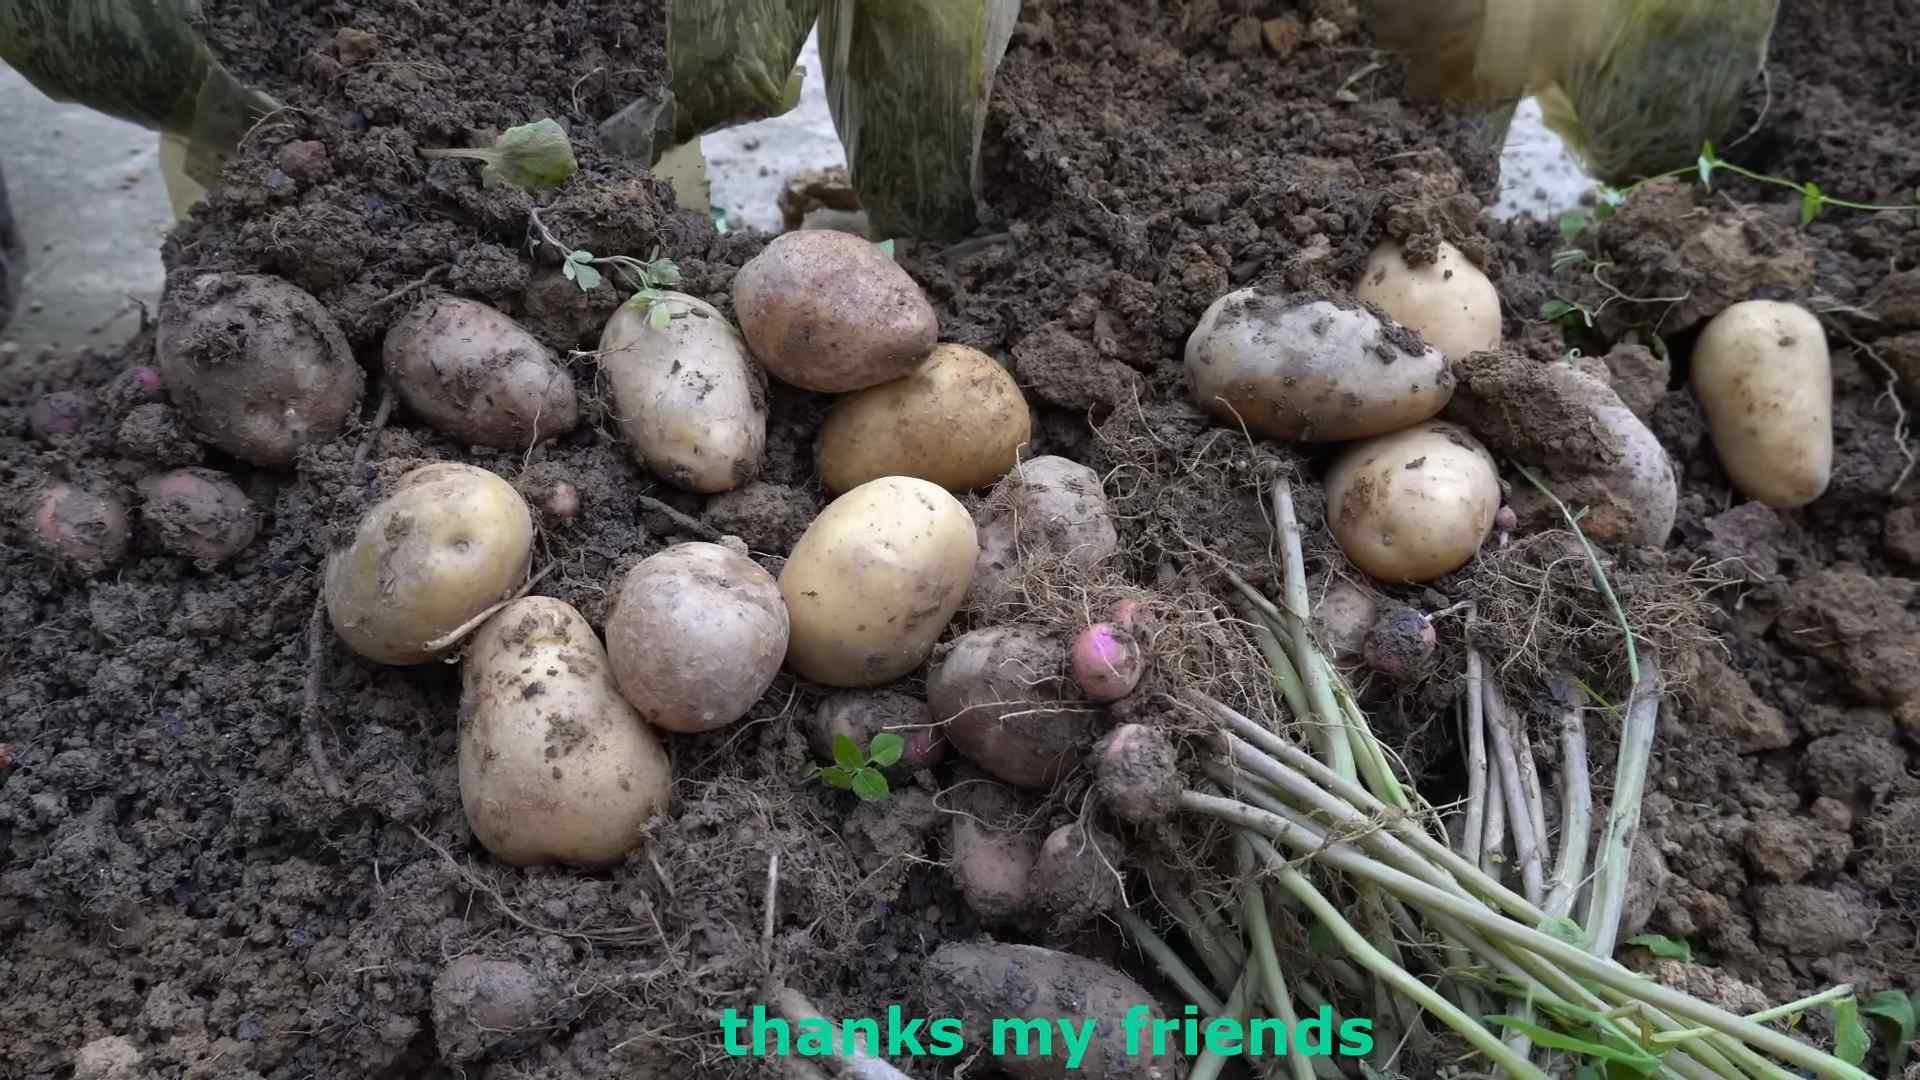
Harvesting Your Potatoes: The Grand Finale!
This is the moment you’ve been waiting for!
1. When to Harvest: Potatoes are typically ready to harvest about 80-100 days after planting. The foliage will start to turn yellow and die back.
2. Stop Watering: About two weeks before harvesting, stop watering the plants. This will help the potatoes to cure and develop a thicker skin.
3. Harvesting: Gently tip the bag over and carefully remove the potatoes from the soil. You can also reach into the bag and feel around for the potatoes.
4. Curing: After harvesting, cure the potatoes by placing them in a cool, dark, and well-ventilated place for about a week. This will help them to develop a thicker skin and prevent rotting.
5. Storage: Store the cured potatoes in a cool, dark, and dry place. They should last for several months.
Troubleshooting: Common Issues and Solutions
Even with the best planning, you might encounter a few hiccups. Here are some common issues and how to address them:
* Potato Blight: This fungal disease can cause brown spots on the leaves and stems. To prevent blight, choose disease-resistant potato varieties and ensure good air circulation around the plants. If blight does occur, treat it with a fungicide.
* Potato Beetles: These pests can defoliate potato plants. Handpick the beetles and larvae off the plants or treat them with an insecticide.
* Poor Drainage: If the soil in the bag is constantly waterlogged, it can lead to root rot. Ensure the bag has adequate drainage holes and avoid overwatering.
* Small Potatoes: If your potatoes are small, it could be due to insufficient sunlight, water, or nutrients. Make sure the plants receive at least 6-8 hours of sunlight per day, water them regularly, and fertilize them if necessary.
Tips for Success:
Here are a few extra tips to help you grow the best potatoes ever!
* Choose the Right Variety: Select potato varieties that are well-suited to your climate and growing conditions.
* Use High-Quality Potting Mix: Avoid using garden soil directly, as it can compact and hinder drainage.
* Water Regularly: Potatoes need consistent moisture, especially during hot weather.
* Hill Your Potatoes: This is the key to maximizing your potato yield.
* Monitor for Pests and Diseases: Keep an eye out for common potato pests and diseases and treat them promptly.
* Be Patient: Growing potatoes takes time and patience. Don’t get discouraged if you don’t see results immediately.
Why I Love Growing Potatoes in Bags:
I’ve been growing potatoes in bags for years, and I absolutely love it! It’s such a convenient and rewarding way to grow your own food, even if you don’t have a lot of space. Plus, it’s a great conversation starter! My neighbors are always curious about my potato bags.
Here’s what I find so great:
* Space-Saving: Perfect for small gardens, balconies, and patios.
* Easy to Manage:
Conclusion
So, there you have it! Creating your own potato gardening bags is not just a cost-effective alternative to store-bought options; it’s a rewarding and empowering experience that puts you in complete control of your potato-growing journey. We’ve walked through the simple steps, highlighting the benefits of using readily available materials and tailoring the size and design to perfectly suit your space and needs.
Why is this DIY trick a must-try? Because it’s more than just saving money. It’s about embracing sustainability by repurposing materials, minimizing waste, and connecting with the earth in a tangible way. It’s about the satisfaction of knowing you built something yourself, something that will nurture life and provide you with delicious, homegrown potatoes. And it’s about the flexibility to adapt your gardening to your specific circumstances, whether you have a sprawling backyard or a tiny balcony.
But the beauty of DIY lies in its adaptability. Feel free to experiment! Try using different types of fabric for your bags. Burlap offers excellent breathability, while heavy-duty canvas provides extra durability. Consider adding drainage holes to the bottom of your bags if you live in a particularly wet climate. You could even get creative with the design, painting your bags with fun patterns or adding handles for easier transport.
For those looking to maximize space, consider creating tiered potato gardening bags. Simply sew multiple smaller bags together, one on top of the other, to create a vertical growing system. This is a fantastic option for balconies or patios where ground space is limited. Another variation is to incorporate a viewing window into the side of your bag. This allows you to monitor the potato growth without disturbing the soil, giving you a sneak peek at your harvest in progress.
Don’t be intimidated by the prospect of sewing. Even if you’re a complete beginner, this project is incredibly forgiving. Imperfect stitches only add character! The most important thing is to create a sturdy and functional bag that will support your growing potatoes.
We are confident that once you try this DIY potato gardening bag method, you’ll be hooked. The sense of accomplishment, the cost savings, and the delicious reward of homegrown potatoes are simply unbeatable.
So, grab your materials, unleash your creativity, and get ready to grow some amazing potatoes! We can’t wait to hear about your experiences. Share your photos, tips, and variations in the comments below. Let’s build a community of DIY potato gardeners and inspire each other to grow our own food, one bag at a time. Happy gardening!
Frequently Asked Questions (FAQ)
What kind of fabric is best for potato gardening bags?
The best fabric for your potato gardening bags depends on your priorities. Burlap is a popular choice because it’s breathable, allowing for good air circulation and drainage. However, it may not be as durable as other options. Heavy-duty canvas is a more durable choice, but it may not be as breathable. You can also use recycled materials like old tarps or feed sacks, but make sure they are clean and free of any harmful chemicals. Consider the climate you live in. If you live in a very wet climate, a more breathable fabric like burlap might be preferable to prevent waterlogging. If you live in a drier climate, canvas might be a better choice to retain moisture. Ultimately, the best fabric is one that is readily available, affordable, and suits your specific needs.
How big should my potato gardening bags be?
The ideal size for your potato gardening bags depends on the variety of potatoes you’re growing and the amount of space you have available. A good starting point is a bag that is approximately 18-24 inches in diameter and 18-24 inches tall. This size will provide enough room for the potato plants to grow and develop a good yield. However, if you’re growing smaller varieties of potatoes, you can get away with smaller bags. Conversely, if you’re growing larger varieties or want to maximize your yield, you may want to opt for larger bags. Remember to consider the weight of the bag when it’s filled with soil and potatoes. Make sure you can easily move it if necessary.
How often should I water my potato gardening bags?
The frequency of watering your potato gardening bags will depend on several factors, including the weather, the type of fabric you’re using, and the size of your plants. As a general rule, you should water your potato plants when the top inch of soil feels dry to the touch. During hot, dry weather, you may need to water them daily. In cooler, wetter weather, you may only need to water them every few days. Be careful not to overwater your potato plants, as this can lead to root rot. Make sure your bags have adequate drainage to prevent water from pooling at the bottom. A good way to check if your plants need water is to stick your finger into the soil. If the soil feels dry, it’s time to water.
What kind of soil should I use in my potato gardening bags?
The best soil for your potato gardening bags is a well-draining, nutrient-rich potting mix. Avoid using garden soil, as it can be too heavy and compact, which can hinder root growth. Look for a potting mix that contains a blend of peat moss, perlite, and vermiculite. You can also add compost or other organic matter to improve the soil’s fertility and drainage. Potatoes prefer slightly acidic soil, so you can also add a small amount of sulfur to the soil to lower the pH. Before planting, make sure to thoroughly moisten the soil.
How do I “hill” my potatoes in a potato gardening bag?
“Hilling” potatoes is the process of adding more soil around the stems of the plants as they grow. This encourages the plants to produce more potatoes along the buried stems. In a potato gardening bag, you can hill your potatoes by gradually adding more soil to the bag as the plants grow taller. Start by filling the bag with about 4-6 inches of soil and planting your seed potatoes. As the plants emerge, add more soil to the bag, covering the stems up to the bottom leaves. Continue this process every few weeks until the bag is full. This will encourage the plants to produce a larger yield of potatoes.
How do I know when my potatoes are ready to harvest from my potato gardening bags?
The time it takes for potatoes to mature depends on the variety you’re growing. Generally, potatoes are ready to harvest when the plants begin to flower or when the foliage starts to die back. You can harvest “new potatoes” (small, immature potatoes) a few weeks after flowering. To harvest new potatoes, simply reach into the bag and carefully remove a few potatoes from the top layer of soil. For mature potatoes, wait until the foliage has completely died back. Then, carefully dump the contents of the bag onto a tarp and sort through the soil to find your potatoes.
Can I reuse my potato gardening bags?
Yes, you can definitely reuse your potato gardening bags! After harvesting your potatoes, simply empty the bags, clean them thoroughly, and store them in a dry place. If you used burlap bags, you may want to wash them to remove any remaining soil or debris. Before reusing the bags, inspect them for any damage or wear and tear. If necessary, repair any holes or tears. You can also add a fresh layer of soil to the bags before planting your next crop. Reusing your potato gardening bags is a great way to save money and reduce waste.
What are some common problems I might encounter when growing potatoes in bags, and how do I fix them?
Some common problems include pests (like potato beetles), diseases (like blight), and nutrient deficiencies. Regularly inspect your plants for signs of pests or diseases. If you find any, take appropriate action, such as using organic pesticides or fungicides. To prevent nutrient deficiencies, make sure you’re using a nutrient-rich potting mix and fertilizing your plants regularly. Overwatering can also be a problem, so make sure your bags have adequate drainage. If you notice any yellowing or wilting leaves, it could be a sign of overwatering or nutrient deficiency. Adjust your watering schedule and fertilize your plants as needed.

Leave a Comment