
Vinegar Hacks Everyday Life: Unlock the surprising power of this pantry staple! I’m constantly amazed by how versatile vinegar truly is. Forget those expensive, specialized cleaners and solutions – you probably already have the answer sitting in your kitchen cabinet. For centuries, vinegar has been more than just a condiment; it’s been a cleaning agent, a medicinal remedy, and even a beauty secret. From ancient civilizations using it to preserve food to modern households relying on it for everyday cleaning, vinegar’s history is rich and fascinating.
But why should you care about vinegar hacks in your everyday life? Well, think about it: are you tired of harsh chemicals? Do you want to save money? Or maybe you’re just looking for a more eco-friendly way to tackle household chores. This article is your ultimate guide to mastering vinegar hacks everyday life. I’m going to share my favorite tips and tricks for using vinegar to clean, deodorize, and even improve your health. Get ready to be amazed by the sheer number of things this humble liquid can do!
Growing Chayote Squash in Buckets: A Beginner’s Guide
Hey there, fellow gardening enthusiasts! Have you ever considered growing chayote squash? It’s a fantastic, versatile vegetable, and you don’t need a huge garden to enjoy it. I’m going to walk you through how to successfully grow chayote in buckets, even if you’re a complete beginner. Trust me, it’s easier than you think!
Why Grow Chayote in Buckets?
Before we dive in, let’s talk about why bucket gardening is a great option for chayote:
* Space Saving: Perfect for balconies, patios, or small yards.
* Portability: You can move your plants to follow the sun or protect them from harsh weather.
* Controlled Environment: Easier to manage soil quality, watering, and pest control.
* Early Start: You can start your chayote indoors and transplant it later.
What You’ll Need
Okay, let’s gather our supplies. Here’s what you’ll need to get started:
* Chayote Fruit: This is the “seed” – you need a mature chayote fruit with a sprout emerging.
* Large Buckets (5-gallon or larger): Make sure they have drainage holes.
* Potting Mix: A well-draining mix is crucial.
* Trellis or Support Structure: Chayote vines need something to climb on.
* Watering Can or Hose: For regular watering.
* Fertilizer: A balanced fertilizer to feed your plants.
* Gloves: To protect your hands.
* Optional: Garden trowel, pruning shears.
Preparing Your Chayote Fruit
The first step is preparing your chayote fruit for planting. This is probably the most unique part of growing chayote!
1. Choose a Mature Fruit: Look for a chayote fruit that’s starting to sprout. You’ll see a little green shoot emerging from the bottom. This is a sign that it’s ready to plant. If you can’t find one already sprouting, you can encourage sprouting by placing the fruit in a paper bag in a warm, dark place for a few weeks. Keep an eye on it, and mist it lightly with water if it seems dry.
2. Inspect the Sprout: Gently examine the sprout. Make sure it looks healthy and isn’t damaged. A healthy sprout is key to a successful start.
3. Planting the Fruit: You can plant the whole fruit. The fruit itself will provide nutrients to the developing plant.
Preparing Your Buckets
Now, let’s get our buckets ready for planting.
1. Drill Drainage Holes: If your buckets don’t already have them, drill several drainage holes in the bottom. This is essential to prevent waterlogging, which can rot the roots.
2. Add Potting Mix: Fill the buckets with a high-quality potting mix. Leave a few inches of space at the top. Don’t use garden soil, as it can compact and doesn’t drain well in containers.
3. Water the Soil: Lightly water the potting mix until it’s evenly moist but not soggy.
Planting Your Chayote
Alright, time to get our hands dirty and plant that chayote!
1. Position the Fruit: Place the chayote fruit horizontally on top of the potting mix, with the sprout pointing upwards.
2. Cover the Fruit Partially: Gently cover the fruit with more potting mix, leaving the sprout exposed. You want about two-thirds of the fruit buried.
3. Water Gently: Water the soil around the fruit gently, being careful not to disturb the sprout.
4. Provide Support: Insert a small stake or trellis near the sprout to give it something to climb on as it grows. This is important, as chayote vines can get quite long.
Caring for Your Chayote Plants
Now that your chayote is planted, it’s time to provide the care it needs to thrive.
1. Watering: Water regularly, keeping the soil consistently moist but not waterlogged. Check the soil moisture by sticking your finger into the soil. If the top inch feels dry, it’s time to water.
2. Sunlight: Chayote plants need plenty of sunlight – at least 6-8 hours per day. Place your buckets in a sunny location. If you’re starting them indoors, use grow lights to supplement natural sunlight.
3. Fertilizing: Feed your plants with a balanced fertilizer every 2-3 weeks. Follow the instructions on the fertilizer package. You can also use compost tea or other organic fertilizers.
4. Trellising: As the vine grows, train it to climb the trellis or support structure. You may need to gently tie the vine to the trellis in several places.
5. Pruning: Prune the vines as needed to control their size and shape. You can also prune away any dead or yellowing leaves.
6. Pest Control: Keep an eye out for pests like aphids, spider mites, and squash bugs. If you spot any pests, treat them with insecticidal soap or neem oil.
Dealing with Common Problems
Even with the best care, you might encounter some problems. Here are a few common issues and how to address them:
* Yellowing Leaves: This could be a sign of overwatering, underwatering, or nutrient deficiency. Check the soil moisture and adjust your watering accordingly. Fertilize your plants if they seem nutrient-deficient.
* Lack of Fruit: Chayote plants are dioecious, meaning they have separate male and female flowers. You need both male and female flowers for pollination to occur. Sometimes, a plant will only produce one type of flower. If this happens, you may need to hand-pollinate the flowers. To hand-pollinate, use a small brush to transfer pollen from the male flowers to the female flowers.
* Slow Growth: This could be due to insufficient sunlight, poor soil, or cool temperatures. Make sure your plants are getting enough sunlight and that the soil is well-draining and nutrient-rich. If the temperatures are cool, consider moving your plants to a warmer location.
Harvesting Your Chayote
The moment you’ve been waiting for – harvesting your chayote!
1. Harvest Time: Chayote fruits are typically ready to harvest about 3-4 months after planting. The fruits should be firm and green.
2. Harvesting Technique: Use pruning shears or a sharp knife to cut the fruit from the vine. Leave a small stem attached to the fruit.
3. Storage: Store your chayote fruits in a cool, dry place. They can last for several weeks.
Enjoying Your Harvest
Now for the best part – enjoying the fruits (or rather, vegetables!) of your labor. Chayote is incredibly versatile and can be used in a variety of dishes.
* Raw: You can eat chayote raw in salads or as a snack. It has a mild, slightly sweet flavor.
* Cooked: Chayote can be boiled, steamed, baked, or stir-fried. It’s often used in soups, stews, and casseroles.
* Pickled: Pickled chayote is a delicious and tangy treat.
* Stuffed: You can stuff chayote with meat, vegetables, or cheese and bake it.
Tips for Success
Here are a few extra tips to help you succeed with growing chayote in buckets:
* Choose the Right Bucket: Make sure your buckets are large enough to accommodate the chayote’s root system. Five-gallon buckets are a good starting point, but larger buckets are even better.
* Use a High-Quality Potting Mix: Don’t skimp on the potting mix. A well-draining mix is essential for healthy root growth.
* Provide Adequate Support: Chayote vines can get quite heavy, so make sure your trellis or support structure is strong enough to support them.
* Water Regularly: Chayote plants need consistent moisture, especially during hot weather.
* Fertilize Regularly: Feed your plants with a balanced fertilizer to ensure they get the nutrients they need.
* Be Patient: Chayote plants can take a while to start producing fruit. Don’t get discouraged if you don’t see fruit right away. Just keep providing them with the care they need, and they’ll eventually reward you with a bountiful harvest.
Growing chayote in buckets is a rewarding experience. With a little bit of care and attention, you can enjoy fresh, homegrown chayote squash right from your own balcony or patio. Happy gardening!

Conclusion
So, there you have it! These vinegar hacks for everyday life are not just simple tricks; they’re game-changers that can save you time, money, and a whole lot of frustration. From banishing stubborn stains to creating all-natural cleaning solutions, the versatility of vinegar is truly remarkable. We’ve explored how this humble pantry staple can become your secret weapon against grime, odors, and even garden pests.
Why is this a must-try? Because it’s effective, eco-friendly, and incredibly affordable. In a world saturated with expensive and often harsh chemicals, vinegar offers a safe and sustainable alternative. You’ll be amazed at how well it works, often outperforming commercial products at a fraction of the cost. Plus, you’ll be reducing your environmental footprint by opting for a natural solution.
But the possibilities don’t stop here! Feel free to experiment and adapt these vinegar hacks to suit your specific needs. For instance, try infusing your cleaning vinegar with citrus peels for a refreshing scent. Or, add a few drops of essential oil to your laundry rinse for an extra boost of fragrance. You can even create a custom weed killer by combining vinegar with salt and dish soap. The key is to start with the basic principles and then let your creativity guide you.
We’re confident that once you experience the power of these vinegar hacks, you’ll wonder how you ever lived without them. They’re practical, efficient, and surprisingly satisfying. Imagine the satisfaction of removing a stubborn stain with a simple vinegar solution, or the peace of mind knowing that you’re cleaning your home with a safe and natural product.
Don’t just take our word for it, though. We encourage you to try these vinegar hacks for yourself and see the amazing results firsthand. Start with one or two that pique your interest and then gradually incorporate more into your daily routine. You might be surprised at how quickly vinegar becomes an indispensable part of your household arsenal.
We’re eager to hear about your experiences! Share your successes, your challenges, and any variations you discover in the comments below. Let’s create a community of vinegar enthusiasts who are passionate about finding innovative and sustainable solutions for everyday problems. Together, we can unlock the full potential of this amazing natural resource and make our lives a little bit easier, cleaner, and greener. So go ahead, grab that bottle of vinegar and get ready to be amazed! Let us know how these **vinegar hacks** work for you!
Frequently Asked Questions (FAQ)
Is vinegar safe to use on all surfaces?
While vinegar is generally safe and effective, it’s important to exercise caution on certain surfaces. Avoid using vinegar on natural stone surfaces like marble, granite, and travertine, as the acidity can etch and damage them. It’s also best to avoid using vinegar on waxed wood furniture, as it can strip the wax finish. When in doubt, test a small, inconspicuous area first to ensure that the vinegar doesn’t cause any discoloration or damage. For delicate fabrics, dilute the vinegar with water before applying it.
What type of vinegar is best for cleaning?
Distilled white vinegar is the most versatile and commonly recommended type of vinegar for cleaning. It’s clear, inexpensive, and has a consistent acidity level, making it ideal for a wide range of cleaning tasks. Avoid using colored vinegars, such as apple cider vinegar or balsamic vinegar, as they can stain certain surfaces. While apple cider vinegar has its own set of health benefits, it’s not as effective for cleaning as distilled white vinegar.
Can I mix vinegar with bleach?
Absolutely not! Mixing vinegar with bleach is extremely dangerous and can create toxic chlorine gas. This gas can cause severe respiratory irritation, burns, and even death. Always use vinegar and bleach separately and never combine them in the same container or cleaning solution. If you’re using bleach to disinfect a surface, rinse it thoroughly with water before applying vinegar.
How do I get rid of the vinegar smell after cleaning?
The vinegar smell is temporary and usually dissipates within a few hours. To speed up the process, you can open windows and doors to ventilate the area. You can also place a bowl of baking soda in the room to absorb the odor. Another option is to add a few drops of essential oil, such as lemon or lavender, to your cleaning solution to mask the vinegar smell. Once the surface is dry, the vinegar smell should be gone completely.
Can vinegar kill mold?
Yes, vinegar is an effective mold killer, especially for small areas of mold growth. To kill mold with vinegar, spray undiluted white vinegar onto the affected surface and let it sit for at least an hour. Then, scrub the area with a brush and wipe it clean with a damp cloth. For larger mold infestations, it’s best to consult with a professional mold remediation company. Vinegar is most effective on porous surfaces like drywall and wood.
How can I use vinegar in my laundry?
Vinegar can be a great addition to your laundry routine. Add 1/2 cup of white vinegar to your washing machine’s fabric softener dispenser to help soften clothes, reduce static cling, and remove detergent residue. Vinegar can also be used as a pre-treatment for stains. Simply apply a small amount of vinegar directly to the stain and let it sit for 10-15 minutes before washing. Vinegar can also help brighten white clothes and remove odors from smelly towels.
Is vinegar safe for pets and children?
Vinegar is generally considered safe for pets and children when used properly. However, it’s important to keep vinegar out of reach of children and pets, as ingestion can cause stomach upset. When cleaning with vinegar, ensure that the area is well-ventilated and that pets and children are not exposed to concentrated vinegar fumes. If your pet or child accidentally ingests vinegar, contact your veterinarian or poison control center immediately.
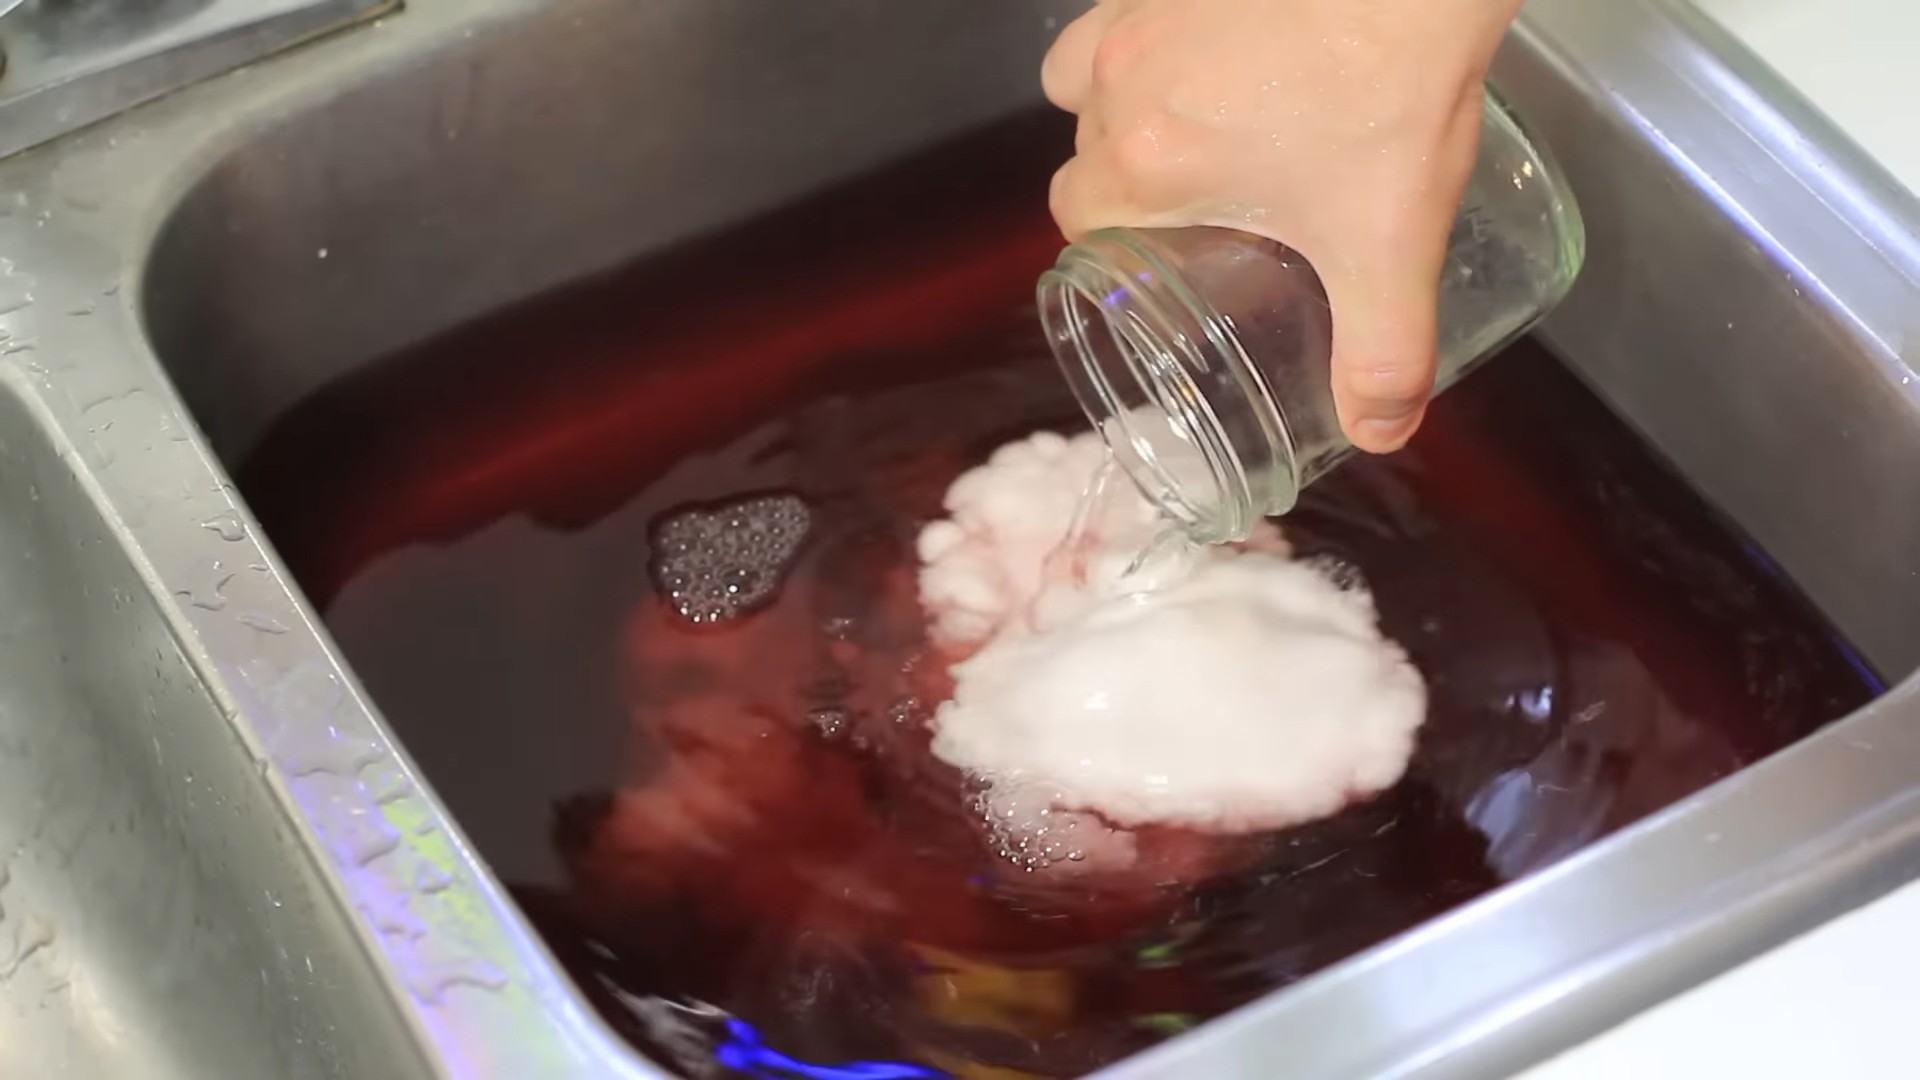
Can vinegar be used to unclog drains?
Yes, vinegar can be used to unclog drains. Pour 1 cup of baking soda down the drain, followed by 1 cup of white vinegar. Let the mixture fizz for 30 minutes, then flush the drain with hot water. This method works best for minor clogs caused by hair, grease, and soap scum. For more severe clogs, you may need to use a drain snake or call a plumber.
How long does vinegar last?
Vinegar has an indefinite shelf life and does not expire. However, the quality of vinegar may degrade over time, especially if it’s not stored properly. To maintain the quality of your vinegar, store it in a cool, dark place in a tightly sealed container. While the appearance of sediment or cloudiness in vinegar is normal and does not affect its safety or effectiveness, you can filter it through a coffee filter if desired.

Leave a Comment