
DIY Kale Bottle Garden: Ever dreamed of fresh, homegrown kale gracing your table, even if you’re short on space or gardening experience? I know I have! Forget sprawling gardens and complicated setups. We’re diving into a super fun and incredibly easy project that will have you harvesting delicious kale in no time – all thanks to a humble plastic bottle!
The beauty of container gardening, and especially upcycling, has roots that stretch back centuries. From ancient hanging gardens to resourceful communities making the most of limited resources, the spirit of growing your own food in creative ways is deeply ingrained in human history. Today, with growing concerns about food security and sustainability, the need for accessible gardening solutions is more important than ever.
Let’s face it, not everyone has a sprawling backyard or the time for extensive gardening. That’s where this DIY Kale Bottle Garden comes in! It’s the perfect solution for apartment dwellers, busy bees, or anyone who wants to enjoy the taste of fresh, organic kale without the hassle. Plus, it’s a fantastic way to reduce waste and give those plastic bottles a new lease on life. So, grab your scissors, some soil, and let’s get growing! I promise, you’ll be amazed at how simple and rewarding this project can be.
DIY Kale Bottle Garden: Your Mini Vegetable Patch for Home
Hello dear garden friends! Do you fancy some fresh kale, even if you don’t have a garden? Then I have just the thing for you: a DIY kale bottle garden! This is not only super easy, but also a great way to reuse plastic bottles and grow delicious vegetables at the same time. Let’s get started!
What you need:
- Empty plastic bottles: 1.5 or 2-liter bottles are best. You will need several, depending on how big you want your garden to be.
- Kale seeds: Available at garden centers or online. Look for organic quality!
- Seed starting mix: Special soil for starting plants.
- Potting soil: Regular potting soil for later transplanting.
- Scissors or knife: For cutting the bottles.
- Drill or nail: For the drainage holes.
- Water: For watering, of course!
- Spray bottle: For watering the seedlings.
- Small stones or gravel: For drainage.
- Optional: Labels and a pen for labeling the bottles.
Step-by-Step Guide:
1. Preparing the Bottles
- Cleaning: First, you need to thoroughly clean the plastic bottles. Remove all labels and rinse them with warm water and dish soap. Make sure no soap residue is left behind.
- Cutting: Now comes the exciting part: cutting the bottles. You have two options:
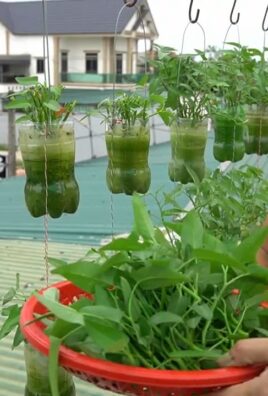
- Option 1 (Hanging Garden): Cut the bottle about 10-15 cm below the bottleneck. You can later insert the upper part (with the bottleneck) upside down into the lower part.
- Option 2 (Standing Garden): Cut the bottle in half. You will get two equal-sized parts that you can use as separate planters.
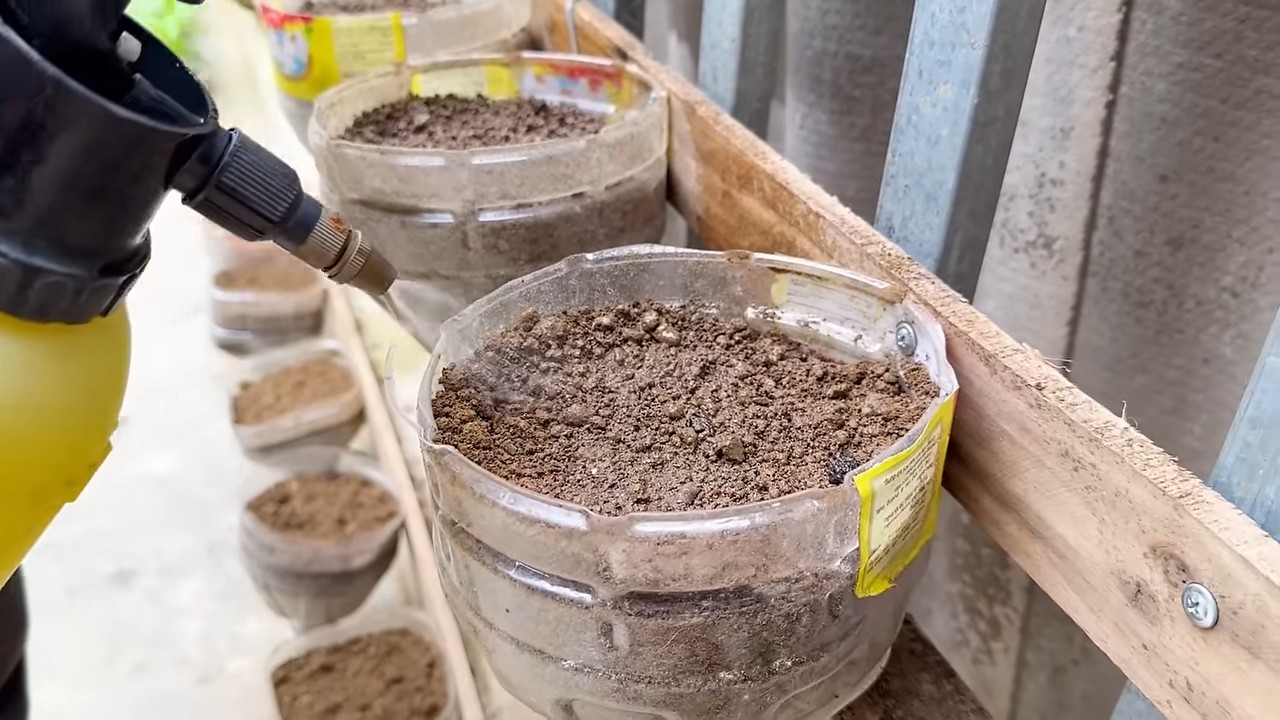
- Drainage Holes: No matter which option you choose, you need drainage holes. Drill or poke several small holes in the bottom of the bottles with a nail. This prevents waterlogging, which could damage the kale.
2. Starting the Kale Plants
- Prepare the seed starting mix: Fill the upper parts of the bottles (with the bottleneck) with seed starting mix. Press the soil down lightly.
- Sowing: Distribute the kale seeds evenly on the soil. Then cover them with a thin layer of seed starting mix (about 0.5 cm).
- Watering: Moisten the soil carefully with a spray bottle. The soil should be damp, but not wet.
- Location: Place the bottles in a bright and warm place. A windowsill is ideal. Avoid direct sunlight, as the seedlings could get scorched.
- Moisture: Keep the soil moist by regularly spraying it with the spray bottle.
- Patience: After a few days (about 5-10), the first seedlings should sprout.
3. Transplanting the Kale Plants
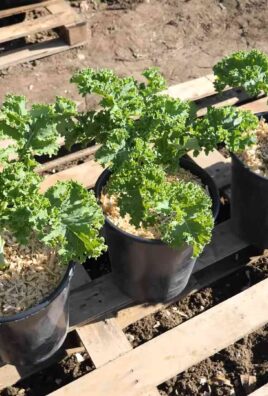
- Preparing the planters: When the kale plants are big enough (about 5-10 cm high), it’s time to transplant them. Fill the lower parts of the bottles (or the halved bottles, depending on which option you chose) with a layer of gravel or small stones for drainage. Then fill the rest of the bottles with potting soil.
- Transplanting: Carefully lift the kale plants out of the seed starting pots. Be careful not to damage the roots. Place the plants in the prepared planters and fill the gaps with potting soil. Press the soil down lightly.
- Watering: Water the plants thoroughly after transplanting.
- Location: Place the plants in a sunny spot. Kale needs a lot of sun to grow well.
- Optional (Hanging Garden): If you chose the hanging option, you can insert the upper part of the bottle (with the bottleneck) upside down into the lower part. Make sure the bottleneck is not sitting in water.
4. Caring for the Kale
- Watering: Water the kale regularly, but avoid waterlogging. The soil should always be slightly moist.
- Fertilizing: Fertilize the kale every few weeks with an organic fertilizer. This ensures healthy growth and a bountiful harvest.
- Pests: Regularly check the plants for pests. If necessary, you can use organic pesticides.
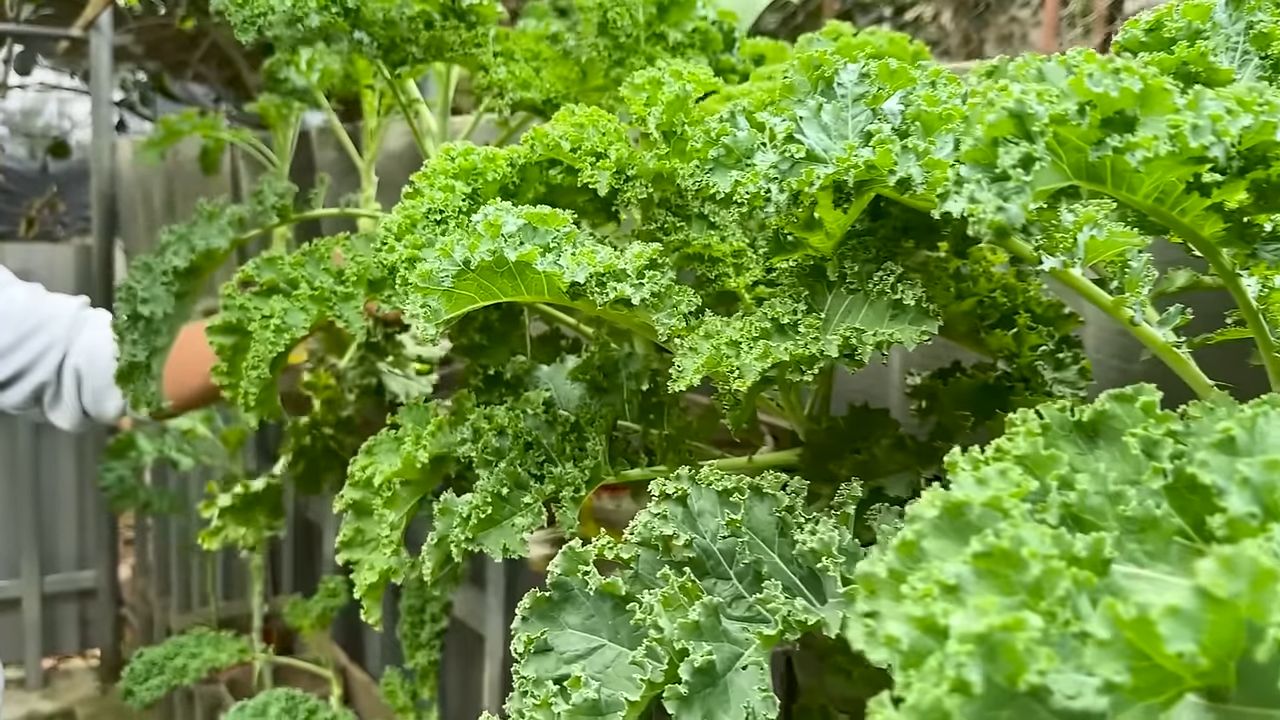
- Harvesting: You can harvest the kale as soon as the leaves are large enough. Cut off the outer leaves and let the inner leaves continue to grow. This way, you can harvest over a longer period.
Additional Tips and Tricks:
- Labeling: Label the bottles with the name of the plant and the sowing date. This helps you keep track.
- Variety: Try out different kale varieties. There are many different types with different flavors and colors.
- Vertical Gardens: If you have limited space, you can attach the bottles to a wall and create a vertical garden. This not only looks great but also saves space.
- Upcycling: Use old yogurt cups or other containers for starting the plants. This saves money and is good for the environment.
- Combinations: Plant other herbs or vegetables in your bottle garden alongside the kale. This provides variety and is good for the plants.
- Winterizing: Kale is relatively hardy. If you leave it outside in the winter, you should cover it with fleece to protect it from frost.
- Sun Protection: On very hot days, it can be useful to protect the plants from direct sunlight to prevent burns.
- Ventilation: Ensure good air circulation to prevent mold growth.
Why a Kale Bottle Garden?
- Sustainability: You recycle plastic bottles and give them a new life.
- Space-saving: Ideal for balconies, patios, or small gardens.
- Fresh ingredients: You always have fresh kale on hand.
- Easy: Also suitable for beginners.
- Decorative: A real eye-catcher!
I hope this guide helps you create your own kale bottle garden. It’s really a great project that is fun and provides you with fresh vegetables. Good luck and have fun gardening! And remember: gardening is like therapy – it’s relaxing and makes you happy! So, get to the bottles and let’s go!
Conclusion
So, there you have it! Transforming a simple plastic bottle into a thriving kale garden is not just a fun project; it’s a sustainable, space-saving, and incredibly rewarding way to enjoy fresh, homegrown greens. This DIY Kale Bottle Garden method offers a fantastic solution for urban dwellers, apartment residents, or anyone with limited gardening space. Forget expensive gardening equipment or large plots of land – all you need are a few recycled bottles, some soil, kale seeds, and a little bit of sunshine to embark on this green adventure.
But why is this DIY trick a must-try? Beyond its simplicity and affordability, it’s about connecting with your food source, reducing waste, and experiencing the joy of nurturing life from a tiny seed. Imagine the satisfaction of harvesting your own crisp, vibrant kale leaves, knowing you grew them yourself in a repurposed bottle! It’s a small act with a big impact, both on your well-being and the environment.
This method is also incredibly versatile. Feel free to experiment with different types of kale – curly kale, lacinato kale (dinosaur kale), or even red Russian kale. You can also try companion planting by adding herbs like basil or thyme to your bottle garden. These herbs not only enhance the flavor of your kale but also help deter pests. Consider painting your bottles with bright colors to add a decorative touch to your balcony or windowsill. Get creative and personalize your DIY Kale Bottle Garden to reflect your own style and preferences.
Furthermore, this project is a fantastic educational opportunity for children. It teaches them about plant life cycles, sustainability, and the importance of healthy eating. Involve them in every step of the process, from planting the seeds to watering the plants and harvesting the kale. It’s a hands-on learning experience that they’ll cherish for years to come.
We understand that embarking on a new DIY project can sometimes feel daunting, but trust us, this one is incredibly easy and beginner-friendly. The steps are straightforward, the materials are readily available, and the rewards are immense. Don’t be afraid to experiment, learn from your mistakes, and most importantly, have fun!
We wholeheartedly encourage you to try this DIY Kale Bottle Garden. It’s a simple yet powerful way to bring a touch of nature into your life, reduce your carbon footprint, and enjoy the delicious taste of homegrown kale. Once you’ve created your own bottle garden, we’d love to hear about your experience! Share your photos, tips, and challenges with us in the comments below. Let’s inspire each other to create a greener, more sustainable world, one bottle garden at a time. We are confident that you will find this DIY Kale Bottle Garden to be a rewarding and enriching experience.
Frequently Asked Questions (FAQ)
What kind of plastic bottles are best for a DIY Kale Bottle Garden?
The best type of plastic bottles to use are those that are food-grade and have a smooth surface. Avoid bottles that have been used to store harsh chemicals or cleaning products. Two-liter soda bottles or larger water bottles are ideal because they provide ample space for the kale roots to grow. Make sure to thoroughly clean the bottles with soap and water before using them. You can also use smaller bottles, but you may need to transplant the kale seedlings to larger containers as they grow. The key is to ensure the bottle is sturdy enough to support the weight of the soil and plants.
How often should I water my DIY Kale Bottle Garden?
The frequency of watering depends on several factors, including the weather, the type of soil you’re using, and the size of your bottle garden. As a general rule, water your kale bottle garden when the top inch of soil feels dry to the touch. Avoid overwatering, as this can lead to root rot. During hot, sunny weather, you may need to water your plants daily. In cooler, cloudier weather, you may only need to water them every few days. A good way to check if your plants need water is to insert your finger into the soil. If the soil feels dry, it’s time to water. When watering, make sure to saturate the soil evenly, allowing excess water to drain out of the drainage holes.
What type of soil should I use for my DIY Kale Bottle Garden?
A well-draining potting mix is essential for a healthy kale bottle garden. Avoid using garden soil, as it can be too heavy and compact, leading to poor drainage and root problems. A good potting mix should contain a blend of peat moss, perlite, and vermiculite. You can also add compost to the mix to provide extra nutrients for your kale plants. Look for a potting mix that is specifically formulated for vegetables or herbs. You can also create your own potting mix by combining equal parts peat moss, perlite, and compost. Make sure the soil is loose and airy to allow for proper root growth.
How much sunlight does my DIY Kale Bottle Garden need?
Kale thrives in full sun, which means it needs at least six hours of direct sunlight per day. If you don’t have a sunny spot in your garden or balcony, you can supplement with artificial light. Grow lights are a great option for indoor gardening, providing the necessary light spectrum for healthy plant growth. Place your kale bottle garden in a south-facing window for maximum sunlight exposure. If you notice your kale plants are becoming leggy or pale, it’s a sign that they’re not getting enough light. Rotate your bottle garden regularly to ensure all sides of the plants receive adequate sunlight.
How do I fertilize my DIY Kale Bottle Garden?
Kale is a heavy feeder, meaning it requires a good amount of nutrients to grow and thrive. Fertilize your kale bottle garden every two to three weeks with a balanced liquid fertilizer. Look for a fertilizer that is specifically formulated for vegetables or leafy greens. Follow the instructions on the fertilizer label carefully to avoid over-fertilizing, which can damage your plants. You can also use organic fertilizers, such as compost tea or fish emulsion. These fertilizers are gentle on the environment and provide essential nutrients for your kale plants. Apply the fertilizer after watering to prevent root burn.
How do I protect my DIY Kale Bottle Garden from pests?
Kale is susceptible to several common garden pests, including aphids, cabbage worms, and flea beetles. To protect your kale bottle garden from pests, you can use several organic methods. Inspect your plants regularly for signs of infestation. If you spot any pests, you can handpick them off the plants or spray them with a strong stream of water. You can also use insecticidal soap or neem oil to control pests. Companion planting can also help deter pests. Planting herbs like basil or thyme near your kale can help repel insects. Covering your bottle garden with netting can also prevent pests from reaching your plants.
How long does it take for kale to grow in a DIY Bottle Garden?
Kale typically takes about 55 to 75 days to mature from seed to harvest. However, you can start harvesting the outer leaves of your kale plants as soon as they are large enough to eat. This allows the inner leaves to continue growing, providing you with a continuous harvest. The exact time it takes for your kale to grow will depend on several factors, including the variety of kale, the growing conditions, and the amount of sunlight it receives. Be patient and monitor your plants regularly. With proper care and attention, you’ll be enjoying fresh, homegrown kale in no time.
Can I grow other vegetables in a bottle garden besides kale?
Absolutely! The bottle garden method is versatile and can be used to grow a variety of other vegetables and herbs. Some popular options include lettuce, spinach, chard, basil, mint, and parsley. When choosing what to grow, consider the size of the plant and the amount of space available in your bottle garden. Smaller, compact varieties are generally best suited for bottle gardens. You can also experiment with different combinations of plants to create a diverse and productive garden. Just make sure to provide each plant with the appropriate amount of sunlight, water, and nutrients.

Leave a Comment