
Growing wheatgrass with water is easier than you might think, and I’m here to show you how! Forget complicated setups and expensive equipment. We’re diving into a simple, soil-free method that will have you enjoying fresh, vibrant wheatgrass in no time.
For centuries, wheatgrass has been celebrated for its incredible health benefits. From ancient Egyptians who revered it for maintaining vitality to modern-day health enthusiasts who swear by its detoxifying properties, this little green powerhouse has a rich history. But accessing it shouldn’t be a hassle! That’s where this DIY trick comes in.
Let’s face it, life is busy. Who has time for complicated gardening projects? But what if you could easily cultivate a nutrient-rich superfood right on your kitchen counter? This method of growing wheatgrass with water is perfect for busy individuals, apartment dwellers, or anyone looking for a quick and easy way to boost their health. Imagine adding freshly harvested wheatgrass juice to your morning smoothie, knowing you grew it yourself with minimal effort. It’s not just about convenience; it’s about taking control of your well-being and enjoying the satisfaction of nurturing something green and healthy. So, are you ready to ditch the soil and discover the magic of water-grown wheatgrass? Let’s get started!

Growing Wheatgrass with Only Water: A Simple DIY Guide
Hello dear plant friends! Today I’m going to show you how you can easily grow wheatgrass at home – using only water! It’s super simple and a great way to always have fresh, healthy greens on hand. Wheatgrass is packed with vitamins and minerals, and growing it yourself is much cheaper than buying it at the store. Let’s get started!
What you need:
- Wheat seeds (preferably specifically for wheatgrass, available at organic stores or online)
- A shallow container (e.g., a baking dish, a tray, or special sprouting trays)
- Water (filtered is ideal, but tap water works too)
- A spray bottle
- A dark place (e.g., a cupboard or a drawer) for the first few days
- A bright place (but not in direct sunlight) for the growth phase
- Optional: Paper towels or seed starting mix (but I’ll show you the version without soil!)
The Ultimate Guide: Growing Wheatgrass Step by Step
Here is a detailed guide to make sure nothing goes wrong:
1. Preparing the Seeds:
- First, you need to wash the wheat seeds thoroughly. Put them in a sieve and rinse them under running water until the water runs clear. This removes dust and dirt.
- Now comes the most important part: Soaking. Put the washed seeds in a bowl and cover them with plenty of water. They should soak for at least 8 hours, or even better, 12-24 hours. This softens the shell and speeds up germination. I usually let mine soak overnight. You will see that the seeds get bigger, which is completely normal.
- After soaking, pour off the water and rinse the seeds thoroughly again.
2. Preparing the Container:
- Clean your container thoroughly with water and dish soap. This prevents mold from forming.
- If you want to use paper towels (optional!), lay several layers on the bottom of the container. This helps to retain moisture. Personally, I find it super easy even without paper towels.
- If you want to use seed starting mix, fill the container about 2-3 cm high with it. Moisten the soil well, but it shouldn’t be dripping wet.
3. Sowing the Seeds:
- Spread the soaked seeds evenly on the bottom of the container. They should be close together, but not on top of each other. It’s better if they form a single layer.
- If you are using paper towels, spray the seeds and the paper with water so that everything is well moistened.
- If you are using seed starting mix, make sure the seeds are lightly covered with soil.
4. The Dark Phase:
- Now comes the most important trick for good germination: Darkness. Place the container in a dark place, e.g., in a cupboard, a drawer, or under an inverted bowl.
- Spray the seeds with water at least twice a day to prevent them from drying out. They should always be moist, but not wet.
- This dark phase lasts for about 2-3 days. During this time, the seeds germinate and form small roots.
5. The Growth Phase:
- After 2-3 days, take the container out of the dark. You will see that the seeds have sprouted and formed small, white roots.
- Place the container in a bright place, but not in direct sunlight. A windowsill that is not exposed to harsh sun is ideal.
- Continue to spray the wheatgrass with water at least twice a day. Make sure the bottom is always moist.
- Now it’s time to be patient! The wheatgrass grows relatively quickly.
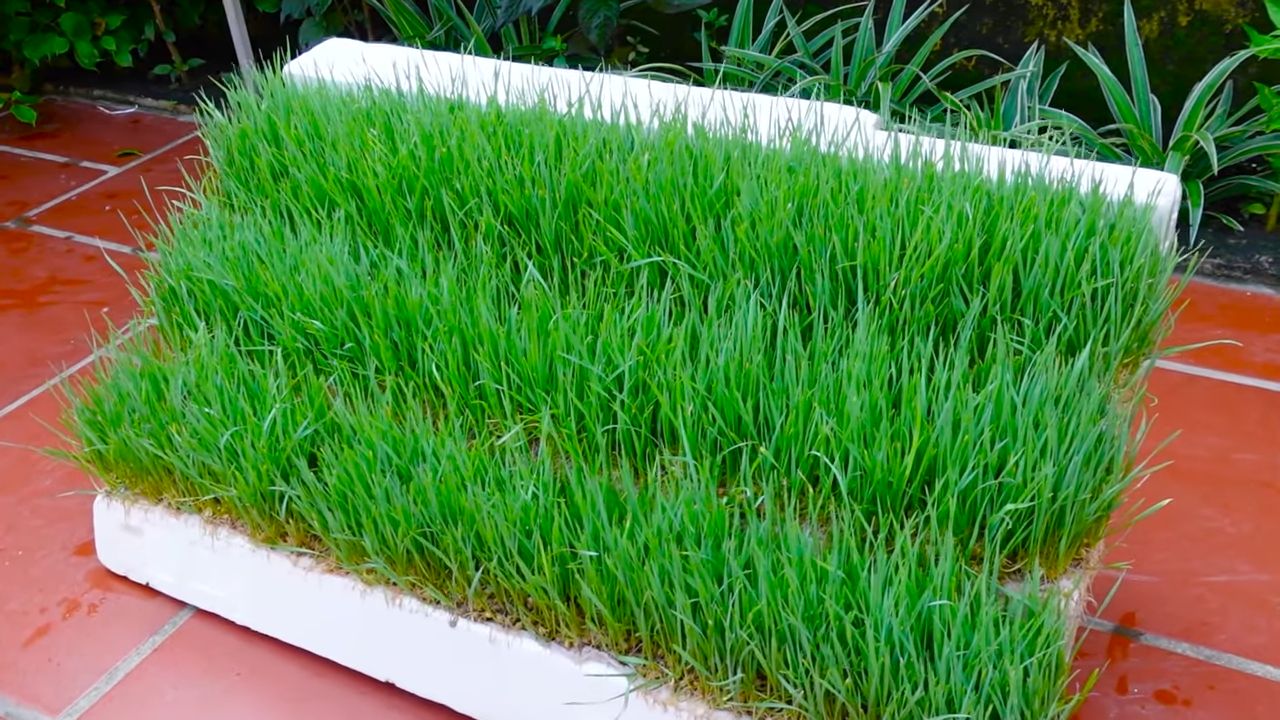
6. The Harvest:
- After about 7-10 days, your wheatgrass is ready to harvest. It should be about 10-15 cm high and have a vibrant green color.
- Cut the wheatgrass with scissors or a knife just above the bottom.
- You can use the wheatgrass immediately or store it in the refrigerator. It will keep there for about 5-7 days.
Uses for Your Wheatgrass:
- Wheatgrass Juice: The classic! Put the wheatgrass in a juicer or blender and press out the juice. It’s best to drink it immediately as it oxidizes quickly.
- Smoothies: Add a handful of wheatgrass to your smoothie. It gives it an extra dose of nutrients.
- Salads: Chop the wheatgrass and add it to your salad.
- As a Garnish: Wheatgrass also looks great as a garnish on plates or buffets.
Common Problems and Solutions:
- Mold: If mold forms, it’s a sign that it’s too damp or there’s not enough ventilation. Carefully remove the mold and ensure better air circulation. Watering less also helps.
- Drying out: If the seeds or wheatgrass dry out, they won’t germinate properly or will die. Spray them with water regularly.
- Slow growth: If the wheatgrass is growing slowly, it could be due to too little light. Move it to a brighter location.
Additional Tips and Tricks:
- Multiple Containers: Sow seeds in several containers at different times so you always have fresh wheatgrass.
- Reuse: You can compost the seed remains after harvesting or use them as fertilizer for other plants.
- Experiment: Try different types of wheat seeds to find out which one you like best.
- Hygiene: Always maintain cleanliness to avoid mold growth.
The Benefits of Growing Wheatgrass at Home
Growing wheatgrass yourself is not only easy but also incredibly rewarding. Here are some of the benefits that I personally appreciate:
- Freshness and Quality: You know exactly what’s in your wheatgrass. No pesticides, no unnecessary additives. Just pure nature.
- Cost-Effectiveness: Buying wheatgrass at the store can be expensive. Growing it yourself is significantly cheaper, especially if you consume it regularly.
- Sustainability: You reduce your ecological footprint because you don’t need long transportation routes.
- Satisfaction: It’s just a great feeling to grow and harvest something yourself. It’s fun and relaxing.
- Health Benefits: Wheatgrass is rich in vitamins, minerals, and antioxidants. It can strengthen the immune system, support detoxification, and boost energy.
Why Wheatgrass is So Healthy
Wheatgrass is a true superfood! It contains an impressive amount of nutrients that can have a positive impact on your health. Here are some of the most important components and their effects:
Vitamins: Wheatgrass contains a variety of vitamins, including Vitamin A, Vitamin C, Vitamin E, and various B vitamins. These vitamins are important for the immune system, skin health, nerve function, and energy metabolism.
Chlorophyll: Wheatgrass is rich in chlorophyll, the green pigment in plants. Chlorophyll is similar in structure to human blood and can improve the body’s oxygen supply, support detoxification, and reduce inflammation.
Conclusion
So, there you have it! Growing your own wheatgrass with just water is not only surprisingly simple, but also incredibly rewarding. Forget expensive juice bar trips and pre-packaged greens that have lost their vibrancy. This DIY method puts the power of fresh, nutrient-packed wheatgrass directly into your hands, allowing you to enjoy its potent health benefits whenever you desire.
Why is this a must-try? Because it’s economical, sustainable, and empowering. You’re in complete control of the growing process, ensuring that your wheatgrass is free from harmful chemicals and pesticides. Plus, the sheer satisfaction of nurturing something from seed to harvest is an experience in itself. Imagine the feeling of snipping those vibrant green blades, knowing you cultivated them yourself!
But the beauty of this method lies in its adaptability. Feel free to experiment with different varieties of wheatgrass seeds to find your preferred flavor profile. Some prefer the sweeter taste of hard red wheat, while others enjoy the slightly more robust flavor of hard white wheat. You can also play around with the growing environment. While indirect sunlight is ideal, you might find that your wheatgrass thrives in a slightly shadier spot, especially during the hotter months.
Consider using different types of trays or containers. While a standard plastic tray works perfectly well, you could also repurpose old takeout containers or even try growing your wheatgrass in a shallow ceramic dish for a more aesthetically pleasing display. Just ensure that your chosen container has adequate drainage to prevent waterlogging.
For those looking to take their wheatgrass game to the next level, consider incorporating a simple sprouting system. These systems often involve stacking trays with drainage holes, allowing you to grow multiple batches of wheatgrass simultaneously and ensure a continuous supply of fresh greens.
Don’t be intimidated by the process. It’s far more forgiving than you might think. Even if you encounter a few hiccups along the way, remember that learning is part of the fun. The key is to be patient, observant, and willing to adjust your approach as needed.
We wholeheartedly encourage you to give this DIY wheatgrass growing method a try. It’s a small investment of time and effort that yields a significant return in terms of health, well-being, and a deeper connection to the natural world. Once you experience the vibrant energy of freshly grown wheatgrass, you’ll wonder why you didn’t start sooner.
And most importantly, we want to hear about your experience! Share your tips, tricks, and triumphs in the comments below. Let us know what worked for you, what challenges you faced, and any creative variations you discovered along the way. Together, we can build a community of wheatgrass enthusiasts and empower each other to embrace a healthier, more sustainable lifestyle. So go ahead, get your hands dirty, and discover the joy of growing your own wheatgrass! Let’s unlock the power of this amazing superfood, one blade at a time. Remember, the key to success is consistent moisture and good air circulation. Happy growing!
Frequently Asked Questions (FAQ)
What exactly is wheatgrass and why should I grow it?
Wheatgrass is essentially the young grass of the common wheat plant. It’s harvested before the wheat kernel forms, making it gluten-free (though those with severe sensitivities should still exercise caution). It’s packed with vitamins, minerals, antioxidants, and enzymes, making it a nutritional powerhouse. People consume it for its potential benefits, including boosting energy levels, detoxifying the body, improving digestion, and strengthening the immune system. Growing it yourself ensures you get the freshest, most potent wheatgrass possible, free from additives or preservatives.
How long does it take to grow wheatgrass from seed to harvest?
Typically, it takes about 7-10 days to grow wheatgrass from seed to harvest. The first 2-3 days are dedicated to soaking and sprouting the seeds. After that, you’ll transfer them to a tray and provide them with water and indirect sunlight. Within a week, you should have a lush, green carpet of wheatgrass ready to be harvested. The ideal height for harvesting is around 4-6 inches.
What kind of seeds should I use for growing wheatgrass?
You’ll want to use hard red winter wheat seeds or hard white winter wheat seeds specifically intended for sprouting or growing wheatgrass. Avoid using seeds that have been treated with fungicides or other chemicals, as these can be harmful to your health. You can find wheatgrass seeds at most health food stores, garden centers, or online retailers. Make sure to purchase organic seeds whenever possible to minimize your exposure to pesticides.
How often should I water my wheatgrass?
Maintaining consistent moisture is crucial for successful wheatgrass growth. You should water your wheatgrass at least once a day, and possibly twice a day in warmer climates or if the soil appears dry. The goal is to keep the soil consistently moist but not waterlogged. Overwatering can lead to mold growth, which can ruin your crop. Use a spray bottle to gently mist the wheatgrass, ensuring that the entire surface is evenly moistened.
What kind of light does wheatgrass need?
Wheatgrass thrives in indirect sunlight. Direct sunlight can scorch the delicate blades and hinder growth. A spot near a window that receives bright, filtered light is ideal. If you don’t have access to natural light, you can use a grow light to supplement. Position the grow light about 12-18 inches above the wheatgrass and keep it on for 12-16 hours per day.
How do I harvest wheatgrass?
Harvesting wheatgrass is simple. Once the blades reach a height of 4-6 inches, use a pair of clean scissors or a sharp knife to cut the grass close to the soil surface. It’s best to harvest your wheatgrass in the morning, as this is when it’s at its peak nutritional value. You can harvest multiple times from the same tray, but the subsequent harvests may be less vigorous.
How do I store harvested wheatgrass?
Freshly harvested wheatgrass is best consumed immediately. However, if you need to store it, you can wrap it in a damp paper towel and place it in a sealed plastic bag in the refrigerator. It will typically stay fresh for up to a week. Be sure to check it regularly for any signs of spoilage.
What if my wheatgrass starts to mold?
Mold growth is a common problem when growing wheatgrass, especially in humid environments. To prevent mold, ensure that your wheatgrass has good air circulation. Avoid overcrowding the seeds in the tray and make sure the soil is not waterlogged. If you notice mold, remove the affected areas immediately. You can also try spraying the wheatgrass with a diluted solution of hydrogen peroxide (1 part hydrogen peroxide to 10 parts water). If the mold is widespread, it’s best to discard the entire batch and start over.
Can I reuse the soil after harvesting wheatgrass?
It’s generally not recommended to reuse the soil after harvesting wheatgrass. The soil will be depleted of nutrients and may contain mold spores or other contaminants. It’s best to start with fresh soil for each batch of wheatgrass. You can compost the used soil to enrich your garden.
Is wheatgrass safe for everyone to consume?
While wheatgrass is generally considered safe for most people, some individuals may experience side effects such as nausea, headaches, or diarrhea, especially when first starting to consume it. It’s best to start with a small amount and gradually increase your intake as tolerated. People with wheat allergies or celiac disease should exercise caution, as wheatgrass may contain trace amounts of gluten. Consult with your doctor before consuming wheatgrass if you have any underlying health conditions or are taking any medications.
Can I grow wheatgrass indoors without soil?
Yes, you can grow wheatgrass hydroponically, which means growing it without soil using a nutrient-rich water solution. This method requires a bit more attention to detail, but it can be a very effective way to grow wheatgrass indoors. You’ll need a hydroponic system, a nutrient solution specifically formulated for wheatgrass, and a grow light.
What are some creative ways to use wheatgrass?
The most common way to consume wheatgrass is by juicing it. You can use a wheatgrass juicer or a regular juicer with a wheatgrass attachment. You can also add wheatgrass to smoothies, salads, or other dishes. Some people even use wheatgrass powder as a dietary supplement. Experiment with different ways to incorporate wheatgrass into your diet and find what works best for you.
Leave a Comment