
Growing Water Spinach Home can be surprisingly easy and rewarding, even if you don’t have a sprawling garden! Have you ever dreamt of snipping fresh, vibrant greens right from your own backyard (or even your windowsill!) to add to your stir-fries or salads? This DIY guide will unlock the secrets to cultivating this delicious and nutritious vegetable, bringing a taste of Southeast Asia right to your table.
Water spinach, also known as kangkong or ong choy, has a rich history, deeply rooted in Asian cuisines for centuries. It’s a staple in many dishes, celebrated for its mild flavor and impressive nutritional profile. But you don’t need to be a seasoned gardener to enjoy its benefits. I’m here to show you how simple it is to achieve success growing water spinach home, regardless of your experience level.
In today’s world, where access to fresh, healthy produce can sometimes be a challenge, having the ability to grow your own food is more valuable than ever. Plus, let’s be honest, there’s something incredibly satisfying about nurturing a plant from seed to harvest. This DIY guide will provide you with practical tips and tricks to overcome common challenges and ensure a bountiful harvest of water spinach. So, let’s get our hands dirty and embark on this exciting gardening adventure together!

Growing Water Spinach (Ong Choy) at Home: A Complete DIY Guide
Hey there, fellow gardening enthusiasts! I’m so excited to share my experience with growing water spinach, also known as Ong Choy, right in my backyard. It’s surprisingly easy, incredibly rewarding, and provides a constant supply of fresh, delicious greens. This guide will walk you through every step, from choosing the right container to harvesting your bounty. Let’s get started!
Choosing Your Growing Method and Materials
Before we dive into the nitty-gritty, let’s decide how you want to grow your water spinach. There are two main methods:
* Water Culture (Hydroponics): This method involves growing the spinach in water without soil. It’s fast, efficient, and perfect if you’re short on space.
* Soil Culture: This is the traditional method, using soil in a container or garden bed. It’s a bit more forgiving for beginners and allows for larger harvests.
For this guide, I’ll cover both methods, so you can choose the one that best suits your needs and preferences.
Materials You’ll Need:
* Water Spinach Seeds or Cuttings: You can find these at most Asian grocery stores or online. Seeds are generally easier to start with.
* Container:
* For Water Culture: A large plastic tub, bucket, or even a repurposed storage container will work. Make sure it’s food-grade and opaque to prevent algae growth.
* For Soil Culture: A pot at least 12 inches deep and wide, or a raised garden bed.
* Growing Medium:
* For Water Culture: None! Just water.
* For Soil Culture: A well-draining potting mix rich in organic matter. I like to use a mix of compost, peat moss, and perlite.
* Nutrient Solution (For Water Culture): A hydroponic nutrient solution specifically formulated for leafy greens.
* Water: Tap water is fine, but letting it sit out for 24 hours to dechlorinate is even better.
* Sunlight: Water spinach needs at least 6 hours of direct sunlight per day.
* Optional:
* Air Pump and Air Stone (For Water Culture): To oxygenate the water and promote healthy root growth.
* pH Meter: To monitor the pH of the water in your hydroponic system.
* Fertilizer (For Soil Culture): A balanced liquid fertilizer to supplement the soil.
Growing Water Spinach in Water (Hydroponics)
This method is super fun and allows you to watch the roots grow!
Preparing the Water Culture System
1. Clean Your Container: Thoroughly wash your container with soap and water to remove any dirt or debris.
2. Drill Holes (Optional): If you’re using a deep container, you might want to drill holes near the top for overflow. This will prevent the water level from getting too high and drowning the plants.
3. Add Water: Fill the container with water, leaving a few inches of space at the top.
4. Add Nutrient Solution: Follow the instructions on your nutrient solution to add the correct amount to the water. A general rule of thumb is to start with a diluted solution and gradually increase the concentration as the plants grow.
5. Install Air Pump and Air Stone (Optional): Place the air stone at the bottom of the container and connect it to the air pump. This will provide oxygen to the roots and prevent them from rotting.
Starting from Seeds
1. Soak the Seeds: Soak the water spinach seeds in warm water for 24 hours to soften the seed coat and improve germination.
2. Prepare Seed Trays: Fill small seed trays or net pots with a sterile growing medium like rockwool or coco coir. Moisten the medium thoroughly.
3. Sow the Seeds: Sow 2-3 seeds per cell or net pot, about 1/4 inch deep.
4. Keep Moist: Cover the seed trays with a clear plastic lid or plastic wrap to create a humid environment. Keep the medium moist by misting it regularly.
5. Germination: The seeds should germinate in 3-7 days. Once they germinate, remove the plastic cover and place the seedlings under a grow light or in a sunny location.
6. Transplant Seedlings: Once the seedlings have developed a few true leaves, they’re ready to be transplanted into your water culture system. Gently remove the seedlings from the seed trays and place them in net pots filled with clay pebbles or another inert growing medium.
7. Place Net Pots in Container: Suspend the net pots in the container so that the roots are submerged in the nutrient solution.
Starting from Cuttings
1. Take Cuttings: Take cuttings from a healthy water spinach plant, about 4-6 inches long. Remove the lower leaves, leaving only a few leaves at the top.
2. Rooting the Cuttings: Place the cuttings in a glass of water. Change the water every day or two.
3. Root Development: Roots should start to develop in a few days. Once the roots are about an inch long, the cuttings are ready to be transplanted into your water culture system.
4. Transplant Cuttings: Place the rooted cuttings in net pots filled with clay pebbles or another inert growing medium.
5. Place Net Pots in Container: Suspend the net pots in the container so that the roots are submerged in the nutrient solution.
Maintaining Your Water Culture System
1. Monitor Water Level: Check the water level regularly and add more water as needed.
2. Change Nutrient Solution: Change the nutrient solution every 1-2 weeks to prevent nutrient deficiencies and algae growth.
3. Monitor pH: The ideal pH for water spinach is between 6.0 and 7.0. Use a pH meter to monitor the pH of the water and adjust it as needed using pH up or pH down solutions.
4. Provide Sunlight: Ensure your water spinach receives at least 6 hours of direct sunlight per day. If you don’t have enough sunlight, you can supplement with a grow light.
5. Control Algae: Algae can be a problem in water culture systems. To prevent algae growth, keep the container opaque, change the nutrient solution regularly, and add a small amount of hydrogen peroxide to the water.
Growing Water Spinach in Soil
This method is more traditional and great if you prefer working with soil.
Preparing the Soil Culture System
1. Choose Your Container: Select a pot that is at least 12 inches deep and wide. Make sure it has drainage holes.
2. Fill with Potting Mix: Fill the pot with a well-draining potting mix rich in organic matter.
3. Water the Soil: Water the soil thoroughly until water drains out of the drainage holes.
Starting from Seeds
1. Soak the Seeds: Soak the water spinach seeds in warm water for 24 hours to soften the seed coat and improve germination.
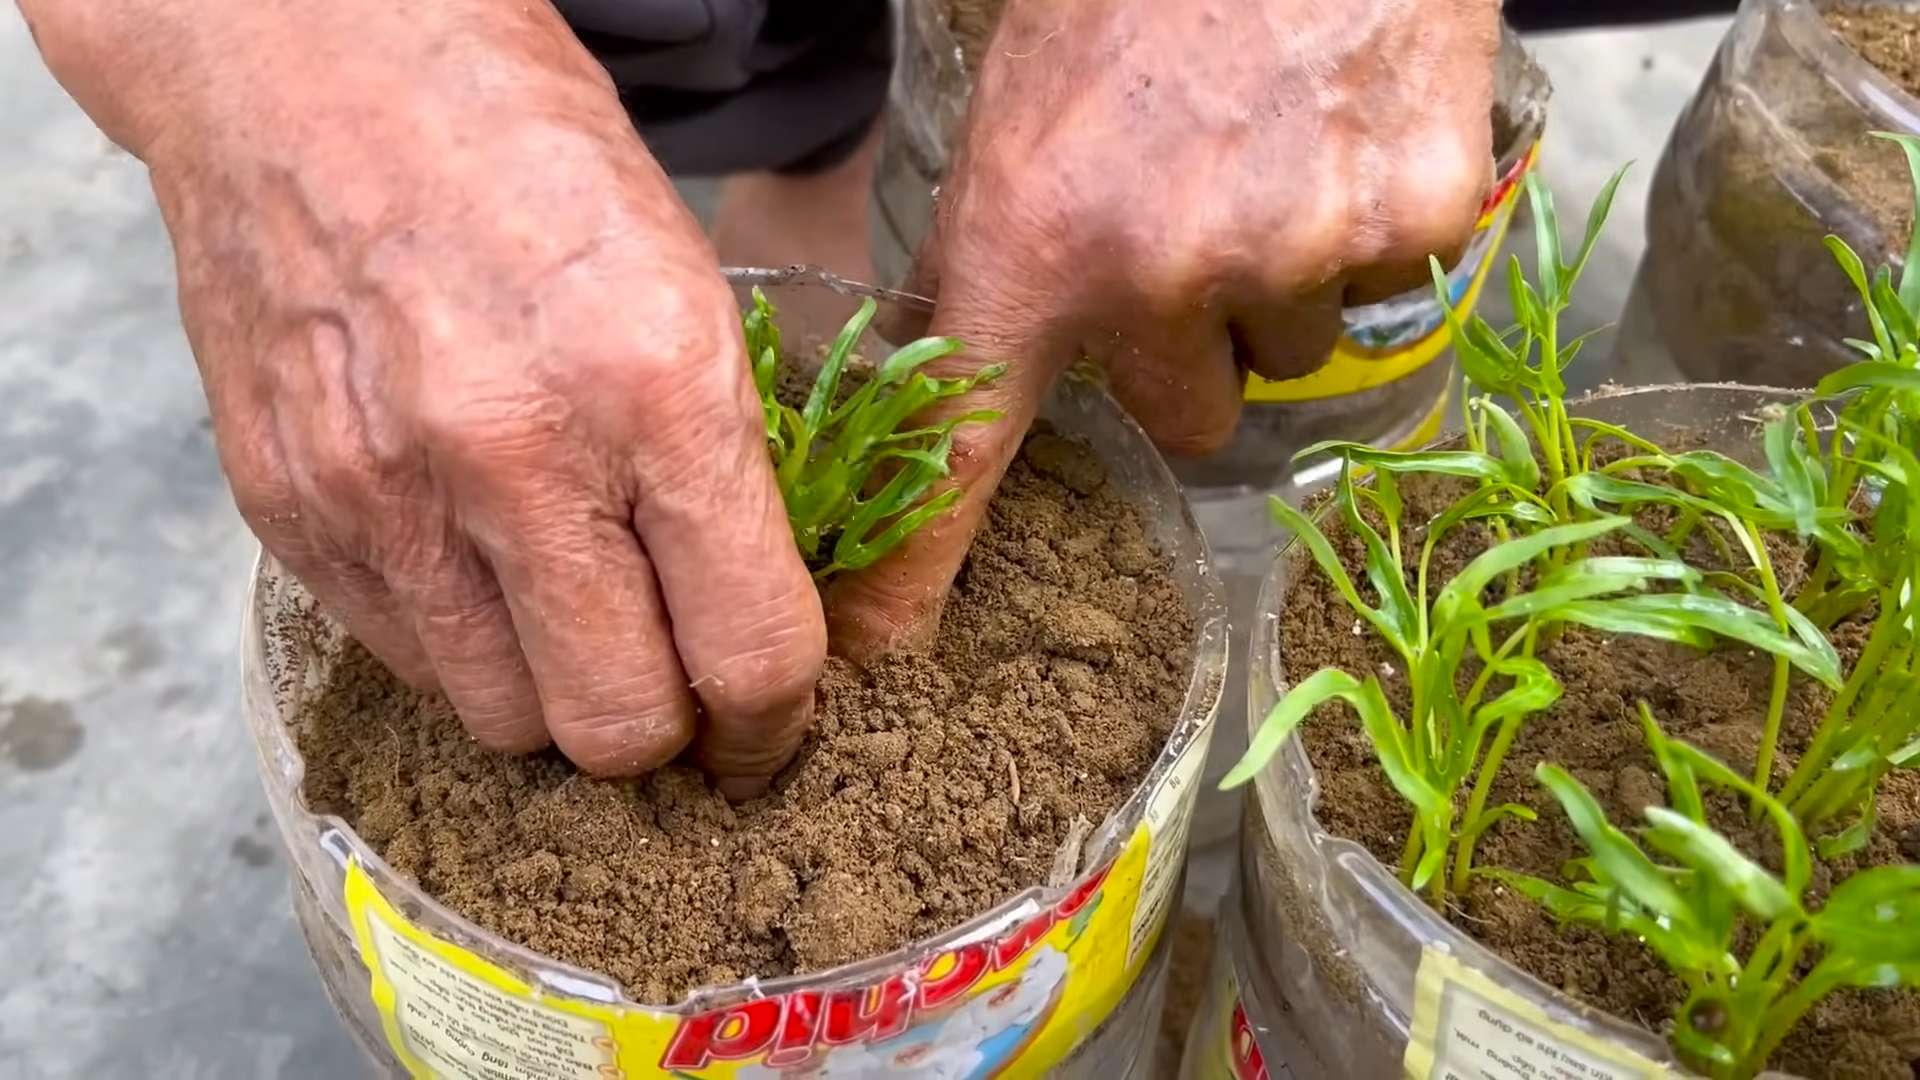
2. Sow the Seeds: Sow the seeds directly into the soil, about 1/2 inch deep and 2 inches apart.
3. Water Gently: Water the soil gently to avoid disturbing the seeds.
4. Keep Moist: Keep the soil moist by watering it regularly.
5. Germination: The seeds should germinate in 7-14 days.
6. Thin Seedlings: Once the seedlings have developed a few true leaves, thin them out so that they are about 6 inches apart.
Starting from Cuttings
1. Take Cuttings: Take cuttings from a healthy water spinach plant, about 4-6 inches long. Remove the lower leaves, leaving only a few leaves at the top.
2. Rooting Hormone (Optional): Dip the cut end of the cuttings in rooting hormone to promote root growth.
3. Plant the Cuttings: Plant the cuttings directly into the soil, about 2 inches deep.
4. Water Gently: Water the soil gently to avoid disturbing the cuttings.
5. Keep Moist: Keep the soil moist by watering it regularly.
6. Root Development: The cuttings should start to root in a few weeks.
Maintaining Your Soil Culture System
1. Water Regularly: Water spinach needs plenty of water, especially during hot weather. Water the soil deeply whenever the top inch feels dry.
2. Fertilize Regularly: Fertilize the water spinach every 2-3 weeks with a balanced liquid fertilizer.
3. Provide Sunlight: Ensure your water spinach receives at least 6 hours of direct sunlight per day.
4. Control Pests: Water spinach can be
Conclusion
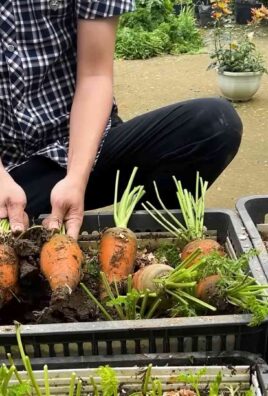
So, there you have it! Growing water spinach at home is not only achievable but also incredibly rewarding. From the vibrant green leaves gracing your plate to the sheer satisfaction of nurturing your own food, this DIY trick is a game-changer for any home cook or gardening enthusiast. Forget those wilted, overpriced bunches at the grocery store; imagine stepping out into your own backyard or balcony and harvesting fresh, crisp water spinach whenever the craving strikes.
This isn’t just about saving money; it’s about connecting with your food on a deeper level. It’s about understanding the journey from seed to table and appreciating the effort that goes into every delicious bite. Plus, you have complete control over the growing process, ensuring that your water spinach is free from harmful pesticides and chemicals.
But the beauty of this DIY project lies in its adaptability. Feel free to experiment with different growing mediums. While we’ve focused on hydroponics and container gardening, you can also try growing water spinach directly in a pond or even a large tub filled with soil. The key is to provide consistent moisture and plenty of sunlight.
Consider adding different nutrients to your water or soil to see how it affects the flavor and growth of your water spinach. Some gardeners swear by adding a diluted seaweed extract, while others prefer a balanced liquid fertilizer. Don’t be afraid to get creative and find what works best for you.
And if you’re feeling adventurous, why not try growing different varieties of water spinach? There are several cultivars available, each with its own unique characteristics. Some are more heat-tolerant, while others are known for their tender leaves. Exploring these variations can add even more excitement to your home gardening journey.
Ultimately, growing water spinach at home is a simple yet profound way to enhance your culinary experience and connect with nature. It’s a project that’s accessible to everyone, regardless of their gardening experience. So, what are you waiting for? Grab some seeds or cuttings, find a sunny spot, and get ready to embark on this exciting adventure.
We’re confident that you’ll be amazed by the results. And once you’ve harvested your first batch of homegrown water spinach, we encourage you to share your experience with us. Post photos of your thriving plants, share your favorite recipes, and let us know what you’ve learned along the way. Together, we can create a community of passionate home gardeners who are dedicated to growing their own delicious and nutritious food. So, go ahead, give this DIY trick a try and discover the joy of growing water spinach at home!
Frequently Asked Questions (FAQ)
What exactly is water spinach, and why should I grow it?
Water spinach, also known as ong choy or kangkong, is a leafy green vegetable popular in Asian cuisine. It’s known for its mild, slightly sweet flavor and its crisp, hollow stems. Growing it yourself ensures you have access to fresh, pesticide-free greens, saves money, and is a rewarding gardening experience. Plus, it grows incredibly fast!
Is growing water spinach at home difficult?
Not at all! It’s surprisingly easy, even for beginners. Water spinach is a resilient plant that thrives in warm, humid conditions and requires minimal maintenance. Whether you choose to grow it hydroponically, in containers, or directly in the ground, the process is straightforward and yields impressive results.
What are the best conditions for growing water spinach?
Water spinach loves sunlight and moisture. Aim for at least 6 hours of direct sunlight per day. Keep the soil or water consistently moist, but not waterlogged. The ideal temperature range is between 70°F and 85°F (21°C and 29°C). If you live in a cooler climate, you can start your water spinach indoors and transplant it outdoors once the weather warms up.
Can I grow water spinach indoors?
Yes, you can! While it prefers outdoor conditions, water spinach can be successfully grown indoors with adequate lighting. Place your plants near a sunny window or use grow lights to provide the necessary illumination. Ensure good air circulation to prevent fungal diseases.
What kind of soil or growing medium should I use?
For container gardening, use a well-draining potting mix that is rich in organic matter. You can also amend your soil with compost or aged manure to improve its fertility. For hydroponic systems, use a nutrient-rich solution specifically designed for leafy greens.
How often should I water my water spinach?
Water spinach needs consistent moisture. Water daily, or even twice a day during hot weather, to keep the soil or water consistently moist. Avoid letting the soil dry out completely, as this can stress the plants and reduce their growth.
When can I harvest my water spinach?
Water spinach is a fast-growing vegetable, and you can typically start harvesting within 4-6 weeks of planting. Harvest the stems and leaves when they are about 6-8 inches long. You can either harvest the entire plant or selectively harvest individual stems, allowing the plant to continue growing and producing more leaves.
How do I harvest water spinach?
Use a sharp knife or scissors to cut the stems about 2 inches above the soil line. This will encourage the plant to produce new shoots and continue growing. You can also pinch off individual leaves as needed.
What are some common problems when growing water spinach, and how can I prevent them?
Some common problems include pests like aphids and spider mites, as well as fungal diseases like powdery mildew. To prevent these problems, ensure good air circulation, avoid overwatering, and inspect your plants regularly for any signs of infestation or disease. If you spot any pests, you can try spraying them with insecticidal soap or neem oil.
How can I use my homegrown water spinach in cooking?
Water spinach is a versatile vegetable that can be used in a variety of dishes. It’s commonly stir-fried with garlic and chili, added to soups and stews, or used in salads. Its mild flavor pairs well with a variety of sauces and seasonings.
Can I grow water spinach from cuttings?
Yes, growing water spinach from cuttings is a very effective method. Simply take cuttings from mature plants, about 6-8 inches long, and place them in water until they develop roots. Once the roots are about an inch long, you can transplant the cuttings into soil or a hydroponic system.
Is water spinach nutritious?
Absolutely! Water spinach is packed with vitamins and minerals, including vitamin A, vitamin C, iron, and calcium. It’s also a good source of fiber and antioxidants. Adding water spinach to your diet can help boost your immune system, improve your digestion, and protect against chronic diseases.
How do I store harvested water spinach?
Store harvested water spinach in the refrigerator in a plastic bag or container. It will stay fresh for several days. To prolong its shelf life, you can wrap the stems in a damp paper towel before storing it in the refrigerator.
Can I grow water spinach in a small space?
Yes, water spinach is well-suited for small-space gardening. You can grow it in containers on a balcony, patio, or even indoors. Choose a container that is at least 12 inches deep and wide to provide enough room for the roots to grow.
What are some variations I can try when growing water spinach?
Experiment with different growing mediums, nutrient solutions, and varieties of water spinach to find what works best for you. You can also try growing water spinach alongside other vegetables, such as tomatoes, peppers, or cucumbers, to create a thriving and diverse garden.

Leave a Comment