
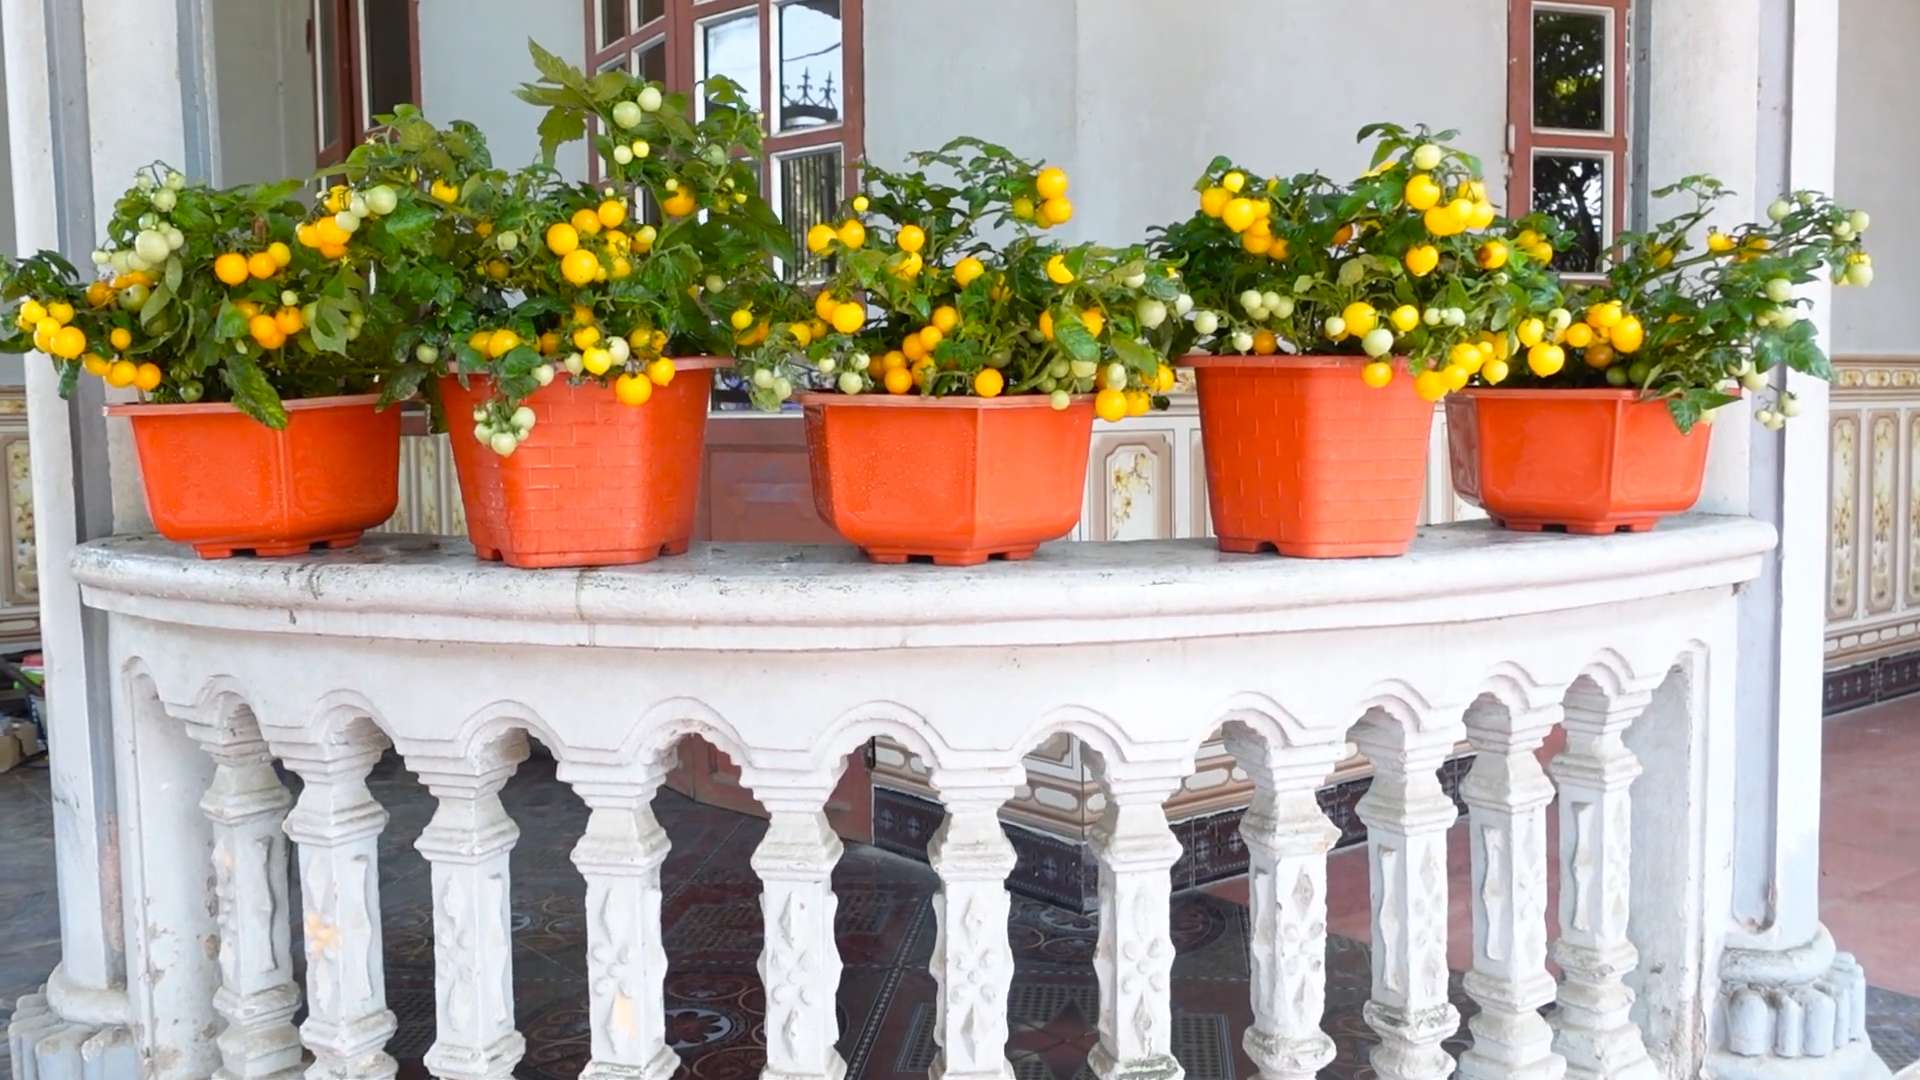
Balcony Gardening Cherry Tomatoes: Imagine stepping onto your balcony and plucking a handful of sweet, juicy cherry tomatoes, bursting with flavor, all grown by your own hand. Sounds idyllic, right? Well, it doesn’t have to be just a dream! For centuries, people have cultivated small gardens in limited spaces, from window boxes in bustling cities to rooftop oases. This tradition speaks to our innate connection with nature and the satisfaction of nurturing life.
But let’s face it, modern life is busy. We crave fresh, healthy food, but often lack the time and space for a sprawling garden. That’s where this DIY guide comes in! I’m going to share some simple yet effective tricks and hacks to help you successfully grow balcony gardening cherry tomatoes, even if you’re a complete beginner. We’ll cover everything from choosing the right containers and soil to providing optimal sunlight and support.
Why cherry tomatoes, you ask? They’re incredibly rewarding! They’re relatively easy to grow, produce abundant yields, and are perfect for snacking, salads, or adding a burst of flavor to your favorite dishes. Plus, there’s nothing quite like the taste of a homegrown tomato, warmed by the sun. So, let’s ditch the store-bought varieties and embark on this exciting journey to create your own miniature tomato paradise on your balcony!
DIY Balcony Cherry Tomato Garden: From Seed to Salsa!
Hey there, fellow balcony gardeners! I’m so excited to share my tried-and-true method for growing delicious, juicy cherry tomatoes right on your balcony. Forget those bland supermarket tomatoes – with a little effort, you can have a constant supply of homegrown goodness for salads, snacks, and even homemade salsa! This guide will walk you through every step, from choosing the right seeds to harvesting your bounty. Let’s get started!
Choosing the Right Cherry Tomato Variety
Before we dive into the nitty-gritty, let’s talk about tomato varieties. Not all cherry tomatoes are created equal, and some are better suited for container gardening than others. Here are a few of my favorites:
* ‘Tiny Tim’: These are super compact and perfect for small balconies. They produce loads of tiny, sweet tomatoes.
* ‘Tumbling Tom’: As the name suggests, these are trailing tomatoes that look fantastic in hanging baskets. They’re prolific producers and easy to harvest.
* ‘Sungold’: These are a classic for a reason! They’re incredibly sweet and flavorful, with a beautiful golden color. They can get a bit leggy, so be prepared to provide support.
* ‘Sweet Million’: These are reliable and produce a huge quantity of small, red tomatoes. They’re also relatively disease-resistant.
* ‘Black Cherry’: For something a little different, try these dark, smoky-flavored tomatoes. They’re a bit more challenging to grow, but the unique taste is worth it.
What You’ll Need: The Essential Supplies
Okay, now that you’ve picked your variety, let’s gather our supplies. Here’s what you’ll need to create your balcony cherry tomato garden:
* Cherry Tomato Seeds: Obviously! Choose a variety that suits your space and taste.
* Seed Starting Trays or Small Pots: These are for starting your seeds indoors.
* Seed Starting Mix: This is a light, sterile mix that’s perfect for delicate seedlings.
* Larger Pots (at least 5 gallons): These will be your tomato plants’ permanent homes.
* Potting Mix: Choose a high-quality potting mix that drains well.
* Tomato Cage or Stakes: Cherry tomato plants can get quite tall and need support.
* Watering Can or Hose: For watering your plants regularly.
* Liquid Fertilizer: A balanced liquid fertilizer will help your plants thrive.
* Gardening Gloves: To keep your hands clean.
* Small Trowel or Shovel: For transplanting seedlings.
* Optional:
* Heat Mat: To speed up germination.
* Grow Lights: If you don’t have a sunny windowsill.
* Mulch: To help retain moisture and suppress weeds.
Starting Your Seeds Indoors: A Step-by-Step Guide
Starting your seeds indoors gives you a head start on the growing season, especially if you live in a cooler climate. I usually start my seeds about 6-8 weeks before the last expected frost.
1. Prepare Your Seed Starting Trays: Fill your seed starting trays or small pots with seed starting mix. Gently press down the soil to remove any air pockets.
2. Sow the Seeds: Make a small indentation (about ¼ inch deep) in the soil. Place 2-3 seeds in each indentation. Cover the seeds with a thin layer of seed starting mix.
3. Water Gently: Water the soil gently using a spray bottle or watering can with a fine rose. You want to moisten the soil without disturbing the seeds.
4. Provide Warmth and Light: Place the seed starting trays in a warm location (around 70-75°F). A heat mat can help speed up germination. If you don’t have a sunny windowsill, use grow lights.
5. Keep the Soil Moist: Check the soil daily and water as needed to keep it consistently moist. Don’t let the soil dry out completely.
6. Wait for Germination: Germination usually takes 5-10 days. Once the seedlings emerge, remove the heat mat and provide plenty of light.
7. Thin the Seedlings: Once the seedlings have their first true leaves (the second set of leaves), thin them out by snipping off the weaker seedlings at the soil line. Leave only one strong seedling per pot or cell.
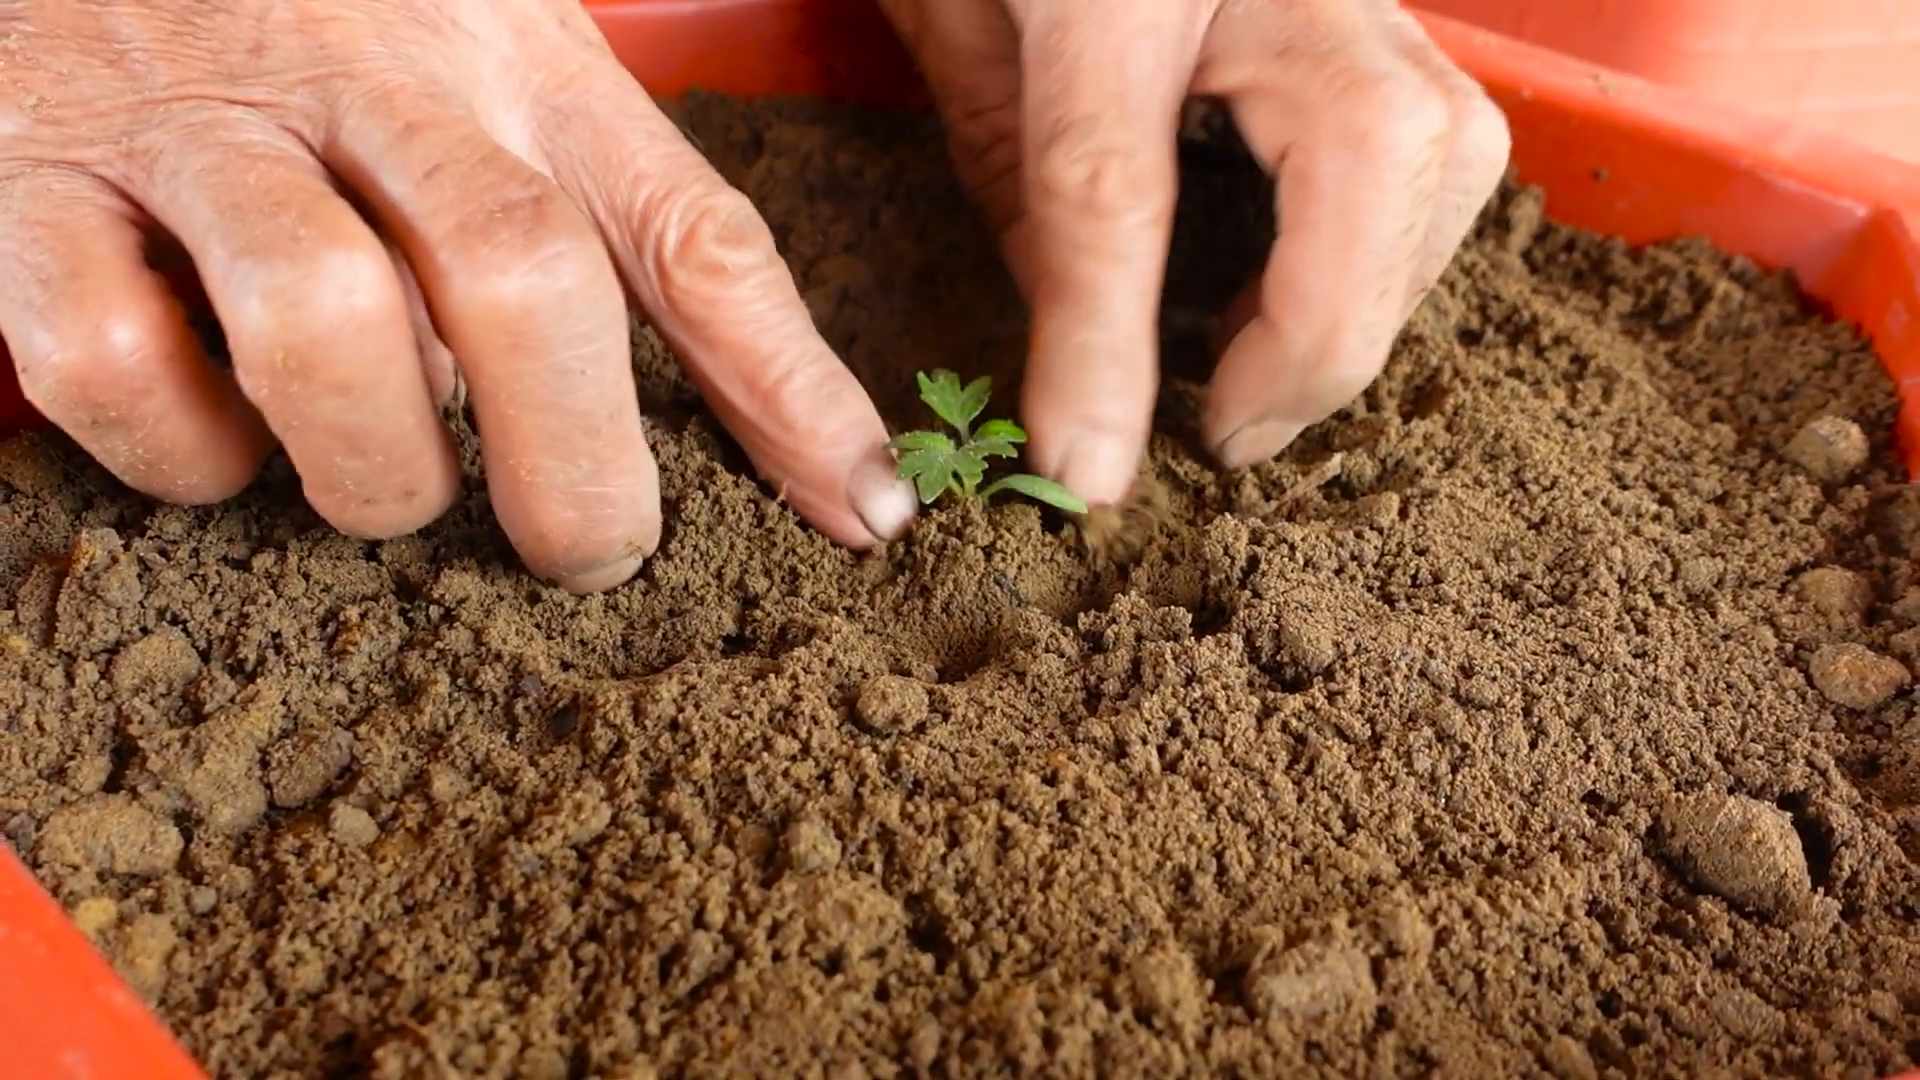
Transplanting Your Seedlings: Moving to Bigger Pots
Once your seedlings have grown a few inches tall and have a strong root system, it’s time to transplant them into larger pots.
1. Harden Off the Seedlings: Before transplanting, you need to “harden off” the seedlings. This means gradually exposing them to outdoor conditions to acclimate them to the sun, wind, and temperature changes. Start by placing the seedlings outdoors in a sheltered location for an hour or two each day, gradually increasing the time over the course of a week.
2. Prepare the Larger Pots: Fill your larger pots (at least 5 gallons) with potting mix. Leave a few inches of space at the top of the pot.
3. Carefully Remove the Seedlings: Gently remove the seedlings from their seed starting trays or small pots. Be careful not to damage the roots. If the seedlings are root-bound (the roots are circling around the bottom of the pot), gently loosen the roots before transplanting.
4. Plant the Seedlings: Dig a hole in the potting mix that’s large enough to accommodate the root ball. Place the seedling in the hole and gently backfill with potting mix. Make sure the top of the root ball is level with the soil surface.
5. Water Thoroughly: Water the newly transplanted seedlings thoroughly.
6. Add Support: Install a tomato cage or stakes to provide support for the growing plants.
Caring for Your Cherry Tomato Plants: The Key to a Bountiful Harvest
Now that your tomato plants are in their permanent homes, it’s time to provide them with the care they need to thrive.
1. Sunlight: Cherry tomato plants need at least 6-8 hours of sunlight per day. Place your pots in a sunny location on your balcony.
2. Watering: Water your tomato plants regularly, especially during hot, dry weather. Water deeply, allowing the water to soak into the soil. Avoid watering the leaves, as this can promote fungal diseases. I usually water in the morning so the leaves have time to dry out during the day.
3. Fertilizing: Feed your tomato plants with a balanced liquid fertilizer every 2-3 weeks. Follow the instructions on the fertilizer label. I like to use a fertilizer that’s specifically formulated for tomatoes.
4. Pruning: Prune your tomato plants to improve air circulation and promote fruit production. Remove any suckers (the small shoots that grow between the main stem and the branches). You can also remove any yellowing or diseased leaves.
5. Pest Control: Keep an eye out for pests such as aphids, whiteflies, and tomato hornworms. If you find any pests, you can try spraying them with insecticidal soap or neem oil. I prefer to pick off tomato hornworms by hand (wear gloves!).
6. Pollination: Tomatoes are self-pollinating, but sometimes they need a little help, especially if you’re growing them indoors or on a balcony where there’s not much wind. You can gently shake the plants or use a small brush to transfer pollen from one flower to another.
Harvesting Your Cherry Tomatoes: The Sweet Reward
The best part of growing cherry tomatoes is, of course, harvesting them!
1. Wait for Ripening: Cherry tomatoes are usually ready to harvest when they’re fully colored and slightly soft to the touch.
2. Gently Pick the Tomatoes: Gently pick the tomatoes from the vine.
3. Enjoy Your Harvest: Eat your cherry tomatoes fresh, add them to salads, or use them to make salsa.
Troubleshooting: Common Problems and Solutions
Even with the best care, you might encounter some problems while growing cherry tomatoes. Here are a few common issues and how to address them:
* Blossom End Rot: This is caused by a calcium deficiency. To prevent blossom end rot, make sure your soil is well-drained and that you’re watering your plants consistently. You can also add calcium to the soil by using bone meal or Epsom salts.
* Fungal Diseases: Fungal diseases such as early blight and late blight can affect tomato plants. To prevent fungal diseases, provide good air circulation, avoid watering the leaves, and use a fungicide if necessary.
* Pests: As mentioned earlier, pests can be a problem. Use insecticidal soap or neem oil to control pests.
Extending the Season: Keeping the Tomatoes Coming
Want to keep harvesting cherry tomatoes for as long as possible? Here are a few tips for extending the
Conclusion
So, there you have it! Transforming your balcony into a thriving cherry tomato haven is not only achievable, but incredibly rewarding. We’ve walked you through the simple steps to cultivate your own delicious, sun-ripened treats right outside your door. Forget those bland, store-bought tomatoes – imagine the burst of flavor from a freshly picked cherry tomato, still warm from the sun, adding a vibrant touch to your salads, snacks, or even just enjoyed straight from the vine.
This DIY balcony gardening trick is a must-try for several reasons. First and foremost, it’s incredibly space-efficient. Even the smallest balcony can accommodate a few well-placed containers, bringing a touch of nature and a bounty of fresh produce to urban living. Secondly, it’s a fantastic way to connect with your food. Knowing exactly where your tomatoes come from and how they were grown adds a layer of satisfaction and appreciation to every bite. Thirdly, it’s surprisingly easy and affordable. With a few basic supplies and a little bit of patience, you can enjoy a continuous harvest of delicious cherry tomatoes throughout the growing season.
But the benefits don’t stop there. Balcony gardening with cherry tomatoes is also a fantastic stress reliever. Tending to your plants, watching them grow, and harvesting your own food can be incredibly therapeutic. Plus, it’s a great way to get some fresh air and sunshine, even if you’re stuck at home.
Ready to take your balcony garden to the next level? Consider experimenting with different varieties of cherry tomatoes. ‘Sungold’ is known for its exceptional sweetness, while ‘Black Cherry’ offers a rich, complex flavor. You can also try growing your tomatoes in hanging baskets for a visually stunning display. Another variation is to companion plant herbs like basil or marigolds alongside your cherry tomatoes. These herbs not only add flavor to your cooking but also help to deter pests and attract beneficial insects.
Don’t be afraid to get creative and personalize your balcony garden to suit your own tastes and preferences. The most important thing is to have fun and enjoy the process.
We are confident that you will find this DIY balcony gardening trick to be a game-changer. It’s a simple, affordable, and rewarding way to bring fresh, delicious cherry tomatoes to your table, no matter how limited your space may be.
So, what are you waiting for? Grab your supplies, get your hands dirty, and start growing your own cherry tomatoes today! We can’t wait to hear about your experiences. Share your photos, tips, and tricks in the comments below. Let’s create a community of balcony gardeners and inspire others to embrace the joy of growing their own food. We are eager to see your balcony gardening cherry tomatoes success!
Frequently Asked Questions (FAQ)
What kind of soil is best for growing cherry tomatoes in containers on a balcony?
The best soil for container-grown cherry tomatoes is a well-draining potting mix specifically formulated for vegetables. Avoid using garden soil, as it can become compacted in containers and hinder drainage. Look for a potting mix that contains ingredients like peat moss, perlite, and vermiculite, which provide good aeration and water retention. You can also amend your potting mix with compost to add nutrients and improve soil structure. A slightly acidic soil pH of around 6.0 to 6.8 is ideal for cherry tomatoes.
How much sunlight do cherry tomatoes need when grown on a balcony?
Cherry tomatoes need at least 6-8 hours of direct sunlight per day to thrive. Choose a location on your balcony that receives the most sunlight. If your balcony doesn’t get enough direct sunlight, you may need to supplement with grow lights. Rotate your tomato plants regularly to ensure that all sides receive adequate sunlight. Insufficient sunlight can lead to leggy growth, reduced fruit production, and bland-tasting tomatoes.
How often should I water my cherry tomato plants on the balcony?
Water your cherry tomato plants deeply and regularly, especially during hot and dry weather. Check the soil moisture level daily by sticking your finger about an inch into the soil. If the soil feels dry, it’s time to water. Water at the base of the plant to avoid wetting the foliage, which can increase the risk of fungal diseases. Avoid overwatering, as this can lead to root rot. The frequency of watering will depend on factors such as the size of your container, the weather conditions, and the type of potting mix you’re using.
What kind of fertilizer should I use for my balcony cherry tomatoes?
Use a balanced fertilizer specifically formulated for tomatoes or vegetables. Look for a fertilizer with an NPK ratio (nitrogen, phosphorus, potassium) of around 5-10-5 or 10-10-10. Fertilize your cherry tomato plants every 2-3 weeks during the growing season, following the instructions on the fertilizer package. You can also use organic fertilizers such as compost tea or fish emulsion. Avoid over-fertilizing, as this can lead to excessive foliage growth and reduced fruit production.
How do I prevent pests and diseases from affecting my balcony cherry tomatoes?
To prevent pests and diseases, start with healthy plants and provide them with optimal growing conditions. Inspect your plants regularly for signs of pests or diseases. Common pests that affect cherry tomatoes include aphids, whiteflies, and tomato hornworms. You can control these pests with insecticidal soap, neem oil, or by handpicking them off the plants. Common diseases that affect cherry tomatoes include early blight, late blight, and blossom end rot. To prevent these diseases, provide good air circulation, avoid wetting the foliage when watering, and use a fungicide if necessary. Consider companion planting with herbs like basil or marigolds, which can help to deter pests and attract beneficial insects.
How do I support my cherry tomato plants as they grow on the balcony?
Cherry tomato plants can become quite large and heavy, so it’s important to provide them with adequate support. Use stakes, cages, or trellises to support your plants as they grow. Insert the support structure into the container when you plant your tomatoes to avoid damaging the roots later. Tie the tomato stems to the support structure with soft twine or plant ties. Prune your tomato plants regularly to remove suckers (the small shoots that grow between the main stem and the branches) to improve air circulation and encourage fruit production.
When is the best time to harvest my balcony cherry tomatoes?
Cherry tomatoes are typically ready to harvest about 60-80 days after planting. The tomatoes should be fully colored and slightly soft to the touch. Gently twist or snip the tomatoes from the vine. Harvest your tomatoes regularly to encourage continued fruit production. Store your harvested tomatoes at room temperature for the best flavor. Avoid refrigerating them, as this can affect their texture and taste.


Leave a Comment