
Thriving Malabar Spinach Tips: Unlock the secrets to a bountiful harvest right in your own backyard! Have you ever dreamed of snipping fresh, vibrant greens for your dinner salad just moments before eating? Or perhaps you’re tired of the wilted, lackluster spinach you find at the grocery store? Well, get ready to turn that dream into a delicious reality! This isn’t just another gardening article; it’s your personal guide to cultivating lush, healthy Malabar spinach that will have your neighbors green with envy.
Malabar spinach, also known as Ceylon spinach or vine spinach, isn’t actually a true spinach, but its mild flavor and impressive nutritional profile have made it a staple in Asian and African cuisines for centuries. Imagine the vibrant curries and stir-fries you can create with your own homegrown supply! But beyond its culinary uses, growing Malabar spinach is incredibly rewarding. It’s a fast-growing, heat-tolerant vine that thrives even in the scorching summer months when other greens are struggling.
Many gardeners shy away from trying new vegetables, fearing complicated techniques and disappointing results. But I’m here to tell you that growing thriving Malabar spinach is easier than you think! This DIY guide will equip you with simple, effective tips and tricks to overcome common challenges and maximize your yield. From choosing the right location to mastering the art of watering and pruning, we’ll cover everything you need to know to enjoy a continuous supply of this delicious and nutritious leafy green. So, grab your gardening gloves, and let’s get started!
Making Malabar Spinach Thrive: Your DIY Guide for a Lush Harvest
Hello, garden friends! I love Malabar spinach – not only is it super healthy, but it’s also incredibly easy to grow once you know a few tricks. In this article, I’ll show you how to make your Malabar spinach thrive so you can enjoy a rich harvest. Don’t worry, it’s easier than you think!
What is Malabar Spinach Anyway?
Before we start, a quick note: Malabar spinach (Basella alba or Basella rubra) isn’t actually a true spinach but a tropical climbing plant. It is heat-resistant and grows quickly, making it a great alternative to true spinach during the summer months. The leaves and stems are edible and have a slightly peppery taste.
Preparation: The Key to Success
Before you even think about sowing, good preparation is the be-all and end-all.
Choosing the Right Variety
There are different varieties of Malabar spinach, mainly with green or red stems. Both are edible and have a similar taste. Simply choose the variety that you find more visually appealing. I personally really like the red variety (Basella rubra) because it’s a real eye-catcher in the garden.
The Perfect Location
Malabar spinach loves the sun! Choose a location that gets at least 6 hours of sun per day. The soil should also be well-draining. It doesn’t like waterlogging at all.
Preparing the Soil
Loose, nutrient-rich soil is ideal. I recommend enriching the soil with compost or well-rotted manure before planting. This gives the Malabar spinach a good start.
Sowing and Starting: How to Do It Right
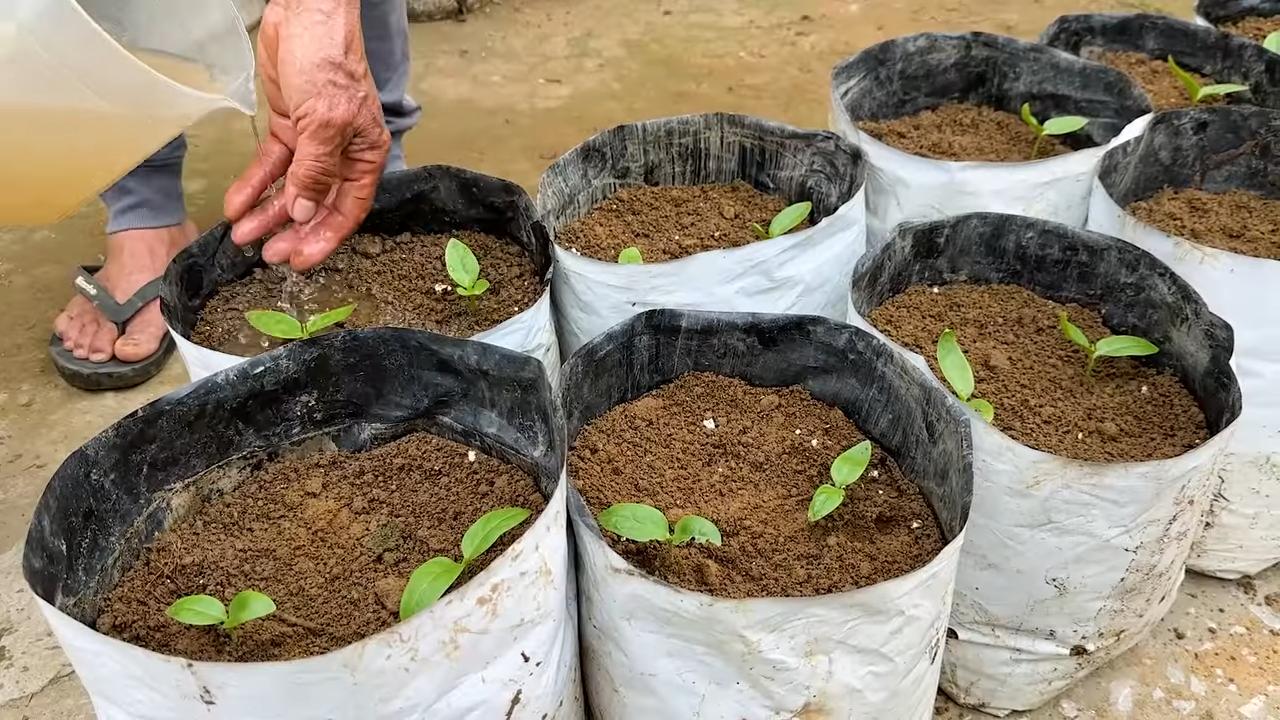
You can either sow Malabar spinach directly outdoors or start it indoors. I prefer starting it indoors because the plants then have a head start.
Direct Sowing
- When: After the last frosts, when the soil has warmed up (at least 18°C / 65°F).
- How-to:
- Prepare the soil (see above).
- Sow the seeds about 1-2 cm (0.4-0.8 inches) deep in the soil.
- Keep the soil moist.
- After the seedlings emerge, thin them to a distance of about 30-45 cm (12-18 inches) apart.
Starting Indoors
- When: About 4-6 weeks before the last frost.
- Materials:
- Seed pots or trays
- Seed starting mix
- Malabar spinach seeds
- Spray bottle
- How-to:
- Fill the seed pots with seed starting mix.
- Sow 2-3 seeds per pot about 1 cm (0.4 inches) deep into the soil.
- Moisten the soil with a spray bottle.
- Place the pots in a warm, bright place (e.g., a windowsill).
- Keep the soil moist, but not too wet.
- After the seedlings emerge, remove the weakest seedling from each pot.
- When the plants are large enough (about 10-15 cm / 4-6 inches), they can be transplanted outdoors.
Transplanting Outdoors: The Big Day
When your indoor-started plants are large enough or your directly sown seedlings look strong enough, it’s time to move them outdoors.
- When: After the last frosts, when the soil has warmed up.
- How-to:
- Prepare the soil (see above).
- Dig holes about 30-45 cm (12-18 inches) apart.
- Carefully remove the plants from their pots and place them in the holes.
- Fill the holes with soil and press down lightly.
- Water the plants well.
Care: Keeping Your Malabar Spinach Happy
Malabar spinach is relatively low-maintenance, but there are a few things you should keep in mind.
Watering
Malabar spinach needs regular water, especially during hot and dry periods. Make sure the soil is always slightly moist, but not wet.
Fertilizing
Regular fertilizing promotes growth. I like to use organic fertilizer like compost tea or diluted nettle tea. You can also use a commercial vegetable fertilizer.
Trellis/Support
Malabar spinach is a climbing plant and needs support. You can provide it with a trellis, a fence, or a climbing frame. I’ve had good experiences with bamboo stakes that I’ve tied together to form a small tipi.
Pests and Diseases
Malabar spinach is relatively resistant to pests and diseases. Aphids may occasionally appear. You can simply spray them off with a jet of water or treat them with a mild soap solution.
Harvest: The Reward for Your Efforts
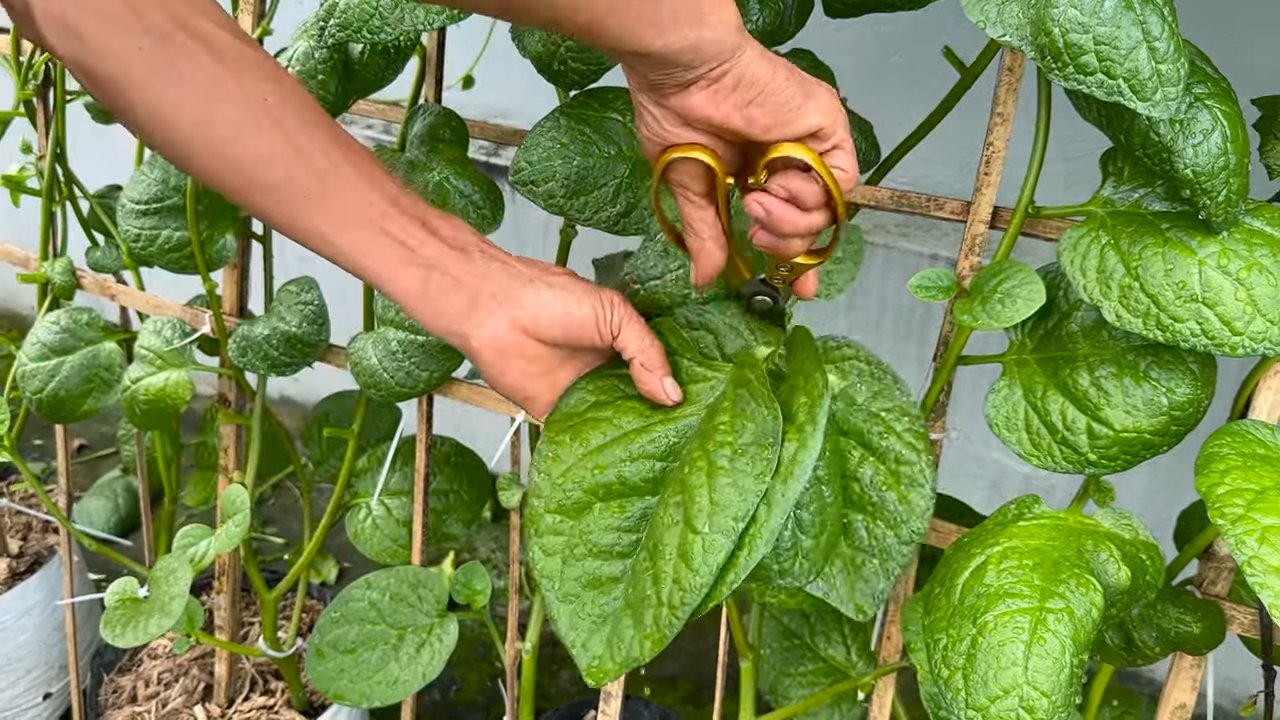
You can harvest Malabar spinach as soon as the leaves are large enough (about 10-15 cm / 4-6 inches). Simply cut off the leaves and stems. The plant will continue to grow and produce new leaves. The more often you harvest, the bushier the plant will become.
- Harvest time: As soon as the leaves are large enough.
- Harvesting method: Cut off leaves and stems.
- Storage: Can be kept in a plastic bag in the refrigerator for a few days.
Use in the Kitchen: Versatile and Delicious
Malabar spinach can be used just like regular spinach. It’s delicious raw in salads, cooked as a vegetable side dish, or in soups and stews. I also love it in curries or as a filling for ravioli.
Summary: The Most Important Points
- Location: Sunny, well-draining soil.
- Sowing: Direct or started indoors.
- Care: Water and fertilize regularly.
- Support: Absolutely necessary.
- Harvest: Harvest regularly to stimulate growth.
Common Mistakes and How to Avoid Them
- Too little sun: Malabar spinach needs a lot of sun to grow well.
- Waterlogging: Ensure good drainage to avoid waterlogged soil.
- No support: Without support, the plant will not grow well.
- Harvesting too late: If you wait too long to harvest, the leaves can become tough.
Extra Tips for Pros (or Those Who Want to Be!)
- Saving seeds: Let some plants flower and form seeds at the end of the season. You can then sow these seeds again the following year.
- Mulching: A layer of mulch helps to keep the soil moist and suppress weeds.
- Companion planting: Malabar spinach gets along well with other vegetables like tomatoes, peppers, and eggplants.
I hope this guide helps you to make your Malabar spinach thrive. Happy gardening and enjoy your meal!
Conclusion
So, there you have it! Mastering the art of propagating your own Malabar spinach is not only incredibly rewarding but also a fantastic way to ensure a continuous supply of this nutritious and delicious leafy green. We’ve walked through the simple steps, from selecting healthy cuttings to nurturing them into thriving plants. This DIY trick is a must-try for any gardener, whether you’re a seasoned pro or just starting out.
Why is this method so compelling? Firstly, it’s cost-effective. Instead of constantly buying new plants or seeds, you can simply propagate from your existing Malabar spinach vine. Secondly, it’s sustainable. You’re reducing waste and contributing to a more eco-friendly gardening practice. Thirdly, it’s incredibly satisfying to watch your cuttings take root and flourish, knowing you played an active role in their growth.
But the benefits don’t stop there. Propagating your own Malabar spinach allows you to experiment with different growing conditions and techniques. Try varying the type of rooting medium you use – perhaps a mix of perlite and vermiculite, or even just water. Observe how different levels of sunlight affect the growth rate. You can even experiment with different types of containers, from small pots to larger raised beds.
Consider these variations to further enhance your Malabar spinach propagation experience:
* Rooting Hormone Boost: While not strictly necessary, dipping your cuttings in rooting hormone can significantly accelerate the rooting process. This is particularly helpful if you’re working with older or less vigorous cuttings.
* Hydroponic Propagation: For a fun and educational experiment, try propagating your Malabar spinach cuttings hydroponically. Simply suspend the cuttings in a nutrient-rich water solution and watch the roots develop.
* Grafting Potential: For the more adventurous gardener, explore the possibility of grafting Malabar spinach onto other compatible rootstocks. This can potentially improve disease resistance or vigor.
* Vertical Gardening: Malabar spinach thrives in vertical gardens. Propagating your own plants allows you to create stunning green walls or hanging baskets filled with this beautiful and productive vine.
Ultimately, the best way to learn is by doing. Don’t be afraid to experiment and adapt the techniques to suit your own specific needs and preferences. The key is to provide your cuttings with the right conditions – adequate moisture, warmth, and light – and to be patient.
We are confident that you’ll find this DIY trick to be a valuable addition to your gardening repertoire. So, grab your pruning shears, select some healthy cuttings, and get started! We encourage you to try propagating your own Malabar spinach and share your experiences with us. Let us know what works best for you, what challenges you encounter, and any tips or tricks you discover along the way. Your feedback will help other gardeners succeed and contribute to a thriving community of Malabar spinach enthusiasts. Happy gardening!
Frequently Asked Questions (FAQ)
What is the best time of year to propagate Malabar spinach?
The ideal time to propagate Malabar spinach is during the warmer months, typically spring and summer. This is when the plant is actively growing and the cuttings are more likely to root successfully. However, if you have a controlled environment, such as a greenhouse or indoor grow space, you can propagate Malabar spinach year-round. The key is to provide consistent warmth and humidity.
How long does it take for Malabar spinach cuttings to root?
The rooting time can vary depending on several factors, including the temperature, humidity, and the health of the cuttings. Generally, you can expect to see roots developing within 1-2 weeks. However, it may take up to 3-4 weeks for the roots to be strong enough to transplant the cuttings into soil. Be patient and continue to provide the cuttings with the necessary care.
What kind of soil should I use for planting the rooted cuttings?
Malabar spinach prefers well-draining soil that is rich in organic matter. A good potting mix for rooted cuttings would be a combination of compost, perlite, and vermiculite. This will provide the necessary nutrients and drainage for healthy growth. You can also amend your garden soil with compost or other organic matter before planting.
How much sunlight does Malabar spinach need?
Malabar spinach thrives in full sun, which means at least 6-8 hours of direct sunlight per day. However, it can also tolerate partial shade, especially in hotter climates. If you’re growing Malabar spinach indoors, make sure to provide it with plenty of bright, indirect light. You may also need to supplement with artificial lighting, especially during the winter months.
How often should I water my Malabar spinach plants?
Malabar spinach needs consistent moisture to thrive. Water your plants regularly, especially during hot and dry weather. The soil should be kept moist but not waterlogged. Check the soil moisture regularly and water when the top inch feels dry to the touch. Avoid overwatering, as this can lead to root rot.
What are some common pests and diseases that affect Malabar spinach?
Malabar spinach is generally resistant to pests and diseases, but it can be susceptible to aphids, spider mites, and fungal diseases. Inspect your plants regularly for any signs of infestation or disease. If you notice any problems, take action immediately to prevent them from spreading. You can use insecticidal soap or neem oil to control pests, and fungicides to treat fungal diseases. Proper air circulation and drainage can also help prevent disease.
Can I eat Malabar spinach raw?
Yes, you can eat Malabar spinach raw. The leaves have a mild, slightly peppery flavor that is similar to spinach. They can be added to salads, sandwiches, or used as a garnish. However, some people prefer to cook Malabar spinach, as it becomes more tender and less mucilaginous when cooked.
How do I harvest Malabar spinach?
You can harvest Malabar spinach leaves as needed, starting when the plants are about 6-8 inches tall. Simply snip off the leaves or stems with a pair of scissors or pruning shears. Regular harvesting will encourage the plant to produce more leaves. You can also harvest the entire plant at the end of the growing season.
Is Malabar spinach a perennial or an annual?
Malabar spinach is a tender perennial in tropical and subtropical climates, meaning it can live for several years if protected from frost. However, in colder climates, it is typically grown as an annual, meaning it completes its life cycle in one growing season.
Can I grow Malabar spinach in a container?
Yes, Malabar spinach can be grown successfully in containers. Choose a large container that is at least 12 inches in diameter and has good drainage. Fill the container with a well-draining potting mix and provide the plant with plenty of sunlight and water. You may also need to provide a trellis or other support for the vine to climb.
How can I encourage more branching in my Malabar spinach plant?
Pinching back the growing tips of your Malabar spinach plant will encourage it to branch out and produce more leaves. Simply snip off the top inch or two of the stem with a pair of scissors or pruning shears. This will stimulate the plant to produce new side shoots, resulting in a bushier and more productive plant.
What are the nutritional benefits of Malabar spinach?
Malabar spinach is a highly nutritious leafy green that is packed with vitamins, minerals, and antioxidants. It is a good source of vitamins A, C, and K, as well as iron, calcium, and potassium. It is also low in calories and fat, making it a healthy addition to any diet.

Leave a Comment