
Grow Basil Indoors? Absolutely! Imagine fresh, fragrant basil readily available right in your kitchen, no matter the season. Forget those sad, wilted bunches from the grocery store – we’re talking vibrant, flavorful basil at your fingertips. For centuries, basil has been cherished not only for its culinary prowess but also for its purported medicinal properties and even its symbolic significance in various cultures, representing love and good wishes.
But let’s be honest, sometimes life gets in the way, and a sprawling outdoor garden just isn’t feasible. That’s where the magic of indoor gardening comes in! This DIY guide is your passport to successfully grow basil indoors, even if you’re a complete beginner. I’ll walk you through simple, effective techniques and hacks that will transform your windowsill into a thriving herb garden.
Why do you need this? Because fresh basil elevates everything! From a simple Caprese salad to a complex pesto, the taste difference is undeniable. Plus, growing your own herbs is incredibly rewarding, therapeutic, and a fantastic way to add a touch of green to your living space. Let’s ditch the store-bought and embrace the joy of homegrown basil!
Grow Your Own Delicious Basil Indoors: A Beginner’s Guide
Hey there, fellow plant enthusiasts! Ever dreamt of having fresh, fragrant basil right at your fingertips, no matter the season? Well, you’re in luck! Growing basil indoors is surprisingly easy and rewarding. I’m going to walk you through everything you need to know to cultivate your own thriving basil plant, from seed to scrumptious pesto. Let’s get started!
What You’ll Need: The Basil Starter Kit
Before we dive in, let’s gather our supplies. Here’s a checklist of everything you’ll need to successfully grow basil indoors:
* Basil Seeds: Choose your favorite variety! Genovese is a classic for pesto, but lemon basil, Thai basil, and purple basil are also fantastic options.
* Seed Starting Tray or Small Pots: These will be your basil’s first home. Make sure they have drainage holes!
* Seed Starting Mix: This is a light, airy soil mix specifically designed for seedlings. Don’t use regular potting soil for starting seeds.
* Potting Soil: Once your seedlings are big enough, they’ll need a new home in a larger pot with nutrient-rich potting soil.
* Grow Lights (Optional, but Recommended): Basil needs a lot of light, especially indoors. Grow lights will ensure your plant gets enough, even on cloudy days.
* Watering Can or Spray Bottle: For gentle watering.
* Small Shovel or Spoon: For transplanting seedlings.
* Well-Draining Pot (at least 6 inches in diameter): This will be your basil plant’s permanent home.
* Fertilizer (Optional): A balanced liquid fertilizer can help boost growth.
Phase 1: Starting from Seed – The Germination Game
Okay, let’s get those seeds germinating! This is where the magic begins.
1. Prepare Your Seed Starting Tray: Fill your seed starting tray or small pots with seed starting mix. Gently pat it down, but don’t compact it too much. You want the soil to be loose and airy.
2. Sow the Seeds: Sprinkle a few basil seeds on top of the soil in each cell or pot. They don’t need to be buried deep; just gently press them into the soil. I usually aim for 2-3 seeds per cell to increase my chances of success.
3. Cover Lightly: Sprinkle a very thin layer of seed starting mix over the seeds. This helps keep them moist and provides a little bit of darkness, which can aid germination.
4. Water Gently: Use a spray bottle or watering can with a gentle nozzle to moisten the soil. You want it to be damp, but not soggy.
5. Create a Humid Environment: Cover the seed starting tray with a clear plastic lid or plastic wrap. This will help create a humid environment that’s perfect for germination. If you’re using individual pots, you can place them inside a clear plastic bag.
6. Find a Warm Spot: Place the tray or pots in a warm location, ideally around 70-75°F (21-24°C). A heat mat can be helpful if your home is cooler.
7. Wait Patiently: Basil seeds typically germinate in 5-10 days. Keep the soil consistently moist, but not waterlogged. Check daily and mist with water as needed.
8. Remove the Cover: Once the seedlings emerge, remove the plastic lid or wrap. This will allow for better air circulation and prevent fungal diseases.
Phase 2: Nurturing Your Seedlings – The Growing Up Stage
Now that your basil seeds have sprouted, it’s time to nurture those tiny seedlings into strong, healthy plants.
1. Provide Plenty of Light: Basil seedlings need a lot of light to thrive. Place them under grow lights or in a very sunny windowsill that receives at least 6-8 hours of direct sunlight per day. If you’re using a windowsill, rotate the tray or pots regularly to ensure even growth.
2. Water Carefully: Water the seedlings when the top inch of soil feels dry to the touch. Avoid overwatering, as this can lead to root rot. Water at the base of the plants to avoid wetting the leaves, which can also promote fungal diseases.
3. Thin the Seedlings: Once the seedlings have their first set of true leaves (the leaves that look like miniature basil leaves, not the initial seed leaves), it’s time to thin them out. Choose the strongest seedling in each cell or pot and snip off the others at the soil line with small scissors. This will give the remaining seedling more room to grow.
4. Fertilize (Optional): If you want to give your seedlings a boost, you can start fertilizing them with a diluted liquid fertilizer. Follow the instructions on the fertilizer label carefully. I usually start with a half-strength solution.
Phase 3: Transplanting to a Larger Pot – Moving On Up!
Once your seedlings are a few inches tall and have several sets of true leaves, it’s time to transplant them to a larger pot.
1. Prepare Your Pot: Choose a well-draining pot that’s at least 6 inches in diameter. Fill it with potting soil, leaving about an inch of space at the top.
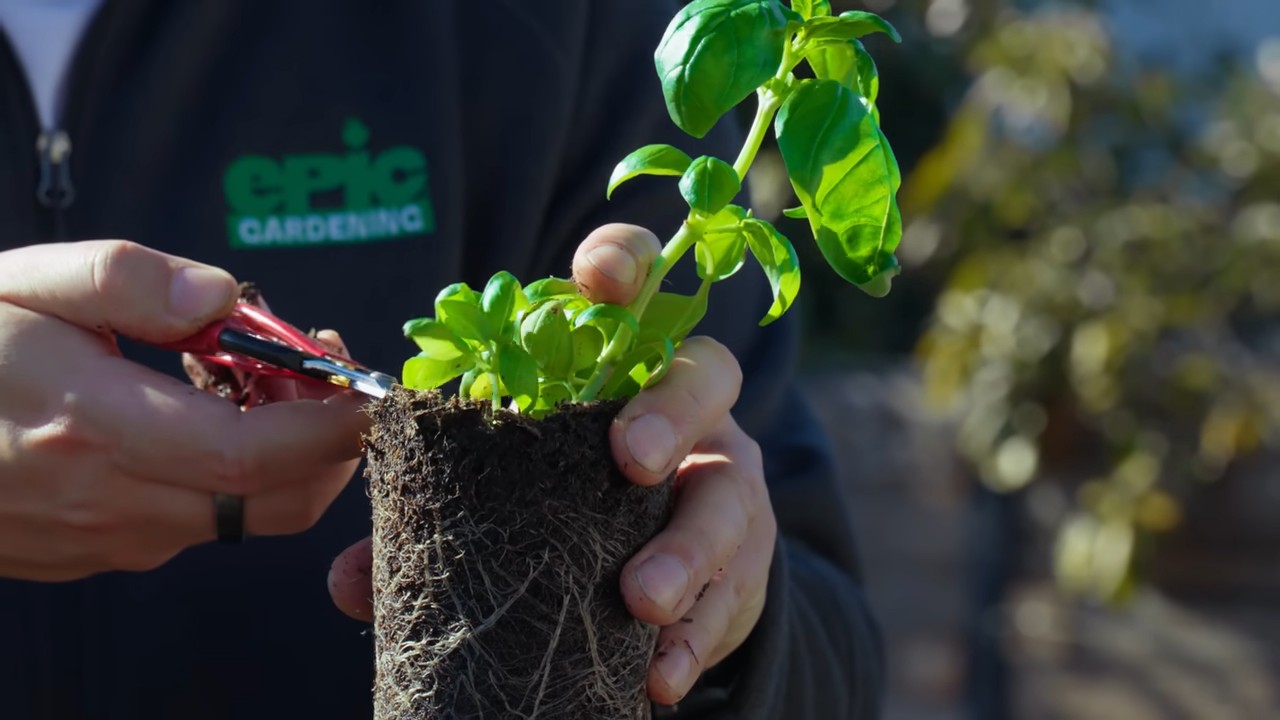
2. Gently Remove the Seedling: Carefully remove the seedling from its cell or pot. Gently loosen the soil around the roots with your fingers. Be careful not to damage the delicate roots.
3. Plant the Seedling: Create a small hole in the center of the potting soil and place the seedling in the hole. Make sure the top of the root ball is level with the surrounding soil.
4. Fill in the Soil: Gently fill in the soil around the seedling, patting it down lightly.
5. Water Thoroughly: Water the newly transplanted seedling thoroughly.
6. Provide Support (Optional): If your seedling is a bit leggy (tall and spindly), you can provide some support by gently staking it with a small stick or chopstick.
Phase 4: Ongoing Care – Keeping Your Basil Happy
Now that your basil plant is in its permanent home, it’s time to provide ongoing care to keep it healthy and productive.
1. Light: Basil needs at least 6-8 hours of direct sunlight per day. If you’re growing it indoors, a sunny windowsill or grow lights are essential. Rotate the plant regularly to ensure even growth.
2. Watering: Water your basil plant when the top inch of soil feels dry to the touch. Avoid overwatering, as this can lead to root rot. Water at the base of the plant to avoid wetting the leaves.
3. Fertilizing: Fertilize your basil plant every 2-4 weeks with a balanced liquid fertilizer. Follow the instructions on the fertilizer label carefully.
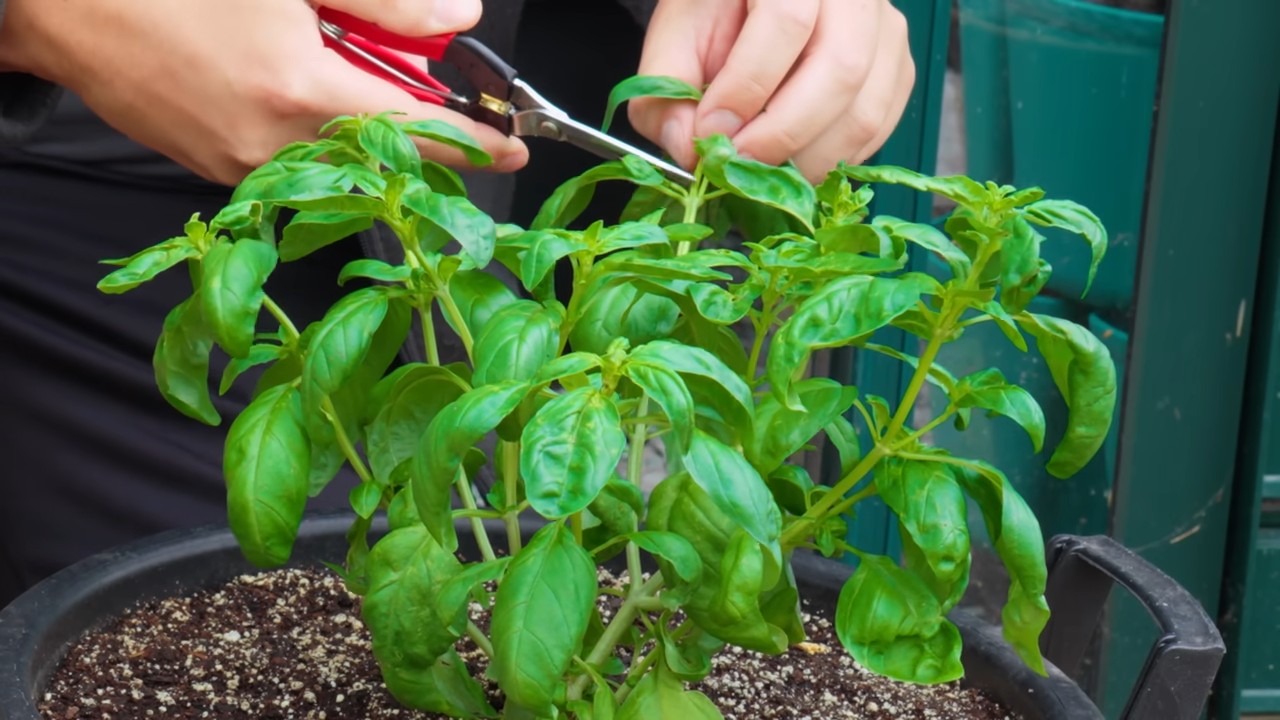
4. Pruning: Pruning is essential for keeping your basil plant bushy and productive. Pinch off the top sets of leaves regularly, especially when the plant starts to form flower buds. This will encourage the plant to produce more leaves.
5. Pest Control: Keep an eye out for pests like aphids, spider mites, and whiteflies. If you spot any pests, you can try spraying the plant with insecticidal soap or neem oil.
6. Temperature: Basil prefers temperatures between 65-80°F (18-27°C). Avoid placing your plant near drafts or cold windows.
7. Humidity: Basil prefers moderate humidity. If your home is very dry, you can increase the humidity around your plant by placing it on a tray filled with pebbles and water. Make sure the bottom of the pot isn’t sitting directly in the water.
Harvesting Your Basil – The Best Part!
The best part of growing your own basil is, of course, harvesting it!
1. Harvest Regularly: Start harvesting your basil leaves when the plant is about 6-8 inches tall.
2. Pinch or Cut: Pinch or cut off the top sets of leaves, leaving at least 4-6 leaves on the plant.
3. Harvest Before Flowering: Harvest your basil leaves before the plant starts to flower. Once the plant flowers, the leaves will become bitter.
4. Store Properly: Freshly harvested basil leaves can be stored in the refrigerator for a few days. Wrap them in a damp paper towel and place them in a plastic bag. You can also freeze basil leaves for longer storage.
Troubleshooting – Common Basil Problems and Solutions
Even with the best care, you might encounter some problems while growing basil indoors. Here are some common issues and how to fix them:
* Yellowing Leaves: This can be caused by overwatering, underwatering, nutrient deficiencies, or pests. Check the soil moisture and adjust your watering accordingly. Fertilize the plant if necessary. Inspect the plant for pests and treat them as needed.
* Leggy Growth: This is usually caused
Conclusion
So, there you have it! Mastering the art of growing basil indoors is not only achievable but also incredibly rewarding. We’ve walked through the essential steps, from selecting the right variety and providing optimal lighting to ensuring proper watering and addressing potential challenges. But why is this DIY trick a must-try?
Simply put, fresh basil elevates any dish. Imagine the vibrant aroma and intense flavor of freshly picked basil leaves brightening up your pasta sauce, pizza, salads, or even a simple Caprese. Store-bought basil, while convenient, often lacks the robust flavor and freshness of homegrown herbs. By growing your own basil indoors, you gain access to a constant supply of this culinary gem, allowing you to infuse your meals with unparalleled flavor and freshness, regardless of the season.
Beyond the culinary benefits, growing basil indoors offers a therapeutic and aesthetically pleasing experience. Nurturing a plant from seed or seedling to a thriving herb is incredibly satisfying. The vibrant green foliage adds a touch of nature to your indoor space, creating a calming and inviting atmosphere. Plus, the act of tending to your basil plant can be a mindful and relaxing activity, providing a welcome break from the stresses of daily life.
But the possibilities don’t stop there! Feel free to experiment with different varieties of basil to discover your favorites. Try growing Genovese basil for classic Italian dishes, Thai basil for Asian-inspired cuisine, or lemon basil for a citrusy twist. You can also explore different growing methods, such as using hydroponics or self-watering planters, to further optimize your basil-growing experience.
Consider these variations to enhance your indoor basil garden:
* Succession Planting: Plant new seeds every few weeks to ensure a continuous harvest of fresh basil.
* Companion Planting: Grow basil alongside other herbs like rosemary or thyme to create a fragrant and productive indoor herb garden.
* Basil Pesto Bonanza: When your basil plant is thriving, make a large batch of homemade pesto and freeze it for future use.
* Infused Oils and Vinegars: Use your homegrown basil to create flavorful infused oils and vinegars for dressings and marinades.
* Gift Giving: Share your basil bounty with friends and family by gifting them small pots of basil or homemade basil-infused products.
Ultimately, growing basil indoors is a simple, cost-effective, and incredibly rewarding DIY project that will transform your culinary creations and enhance your indoor living space. Don’t be intimidated by the process – with a little patience and attention, you’ll be harvesting fresh basil in no time.
We encourage you to embark on this green adventure and discover the joy of growing your own basil. And most importantly, we want to hear about your experiences! Share your tips, tricks, and photos of your thriving indoor basil gardens in the comments below. Let’s create a community of indoor basil enthusiasts and inspire others to embrace the joys of homegrown herbs. Happy growing!
Frequently Asked Questions (FAQ)
What is the best location in my home for growing basil indoors?
The ideal location for growing basil indoors is a spot that receives at least 6-8 hours of direct sunlight per day. A south-facing window is typically the best option, but east- or west-facing windows can also work if they provide sufficient sunlight. If you don’t have access to a sunny window, you can supplement with grow lights. Position the grow lights about 6-12 inches above the basil plants and keep them on for 12-16 hours per day. Remember to rotate your basil plant regularly to ensure even light exposure on all sides, preventing it from leaning towards the light source.
How often should I water my indoor basil plant?
Watering frequency depends on several factors, including the size of the pot, the type of potting mix, and the ambient temperature and humidity. As a general rule, water your basil plant when the top inch of soil feels dry to the touch. Avoid overwatering, as this can lead to root rot. Ensure that the pot has drainage holes to allow excess water to escape. When watering, water thoroughly until water drains out of the bottom of the pot. During warmer months or in drier climates, you may need to water more frequently. Conversely, during cooler months or in more humid environments, you may need to water less often. Observe your plant closely and adjust your watering schedule accordingly.
What kind of soil is best for growing basil indoors?
Basil thrives in well-draining soil that is rich in organic matter. A good potting mix for indoor basil plants is a blend of peat moss, perlite, and vermiculite. You can also add compost or other organic amendments to improve the soil’s fertility and drainage. Avoid using garden soil, as it can be too heavy and may contain pests or diseases. The ideal pH for basil is between 6.0 and 7.5. You can test the pH of your soil using a soil testing kit and amend it if necessary.
How do I fertilize my indoor basil plant?
Basil is a relatively heavy feeder and benefits from regular fertilization. Use a balanced liquid fertilizer diluted to half strength every 2-4 weeks during the growing season (spring and summer). Look for a fertilizer with an NPK ratio (nitrogen, phosphorus, potassium) of around 10-10-10 or 20-20-20. Avoid over-fertilizing, as this can lead to leggy growth and reduced flavor. You can also use organic fertilizers, such as compost tea or fish emulsion, to provide nutrients to your basil plant.
How do I harvest basil leaves from my indoor plant?
Harvesting basil leaves regularly encourages the plant to grow bushier and produce more leaves. To harvest, pinch or cut off the leaves just above a leaf node (the point where leaves grow from the stem). This will encourage the plant to branch out and produce more leaves. Avoid removing more than one-third of the plant’s leaves at a time, as this can stress the plant. You can harvest basil leaves at any time, but they are most flavorful when harvested in the morning after the dew has dried.
What are some common problems when growing basil indoors and how do I fix them?
Some common problems when growing basil indoors include:
* Yellowing Leaves: This can be caused by overwatering, underwatering, nutrient deficiencies, or pests. Adjust your watering schedule, fertilize regularly, and inspect your plant for pests.
* Leggy Growth: This is often caused by insufficient light. Provide more light by moving your plant to a sunnier location or using grow lights.
* Root Rot: This is caused by overwatering and poor drainage. Ensure that your pot has drainage holes and avoid overwatering.
* Pests: Common pests that affect basil include aphids, spider mites, and whiteflies. Treat infestations with insecticidal soap or neem oil.
* Powdery Mildew: This is a fungal disease that appears as a white powdery coating on the leaves. Improve air circulation and treat with a fungicide.
Can I grow basil from seed indoors?
Yes, you can easily grow basil from seed indoors. Start seeds indoors 6-8 weeks before the last expected frost. Sow seeds in a seed-starting mix and keep them moist. Germination typically occurs within 5-10 days. Once the seedlings have developed a few sets of true leaves, transplant them into individual pots. Provide plenty of light and water regularly.
How do I prevent my indoor basil plant from flowering?
Flowering signals the end of the basil plant’s life cycle and can cause the leaves to become bitter. To prevent flowering, pinch off any flower buds as soon as you see them. Regular harvesting of leaves also helps to prevent flowering.
Can I propagate basil from cuttings?
Yes, basil is very easy to propagate from cuttings. Take a 4-6 inch cutting from a healthy basil plant, removing the lower leaves. Place the cutting in a glass of water, making sure that the leaves are above the water line. Roots will typically develop within 1-2 weeks. Once the roots are about an inch long, transplant the cutting into a pot filled with potting mix.
How long will my indoor basil plant live?
With proper care, an indoor basil plant can live for several months to a year. However, basil is an annual plant, meaning that it will eventually complete its life cycle and die. To ensure a continuous supply of fresh basil, consider starting new plants from seed or cuttings every few months.
Leave a Comment