
Growing Healthy Bean Plants doesn’t have to be a daunting task! Imagine plucking fresh, crisp beans straight from your own backyard, ready to be tossed into a vibrant salad or steamed as a delicious side dish. Sounds idyllic, right? Well, it’s absolutely achievable, even if you don’t have a sprawling garden. For centuries, beans have been a staple crop in cultures around the world, from the ancient Incas to the Mediterranean, providing essential nutrients and a satisfying earthy flavor.
But let’s be honest, sometimes getting those bean plants to thrive can feel like a real challenge. Yellowing leaves, stunted growth, and pesky pests can quickly turn your gardening dreams into a frustrating reality. That’s where these DIY tricks and hacks come in! I’m going to share some simple, yet effective, techniques that will help you nurture your bean plants from tiny seedlings to bountiful producers.
Whether you’re a seasoned gardener or just starting out, these tips will empower you to create the perfect environment for growing healthy bean plants. We’ll cover everything from soil preparation and watering techniques to natural pest control methods, ensuring you have all the knowledge you need to enjoy a successful and rewarding bean harvest. So, grab your gardening gloves, and let’s get started!

Growing Your Own Bean Bounty: Your DIY Guide for Healthy Plants
Hey plant friend! Fancy growing your own beans? It’s easier than you think and super satisfying when you can harvest and enjoy your homegrown beans. In this guide, I’ll show you step-by-step how to grow healthy and productive bean plants – whether in the garden, on the balcony, or even on the windowsill. Let’s get started!
The Preparation: What You Need
Before we start, let’s make sure we have everything we need. Here is a list of things you’ll require:
- Bean seeds: Choose a variety that you like and that is suitable for your region. There are bush beans, pole beans, and runner beans – each has its pros and cons.
- Seed pots or trays: for starting indoors.
- Seed starting mix: It is low in nutrients and loose, ideal for young seedlings.
- Garden soil or potting soil: For planting out in the garden bed or in larger pots.
- Watering can or spray bottle: For watering.
- Plant stakes or a trellis: Especially important for pole beans, but bush beans can also benefit from them.
- Garden tools: Spade, shovel, possibly a small hoe.
- Labels and a pen: To identify the different bean varieties.
- A sunny spot: Beans love the sun!
Sowing: The Start of a Bean’s Life
There are two ways to sow beans: directly into the garden bed or by starting them indoors. I personally prefer starting them indoors, as it protects the plants from snails and other pests and gives them a head start on growth.
Starting Indoors (optional, but recommended)
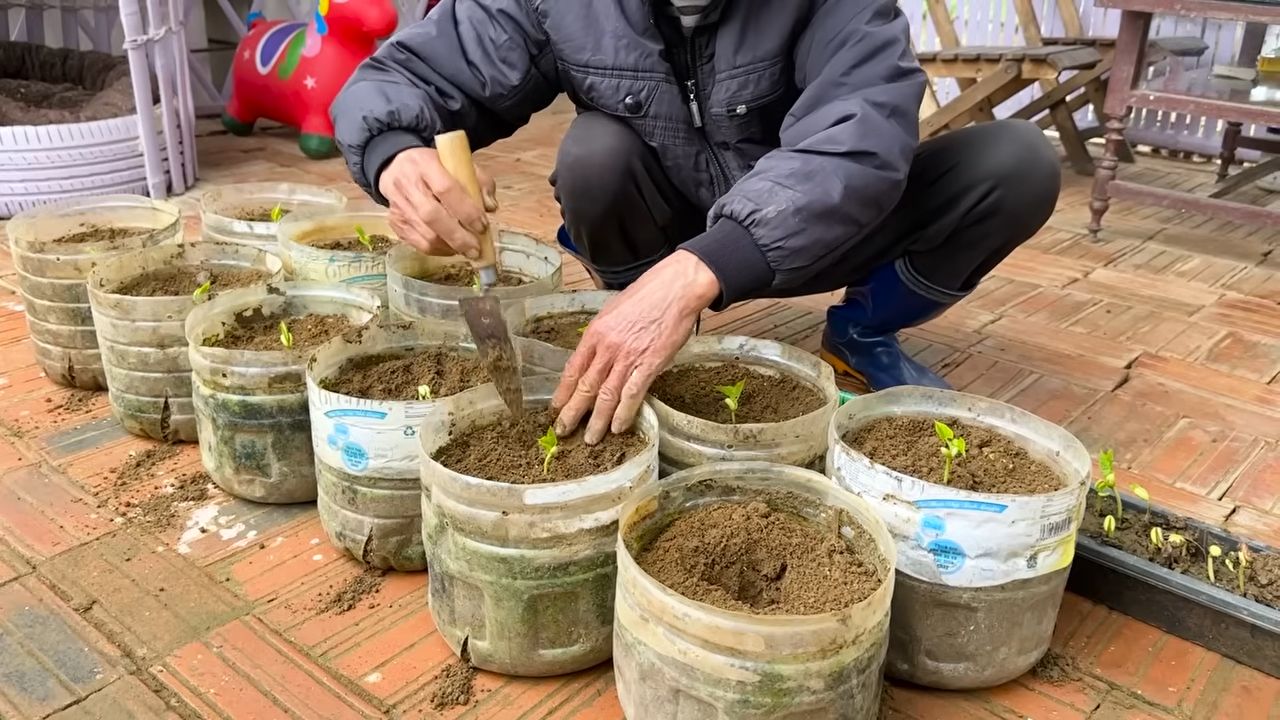
- Prepare pots: Fill the seed pots or trays with seed starting mix. Press the soil down lightly.
- Place seeds: Place 2-3 bean seeds in each pot. They should be about 2-3 cm (about 1 inch) deep in the soil.
- Cover with soil: Cover the seeds with a thin layer of seed starting mix.
- Water: Water the soil carefully so that it is moist but not wet. It’s best to use a spray bottle to avoid washing the seeds away.
- Keep warm: Place the pots in a warm, bright place. A temperature of 18-22°C (64-72°F) is ideal.
- Keep moist: Keep the soil evenly moist, but avoid waterlogging.
- Be patient: After about 1-2 weeks, the first seedlings should appear.
Direct Sowing in the Garden Bed
- Prepare the soil: Loosen the soil in the bed thoroughly and remove weeds. Work in compost or organic fertilizer to enrich the soil with nutrients.
- Make furrows: Use a hoe or a spade to create furrows in the soil. The distance between the furrows should be about 40-50 cm (16-20 inches).
- Place seeds: Place the bean seeds in the furrows. The distance between the seeds should be about 5-10 cm (2-4 inches).
- Cover with soil: Cover the seeds with a layer of soil about 2-3 cm (about 1 inch) thick.
- Water: Water the soil carefully.
- Protective measures: Protect the young seedlings from slugs and birds. You can use a slug fence or a net, for example.
Planting Out: Off to the Great Outdoors!
As soon as the bean plants are about 10-15 cm (4-6 inches) tall and there is no more danger of frost (usually mid-May), they can be planted outdoors.
- Harden off: Before you put the plants in the bed, you should harden them off for a few days. Place them outside during the day and bring them back in at night. This way, they slowly get used to the outdoor conditions.
- Dig planting holes: Dig planting holes in the bed or in pots. The distance between the holes should be about 40-50 cm (16-20 inches).
- Insert plants: Carefully place the bean plants in the holes. Make sure the roots are not damaged.
- Fill with soil: Fill the holes with soil and press down lightly.
- Water: Water the plants thoroughly.
- Install support: If you have planted pole beans, you should now install the support. This can be bamboo stakes, a fence, or a trellis.
Care: Keeping the Beans Happy
Proper care is crucial for a bountiful harvest. Here are some tips:
- Watering: Beans need regular water, especially during flowering and fruit formation. Make sure the soil is always slightly moist, but avoid waterlogging.
- Fertilizing: Fertilize the beans regularly with an organic fertilizer or compost. Avoid nitrogen-rich fertilizers, as these promote leaf growth but can inhibit flower formation.
- Weed control: Remove weeds regularly as they take nutrients and water from the beans.
- Pest protection: Regularly check the plants for pests like aphids or bean beetles. If necessary, you can use biological pesticides.
- Pinching out: With pole beans, you can pinch off the side shoots to promote the growth of the main shoots.
- Supporting: If the bean plants become too heavy, you can support them with stakes or strings.
Harvest: The Fruits of Your Labor
Depending on the variety and weather, you can harvest the first beans about 8-12 weeks after sowing.
- When to harvest: Harvest the beans when they are plump and crisp. The pods should bend easily.
- Harvesting technique: Cut the beans off with a knife or scissors. Do not pull on the pods, as you could damage the plant.
- Regular harvesting: Harvest the beans regularly to encourage the formation of new pods.
- Storage: Fresh beans have a limited shelf life. You can store them in the refrigerator or freeze them.
Special Tips for Different Bean Varieties
- Bush beans: They are easy to care for and are well-suited for growing in pots. They do not need a trellis.
- Pole beans: They need a trellis and can grow very tall. They are more productive than bush beans.
- Runner beans: They are not only tasty but also beautiful to look at. They have striking red flowers and also need a trellis.
Common Problems and Solutions
No flowers: This can be due to too much nitrogen in the soil. Avoid nitrogen-rich fertilizers.
Slug infestation: Protect the young seedlings with a slug fence or sprinkle slug pellets.
Aphids: Spray the plants with a soap and water solution.
Bean beetles: Pick off the beetles or use beneficial insects like parasitic wasps.
Yellow leaves: This can be a sign of a nutrient deficiency. Fertilize the plants with an organic fertilizer.
Conclusion
So, there you have it! Mastering the art of growing healthy bean plants doesn’t require a green thumb blessed by the gardening gods. It’s about understanding their needs, providing the right environment, and employing a few simple, yet effective, DIY tricks. This method, focusing on [mention a specific DIY trick discussed in the article, e.g., “creating a DIY bean trellis using repurposed materials”], is a game-changer for several reasons.
First and foremost, it’s incredibly cost-effective. Instead of shelling out money for expensive store-bought supports or specialized fertilizers, you’re utilizing resources you likely already have around the house. This not only saves you money but also promotes sustainability by reducing waste and repurposing materials. Think about it: old bamboo poles, discarded netting, even sturdy branches from pruning can all be transformed into a thriving bean haven.
Secondly, this DIY approach allows for complete customization. You can tailor the support system to the specific variety of bean you’re growing, ensuring optimal growth and yield. For instance, if you’re growing pole beans, you might opt for a taller, more robust trellis. If you’re growing bush beans, a simple cage or low support structure might suffice. The possibilities are endless, limited only by your imagination and the materials at your disposal.
Furthermore, the satisfaction of nurturing your bean plants from seed to harvest using your own ingenuity is unparalleled. There’s a certain pride that comes with knowing you’ve created something beautiful and productive with your own two hands. It’s a tangible connection to nature and a rewarding experience that extends far beyond the dinner table.
But the benefits don’t stop there! Consider these variations to further enhance your bean-growing success:
* Companion Planting: Plant marigolds or nasturtiums near your bean plants to deter pests naturally. The strong scent of these flowers repels common bean predators, reducing the need for chemical pesticides.
* Soil Enrichment: Incorporate compost or well-rotted manure into the soil before planting to provide essential nutrients. This will give your bean plants a strong start and promote healthy growth.
* Watering Techniques: Water deeply and consistently, especially during flowering and pod development. Avoid overhead watering, which can lead to fungal diseases. Instead, water at the base of the plants.
* Vertical Gardening: If you’re short on space, consider growing your bean plants vertically on a wall or fence. This is a great way to maximize your growing area and add visual interest to your garden.
We wholeheartedly encourage you to try this DIY trick for growing healthy bean plants. It’s a simple, affordable, and rewarding way to enjoy fresh, homegrown beans all season long. Don’t be afraid to experiment and adapt the techniques to suit your specific needs and resources.
And most importantly, we want to hear about your experiences! Share your photos, tips, and stories in the comments below. Let’s create a community of bean-growing enthusiasts and learn from each other’s successes and challenges. Together, we can unlock the secrets to bountiful bean harvests and enjoy the delicious rewards of our labor. So, grab your seeds, gather your materials, and get ready to grow some amazing beans!
Frequently Asked Questions (FAQ)
What are the most common problems when growing bean plants, and how can this DIY trick help prevent them?
The most common problems include pest infestations (like aphids and bean beetles), fungal diseases (like powdery mildew), and poor soil conditions. This DIY trick, particularly if it involves creating a trellis, helps by improving air circulation around the plants, which reduces the risk of fungal diseases. A well-supported plant is also less likely to be stressed, making it more resistant to pests. Furthermore, if the DIY trick involves amending the soil with compost or other organic matter, it can improve drainage and nutrient availability, leading to healthier, more resilient plants.
How often should I water my bean plants, and what’s the best way to do it?
Watering frequency depends on the weather and soil conditions. Generally, bean plants need about 1 inch of water per week. Check the soil moisture regularly by sticking your finger about an inch deep. If the soil feels dry, it’s time to water. The best way to water is deeply and infrequently, rather than shallowly and often. This encourages the roots to grow deeper, making the plants more drought-tolerant. Avoid overhead watering, as it can create a humid environment that promotes fungal diseases. Instead, water at the base of the plants, using a soaker hose or watering can.
What kind of soil is best for growing bean plants?
Bean plants prefer well-drained, loamy soil with a pH between 6.0 and 7.0. Before planting, amend the soil with compost or well-rotted manure to improve its fertility and drainage. Avoid heavy clay soils, as they can become waterlogged and suffocate the roots. If you have clay soil, consider adding sand or other amendments to improve drainage. A soil test can help you determine the pH and nutrient levels of your soil, allowing you to make necessary adjustments before planting.
When is the best time to plant bean seeds?
The best time to plant bean seeds is after the last frost, when the soil has warmed to at least 60°F (15°C). Bean plants are sensitive to cold temperatures, so planting too early can result in poor germination or stunted growth. You can start bean seeds indoors 2-3 weeks before the last frost, but be sure to harden them off before transplanting them outdoors. Check your local frost dates to determine the best planting time for your region.
How do I know when my bean plants are ready to harvest?
The timing of harvest depends on the variety of bean you’re growing. Snap beans are typically ready to harvest when the pods are firm, crisp, and about the size of a pencil. Shelling beans are ready to harvest when the pods are plump and the beans inside are fully developed. Dry beans are ready to harvest when the pods are dry and brittle. Harvest beans regularly to encourage continued production.
What are some common pests and diseases that affect bean plants, and how can I prevent them?
Common pests include aphids, bean beetles, and spider mites. Common diseases include powdery mildew, bean rust, and anthracnose. To prevent pests and diseases, practice good garden hygiene, such as removing weeds and debris that can harbor pests and diseases. Rotate your crops each year to prevent soilborne diseases from building up. Use organic pest control methods, such as insecticidal soap or neem oil, to control pests. Choose disease-resistant varieties of bean plants. Ensure good air circulation around the plants by spacing them properly and providing adequate support.
Can I grow bean plants in containers?
Yes, you can grow bean plants in containers, but you’ll need to choose a large enough container (at least 12 inches in diameter) and use a well-draining potting mix. Bush bean varieties are generally better suited for container gardening than pole bean varieties. Provide adequate support for the plants, such as a trellis or cage. Water regularly and fertilize every few weeks with a balanced fertilizer.
How can I save bean seeds for next year?
To save bean seeds, allow the pods to dry completely on the plant. Once the pods are dry and brittle, shell the beans and store them in an airtight container in a cool, dry place. Be sure to label the container with the variety of bean and the date of harvest. Only save seeds from healthy, disease-free plants.
What are some good companion plants for bean plants?
Good companion plants for bean plants include marigolds, nasturtiums, carrots, cucumbers, and rosemary. Marigolds and nasturtiums deter pests, while carrots and cucumbers provide shade and support. Rosemary repels bean beetles. Avoid planting bean plants near onions or garlic, as they can inhibit growth.
How does this DIY trick help with vertical gardening of beans?
This DIY trick is particularly helpful for vertical gardening of beans because it provides a customizable and often cost-effective way to create the necessary support structure. Whether it’s a trellis made from repurposed materials or a simple string system, the DIY approach allows you to tailor the support to the specific space and bean variety. This maximizes space utilization, improves air circulation, and makes harvesting easier, all key benefits of vertical gardening.
Leave a Comment