
Alcohol and dish soap cleaner – sounds like a bartender’s secret weapon, right? Well, in this case, it’s your secret weapon for a sparkling clean home, and I’m here to tell you all about it! Forget those harsh chemicals and expensive cleaning products; we’re diving into the world of DIY cleaning with a simple, effective, and surprisingly powerful solution.
The beauty of homemade cleaners isn’t just about saving money; it’s about taking control of what you bring into your home. For generations, resourceful homemakers have relied on simple ingredients to keep their spaces clean and healthy. Think about it – before the age of mass-produced cleaners, vinegar, baking soda, and yes, even alcohol, were staples in every household. We’re simply rediscovering the wisdom of our ancestors, with a modern twist!
But why alcohol and dish soap cleaner, specifically? Well, let’s face it, life gets messy! From greasy stovetops to grimy bathroom tiles, we’re constantly battling dirt and grime. This DIY cleaner is a fantastic degreaser, disinfectant, and all-around grime buster. It’s perfect for those of us who want a clean home without the harsh chemicals or the hefty price tag. Plus, it’s incredibly easy to make, and I’m going to show you exactly how!
DIY Streak-Free Window Cleaner: Alcohol and Dish Soap Magic!
Hey everyone! I’m so excited to share my go-to recipe for sparkling clean windows. Forget those expensive store-bought cleaners – this DIY solution using just alcohol and dish soap is incredibly effective, super affordable, and leaves your windows streak-free! I’ve been using this for years, and trust me, you’ll never go back.
What You’ll Need: The Essential Supplies
Before we dive in, let’s gather our supplies. This is a pretty simple list, so you probably already have most of these things lying around.
* **Isopropyl Alcohol (Rubbing Alcohol):** 70% or 91% works great. I usually opt for 70% because it’s readily available and a bit gentler, but 91% will evaporate faster.
* **Dish Soap:** A small amount of mild dish soap is key. I prefer using a clear, unscented dish soap to avoid any potential residue or streaks. Dawn is a popular choice, but any gentle dish soap will do.
* **Distilled Water:** This is crucial for streak-free results! Tap water can contain minerals that leave spots.
* **Spray Bottle:** A clean, empty spray bottle is essential for application. Make sure it’s properly cleaned to avoid contaminating the solution.
* **Microfiber Cloths:** These are my secret weapon for streak-free cleaning! They’re super absorbent and won’t leave lint behind.
* **Optional: Squeegee:** If you have large windows or want a professional finish, a squeegee can be a great addition.
* **Optional: Bucket:** For pre-cleaning heavily soiled windows.
The Perfect Recipe: Mixing the Ingredients
Okay, now for the fun part – mixing our window cleaning solution! Getting the ratios right is important for optimal results.
1. **Gather Your Measuring Tools:** I like to use measuring cups and spoons to ensure accuracy, but you can also eyeball it once you’ve made the recipe a few times.
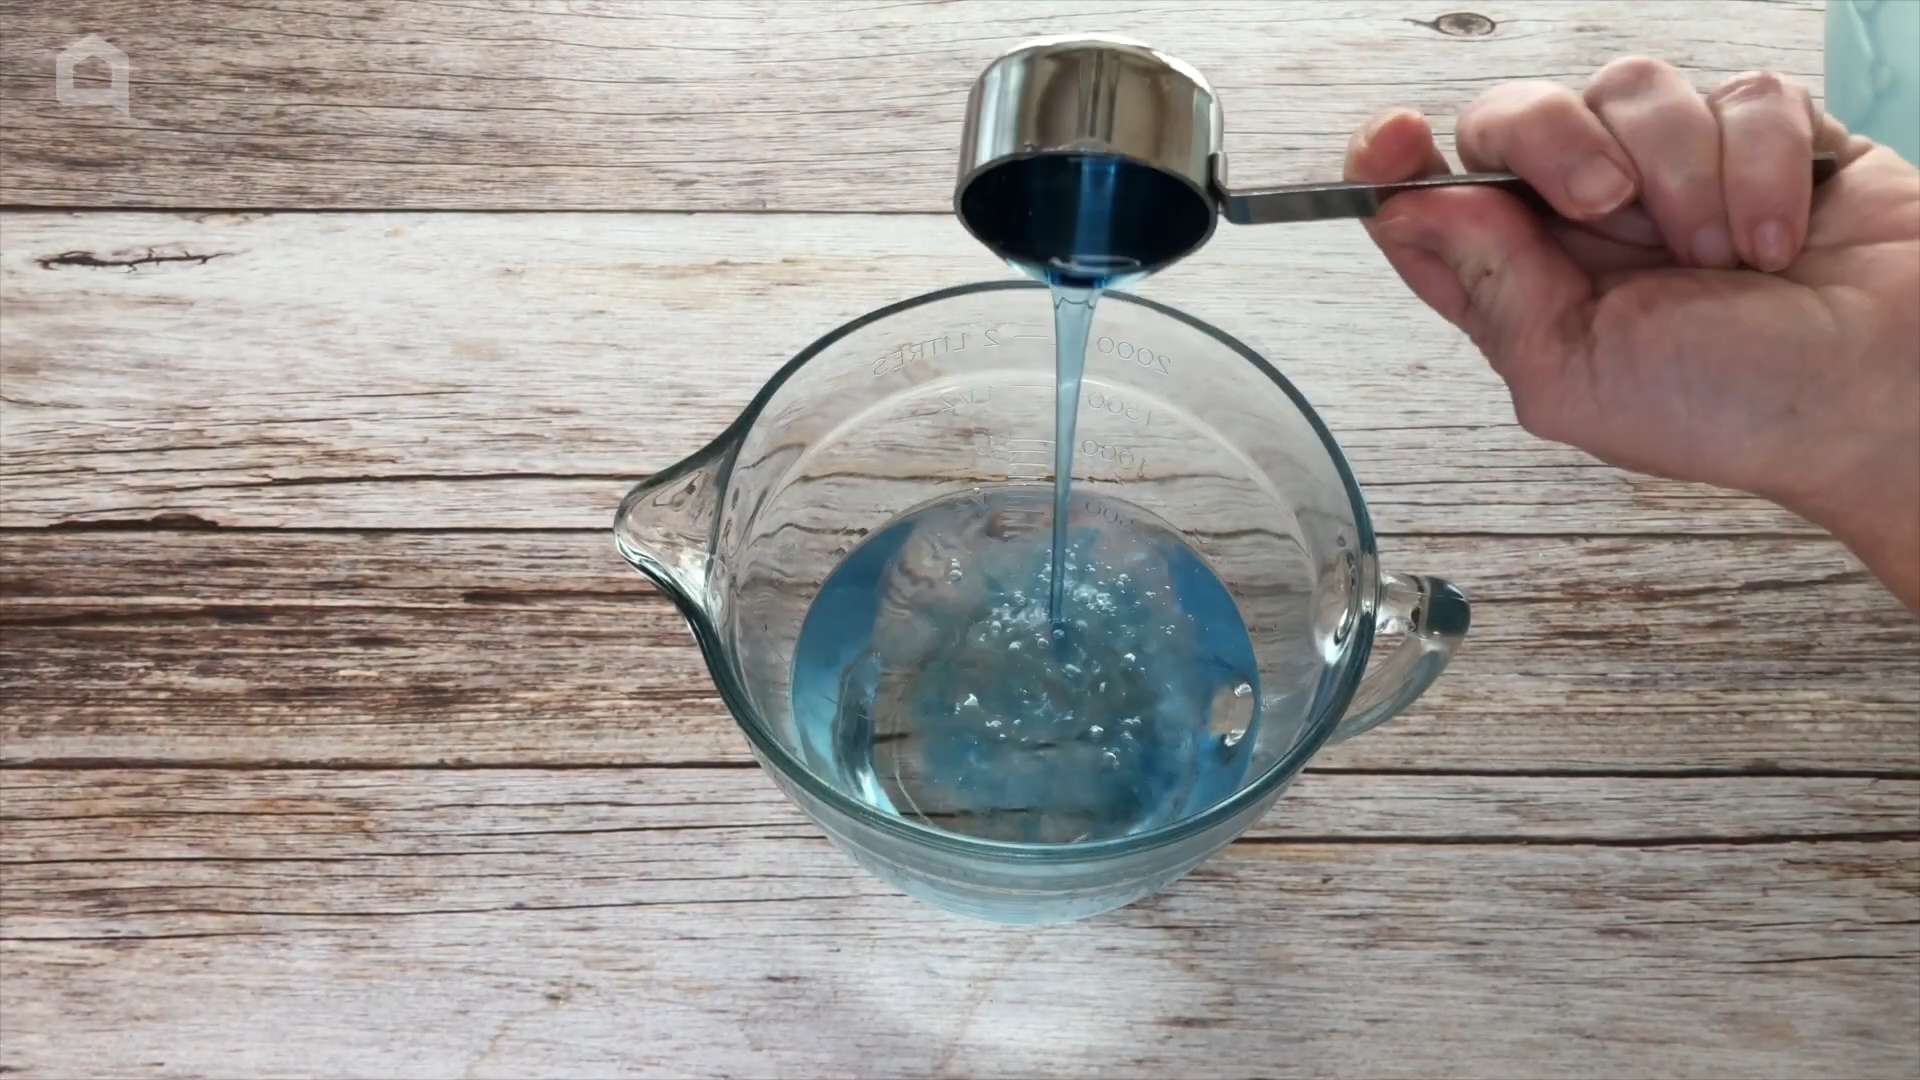
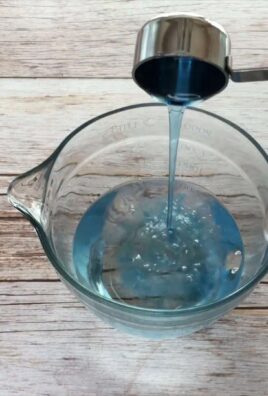
2. **Pour in the Alcohol:** In your spray bottle, pour 1 cup of isopropyl alcohol. This is the main cleaning agent, cutting through grease and grime.
3. **Add the Dish Soap:** Add just 1 tablespoon of dish soap to the spray bottle. Remember, a little goes a long way! Too much soap can leave a residue.
4. **Top with Distilled Water:** Fill the rest of the spray bottle with distilled water, leaving a little space at the top.
5. **Shake Well:** Secure the spray bottle lid tightly and shake vigorously to combine all the ingredients. You want to make sure the soap is fully dissolved.
Cleaning Time! Step-by-Step Window Cleaning Guide
Now that we have our amazing window cleaner, let’s get those windows sparkling!
1. **Prepare the Windows:** Before you start spraying, give your windows a quick once-over. Remove any cobwebs, loose dirt, or debris with a brush or vacuum cleaner attachment.
2. **Pre-Clean Heavily Soiled Windows (Optional):** If your windows are particularly dirty, I recommend pre-cleaning them with a bucket of warm water and a sponge. This will remove the bulk of the grime and make the cleaning process much easier.
3. **Spray the Window:** Hold the spray bottle a few inches away from the window and spray a generous amount of the cleaning solution onto the glass. Don’t be afraid to saturate the surface.
4. **Wipe with a Microfiber Cloth:** Immediately wipe the window with a clean, dry microfiber cloth. Use overlapping strokes to ensure you cover the entire surface. Apply gentle pressure to remove any stubborn spots.
5. **Dry with a Clean Microfiber Cloth (or Squeegee):** For a streak-free finish, use a second clean, dry microfiber cloth to buff the window dry. If you’re using a squeegee, overlap each stroke slightly and wipe the blade clean after each pass.
6. **Repeat if Necessary:** If your windows are extremely dirty, you may need to repeat the spraying and wiping process.
7. **Clean the Edges:** Don’t forget to wipe down the edges and corners of the window with a clean microfiber cloth to remove any remaining solution or dirt.
Troubleshooting: Common Issues and Solutions
Even with the best recipe, you might encounter a few challenges. Here are some common issues and how to fix them:
* **Streaks:** If you’re seeing streaks, it could be due to a few reasons:
* **Too much dish soap:** Reduce the amount of dish soap in your next batch.
* **Dirty microfiber cloths:** Make sure your cloths are clean and dry. Wash them frequently.
* **Hard water:** Ensure you’re using distilled water.
* **Not drying properly:** Buff the windows thoroughly with a clean, dry microfiber cloth.
* **Residue:** If you’re noticing a film or residue on your windows, it’s likely due to too much dish soap. Try reducing the amount in your next batch or wiping the windows down with plain distilled water after cleaning.
* **Smearing:** Smearing can occur if your windows are too hot or if you’re using a dirty cloth. Clean windows on a cloudy day or in the early morning or late evening when the sun isn’t directly hitting them. Always use clean microfiber cloths.
* **Spotting:** Spotting is usually caused by hard water. Make sure you’re using distilled water in your cleaning solution.
Extra Tips and Tricks for Sparkling Windows
Here are a few extra tips to help you achieve the best possible results:
* **Clean on a Cloudy Day:** Avoid cleaning windows in direct sunlight, as the solution can dry too quickly and leave streaks.
* **Wash Microfiber Cloths Regularly:** Dirty cloths can spread dirt and grime, so wash them frequently in hot water with a mild detergent. Avoid using fabric softener, as it can reduce their absorbency.
* **Use a Ladder Safely:** If you’re cleaning high windows, use a sturdy ladder and always have someone spot you.
* **Clean Window Screens:** Don’t forget to clean your window screens! You can use a brush or vacuum cleaner attachment to remove dust and debris. For a deeper clean, wash them with soapy water and rinse thoroughly.
* Test in an Inconspicuous Area: Before cleaning all your windows, test the solution in a small, hidden area to ensure it doesn’t damage the glass or surrounding surfaces.
* Clean Windows Inside and Out: For truly sparkling windows, clean both the inside and outside surfaces.
* Don’t Forget the Mirrors: This solution works great on mirrors too!
Why This Works: The Science Behind the Sparkle
So, why does this simple recipe work so well? Let’s break it down:
* **Isopropyl Alcohol:** Alcohol is a fantastic solvent, meaning it can dissolve grease, grime, and other stubborn residues. It also evaporates quickly, which helps prevent streaks.
* **Dish Soap:** Dish soap acts as a surfactant, which means it reduces the surface tension of water, allowing it to spread more easily and lift dirt away from the glass.
* **Distilled Water:** Distilled water is free of minerals and impurities that can cause streaks and spots.
Alternative Uses for Your DIY Cleaner
This cleaner isn’t just for windows! I’ve found it works wonders on other surfaces too:
* **Mirrors:** As mentioned earlier, it’s perfect for cleaning mirrors without leaving streaks.
* **Glass Shower Doors:** Say goodbye to soap scum! This solution can help keep your glass shower doors sparkling clean.
* **Chrome Fixtures:** Use it to polish chrome fixtures in your bathroom and kitchen.
* **Car Windows:** It’s safe to use on your car windows too!
Safety First: Important Precautions
While this DIY cleaner is relatively safe, it’s important to take a few precautions:
* **Ventilation:** Work in a well-ventilated area to avoid inhaling too much alcohol vapor.
* **Eye Protection:** Wear safety glasses or goggles to protect your eyes from splashes.
* **Skin Sensitivity:** If you have sensitive skin, wear gloves to avoid irritation.
* **Keep Out of Reach of Children and Pets:** Store the cleaning solution in a safe place out of reach of children and pets.
* Do not mix with Bleach: Never mix this solution with bleach or other cleaning products, as it can create harmful fumes.
I hope you enjoy this DIY window cleaner as much as I do! It’s a simple, effective, and affordable way to keep your windows sparkling clean. Happy cleaning!
Conclusion
So, there you have it! This simple yet incredibly effective DIY alcohol and dish soap cleaner is a game-changer for anyone looking to achieve sparkling surfaces without harsh chemicals or breaking the bank. We’ve walked you through the easy steps, highlighted the benefits, and hopefully, convinced you that this is a must-try cleaning solution.
Why is it a must-try? Because it’s a powerful degreaser, a fantastic disinfectant, and a streak-free wonder all rolled into one. Think about it: no more expensive, store-bought cleaners filled with ingredients you can’t even pronounce. This homemade solution is transparent, effective, and gives you complete control over what you’re using in your home. Plus, it’s incredibly versatile.
But don’t just take our word for it! We encourage you to experiment and find what works best for your needs. Here are a few suggestions and variations to consider:
* Scent Sensations: Add a few drops of your favorite essential oil for a pleasant aroma. Lavender, lemon, or eucalyptus are excellent choices for a fresh and clean scent. Be mindful of the surface you are cleaning, as some essential oils can react with certain materials.
* Vinegar Boost: For extra cleaning power, especially on stubborn stains or hard water spots, add a tablespoon of white vinegar to the mix. However, be cautious when using vinegar on certain surfaces like marble or granite, as it can etch the stone.
* Spray Bottle Selection: Choose a spray bottle that provides a fine mist for even distribution. A good quality spray bottle will also prevent leaks and ensure the cleaner lasts longer.
* Surface Specifics: While this cleaner is generally safe for most surfaces, always test it in an inconspicuous area first, especially on delicate materials like wood or painted surfaces. Dilute the solution further with water if needed.
* Glass Gleam: For windows and mirrors, use distilled water instead of tap water to prevent mineral deposits and ensure a truly streak-free shine.
This DIY alcohol and dish soap cleaner is more than just a cleaning solution; it’s a step towards a more sustainable and healthier home. It’s about taking control of the products you use and reducing your reliance on potentially harmful chemicals. It’s about saving money without compromising on cleanliness.
We are confident that once you try this DIY cleaner, you’ll be amazed by the results. It’s a simple, effective, and affordable way to keep your home sparkling clean. So, go ahead, give it a try! We’re eager to hear about your experiences. Share your tips, variations, and before-and-after photos in the comments below. Let’s build a community of clean-home enthusiasts who are passionate about natural and effective cleaning solutions. We believe that this **alcohol and dish soap cleaner** will become a staple in your cleaning routine.
Frequently Asked Questions (FAQ)
Is this DIY cleaner safe to use on all surfaces?
While this DIY alcohol and dish soap cleaner is generally safe for most non-porous surfaces like countertops, tiles, glass, and stainless steel, it’s always best to test it in an inconspicuous area first, especially on delicate materials like wood, painted surfaces, or natural stone (marble, granite). The alcohol content, while diluted, could potentially damage certain finishes. If you’re unsure, dilute the solution further with water or consult the manufacturer’s recommendations for the surface in question. For example, avoid using it on waxed furniture as it can strip the wax.
What type of alcohol should I use?
Isopropyl alcohol (rubbing alcohol) with a concentration of 70% or higher is recommended for its disinfecting properties. You can also use denatured alcohol, which is ethanol with added ingredients to make it undrinkable. Avoid using alcohols that contain fragrances or additives, as these could leave residue or streaks on surfaces. The higher the alcohol percentage, the better the disinfecting power.
What kind of dish soap is best?
A mild, clear dish soap is ideal. Avoid using dish soaps that contain added moisturizers, lotions, or dyes, as these can leave a film or streaks on surfaces. A simple, grease-cutting dish soap is all you need. Consider using a natural or plant-based dish soap for an even more eco-friendly cleaning solution.
Can I use this cleaner to disinfect?
Yes, the alcohol in this cleaner provides disinfecting properties. However, it’s important to note that this DIY cleaner is not a substitute for hospital-grade disinfectants. For general household cleaning and disinfecting, it’s effective against many common germs and bacteria. Allow the cleaner to sit on the surface for a few minutes before wiping it away to maximize its disinfecting power.
How long does this cleaner last?
This DIY cleaner can last for several weeks or even months if stored properly in a cool, dark place. However, it’s best to use it within a few months to ensure the alcohol doesn’t evaporate and the dish soap doesn’t separate. Label the spray bottle with the date you made the cleaner so you can keep track of its freshness.
Can I use this cleaner on electronics?
No, it’s generally not recommended to use this cleaner on electronics, especially screens. The alcohol and dish soap can damage the delicate coatings and components of electronic devices. Use a specialized screen cleaner or a microfiber cloth dampened with distilled water for cleaning electronics.
My cleaner is leaving streaks. What am I doing wrong?
Streaking can be caused by several factors:
* Too much dish soap: Use only a small amount of dish soap. Too much can leave a residue.
* Hard water: Use distilled water instead of tap water, especially for cleaning glass and mirrors.
* Dirty cloth: Use a clean microfiber cloth to wipe the surface.
* Insufficient wiping: Ensure you’re thoroughly wiping the surface dry after applying the cleaner.
* Soap residue: Rinse the surface with clean water and dry with a clean cloth.
Can I add bleach to this cleaner for extra disinfecting power?
No, never mix alcohol and bleach. This combination creates toxic fumes that can be harmful to your health. Always use cleaning products separately and follow the manufacturer’s instructions.
Is this cleaner safe for pets and children?
While this cleaner is made with relatively safe ingredients, it’s still important to keep it out of reach of children and pets. The alcohol can be harmful if ingested. Store the cleaner in a labeled spray bottle and keep it in a secure location. If your pet or child ingests the cleaner, contact a medical professional or veterinarian immediately.
Can I use this cleaner on wood floors?
Use extreme caution when using this cleaner on wood floors. The alcohol can strip the finish and damage the wood. If you choose to use it, dilute the solution significantly with water and test it in an inconspicuous area first. Avoid using it on waxed wood floors. A better option for wood floors is a cleaner specifically designed for wood.
Leave a Comment