
Balcony Chili Growing Tips: Dreaming of adding a fiery kick to your meals with homegrown chilies, but think you need acres of land? Think again! I’m here to tell you that even the smallest balcony can become a chili pepper paradise. For centuries, chilies have been prized not only for their flavor but also for their medicinal properties, playing a vital role in cuisines and cultures around the globe. From the ancient Aztecs who used them in rituals to the modern-day foodies who crave their heat, chilies have always held a special place in our hearts (and stomachs!).
But let’s face it, not everyone has a sprawling garden. That’s where these DIY balcony chili growing tips come in! I’m going to share my secrets to successfully cultivating these flavorful fruits in even the most limited spaces. Imagine stepping onto your balcony and plucking fresh chilies whenever you need a burst of flavor. No more trips to the grocery store for overpriced, often lackluster peppers. With a few simple tricks and a little bit of love, you can enjoy a bountiful harvest right outside your door. So, let’s dive into the world of balcony chili growing tips and transform your outdoor space into a vibrant, edible oasis!
Balcony Chili: Your Guide to a Fiery Harvest!
Hey chili lovers! Do you dream of your own chili harvest right on your balcony? Great! I’ll show you how to turn your balcony into a little chili paradise with a few simple tricks and tips. Don’t worry, it’s easier than you think!
Choosing the Right Chili Variety
Before we get started, choosing the right chili variety is crucial. Not every chili feels at home on the balcony. Here are a few varieties that are particularly well-suited:
- Jalapeño: A classic that is robust and easy to care for. Perfect for beginners!
- Cayenne: Hotter than Jalapeño, but still manageable. Produces many pods.
- Habanero: For those who like it really hot! Needs a little more attention, but rewards you with serious fire.
- Thai Chili: Small, but powerful! Ideal for Asian dishes and very productive.
- Pimiento de Padrón: A Spanish specialty where some pods are hot and others are mild – an exciting surprise!
- Bush Chilies: These varieties are specially bred for growing in pots and remain compact.
Important: When buying, pay attention to the chili’s ripening time. The shorter the ripening time, the sooner you can harvest!
The Preparation: What You Need
Before you start planting, you should make sure you have everything you need on hand. Here is a checklist:
- Chili seeds or young plants: The easiest way is to start with young plants. Seeds are cheaper but require a bit more patience.
- Pots: Choose pots with sufficient volume (at least 10 liters per plant, 20 liters are better for larger varieties). Make sure there are drainage holes so that water can run off.
- Soil: Use special chili or vegetable soil. This is richer in nutrients than potting soil and offers the plants optimal conditions.
- Fertilizer: Liquid fertilizer for chili plants is ideal. But you can also use organic fertilizer such as horn shavings or compost.
- Watering can or hose: For regular watering.
- Plant stakes: For larger chili varieties to support the plants.
- Spray bottle: For watering the leaves and preventing pests.
- Gloves: To protect your hands when handling soil and chili plants.
Sowing or Young Plants?
You have the choice: Either you grow your chilies yourself from seed or you buy young plants. Both options have their pros and cons.
- Sowing:
- Advantages: Cheaper, greater variety of types, you have the entire process in view.
- Disadvantages: Takes more time and patience, requires prior knowledge.
- Young plants:
- Advantages: Faster results, easier, ideal for beginners.
- Disadvantages: More expensive, less variety.
If you decide to sow, it is best to start in February or March. This gives the plants enough time to grow strong until summer.
Sowing: Step by Step
- Preparation: Fill small seed pots with seed starting mix. Lighten the soil slightly.
- Sowing: Place 2-3 chili seeds per pot on the soil. Cover the seeds with a thin layer of soil (approx. 0.5 cm).
- Watering: Spray the soil carefully with water. Avoid waterlogging.
- Location: Place the pots in a warm and bright place (e.g. windowsill). A temperature of 22-25°C is ideal.
- Covering: Cover the pots with plastic wrap or a mini-greenhouse to increase humidity. Ventilate briefly every day to prevent mold.
- Germination: The first seedlings should appear after approx. 1-3 weeks. Remove the cover as soon as the plants emerge from the soil.
- Pricking out: When the plants have 2-4 leaves, you can prick them out. This means you transfer each plant individually into a larger pot.
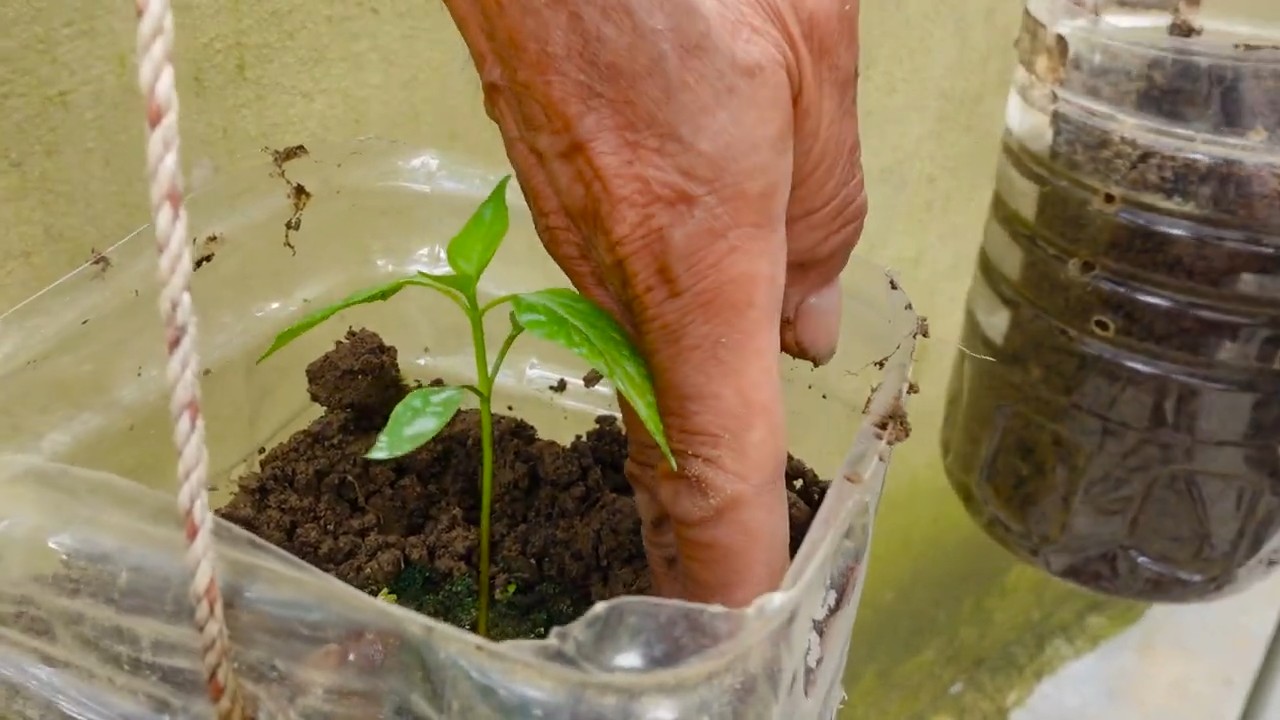
Planting the Young Plants
If you have opted for young plants, you can skip this step. But there are a few things to keep in mind here too:
- Preparation: Choose a sunny location for your chili plants. Chilies love the sun!
- Prepare the pot: Fill the pot with chili or vegetable soil. Make sure the pot has drainage holes.
- Planting: Carefully remove the young plant from the nursery pot. Loosen the root ball a little.
- Inserting: Place the plant in the pot. The top of the root ball should be level with the soil surface.
- Watering in: Water the plant thoroughly.
- Supporting: For larger chili varieties, you can use a plant stake to support the plant.
The Care: How to Keep Your Chilies Happy
Proper care is the be-all and end-all for a rich chili harvest. Here are the most important points:
- Watering: Chilies need regular water, especially on hot days. The soil should always be slightly moist, but avoid waterlogging. It is best to water in the morning or evening when the sun is not so strong.
- Fertilizing: Fertilize your chili plants regularly with a special chili fertilizer. Start about 2-3 weeks after planting. Follow the instructions on the fertilizer packaging.
- Location: Chilies love the sun! Place your plants in the sunniest possible location. At least 6 hours of sun per day are ideal.
- Pruning: Pinching out (removing the side shoots) is not absolutely necessary for chili plants, but it can increase the yield. Simply remove the shoots that grow between the main stem and side shoots.
- Overwintering: Chilies are perennial and can be overwintered. Cut the plant back in autumn and place it in a bright and cool place (approx. 10-15°C). Water only a little. In spring, you can put the plant back outside.
Pests and Diseases
Chili plants can also be affected by pests and diseases. Here are the most common problems and how you can combat them:
- Aphids: Small, green or black insects that settle on the leaves and shoots. Combat them with a jet of water or with a biological insecticide.
- Spider mites: Very small, spider-like animals that form fine webs on the leaves. Increase the humidity and combat them with a special agent against spider mites.
- Whitefly: Small, white insects that fly up when the plant is touched. Combat them with yellow sticky traps or with a biological insecticide.
- Fungal diseases: Occur mainly in high humidity. Ensure good ventilation and remove affected leaves.
Important: Check your plants regularly for pests and diseases. The sooner you detect a problem, the easier it is to fix.
Die Ernte: End
Conclusion
So, there you have it! Transforming your balcony into a vibrant chili pepper paradise is not only achievable but also incredibly rewarding. We’ve explored the key elements, from selecting the right chili varieties and providing optimal sunlight to mastering watering techniques and combating common pests. This journey into balcony chili growing is more than just a gardening project; it’s an opportunity to connect with nature, add a touch of spice to your life, and enjoy the satisfaction of harvesting your own homegrown chilies.
Why is this DIY trick a must-try? Because it empowers you to control the quality and freshness of your chilies, offering a flavor experience far superior to store-bought options. Imagine the burst of flavor from a freshly picked habanero in your homemade salsa or the subtle heat of a cayenne pepper enhancing your favorite stir-fry. Plus, the vibrant colors and textures of chili plants add a unique aesthetic appeal to your balcony, creating a mini-oasis of green and red.
But the benefits extend beyond culinary delights and visual appeal. Balcony chili growing is a fantastic stress reliever. Tending to your plants, observing their growth, and nurturing them to fruition can be incredibly therapeutic. It’s a chance to disconnect from the digital world and reconnect with the natural rhythms of life.
Ready to take your balcony chili growing to the next level? Consider these variations and suggestions:
* Experiment with different chili varieties: Don’t limit yourself to just one type of chili. Explore the diverse world of chili peppers, from the mild poblano to the fiery ghost pepper. Each variety offers a unique flavor profile and heat level, allowing you to tailor your harvest to your specific preferences.
* Companion planting: Enhance your chili plants’ growth and deter pests by incorporating companion plants like basil, marigolds, and nasturtiums. These plants not only add beauty to your balcony garden but also provide valuable benefits to your chili plants.
* Vertical gardening: Maximize your balcony space by utilizing vertical gardening techniques. Hanging baskets, wall planters, and stacked pots can create a stunning display of chili plants while saving valuable floor space.
* DIY fertilizer: Create your own organic fertilizer using kitchen scraps like coffee grounds, eggshells, and banana peels. This is a sustainable and cost-effective way to nourish your chili plants and promote healthy growth.
* Seed saving: Once your chili plants have produced fruit, consider saving the seeds for future planting. This allows you to perpetuate your favorite chili varieties and create a self-sustaining balcony garden.
We’re confident that you’ll find balcony chili growing to be a rewarding and enjoyable experience. So, grab your gardening gloves, select your favorite chili varieties, and get ready to transform your balcony into a spicy haven.
We encourage you to embark on this exciting journey and share your experiences with us. Post photos of your balcony chili garden on social media using #BalconyChiliAdventures and tag us! We can’t wait to see your creations and learn from your successes. Let’s build a community of balcony chili growers and spread the joy of homegrown spice! Remember, even a small balcony can yield a bountiful harvest of delicious and fiery chilies. Happy growing!
Frequently Asked Questions (FAQ)
What are the best chili varieties to grow on a balcony?
The best chili varieties for balcony growing are those that are compact and well-suited to container gardening. Some excellent choices include:
* Thai Chilies: These small, prolific peppers are perfect for adding a fiery kick to Asian dishes. They thrive in containers and produce a continuous harvest.
* Jalapeños: A classic choice for their moderate heat and versatility. Jalapeños are relatively easy to grow and produce a good yield in containers.
* Cayenne Peppers: These slender, red peppers are known for their intense heat and are ideal for drying and grinding into chili powder. They are well-suited to container growing.
* Serrano Peppers: Similar to jalapeños but with a slightly higher heat level. Serrano peppers are a good choice for those who prefer a spicier flavor.
* Habaneros: For the adventurous gardener, habaneros offer an intense fruity flavor and scorching heat. They require a bit more care but are well worth the effort.
* Poblano Peppers: A milder option, poblanos are great for stuffing or roasting. They are relatively large plants, so choose a larger container.
* Bell Peppers: While technically not chilies, bell peppers are a popular choice for balcony gardens due to their mild flavor and versatility. They come in a variety of colors, adding visual appeal to your garden.
Consider your personal preferences and the amount of space you have available when selecting chili varieties for your balcony garden.
How much sunlight do chili plants need on a balcony?
Chili plants require at least 6-8 hours of direct sunlight per day to thrive. If your balcony doesn’t receive enough direct sunlight, you may need to supplement with grow lights. Position your chili plants in the sunniest spot on your balcony, and rotate them regularly to ensure even exposure to sunlight.
How often should I water my chili plants on a balcony?
Water your chili plants when the top inch of soil feels dry to the touch. Avoid overwatering, as this can lead to root rot. The frequency of watering will depend on the weather conditions, the size of your containers, and the type of soil you are using. During hot, dry weather, you may need to water your plants daily. In cooler, wetter weather, you may only need to water them every few days. Ensure your containers have drainage holes to prevent waterlogging.
What type of soil is best for growing chilies on a balcony?
Use a well-draining potting mix that is specifically formulated for container gardening. Avoid using garden soil, as it can become compacted and poorly drained in containers. A good potting mix will provide adequate drainage, aeration, and nutrients for your chili plants. You can also amend your potting mix with compost or other organic matter to improve its fertility.
How do I fertilize my chili plants on a balcony?
Fertilize your chili plants regularly with a balanced fertilizer that is specifically formulated for vegetables. Follow the instructions on the fertilizer package for application rates and frequency. You can also use organic fertilizers like compost tea or fish emulsion. Avoid over-fertilizing, as this can lead to excessive foliage growth and reduced fruit production.
How do I protect my chili plants from pests and diseases on a balcony?
Inspect your chili plants regularly for signs of pests and diseases. Common pests that can affect chili plants include aphids, spider mites, and whiteflies. You can control these pests with insecticidal soap, neem oil, or by handpicking them off the plants. Common diseases that can affect chili plants include powdery mildew and fungal leaf spots. You can prevent these diseases by providing good air circulation, avoiding overwatering, and using a fungicide if necessary.
Can I grow chili plants on a balcony in winter?
In colder climates, you can overwinter your chili plants indoors. Before the first frost, bring your chili plants indoors and place them in a sunny location. Reduce watering and fertilizing during the winter months. You can also prune your plants back to encourage new growth in the spring.
How long does it take for chili plants to produce fruit on a balcony?
The time it takes for chili plants to produce fruit depends on the variety of chili, the growing conditions, and the age of the plant. Generally, it takes about 60-90 days from transplanting for chili plants to start producing fruit.
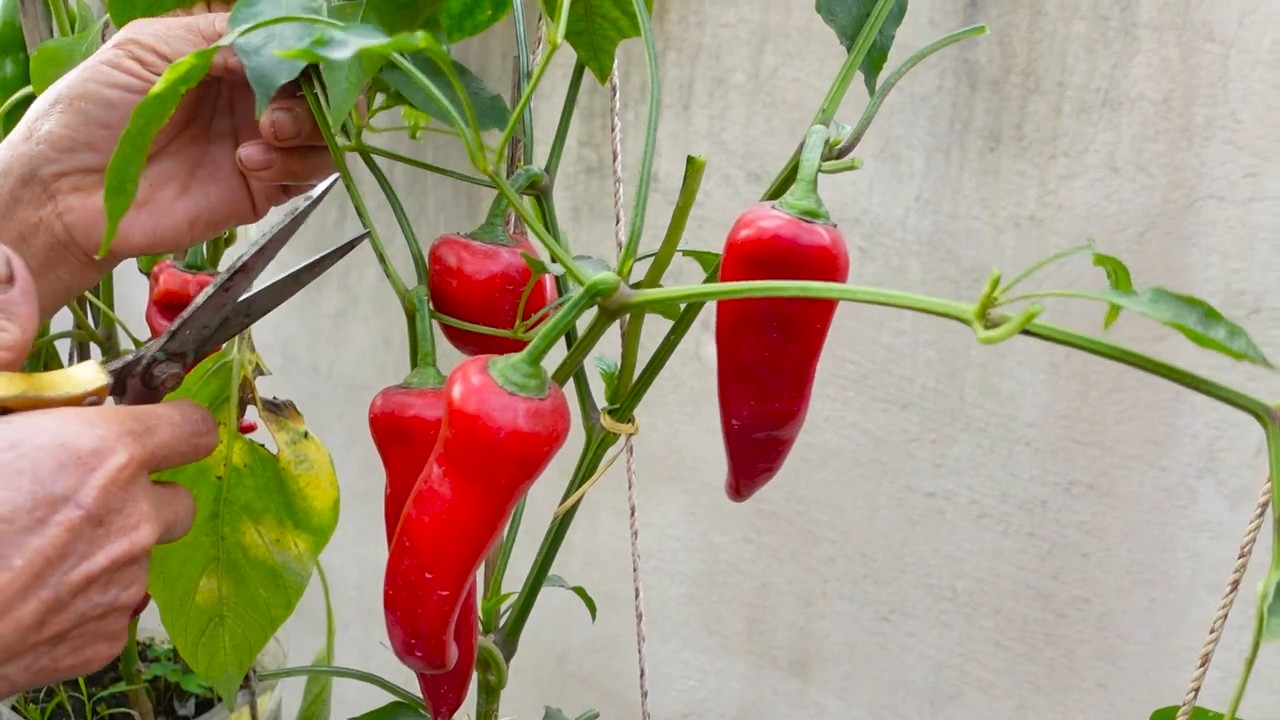
How do I harvest chili peppers from my balcony garden?
Harvest chili peppers when they have reached their mature color and size. Use a sharp knife or scissors to cut the peppers from the plant, leaving a small stem attached. Handle chili peppers with care, as some varieties can be very hot. Wear gloves when handling hot peppers to avoid skin irritation.
Can I dry my homegrown chili peppers from my balcony garden?
Yes, you can dry your homegrown chili peppers. There are several ways to dry chili peppers, including air-drying, oven-drying, and using a dehydrator. Air-drying is the simplest method, but it can take several weeks. Oven-drying is faster, but it requires careful monitoring to prevent the peppers from burning. A dehydrator is the most efficient method, as it provides consistent heat and airflow. Once the peppers are completely dry, store them in an airtight container in a cool, dark place.

Leave a Comment