
Grape Growing Easy Hack: Imagine plucking juicy, sun-ripened grapes straight from your own backyard! For centuries, grapes have been a symbol of abundance, celebration, and even healing, playing a significant role in cultures around the world, from ancient Roman feasts to modern-day wine production. But the thought of cultivating your own vineyard can seem daunting, right?
I get it! Many people believe that growing grapes is only for experienced farmers with acres of land. But what if I told you that with a few clever tricks and a little DIY spirit, you could enjoy the sweet rewards of homegrown grapes, even in a small space?
This article is your guide to a grape growing easy hack that will simplify the process and increase your chances of a bountiful harvest. We’ll explore simple, effective techniques that bypass common challenges, making grape cultivation accessible to everyone. Forget complicated procedures and expensive equipment. I’m here to show you how to unlock the secrets to successful grape growing with minimal effort and maximum enjoyment. Let’s get started and transform your garden into a grape-lover’s paradise!

Grow Grapes Like a Pro: My Foolproof DIY Hack!
Okay, grape lovers, listen up! I’m about to share my secret weapon for growing tons of delicious grapes, even if you think you have a “brown thumb.” This isn’t some complicated vineyard technique; it’s a simple, effective DIY hack that anyone can do. I’ve been using this method for years, and trust me, it works wonders. Get ready for a grape harvest that will make your neighbors jealous!
What You’ll Need: The Grape Growing Arsenal
Before we dive in, let’s gather our supplies. Don’t worry, you probably have most of this stuff lying around already!
* Grape Cuttings: This is the most important part! You can get these from a friend who grows grapes, a local nursery, or even online. Make sure they’re healthy, dormant cuttings (usually taken in late winter or early spring). Look for cuttings that are about pencil-thickness and have at least 3-4 buds.
* Rooting Hormone: This will significantly increase your chances of success. I prefer a powder form, but liquid works too.
* Small Pots or Containers: Think yogurt containers, plastic cups, or small nursery pots. Make sure they have drainage holes!
* Potting Mix: A well-draining potting mix is crucial. Avoid using garden soil, as it can compact and suffocate the roots.
* Watering Can or Spray Bottle: For gentle watering.
* Clear Plastic Bags or a Humidity Dome: To create a humid environment for rooting.
* Sharp Pruning Shears or Knife: For making clean cuts.
* Optional: A heat mat can speed up the rooting process, but it’s not essential.
Phase 1: Preparing Your Grape Cuttings
This is where the magic begins! We need to get those cuttings ready to sprout some roots.
1. Inspect Your Cuttings: Take a close look at each cutting. Make sure there are no signs of disease or damage. Healthy cuttings are key!
2. Make the Cut: Using your sharp pruning shears or knife, make a clean cut at the bottom of the cutting, just below a node (where a bud is located). Cut at a slight angle. This will help the cutting absorb water and nutrients.
3. Trim the Top (Optional): If your cuttings are long, you can trim the top to about 6-8 inches. This will help the cutting focus its energy on root development. Make a straight cut at the top.
4. Prepare the Rooting Hormone: Pour a small amount of rooting hormone into a separate container. This prevents contamination of the entire container.
Phase 2: Planting and Rooting Your Grape Cuttings
Now for the fun part – getting those cuttings into the soil!
1. Prepare Your Pots: Fill your pots or containers with the well-draining potting mix. Leave about an inch of space at the top.
2. Moisten the Soil: Water the potting mix thoroughly until it’s evenly moist, but not soggy.
3. Dip in Rooting Hormone: Dip the bottom inch of the cutting into the rooting hormone powder. Tap off any excess.
4. Plant the Cutting: Make a hole in the center of the potting mix with your finger or a pencil. Insert the cutting into the hole, making sure that at least one bud is buried below the soil surface. Gently firm the soil around the cutting.
5. Water Gently: Water the cutting gently to settle the soil.
6. Create a Humid Environment: This is where the plastic bags or humidity dome come in. Place the pot inside a clear plastic bag and seal it, or place it under a humidity dome. This will help create a humid environment that encourages root development.
7. Find the Right Spot: Place the pots in a warm, bright location, but avoid direct sunlight. Direct sunlight can scorch the cuttings. A windowsill with indirect light is perfect.
8. Maintain Moisture: Check the soil moisture regularly. The soil should be consistently moist, but not waterlogged. If the soil feels dry, mist it with a spray bottle. If you’re using plastic bags, open them every few days to allow for air circulation and prevent mold growth.
Phase 3: Monitoring and Caring for Your Grape Cuttings
Patience is key! Rooting can take several weeks, so don’t get discouraged if you don’t see results right away.
1. Check for Root Development: After a few weeks, gently tug on the cutting. If you feel resistance, that means roots are starting to form! You can also gently remove the cutting from the pot to check for roots, but be careful not to damage them.
2. Gradually Acclimate to Lower Humidity: Once you see roots, gradually acclimate the cuttings to lower humidity. Start by opening the plastic bags or humidity dome for a few hours each day, then gradually increase the time until the cuttings are fully exposed to the air.
3. Fertilize Lightly: Once the cuttings have developed a good root system, you can start fertilizing them lightly with a balanced liquid fertilizer. Follow the instructions on the fertilizer label.
4. Repot if Necessary: If the cuttings outgrow their pots, repot them into larger containers.
Phase 4: Planting Your Grape Vines in the Garden
Congratulations! You’ve successfully rooted your grape cuttings. Now it’s time to plant them in the garden.
1. Choose a Sunny Location: Grapes need at least 6-8 hours of sunlight per day. Choose a location in your garden that gets plenty of sun.
2. Prepare the Soil: Grapes prefer well-drained soil. Amend the soil with compost or other organic matter to improve drainage and fertility.
3. Dig a Hole: Dig a hole that is twice as wide and as deep as the root ball of the grape vine.
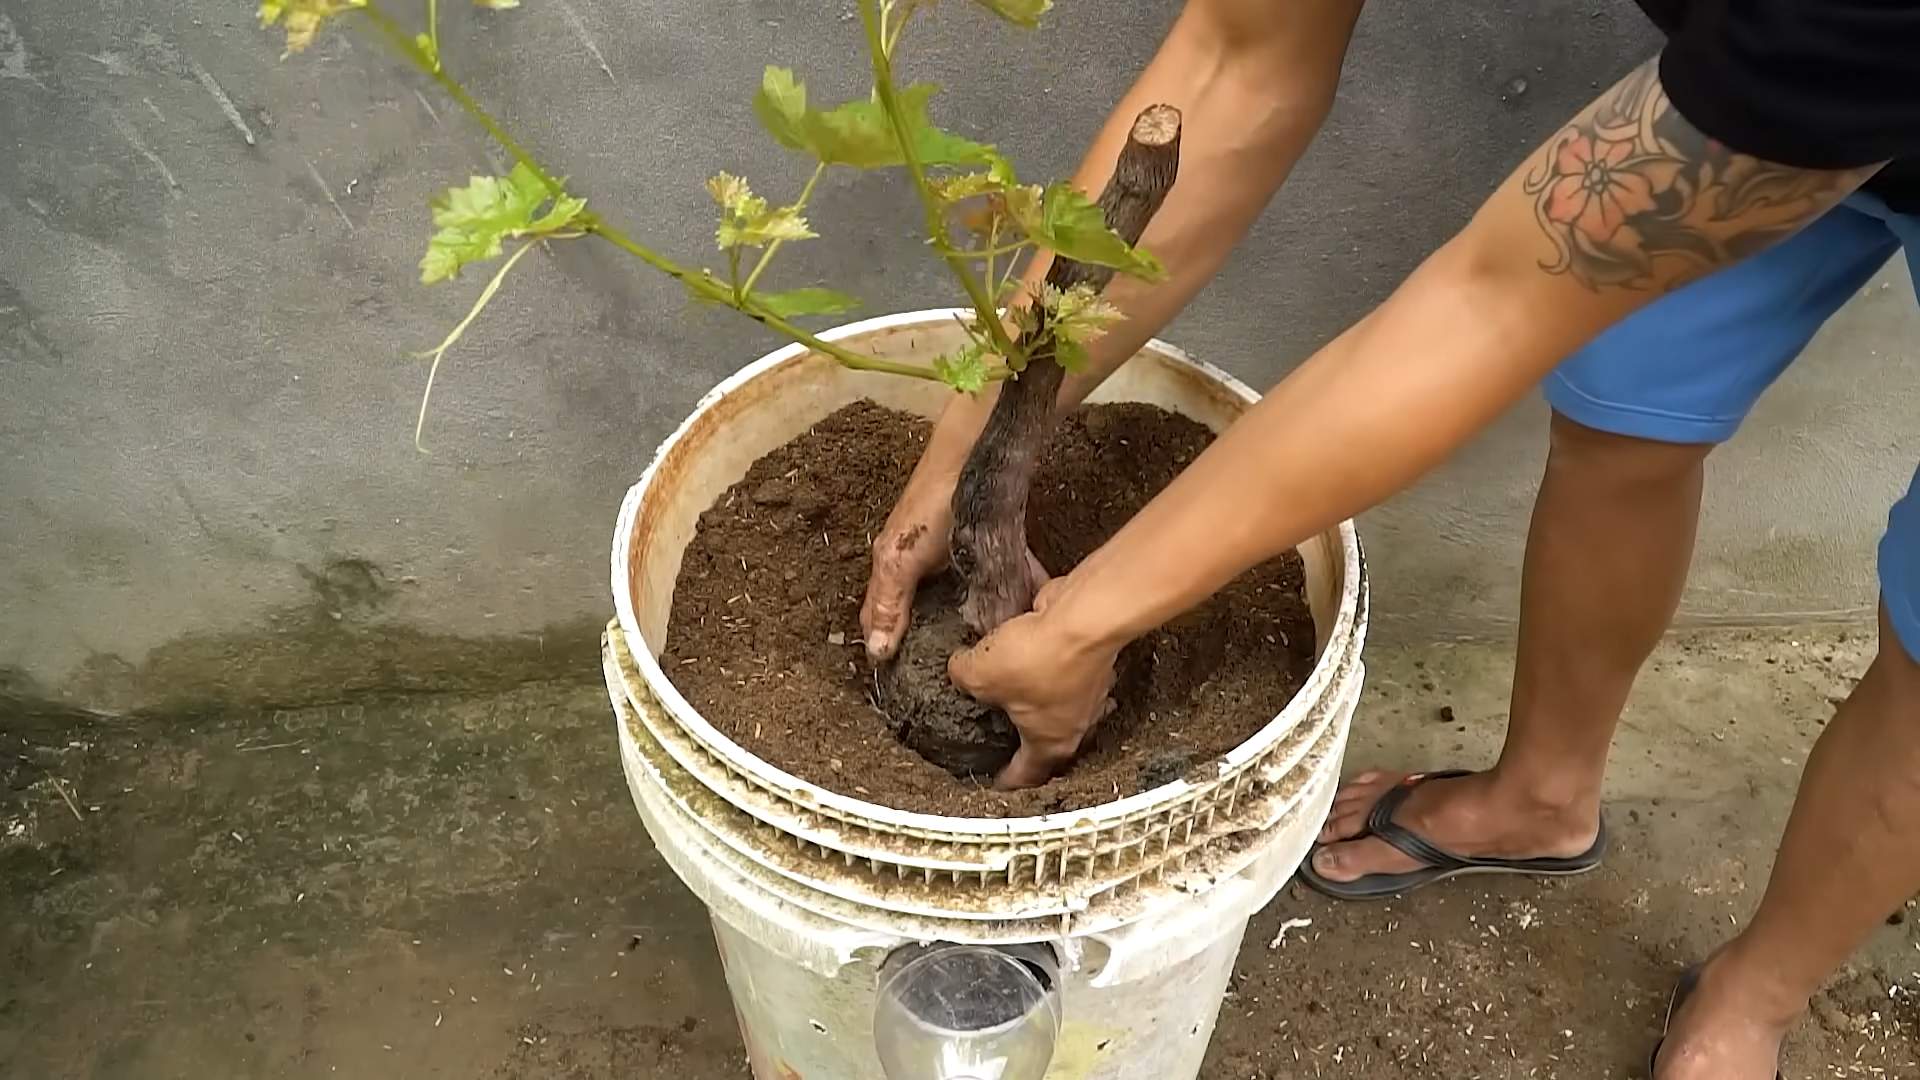
4. Plant the Grape Vine: Gently remove the grape vine from its pot and place it in the hole. Make sure the top of the root ball is level with the ground.
5. Backfill the Hole: Backfill the hole with soil, gently firming it around the grape vine.
6. Water Thoroughly: Water the grape vine thoroughly after planting.
7. Provide Support: Grape vines need support to grow properly. Install a trellis or other support system near the grape vine.
8. Mulch: Apply a layer of mulch around the base of the grape vine to help retain moisture and suppress weeds.
Extra Tips for Grape Growing Success
* Choose the Right Grape Variety: Consider your climate and growing conditions when choosing a grape variety. S
Okay, grape lovers, listen up! I’m about to share my secret weapon for growing tons of delicious grapes, even if you think you have a “brown thumb.” This isn’t some complicated vineyard technique; it’s a simple, effective DIY hack that anyone can do. I’ve been using this method for years, and trust me, it works wonders. Get ready for a grape harvest that will make your neighbors jealous!
What You’ll Need: The Grape Growing Arsenal
Before we dive in, let’s gather our supplies. Don’t worry, you probably have most of this stuff lying around already!
* Grape Cuttings: This is the most important part! You can get these from a friend who grows grapes, a local nursery, or even online. Make sure they’re healthy, dormant cuttings (usually taken in late winter or early spring). Look for cuttings that are about pencil-thickness and have at least 3-4 buds.
* Rooting Hormone: This will significantly increase your chances of success. I prefer a powder form, but liquid works too.
* Small Pots or Containers: Think yogurt containers, plastic cups, or small nursery pots. Make sure they have drainage holes!
* Potting Mix: A well-draining potting mix is crucial. Avoid using garden soil, as it can compact and suffocate the roots.
* Watering Can or Spray Bottle: For gentle watering.
* Clear Plastic Bags or a Humidity Dome: To create a humid environment for rooting.
* Sharp Pruning Shears or Knife: For making clean cuts.
* Optional: A heat mat can speed up the rooting process, but it’s not essential.
Phase 1: Preparing Your Grape Cuttings
This is where the magic begins! We need to get those cuttings ready to sprout some roots.
1. Inspect Your Cuttings: Take a close look at each cutting. Make sure there are no signs of disease or damage. Healthy cuttings are key!
2. Make the Cut: Using your sharp pruning shears or knife, make a clean cut at the bottom of the cutting, just below a node (where a bud is located). Cut at a slight angle. This will help the cutting absorb water and nutrients.
3. Trim the Top (Optional): If your cuttings are long, you can trim the top to about 6-8 inches. This will help the cutting focus its energy on root development. Make a straight cut at the top.
4. Prepare the Rooting Hormone: Pour a small amount of rooting hormone into a separate container. This prevents contamination of the entire container.
Phase 2: Planting and Rooting Your Grape Cuttings
Now for the fun part – getting those cuttings into the soil!
1. Prepare Your Pots: Fill your pots or containers with the well-draining potting mix. Leave about an inch of space at the top.
2. Moisten the Soil: Water the potting mix thoroughly until it’s evenly moist, but not soggy.
3. Dip in Rooting Hormone: Dip the bottom inch of the cutting into the rooting hormone powder. Tap off any excess.
4. Plant the Cutting: Make a hole in the center of the potting mix with your finger or a pencil. Insert the cutting into the hole, making sure that at least one bud is buried below the soil surface. Gently firm the soil around the cutting.
5. Water Gently: Water the cutting gently to settle the soil.
6. Create a Humid Environment: This is where the plastic bags or humidity dome come in. Place the pot inside a clear plastic bag and seal it, or place it under a humidity dome. This will help create a humid environment that encourages root development.
7. Find the Right Spot: Place the pots in a warm, bright location, but avoid direct sunlight. Direct sunlight can scorch the cuttings. A windowsill with indirect light is perfect.
8. Maintain Moisture: Check the soil moisture regularly. The soil should be consistently moist, but not waterlogged. If the soil feels dry, mist it with a spray bottle. If you’re using plastic bags, open them every few days to allow for air circulation and prevent mold growth.
Phase 3: Monitoring and Caring for Your Grape Cuttings
Patience is key! Rooting can take several weeks, so don’t get discouraged if you don’t see results right away.
1. Check for Root Development: After a few weeks, gently tug on the cutting. If you feel resistance, that means roots are starting to form! You can also gently remove the cutting from the pot to check for roots, but be careful not to damage them.
2. Gradually Acclimate to Lower Humidity: Once you see roots, gradually acclimate the cuttings to lower humidity. Start by opening the plastic bags or humidity dome for a few hours each day, then gradually increase the time until the cuttings are fully exposed to the air.
3. Fertilize Lightly: Once the cuttings have developed a good root system, you can start fertilizing them lightly with a balanced liquid fertilizer. Follow the instructions on the fertilizer label.
4. Repot if Necessary: If the cuttings outgrow their pots, repot them into larger containers.
Phase 4: Planting Your Grape Vines in the Garden
Congratulations! You’ve successfully rooted your grape cuttings. Now it’s time to plant them in the garden.
1. Choose a Sunny Location: Grapes need at least 6-8 hours of sunlight per day. Choose a location in your garden that gets plenty of sun.
2. Prepare the Soil: Grapes prefer well-drained soil. Amend the soil with compost or other organic matter to improve drainage and fertility.
3. Dig a Hole: Dig a hole that is twice as wide and as deep as the root ball of the grape vine.
4. Plant the Grape Vine: Gently remove the grape vine from its pot and place it in the hole. Make sure the top of the root ball is level with the ground.
5. Backfill the Hole: Backfill the hole with soil, gently firming it around the grape vine.
6. Water Thoroughly: Water the grape vine thoroughly after planting.
7. Provide Support: Grape vines need support to grow properly. Install a trellis or other support system near the grape vine.
8. Mulch: Apply a layer of mulch around the base of the grape vine to help retain moisture and suppress weeds.
Extra Tips for Grape Growing Success
* Choose the Right Grape Variety: Consider your climate and growing conditions when choosing a grape variety. Some varieties are more cold-hardy than others.
* Prune Regularly: Pruning is essential for grape production. Prune your grape vines in late winter or early spring to remove dead or damaged wood and to encourage fruit production.
* Protect from Pests and Diseases: Grapes can be susceptible to pests and diseases. Monitor your grape vines regularly and take action if you see any signs of problems.
* Be Patient: It can take several years for grape vines to start producing fruit. Don’t get discouraged if you don’t see results right away.
Troubleshooting Common Grape Growing Problems
* Cuttings Not Rooting: Make sure the cuttings are healthy, the soil is moist, and the humidity is high. Try using a heat mat to speed up the rooting process.
* Yellowing Leaves: This could be a sign of nutrient deficiency. Fertilize your grape vines with a balanced fertilizer.
* Powdery Mildew: This is a common fungal disease that can affect grapes. Treat with a fungicide.
* Birds Eating Grapes: Protect your grapes with netting.
Why This Hack Works So Well
The key to this hack is creating the perfect environment for root development. The rooting hormone encourages root growth, the well-draining potting mix prevents root rot, and the humid environment keeps the cuttings from drying out. By following these simple steps, you can significantly increase your chances of successfully rooting grape cuttings and growing your own delicious grapes!
I hope this guide helps you grow your own amazing grapes! Happy gardening!
Conclusion
So, there you have it! This simple, yet incredibly effective, DIY trick for grape growing is a game-changer for both novice and experienced gardeners alike. Forget complicated setups and expensive equipment. This method offers a straightforward, accessible path to bountiful harvests of juicy, delicious grapes. The beauty of this technique lies in its simplicity and adaptability. It’s a testament to the fact that sometimes, the most effective solutions are the most readily available.
Why is this a must-try? Because it addresses some of the most common challenges faced by grape growers: providing adequate support, maximizing sunlight exposure, and promoting healthy air circulation. By implementing this easy hack, you’re essentially creating an optimal environment for your grapevines to thrive. You’ll witness stronger growth, increased fruit production, and a significant reduction in disease susceptibility. Imagine the satisfaction of harvesting your own grapes, knowing that you achieved it with a simple, ingenious technique.
But the benefits don’t stop there. This method is also incredibly versatile. Feel free to experiment with different materials for your support structure. Bamboo stakes, repurposed metal rods, or even sturdy branches can all work wonders. Consider the specific needs of your grape variety when determining the height and spacing of your supports. For example, vigorous varieties might require a taller and more robust structure.
Furthermore, you can adapt this technique to suit your available space. Whether you have a sprawling vineyard or a small backyard garden, this DIY trick can be scaled to fit your needs. You can even use it for container-grown grapes, providing them with the support they need to climb and flourish.
Don’t be afraid to get creative and personalize this method to your own preferences. Perhaps you want to add decorative elements to your support structure, or incorporate companion plants to attract beneficial insects. The possibilities are endless!
We are confident that this DIY trick will revolutionize your grape growing experience. It’s a cost-effective, time-saving, and highly rewarding method that will yield impressive results. So, what are you waiting for? Give it a try and witness the transformation of your grapevines firsthand.
We encourage you to share your experiences with us! Post photos of your DIY grape supports and let us know how this trick has worked for you. Your feedback will not only inspire other gardeners but also help us refine and improve this method even further. Let’s build a community of successful grape growers, all thanks to this simple yet powerful DIY hack. Remember, successful grape growing is within your reach!
Frequently Asked Questions (FAQ)
What type of grapes is this DIY trick best suited for?
This DIY trick is generally suitable for most grape varieties, especially those that are known for their vigorous growth and climbing habits. However, it’s essential to consider the specific needs of your chosen variety. For instance, some varieties might require a more robust support structure due to their heavier fruit load. Table grapes, wine grapes, and even ornamental grapevines can all benefit from this method. Just be sure to research the specific requirements of your grape variety and adjust the DIY trick accordingly. For example, muscadine grapes, known for their heavy vines, might need extra sturdy support.
How often should I prune my grapevines when using this DIY support system?
Pruning is crucial for maintaining the health and productivity of your grapevines, regardless of the support system you’re using. The frequency and method of pruning will depend on the grape variety and your desired training system. Generally, dormant pruning is done in late winter or early spring, before the buds begin to swell. This involves removing excess growth, shaping the vine, and promoting fruit production. Summer pruning can also be done to remove unwanted shoots and improve air circulation. Consult a grape growing guide or local expert for specific pruning recommendations for your grape variety.
What type of soil is best for growing grapes with this DIY trick?
Grapes generally prefer well-drained soil with a slightly acidic to neutral pH (around 6.0 to 7.0). Good drainage is essential to prevent root rot. Before planting, it’s a good idea to conduct a soil test to determine its pH and nutrient levels. Amend the soil as needed with compost, manure, or other organic matter to improve its fertility and drainage. If your soil is heavy clay, consider adding sand or gravel to improve drainage. If your soil is too acidic, you can add lime to raise the pH.
How much sunlight do grapevines need when using this DIY support system?
Grapevines require at least 6-8 hours of direct sunlight per day to thrive. The DIY support system helps maximize sunlight exposure by allowing the vines to climb and spread out. When choosing a location for your grapevines, select a spot that receives ample sunlight throughout the day. Avoid planting them in areas that are shaded by trees or buildings. If you live in a region with intense sunlight, you might need to provide some afternoon shade to prevent sunburn on the grapes.
Can I use this DIY trick for container-grown grapes?
Yes, this DIY trick can be adapted for container-grown grapes. Choose a large container with good drainage holes. Use a well-draining potting mix and provide a sturdy support structure for the vines to climb. You can use bamboo stakes, a small trellis, or even a repurposed tomato cage. Be sure to water the container regularly and fertilize the vines as needed. Container-grown grapes might require more frequent watering and fertilization than those grown in the ground.
What are some common pests and diseases that affect grapevines, and how can I prevent them?
Grapevines are susceptible to various pests and diseases, including aphids, Japanese beetles, powdery mildew, and black rot. To prevent these problems, choose disease-resistant grape varieties, maintain good air circulation, and practice proper sanitation. Regularly inspect your vines for signs of pests or diseases and take action promptly. You can use organic pesticides or fungicides to control infestations. Encourage beneficial insects, such as ladybugs and lacewings, to prey on pests. Pruning also helps improve air circulation and reduce the risk of disease.
How long does it take for grapevines to produce fruit after planting?
It typically takes 2-3 years for grapevines to start producing fruit after planting. The first year is usually focused on establishing the root system and vine structure. In the second year, you might see some small clusters of grapes, but they might not be of the best quality. By the third year, you should have a more substantial harvest. The amount of fruit produced will increase as the vines mature. Proper pruning, fertilization, and pest control are essential for maximizing fruit production.
What are some variations of this DIY grape support system?
There are many variations you can try! Instead of individual stakes, you could create a simple trellis system using wire strung between posts. You could also build a more elaborate pergola or arbor for your grapevines to climb on. Consider using recycled materials, such as old pallets or metal pipes, to create your support structure. Get creative and design a support system that complements your garden’s aesthetic. You can even incorporate decorative elements, such as trellises or climbing roses, to enhance the visual appeal of your grapevines.
How do I know when my grapes are ripe and ready to harvest?
The best way to determine if your grapes are ripe is to taste them! Ripe grapes will be sweet and juicy, with a balanced flavor. The color of the grapes will also change as they ripen, depending on the variety. The seeds should be easily removed from the pulp. You can also use a refractometer to measure the sugar content of the grapes. The ideal sugar level will vary depending on the grape variety and your desired use (e.g., table grapes, wine grapes).
What kind of fertilizer should I use for my grapevines?
Use a balanced fertilizer specifically formulated for fruit trees or grapevines. A fertilizer with an NPK ratio of 10-10-10 or 12-12-12 is generally a good choice. Apply the fertilizer in early spring, before the buds begin to swell. Follow the instructions on the fertilizer label for application rates. Avoid over-fertilizing, as this can lead to excessive vegetative growth and reduced fruit production. You can also amend the soil with compost or manure to provide a slow-release source of nutrients.

Leave a Comment