
Indoor mushroom cultivation might sound like something reserved for expert mycologists, but trust me, it’s surprisingly accessible and incredibly rewarding! Have you ever imagined harvesting fresh, delicious mushrooms right from your own kitchen? It’s not just a foodie fantasy; it’s a tangible reality with a few simple DIY tricks.
Mushrooms have been revered for centuries across various cultures, not only for their unique flavors but also for their medicinal properties. From ancient Chinese remedies to traditional European cuisine, fungi have held a significant place in human history. Now, you can bring this ancient tradition into your modern home!
Why should you embark on this indoor mushroom adventure? Well, for starters, it’s a fantastic way to reduce your grocery bill and enjoy organic, pesticide-free produce. Plus, indoor mushroom cultivation is a sustainable practice that minimizes your environmental footprint. But more than that, it’s a fascinating hobby that connects you with nature and provides a sense of accomplishment as you watch these incredible organisms flourish. I’m excited to share some easy-to-follow DIY hacks that will have you harvesting your own gourmet mushrooms in no time!
Growing Gourmet Mushrooms at Home: A Beginner’s Guide
Hey there, fellow fungi enthusiasts! Ever dreamt of harvesting your own delicious mushrooms right in your kitchen? Well, dream no more! I’m going to walk you through a simple and rewarding method for growing gourmet mushrooms indoors. We’ll focus on oyster mushrooms (they’re relatively easy and forgiving), but the principles can be adapted for other varieties later on. Get ready to become a mushroom maestro!
What You’ll Need: The Essential Supplies
Before we dive in, let’s gather our supplies. This is crucial for a smooth and successful growing experience. Don’t worry, most of these items are readily available and won’t break the bank.
* Oyster Mushroom Spawn: This is the “seed” of your mushrooms. You can purchase it online from reputable mushroom suppliers. Make sure to choose a strain that suits your climate and growing conditions. I recommend starting with a blue or pearl oyster mushroom strain – they are known for their resilience.
* Substrate: This is the food source for your mushrooms. We’ll be using pasteurized straw, which is readily available at farm supply stores or even pet stores (used for animal bedding). You can also use hardwood sawdust pellets (the kind used for wood stoves), but straw is generally easier for beginners.
* Large Container: A large plastic tub with a lid is ideal. Think of a storage container you might use for holiday decorations. The size will depend on how many mushrooms you want to grow. A 20-30 gallon tub is a good starting point.
* Drill with Drill Bits: We’ll need to drill holes in the tub for ventilation and mushroom fruiting.
* Spray Bottle: For misting the mushrooms to maintain humidity.
* Bleach: For sanitizing the container and work area.
* Large Pot or Kettle: For pasteurizing the straw.
* Thermometer: To monitor the temperature of the water during pasteurization.
* Gloves: To keep everything clean and prevent contamination.
* Face Mask: To avoid inhaling dust and spores.
* Optional: A humidity tent or greenhouse (if your indoor environment is very dry).
Preparing the Substrate: Pasteurization is Key
This is arguably the most important step. Pasteurization kills off competing organisms that could prevent your mushrooms from growing. We’re not sterilizing (which would kill everything, including beneficial microbes), just reducing the competition.
1. Chop the Straw: Cut the straw into smaller pieces, about 2-4 inches long. This makes it easier to pack into the container and allows the mycelium (the mushroom’s root system) to colonize it more effectively. I use garden shears for this, but you can also use a lawnmower with a collection bag (be careful!).
2. Soak the Straw: Place the chopped straw in a large container (like a clean trash can) and cover it with water. Let it soak for at least 24 hours. This hydrates the straw, making it more palatable for the mycelium.
3. Pasteurize the Straw: Drain the soaked straw and transfer it to a large pot or kettle. Cover it with fresh water. Heat the water to 160-180°F (71-82°C) and maintain that temperature for 60-90 minutes. Use a thermometer to ensure accurate temperature control. This is crucial!
4. Drain and Cool: After pasteurization, carefully drain the hot water from the straw. Let the straw cool down to room temperature. This can take several hours. You want the straw to be moist but not dripping wet. Squeeze a handful of straw – it should feel like a wrung-out sponge.
Preparing the Growing Container: Sanitation First!
Cleanliness is paramount in mushroom cultivation. We want to give our oyster mushrooms the best possible chance to thrive.
1. Sanitize the Container: Wash the plastic tub and lid thoroughly with soap and water. Then, sanitize it with a diluted bleach solution (1 part bleach to 9 parts water). Rinse well and allow to air dry completely.
2. Drill Ventilation Holes: Drill several 1/4-inch holes around the sides of the tub, about 4-6 inches apart. These holes will provide ventilation and allow the mushrooms to fruit. Drill a few holes in the lid as well.
3. Optional: Cover Holes with Micropore Tape: To prevent fruit flies and other pests from entering, you can cover the ventilation holes with micropore tape (the kind used for medical bandages). This allows air to pass through but keeps out unwanted critters.
Inoculating the Substrate: Mixing Spawn and Straw
Now for the fun part – introducing the mushroom spawn to the prepared straw!
1. Clean Your Hands: Wash your hands thoroughly with soap and water, or wear gloves.
2. Layering Technique: Place a layer of pasteurized straw (about 2-3 inches thick) at the bottom of the container.
3. Sprinkle Spawn: Sprinkle a generous amount of oyster mushroom spawn over the straw layer. Aim for about 5-10% spawn by weight (e.g., if you have 10 pounds of straw, use 0.5-1 pound of spawn).
4. Repeat Layers: Continue layering straw and spawn until the container is almost full, leaving a few inches of space at the top. Make sure the top layer is straw.
5. Gently Compact: Gently press down on the straw to compact it slightly. This helps the mycelium make better contact with the substrate.
Incubation: The Mycelium Takes Over
This is the waiting game. The mycelium needs time to colonize the straw.
1. Close the Lid: Place the lid on the container, but don’t seal it completely. You want some air exchange.
2. Incubation Location: Place the container in a dark, warm location with a temperature of 65-75°F (18-24°C). A closet, basement, or spare room works well. Avoid direct sunlight.
3. Monitor Colonization: Check the container every few days. You should start to see white, fuzzy growth (the mycelium) spreading throughout the straw.
4. Patience is Key: It can take 2-4 weeks for the mycelium to fully colonize the straw. The substrate will turn almost completely white.
Fruiting: Time for Mushrooms!
Once the substrate is fully colonized, it’s time to trigger fruiting (the formation of mushrooms).
1. Increase Humidity: Oyster mushrooms need high humidity to fruit. Mist the inside of the container with water several times a day. You can also place a humidity tent or greenhouse over the container to help maintain humidity.
2. Increase Air Exchange: Open the lid of the container more frequently to increase air exchange. This helps prevent the buildup of carbon dioxide, which can inhibit fruiting.
3. Introduce Light: Move the container to a location with indirect light. Oyster mushrooms don’t need a lot of light, but some light is necessary for proper fruiting.
4. Monitor for Pinheads: After a few days, you should start to see small mushroom “pinheads” forming around the ventilation holes.
5. Maintain Conditions: Continue misting and providing fresh air. The pinheads will grow rapidly into mature mushrooms.
Harvesting: Enjoy Your Bounty!
The moment you’ve been waiting for!
1. Harvest When Mature: Harvest the mushrooms when the caps are fully developed but before they start to drop spores (you’ll see a white powder on the surrounding surfaces).
2. Twist and Pull: Gently twist and pull the mushrooms from the substrate.
3. Clean Up: Remove any remaining mushroom stems from the substrate to prevent them from rotting.
4. Enjoy Your Harvest: Cook and enjoy your freshly grown oyster mushrooms! They’re delicious sautéed, grilled, or added to soups and stews.
Second Flush and Beyond: Keeping the Harvest Coming
After harvesting the first flush of mushrooms, you can often get a second (and sometimes even a third) flush.
1. Soak the Substrate: After harvesting, soak the substrate in water for 12-24 hours. This rehydrates the mycelium and encourages it to produce more mushrooms.
2. Drain and Repeat: Drain the water and repeat the fruiting process.
3. Decline in Production: Each subsequent flush will typically produce fewer mushrooms than the previous one.
4. Composting: Once the substrate is exhausted, you can compost it and use it to enrich your garden soil.
Troubleshooting: Common Problems and Solutions
Even with the best preparation, you might encounter some challenges. Here are a few common problems and how to address them:
* Contamination: If you see mold or other unwanted growth in your container,
Conclusion
So, there you have it! Mastering the art of indoor mushroom cultivation is not only achievable but also incredibly rewarding. We’ve walked you through the process, demystifying each step and providing you with the knowledge to transform your home into a thriving mushroom farm. Why is this DIY trick a must-try? Because it offers a unique blend of sustainability, cost-effectiveness, and sheer fascination. Imagine harvesting fresh, delicious mushrooms right from your own home, knowing exactly where they came from and how they were grown. No more relying on expensive grocery store options or wondering about the origins of your food.
Beyond the practical benefits, indoor mushroom cultivation connects you to the natural world in a profound way. It’s a hands-on learning experience that teaches you about the fascinating life cycle of fungi and the intricate relationships within our ecosystem. Plus, it’s a fantastic conversation starter!
But the journey doesn’t end here. Feel free to experiment with different mushroom varieties. Oyster mushrooms are a great starting point, but once you’ve mastered the basics, consider branching out to shiitake, lion’s mane, or even more exotic species. Each variety offers a unique flavor profile and growing requirements, providing endless opportunities for exploration.
Consider these variations to personalize your indoor mushroom cultivation experience:
* Substrate Swaps: While we focused on straw and coffee grounds, explore other substrates like hardwood sawdust, cardboard, or even old cotton clothing. Each substrate will influence the flavor and yield of your mushrooms.
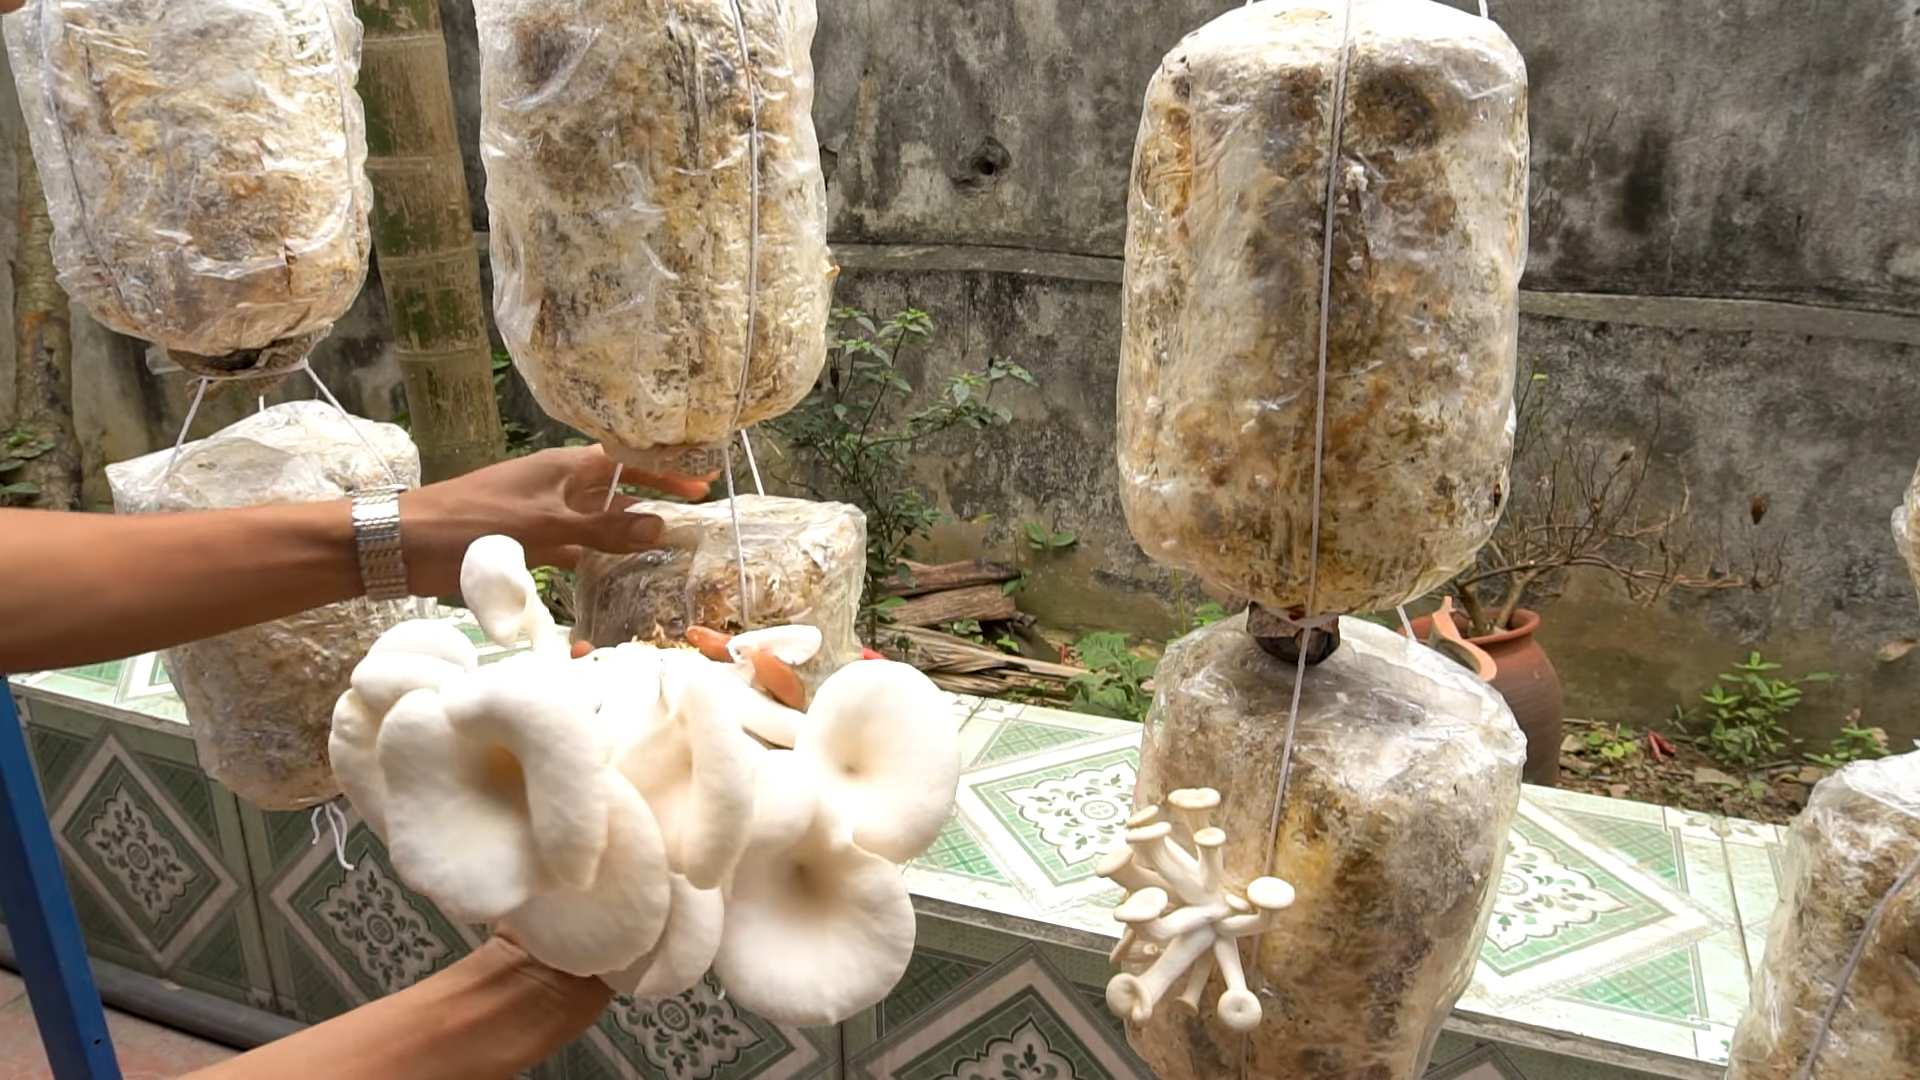
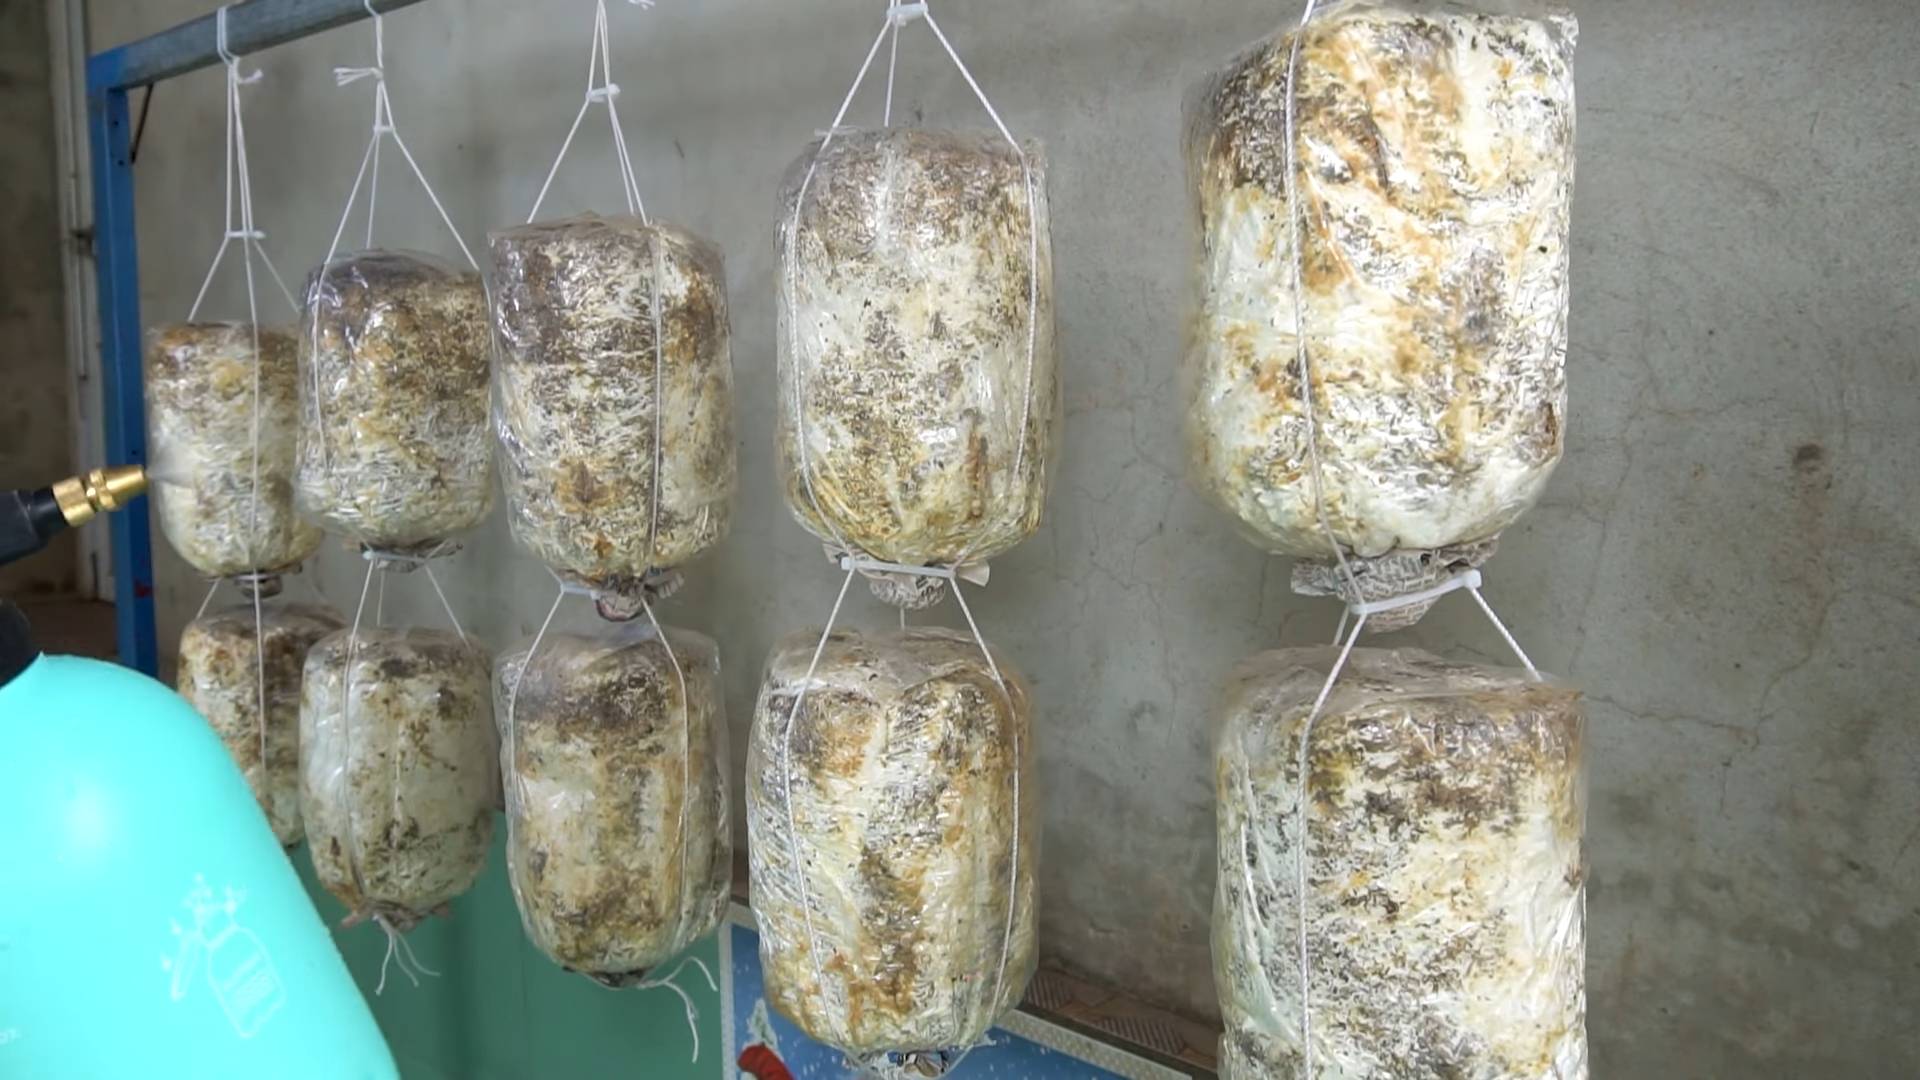
* Vertical Farming: Maximize your space by creating a vertical mushroom farm using stacked shelves or hanging bags. This is especially useful for those with limited space.
* Automated Systems: For the tech-savvy, consider automating aspects of your mushroom farm, such as humidity control and watering, using sensors and timers.
* Mushroom Teas and Extracts: Once you have a surplus of mushrooms, explore the world of mushroom teas and extracts. Many mushrooms have medicinal properties and can be used to create health-boosting beverages.
We wholeheartedly encourage you to embark on this exciting adventure of indoor mushroom cultivation. Don’t be afraid to make mistakes – they are valuable learning opportunities. The most important thing is to start, experiment, and have fun!
Once you’ve harvested your first batch of homegrown mushrooms, we’d love to hear about your experience. Share your successes, challenges, and any tips you’ve learned along the way in the comments below. Let’s build a community of indoor mushroom enthusiasts and learn from each other. Happy growing!
Frequently Asked Questions (FAQ)
What are the easiest mushrooms to grow indoors for beginners?
Oyster mushrooms are widely considered the easiest mushrooms to grow indoors for beginners. They are relatively forgiving, grow quickly, and can thrive on a variety of substrates, including straw, coffee grounds, and even cardboard. Their adaptability makes them an excellent choice for those just starting their indoor mushroom cultivation journey. Other good options for beginners include shiitake and wine cap mushrooms, though they may require slightly more attention to detail.
How long does it take to grow mushrooms indoors?
The time it takes to grow mushrooms indoors varies depending on the species, substrate, and environmental conditions. Oyster mushrooms, for example, can typically be harvested within 2-4 weeks after the substrate is fully colonized. Shiitake mushrooms, on the other hand, may take several months to produce their first flush. Factors such as temperature, humidity, and light levels can also influence the growth rate. Consistent monitoring and adjustments to these factors can help optimize the growing process and shorten the time to harvest.
What are the ideal temperature and humidity levels for indoor mushroom cultivation?
The ideal temperature and humidity levels for indoor mushroom cultivation depend on the specific mushroom species you are growing. Generally, most mushrooms prefer temperatures between 60-75°F (15-24°C) and humidity levels between 80-90%. Oyster mushrooms, for instance, thrive in slightly cooler temperatures and higher humidity levels. Maintaining consistent temperature and humidity is crucial for successful mushroom cultivation. You can use a thermometer and hygrometer to monitor these conditions and adjust them as needed using humidifiers, fans, and ventilation.
What kind of lighting do mushrooms need?
Mushrooms do not require direct sunlight, as they are not photosynthetic organisms. However, they do need some light to initiate pinning (the formation of baby mushrooms). Indirect or ambient light is usually sufficient. A north-facing window or a fluorescent light source is ideal. Avoid exposing your mushrooms to direct sunlight, as this can dry them out and inhibit their growth. A simple timer can be used to regulate the light exposure, providing a consistent day/night cycle.
How do I prevent contamination in my indoor mushroom farm?
Preventing contamination is essential for successful indoor mushroom cultivation. Start by sterilizing your substrate and equipment thoroughly. Use a pressure cooker or autoclave to sterilize the substrate and clean all surfaces with isopropyl alcohol. Maintain a clean growing environment by regularly cleaning the area and minimizing air currents. Use filtered air if possible. Inspect your mushroom cultures regularly for signs of contamination, such as mold or unusual odors. If you detect contamination, remove the affected area immediately to prevent it from spreading.
Can I use coffee grounds for indoor mushroom cultivation?
Yes, coffee grounds are an excellent substrate for growing certain types of mushrooms, particularly oyster mushrooms. Coffee grounds are rich in nutrients and have already been pasteurized during the brewing process, making them less susceptible to contamination. However, it’s important to use fresh coffee grounds and mix them with other substrates, such as straw or sawdust, to provide a more balanced nutrient profile. Ensure the coffee grounds are not too acidic, as this can inhibit mushroom growth.
How often should I water my mushrooms?
The frequency of watering depends on the humidity levels and the type of substrate you are using. Generally, you should mist your mushrooms with water 1-2 times per day to maintain a high humidity level. Avoid overwatering, as this can lead to mold growth and other problems. The substrate should be moist but not soggy. Use a spray bottle to mist the mushrooms gently, ensuring that the water droplets are fine and evenly distributed.
What do I do if my mushrooms are not growing?
If your mushrooms are not growing, there could be several reasons. First, check the temperature and humidity levels to ensure they are within the optimal range for the species you are growing. Make sure the substrate is properly colonized and that there are no signs of contamination. Ensure adequate light exposure. If all these factors are in order, try increasing the humidity or providing more ventilation. Sometimes, it simply takes time for the mushrooms to start growing, so be patient and continue to monitor the conditions.
How many times can I harvest mushrooms from the same substrate?
You can typically harvest mushrooms multiple times from the same substrate, a process known as “flushing.” After the first harvest, allow the substrate to rest for a few days, then rehydrate it by soaking it in water. This will encourage a second flush of mushrooms. You can usually get 2-3 flushes from the same substrate before it becomes depleted of nutrients. The size and quality of the mushrooms may decrease with each subsequent flush.
What can I do with the spent substrate after harvesting mushrooms?
The spent substrate after harvesting mushrooms is a valuable resource that can be used in a variety of ways. It is an excellent soil amendment for your garden, providing nutrients and improving soil structure. You can also compost the spent substrate to create nutrient-rich compost for your plants. Additionally, some people use the spent substrate as animal feed or as a biofuel source. Don’t throw it away – recycle it!
Leave a Comment