
Container Brussel Sprouts: Tiny cabbages bursting with flavor, right on your patio! Imagine stepping outside and harvesting fresh, vibrant Brussel sprouts, even if you don’t have acres of land. Sounds like a dream, right? Well, it doesn’t have to be! For centuries, gardeners have been finding innovative ways to cultivate their own food, from elaborate rooftop gardens in ancient cities to simple window boxes overflowing with herbs. This DIY guide will unlock the secrets to growing your very own container Brussel sprouts, bringing the joy of homegrown goodness to your doorstep.
Why should you bother with this DIY project? Because let’s face it, store-bought Brussel sprouts can be a gamble. Sometimes they’re perfect, other times they’re bitter and bland. But when you grow your own, you control the quality, the freshness, and the flavor! Plus, there’s something incredibly satisfying about nurturing a plant from seedling to harvest. I’m going to show you how to avoid common pitfalls and maximize your yield, so you can enjoy delicious, homegrown Brussel sprouts all season long. Get ready to roll up your sleeves and transform your outdoor space into a mini-farm!
Growing Brussels Sprouts in Containers: A Comprehensive DIY Guide
Hey there, fellow gardening enthusiasts! I’m so excited to share my tried-and-true method for growing Brussels sprouts in containers. It might seem daunting, but trust me, with a little patience and the right approach, you can enjoy fresh, homegrown Brussels sprouts even if you don’t have a sprawling garden. Let’s dive in!
Choosing the Right Container and Location
Before we get our hands dirty, let’s talk about setting the stage for success. The right container and location are crucial for healthy Brussels sprouts.
* Container Size: Brussels sprouts need room to grow, both above and below the soil. I recommend a container that’s at least 12 inches in diameter and 12 inches deep. A 5-gallon bucket or a large planter pot works perfectly. Bigger is generally better, as it gives the roots more space to spread out.
* Material: The container material doesn’t matter too much, but I prefer plastic or resin pots because they retain moisture better than terracotta, which can dry out quickly. Make sure your chosen container has drainage holes! Brussels sprouts hate sitting in soggy soil.
* Location: Brussels sprouts need at least 6 hours of sunlight per day. A sunny patio, balcony, or even a spot in your yard that gets plenty of light will work. If you live in a particularly hot climate, some afternoon shade can be beneficial to prevent the plants from getting stressed.
Preparing the Soil
Now, let’s get down to the nitty-gritty: the soil! Brussels sprouts are heavy feeders, so rich, well-draining soil is essential.
* Soil Mix: I like to use a mix of equal parts potting mix, compost, and perlite or vermiculite. The potting mix provides a good base, the compost adds nutrients, and the perlite or vermiculite improves drainage and aeration.
* pH Level: Brussels sprouts prefer a slightly acidic to neutral soil pH, around 6.0 to 7.0. You can test your soil pH with a simple soil testing kit, which you can find at most garden centers. If your soil is too acidic, you can add lime to raise the pH.
* Fertilizer: Before planting, I like to mix in a slow-release fertilizer formulated for vegetables. This will give your Brussels sprouts a good head start. Follow the instructions on the fertilizer package for the correct amount to use.
Planting Your Brussels Sprouts
Alright, time to get those sprouts in the ground! You can start Brussels sprouts from seed or purchase transplants from a nursery. I usually opt for transplants because they’re easier and faster.
* Starting from Seed: If you’re starting from seed, sow the seeds indoors about 6-8 weeks before the last expected frost. Plant the seeds about 1/2 inch deep in seed-starting mix. Keep the soil moist and warm, and the seeds should germinate in about a week. Once the seedlings have a few sets of true leaves, you can transplant them into larger pots.
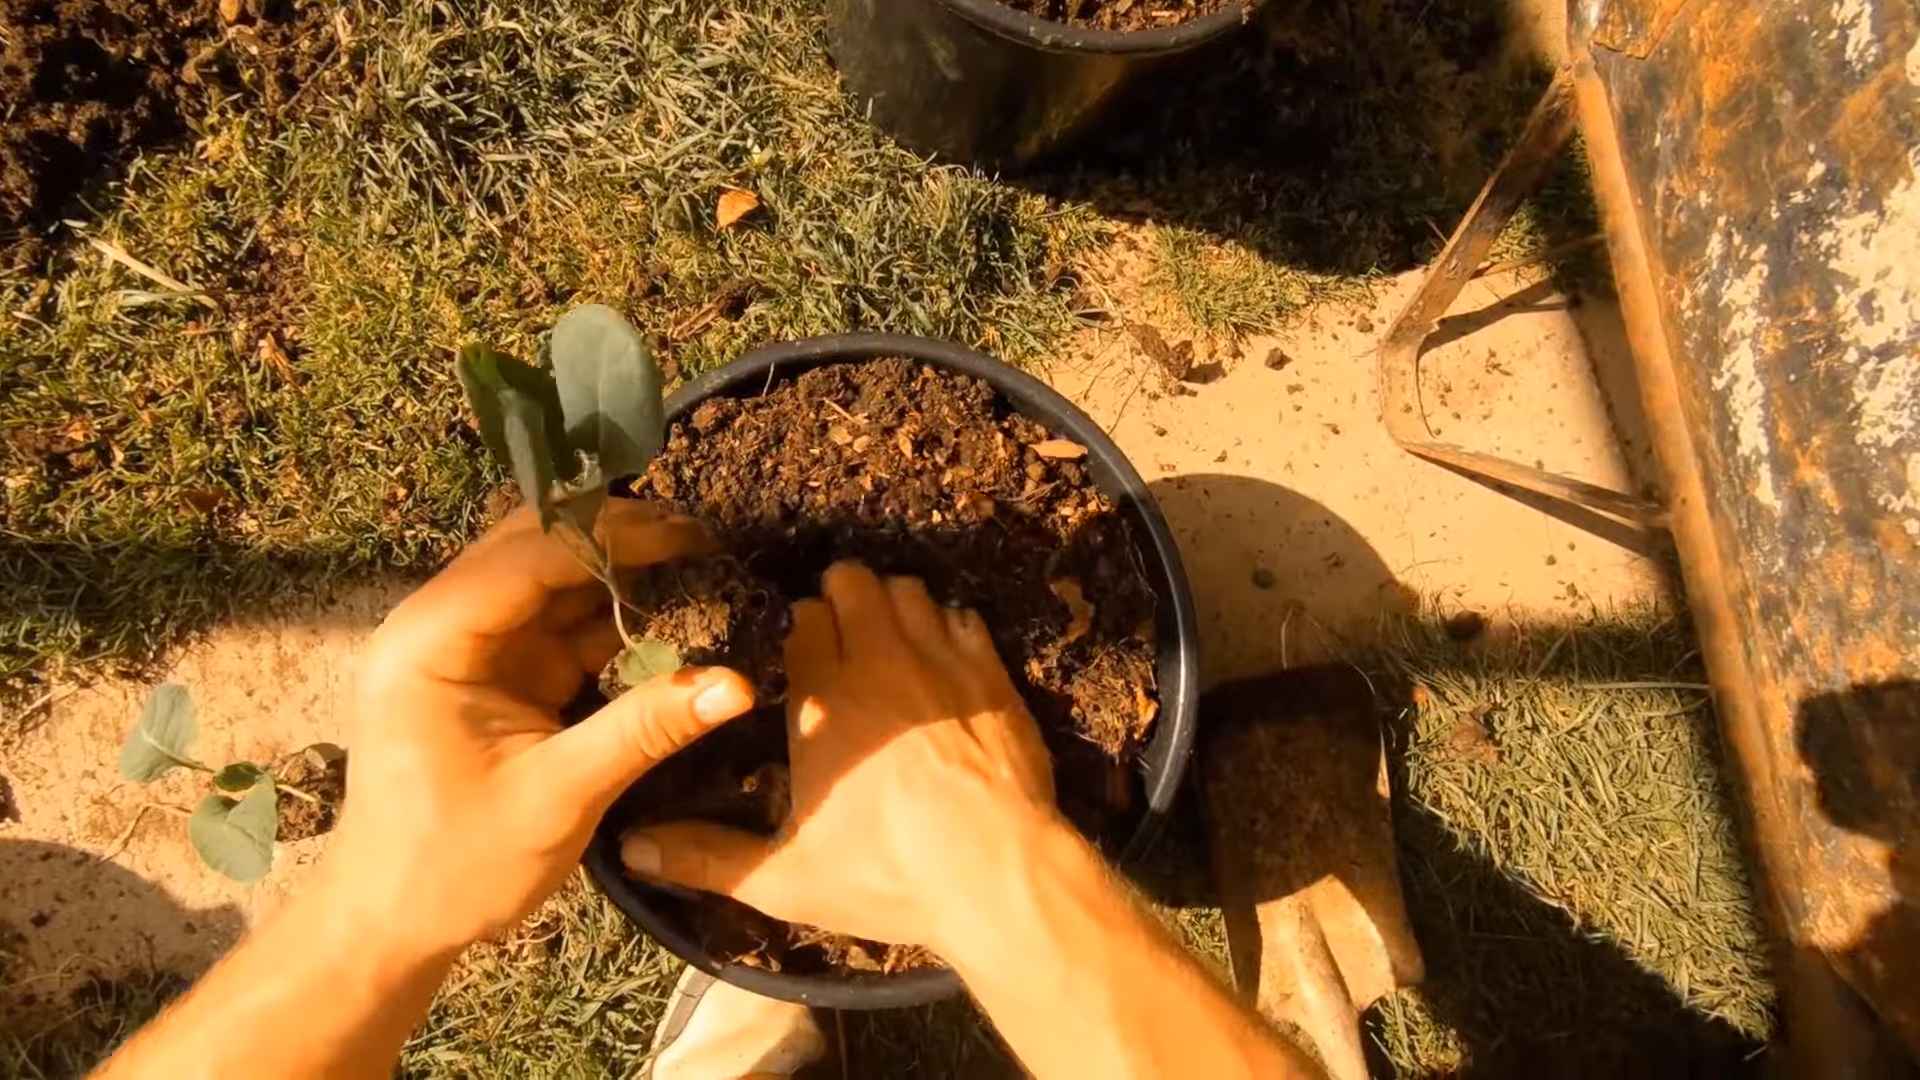
* Planting Transplants: When planting transplants, dig a hole in the soil that’s slightly larger than the root ball. Gently remove the transplant from its container and loosen the roots a bit. Place the transplant in the hole, making sure the top of the root ball is level with the soil surface. Fill in the hole with soil and gently firm it down.
* Spacing: If you’re planting multiple Brussels sprouts in the same container, space them at least 18 inches apart. This will give them enough room to grow and prevent overcrowding.
* Watering: After planting, water the Brussels sprouts thoroughly. The soil should be moist but not soggy.
Caring for Your Brussels Sprouts
Now comes the ongoing care. Consistent watering, fertilizing, and pest control are key to a bountiful harvest.
* Watering: Brussels sprouts need consistent moisture, especially during hot weather. Water deeply whenever the top inch of soil feels dry to the touch. Avoid overwatering, as this can lead to root rot.
* Fertilizing: Brussels sprouts are heavy feeders, so you’ll need to fertilize them regularly. I like to use a liquid fertilizer every 2-3 weeks. Choose a fertilizer that’s high in nitrogen, phosphorus, and potassium.
* Sunlight: Ensure your container gets at least 6 hours of direct sunlight daily. If you notice the leaves are pale or the sprouts aren’t developing well, it might not be getting enough light.
* Pest Control: Brussels sprouts are susceptible to several pests, including cabbage worms, aphids, and flea beetles. Inspect your plants regularly for signs of infestation.
* Cabbage Worms: These green caterpillars can devour the leaves of your Brussels sprouts. Handpicking them off the plants is an effective way to control them. You can also use Bacillus thuringiensis (Bt), a natural insecticide that’s safe for humans and pets.
* Aphids: These tiny insects suck the sap from the leaves, causing them to curl and yellow. You can spray aphids off with a strong stream of water or use insecticidal soap.
* Flea Beetles: These tiny beetles jump when disturbed and can create small holes in the leaves. You can control flea beetles with row covers or by spraying with neem oil.
* Supporting the Plants: As your Brussels sprouts grow, they may become top-heavy and need support. You can use stakes or a tomato cage to keep the plants upright.
Harvesting Your Brussels Sprouts
The moment we’ve all been waiting for: harvest time! Brussels sprouts are typically ready to harvest in the fall, about 90-100 days after planting.
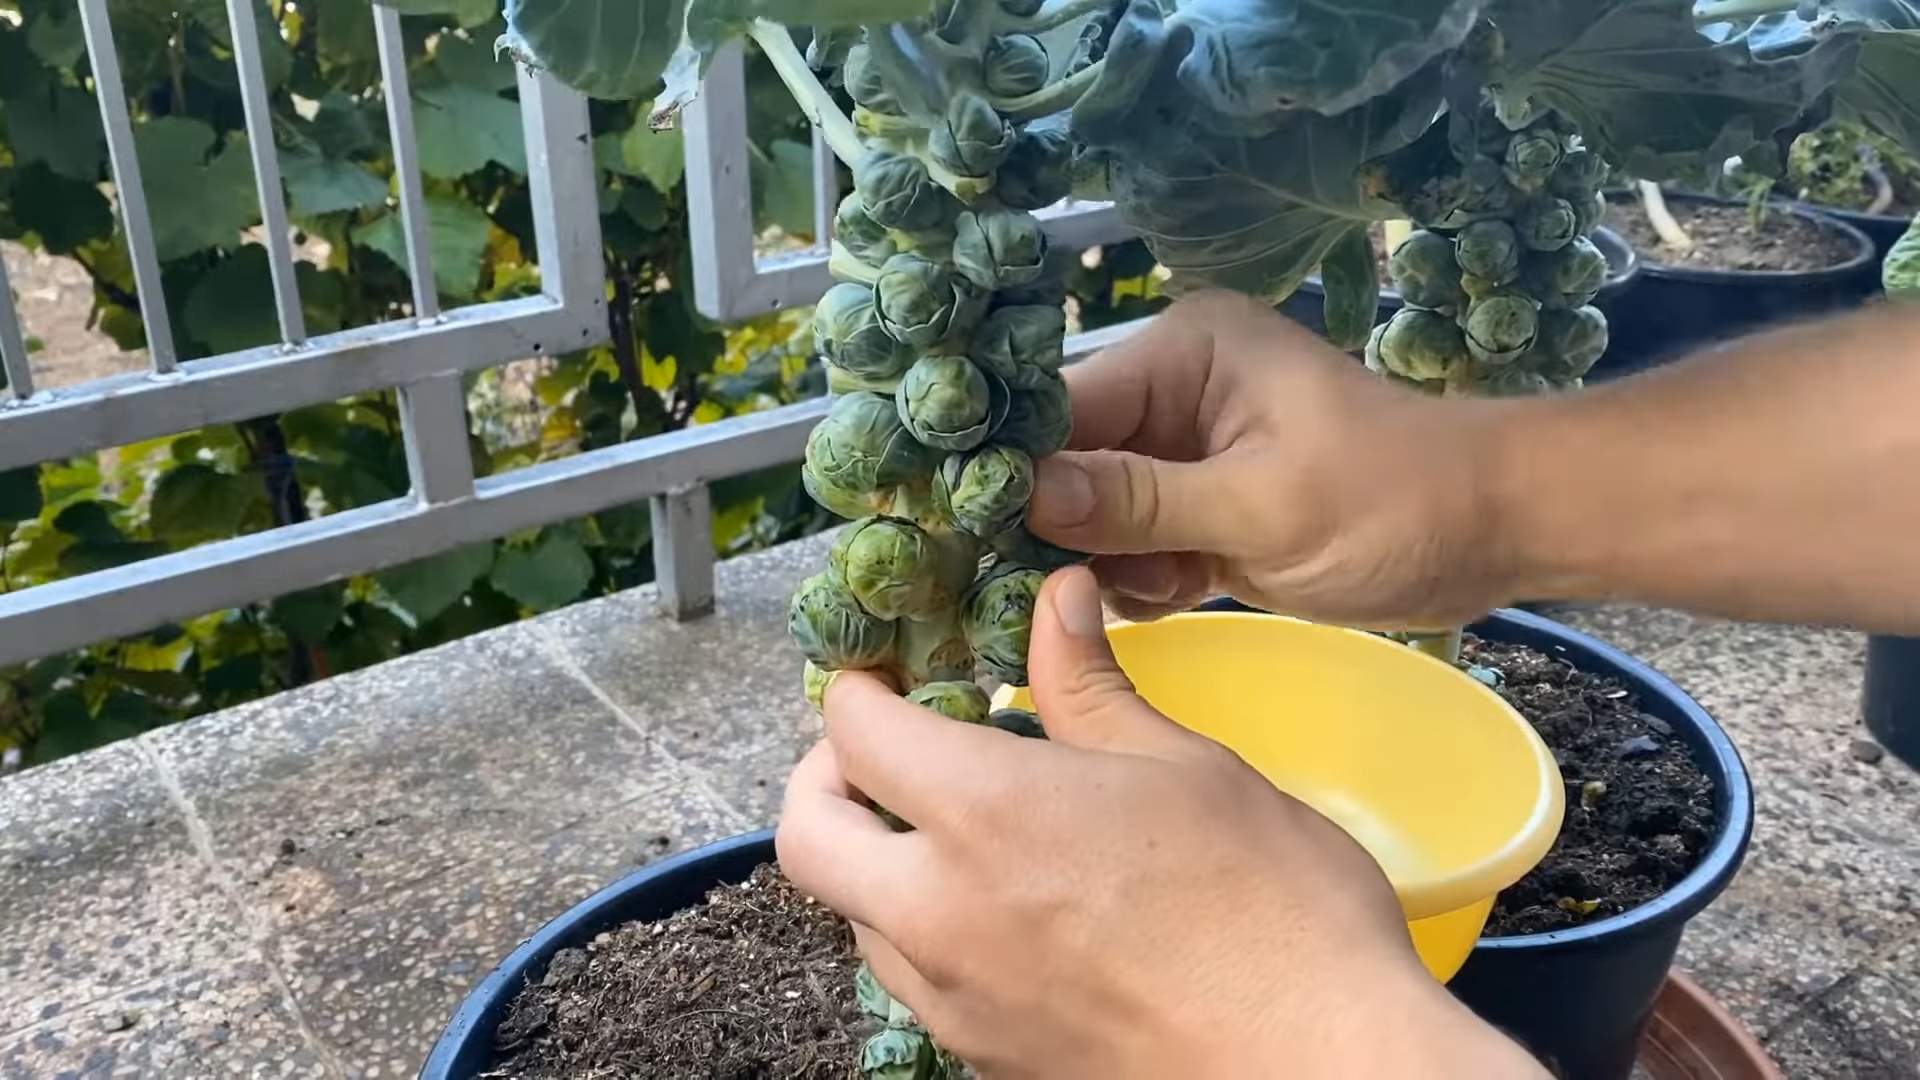
* When to Harvest: The sprouts are ready to harvest when they are firm, green, and about 1-2 inches in diameter. The lower sprouts on the stalk will mature first.
* How to Harvest: To harvest, simply twist the sprouts off the stalk. Start with the lower sprouts and work your way up. You can also remove the leaves below the sprouts as you harvest.
* Storage: Freshly harvested Brussels sprouts can be stored in the refrigerator for up to a week.
Troubleshooting
Even with the best care, you might encounter some problems along the way. Here are a few common issues and how to address them:
* Yellowing Leaves: Yellowing leaves can be a sign of overwatering, underwatering, or nutrient deficiency. Check the soil moisture and adjust your watering accordingly. If the soil is dry, water deeply. If the soil is soggy, let it dry out before watering again. You may also need to fertilize your plants.
* Sprouts Not Forming: If your Brussels sprouts aren’t forming, it could be due to lack of sunlight, poor soil, or insufficient fertilization. Make sure your plants are getting at least 6 hours of sunlight per day. Amend the soil with compost and fertilize regularly.
* Sprouts Splitting: Sprouts can split if they get too much water after a dry spell. Water consistently to prevent this.
Step-by-Step Instructions: A Quick Recap
Let’s break down the entire process into easy-to-follow steps:
1. Choose a Container: Select a container that’s at least 12 inches in diameter and 12 inches deep with drainage holes.
2. Prepare the Soil: Mix equal parts potting mix, compost, and perlite or vermiculite. Add a slow-release fertilizer.
3. Plant Your Sprouts: Plant transplants, ensuring the top of the root ball is level with the soil surface. Space them at least 18 inches apart if planting multiple sprouts.
4. Water Thoroughly: Water deeply after planting.
5. Provide Sunlight: Ensure your container gets at least 6 hours of direct sunlight daily.
6. Water Regularly: Water deeply whenever the top inch of soil feels dry.
7. Fertilize Every 2-3 Weeks: Use a liquid fertilizer high in nitrogen, phosphorus, and potassium.
8. Monitor for Pests: Inspect your plants regularly for pests like cabbage worms, aphids, and flea beetles. Take action as needed.
9. Support the Plants: Use stakes or a tomato cage to support the plants as they grow.
10. Harvest When Ready: Harvest the sprouts when they are firm, green, and about 1-2 inches in diameter. Twist them off the stalk, starting with the lower sprouts.
Extra Tips for Success
Here are a few extra tips that I’ve learned over the years:
* Choose the Right Variety: Some Brussels sprouts varieties are better suited for container gardening than others. Look for compact varieties like ‘Jade Cross’ or ‘Long Island Improved.’
* Pinch Out the Top: About a month before you want to harvest, pinch out the top of the plant. This will encourage the sprouts to mature more quickly.
* Rotate Your Crops: Don’t plant
Conclusion
So, there you have it! Growing container Brussel sprouts is not only achievable but also incredibly rewarding. Forget the supermarket prices and the often-lackluster quality of store-bought sprouts. With a little effort and the right approach, you can enjoy a steady supply of fresh, flavorful Brussel sprouts right from your own patio, balcony, or garden.
This DIY trick, focusing on container gardening, opens up the possibility of growing these nutritious vegetables even if you lack a traditional garden space. It’s a game-changer for urban gardeners, apartment dwellers, and anyone looking to maximize their yield in a limited area. The controlled environment of a container also allows for better management of soil quality, watering, and pest control, leading to healthier and more productive plants.
But the benefits don’t stop there. Growing your own Brussel sprouts allows you to experiment with different varieties. Consider trying ‘Long Island Improved’ for a classic flavor, or ‘Redarling’ for a beautiful, vibrant addition to your plate. You can also adjust the planting time to extend your harvest season, ensuring a continuous supply of fresh sprouts throughout the fall and winter.
Beyond variety, think about companion planting within your container. Marigolds can help deter pests, while herbs like rosemary or thyme can add a delightful aroma and potentially improve the flavor of your sprouts. Don’t be afraid to get creative and tailor your container garden to your specific needs and preferences.
The key to success with container Brussel sprouts lies in consistent care. Regular watering, proper fertilization, and vigilant monitoring for pests are essential. But the effort is well worth it when you bite into a freshly harvested sprout, bursting with flavor and packed with nutrients.
We strongly encourage you to give this DIY trick a try. It’s a fun, educational, and ultimately delicious way to connect with your food and enjoy the fruits (or rather, vegetables) of your labor. Once you’ve experienced the satisfaction of growing your own Brussel sprouts, you’ll never look at them the same way again.
Don’t just take our word for it! We’d love to hear about your experiences growing container Brussel sprouts. Share your tips, tricks, and photos in the comments below. Let’s build a community of passionate gardeners and spread the joy of homegrown goodness. What varieties did you try? What challenges did you face? What successes did you celebrate? Your insights can help others embark on their own Brussel sprout growing journey. So, grab your containers, seeds, and gardening gloves, and let’s get growing!
Frequently Asked Questions (FAQ)
What size container do I need for Brussel sprouts?
Brussel sprouts require a significant amount of space for their root systems to develop properly. A minimum of 12 inches in diameter and 12 inches deep is recommended for a single plant. However, a larger container, such as a 5-gallon bucket or a half-barrel planter, is ideal. If you plan to grow multiple plants in one container, ensure there is at least 18 inches of space between each plant. The larger the container, the more room the roots have to grow, leading to a healthier and more productive plant. Remember, adequate drainage is crucial, so ensure your container has drainage holes.
What type of soil is best for container Brussel sprouts?
Brussel sprouts thrive in well-draining, nutrient-rich soil. A good quality potting mix specifically formulated for vegetables is an excellent choice. You can also create your own mix by combining equal parts of compost, peat moss (or coconut coir), and perlite or vermiculite. Compost provides essential nutrients, peat moss (or coconut coir) helps retain moisture, and perlite or vermiculite improves drainage and aeration. Avoid using garden soil in containers, as it can become compacted and hinder root growth. The ideal pH range for Brussel sprouts is between 6.0 and 7.5.
How often should I water my container Brussel sprouts?
Watering frequency depends on several factors, including the weather, the size of the container, and the type of soil. Generally, you should water your Brussel sprouts whenever the top inch of soil feels dry to the touch. During hot, dry weather, you may need to water daily. Avoid overwatering, as this can lead to root rot. Ensure the container has adequate drainage to prevent water from pooling at the bottom. A good rule of thumb is to water deeply and thoroughly, allowing excess water to drain out of the drainage holes.
How much sunlight do Brussel sprouts need?
Brussel sprouts require at least 6 hours of direct sunlight per day to thrive. Choose a location for your container that receives ample sunlight throughout the day. If you live in a particularly hot climate, some afternoon shade may be beneficial to prevent the plants from overheating. If you don’t have a sunny spot, you can supplement with grow lights.
When is the best time to plant Brussel sprouts in containers?
Brussel sprouts are a cool-season crop, so the best time to plant them is in the late spring or early summer for a fall harvest, or in late summer for a winter harvest in milder climates. Check your local frost dates to determine the optimal planting time for your region. You can start seeds indoors 6-8 weeks before the last expected frost or purchase seedlings from a local nursery.
How do I fertilize my container Brussel sprouts?
Brussel sprouts are heavy feeders and require regular fertilization to produce a good yield. Use a balanced fertilizer, such as a 10-10-10 or 14-14-14, according to the package directions. You can also use organic fertilizers, such as compost tea or fish emulsion. Fertilize every 2-3 weeks during the growing season. Avoid over-fertilizing, as this can lead to excessive foliage growth at the expense of sprout development.
How do I deal with pests and diseases on my container Brussel sprouts?
Common pests that affect Brussel sprouts include aphids, cabbage worms, and flea beetles. Regularly inspect your plants for signs of infestation and take action promptly. You can use insecticidal soap, neem oil, or Bacillus thuringiensis (Bt) to control these pests. Diseases that can affect Brussel sprouts include clubroot and downy mildew. Ensure good air circulation around your plants and avoid overhead watering to prevent these diseases. If you notice signs of disease, remove affected leaves and treat with a fungicide if necessary. Companion planting with marigolds can also help deter pests.
How do I harvest Brussel sprouts from my container plants?
Brussel sprouts are typically ready to harvest when the sprouts are firm, green, and about 1-2 inches in diameter. Start harvesting from the bottom of the plant upwards, twisting or cutting off the sprouts as they mature. The lower sprouts will mature first, and the plant will continue to produce sprouts upwards. After harvesting the sprouts, you can remove the leaves below them to encourage further sprout development. Harvest regularly to encourage continued production.
Can I grow Brussel sprouts in containers indoors?
While it’s possible to grow Brussel sprouts indoors, it can be challenging due to the high light requirements. You’ll need to provide at least 6 hours of direct sunlight or supplement with strong grow lights. Ensure good air circulation and maintain a cool temperature. Indoor-grown Brussel sprouts may not produce as many sprouts as those grown outdoors, but it’s still a rewarding experience.
What are some good companion plants for container Brussel sprouts?
Good companion plants for Brussel sprouts include marigolds, nasturtiums, rosemary, thyme, and dill. Marigolds and nasturtiums help deter pests, while rosemary, thyme, and dill can improve the flavor of the sprouts and attract beneficial insects. Avoid planting Brussel sprouts near strawberries or tomatoes, as they can compete for nutrients.
Leave a Comment