
Hydrogen Peroxide Salt Cleaning: Your Secret Weapon for a Sparkling Clean Home
Have you ever wished for a simple, eco-friendly cleaning solution that could tackle even the toughest grime? I know I have! That’s why I’m so excited to share my favorite hydrogen peroxide salt cleaning trick with you. This powerful combination isn’t just effective; it’s also incredibly affordable and readily available, making it a perfect addition to your DIY cleaning arsenal.
The use of natural cleaning agents has a rich history, dating back centuries. Our ancestors relied on readily available ingredients like salt and vinegar for cleaning and preserving food. While modern cleaning products offer convenience, many contain harsh chemicals that can be harmful to our health and the environment. This is where the magic of hydrogen peroxide salt cleaning comes in.
Why You Need This DIY Cleaning Hack
In today’s busy world, finding time for thorough cleaning can feel like a monumental task. But a sparkling clean home doesn’t have to mean hours of scrubbing and expensive cleaning products. This hydrogen peroxide salt cleaning method offers a simple, effective, and cost-saving alternative. It’s perfect for tackling stubborn stains on countertops, brightening grout, and even sanitizing surfaces – all without the harsh chemicals found in many commercial cleaners. You’ll be amazed at how easily this simple mixture can transform your home!
So, are you ready to discover the power of this amazing cleaning duo? Let’s dive into the details and learn how to harness the cleaning power of hydrogen peroxide and salt to achieve a sparkling clean home, naturally and affordably. Get ready to say goodbye to stubborn stains and hello to a brighter, healthier home with this easy hydrogen peroxide salt cleaning method!
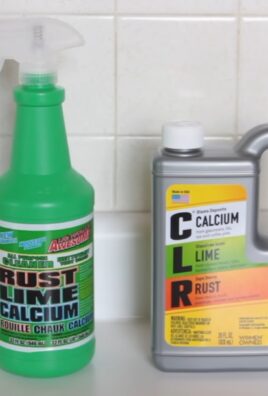
Cleaning with Hydrogen Peroxide and Salt: A Powerful DIY Cleaning Hack
I’ve always been a fan of natural cleaning solutions, and this hydrogen peroxide and salt combo is a real game-changer. It’s incredibly effective for tackling tough stains and grime, and it’s much gentler on the environment than harsh chemical cleaners. Let’s dive into how to make and use this powerful cleaning solution!
What You’ll Need:
- Hydrogen peroxide (3% solution – the kind you find in drugstores)
- Table salt (iodized or non-iodized works fine)
- Spray bottle
- Small bowl
- Measuring spoons
- Cleaning cloths or sponges
- Optional: Rubber gloves (for sensitive skin)
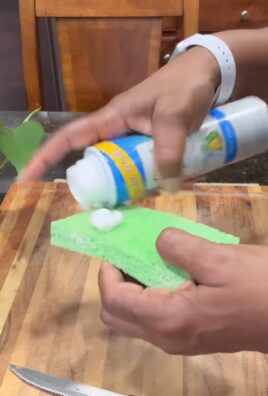
Making Your Cleaning Solution:
- Measure your ingredients: For a basic solution, I usually start with a 1:1 ratio of hydrogen peroxide and salt. For example, I’ll use 1/4 cup of hydrogen peroxide and 1/4 cup of salt. You can adjust this ratio depending on the cleaning task. For really stubborn stains, you might want to increase the amount of salt. For more delicate surfaces, you might want to use less salt.
- Combine the ingredients: In your small bowl, carefully add the salt to the hydrogen peroxide. Don’t worry if it doesn’t dissolve completely right away; it will fizz a bit as it mixes.
- Stir gently: Use a spoon to gently stir the mixture until it’s mostly combined. You’ll notice some fizzing – this is normal and shows the cleaning power at work!
- Transfer to a spray bottle: Once the mixture is combined, carefully pour it into your spray bottle. Make sure the bottle is clean before you do this.
Using Your Hydrogen Peroxide and Salt Cleaner:
This cleaning solution is versatile and can be used on a variety of surfaces. However, always test it on a small, inconspicuous area first to ensure it doesn’t damage the surface. Here’s how to use it effectively:
- Spray the solution: Generously spray the affected area with your homemade cleaner. Make sure to coat the surface evenly.
- Let it sit: Allow the solution to sit for a few minutes. For tougher stains, you might want to let it sit for 10-15 minutes, or even longer. The fizzing action helps to lift the dirt and grime.
- Scrub gently: Use a clean cloth or sponge to gently scrub the area. Avoid using abrasive scrubbers, as these could scratch the surface. For really stubborn stains, you might need to scrub a little harder, but be gentle!
- Rinse thoroughly: Once you’ve scrubbed the area, rinse it thoroughly with clean water. This is crucial to remove any remaining residue.
- Dry the surface: Use a clean cloth to dry the surface completely. This helps to prevent water spots and ensures a sparkling clean finish.
Specific Cleaning Applications:
Cleaning Grout:
Grout can be notoriously difficult to clean. This hydrogen peroxide and salt solution is a great way to tackle that stubborn grime. Simply spray the grout, let it sit for 10-15 minutes, scrub with a grout brush, and rinse thoroughly. You’ll be amazed at the results!
Cleaning Countertops:
For countertops, I recommend using a slightly less concentrated solution. You can try a 2:1 ratio of hydrogen peroxide to salt. Spray, let it sit for a few minutes, wipe clean, and rinse. This is great for removing everyday spills and stains.
Cleaning White Shoes:
White shoes can get dirty quickly. This cleaner works wonders on canvas and other fabric shoes. Make sure to test it on a small, hidden area first. Spray the solution onto the shoes, let it sit for a few minutes, scrub gently with a soft brush, and then rinse and let them air dry. Remember to avoid getting the solution inside the shoe.
Cleaning Bathroom Fixtures:
This solution is also effective for cleaning bathroom fixtures like sinks, toilets, and bathtubs. Spray the solution onto the surface, let it sit for a few minutes, scrub with a soft cloth or sponge, and rinse thoroughly. It’s a great way to remove soap scum and other bathroom grime.
Important Considerations:
- Test on a small area first: Always test your cleaning solution on a small, inconspicuous area before applying it to the entire surface. This will help you avoid any potential damage.
- Avoid using on delicate surfaces: This cleaning solution is not suitable for all surfaces. Avoid using it on polished wood, marble, or other delicate materials. Always check the manufacturer’s recommendations for cleaning your specific surfaces.
- Don’t mix with other cleaners: Never mix this solution with other cleaning products, especially bleach. This can create dangerous fumes and potentially harmful chemical reactions.
- Store properly: Store your cleaning solution in a cool, dark place away from children and pets. The hydrogen peroxide can degrade over time, so it’s best to make a fresh batch every few weeks.
- Ventilation is key: When using this solution, ensure good ventilation in the area. The fizzing action releases some oxygen, and good ventilation will help prevent any potential respiratory irritation.
Troubleshooting:
If you find that your solution isn’t working as effectively as you’d like, you can try increasing the amount of salt or letting it sit for a longer period. For really stubborn stains, you might need to repeat the process.
Remember, safety first! Always wear gloves if you have sensitive skin and ensure proper ventilation. With a little patience and elbow grease, this hydrogen peroxide and salt cleaning solution will leave your home sparkling clean!

Conclusion
So there you have it – a simple, effective, and surprisingly versatile cleaning solution using just hydrogen peroxide and salt! This hydrogen peroxide salt cleaning method isn’t just about sparkling surfaces; it’s about embracing a sustainable, cost-effective, and environmentally friendly approach to household cleaning. Forget harsh chemicals and their potentially harmful fumes; this DIY trick offers a powerful cleaning punch without the guilt. It’s a game-changer for tackling stubborn stains, disinfecting surfaces, and leaving your home smelling fresh and clean. The ease of preparation and the impressive results make this a must-try for anyone looking to simplify their cleaning routine and reduce their environmental impact. From brightening grout to whitening laundry, the applications are truly limitless. You’ll be amazed at how effectively this simple combination tackles grime and leaves your home sparkling.
Don’t be afraid to experiment! This recipe is incredibly adaptable. For extra scrubbing power, consider adding a few drops of your favorite essential oil – tea tree oil for its antiseptic properties, lemon for a fresh scent, or lavender for a calming aroma. For delicate surfaces, you might want to dilute the paste slightly with a little extra hydrogen peroxide. If you’re tackling particularly stubborn stains, let the paste sit for a few minutes before scrubbing. Remember to always test a small, inconspicuous area first to ensure the mixture doesn’t damage the surface. For larger cleaning tasks, consider preparing a larger batch of the paste in advance. The possibilities are endless!
We strongly encourage you to try this hydrogen peroxide salt cleaning method and share your experiences with us! Let us know what surfaces you’ve cleaned, what results you’ve achieved, and any variations you’ve experimented with. Your feedback will not only help us improve this guide but also inspire other readers to embrace this simple yet powerful cleaning solution. Join the growing community of eco-conscious cleaners who are ditching harsh chemicals and embracing the power of nature’s cleaning agents. Share your before-and-after photos on social media using #HydrogenPeroxideSaltClean – we can’t wait to see your sparkling results!
Frequently Asked Questions
What type of hydrogen peroxide should I use?
For cleaning purposes, a 3% hydrogen peroxide solution is generally recommended. This is the concentration readily available at most drugstores and supermarkets. Avoid using higher concentrations, as these can be more damaging to surfaces and potentially harmful if not handled carefully. Always follow the safety precautions on the hydrogen peroxide bottle.
Is this method safe for all surfaces?
While generally safe, it’s crucial to test this mixture on an inconspicuous area first before applying it to the entire surface. This is especially important for delicate materials like polished wood, certain fabrics, or painted surfaces. Hydrogen peroxide can bleach some materials, so a test patch is essential to avoid unintended discoloration. Avoid using this method on electronics or anything that could be damaged by moisture.
How long should I let the paste sit before scrubbing?
The required dwell time depends on the type of stain or dirt you’re tackling. For light cleaning, a quick scrub after application might suffice. For stubborn stains, allowing the paste to sit for 5-10 minutes can significantly enhance its effectiveness. For extremely stubborn stains, you may even leave it for up to 30 minutes, but always monitor the surface to prevent damage.
Can I use this method on my clothes?
Yes, this method can be used to whiten and brighten some clothes, particularly white fabrics. However, always test it on an inconspicuous area first to ensure it doesn’t damage or discolor the fabric. It’s particularly effective on removing stains from white cotton or linen. For colored clothes, it’s best to avoid this method to prevent fading.
What should I do if I get hydrogen peroxide on my skin?
Hydrogen peroxide is generally considered safe for skin contact in low concentrations, but it’s always best to rinse the affected area thoroughly with water if it comes into contact with your skin. If irritation occurs, discontinue use and consult a medical professional if necessary. Always wear gloves when using hydrogen peroxide for cleaning, especially for extended periods.
Can I store the leftover paste?
It’s generally not recommended to store leftover paste. Hydrogen peroxide can lose its effectiveness over time, especially when mixed with other substances. It’s best to prepare a fresh batch each time you need to clean. This ensures optimal cleaning power and avoids potential issues with the mixture degrading.
What are the environmental benefits of this cleaning method?
This hydrogen peroxide salt cleaning method offers several environmental benefits. It avoids the use of harsh chemicals and their associated packaging waste, reducing your environmental footprint. Hydrogen peroxide is a naturally occurring substance that breaks down into water and oxygen, making it a biodegradable and environmentally friendly cleaning agent. By choosing this method, you contribute to a more sustainable and eco-conscious lifestyle.
Is this method effective on mold and mildew?
Hydrogen peroxide is a known disinfectant and can be effective in killing mold and mildew. However, for severe mold infestations, it’s best to consult a professional mold remediation service. For minor mold and mildew issues, this method can be a helpful addition to your cleaning routine, but ensure proper ventilation during and after application.
Leave a Comment