
Grow Chili Peppers: Your Guide to a Spicy Harvest
Growing chili peppers – it sounds intimidating, right? But I’m here to tell you it’s surprisingly achievable, even for the most novice gardener! This article is your passport to a vibrant, spicy harvest right in your own backyard. Forget expensive grocery store peppers; I’ll show you how to cultivate your own fiery delights, from seed to sizzling salsa.
The history of chili peppers is fascinating! Originating in the Americas, these fiery fruits have traveled the globe, becoming a staple in countless cuisines. From the mild sweetness of a bell pepper to the explosive heat of a habanero, the variety is astounding. And the best part? You can experience this incredible diversity firsthand by learning how to grow chili peppers yourself.
Why Grow Your Own?
There are so many reasons to embark on this spicy adventure! Firstly, homegrown chili peppers are bursting with flavor, far surpassing anything you’ll find in the supermarket. Secondly, you have complete control over the growing process, ensuring your peppers are free from pesticides and other unwanted chemicals. And finally, there’s an immense satisfaction in nurturing a plant from a tiny seed to a bountiful harvest – it’s a truly rewarding experience. This guide will equip you with the grow chili peppers knowledge and techniques you need to succeed.
So, whether you’re a seasoned gardener or a complete beginner, get ready to roll up your sleeves and discover the joy of cultivating your own chili peppers. Let’s get growing!
Growing Chili Peppers: A DIY Guide to a Spicy Harvest
I love the vibrant colors and intense flavors of chili peppers, and nothing beats the satisfaction of growing your own. This guide will walk you through the entire process, from seed to harvest, ensuring you have a bumper crop of delicious chilies.
Phase 1: Starting Seeds Indoors
- Choosing Your Seeds: Select chili pepper varieties suited to your climate and growing season. Consider factors like heat level (Scoville units), plant size, and fruit shape. I recommend starting with a few different types to see what you like best!
- Seed Starting Mix: Use a seed-starting mix, not garden soil. Garden soil is often too dense and can lead to damping off (a fungal disease that kills seedlings). A good seed starting mix will be light, airy, and well-draining.
- Planting the Seeds: Sow seeds about ¼ inch deep in small pots or seed trays. Gently water the soil, ensuring it’s moist but not soggy. I usually use a spray bottle for this.
- Providing Light and Warmth: Chili peppers need plenty of light and warmth to germinate. Place your seed trays in a warm location (ideally 70-80°F) with at least 6-8 hours of sunlight per day. A sunny windowsill works well, or you can use grow lights.
- Maintaining Moisture: Keep the soil consistently moist but not waterlogged. Check the moisture level daily and water as needed. Overwatering is a common mistake that can kill seedlings.
- Germination: Germination typically takes 1-3 weeks, depending on the variety and temperature. Once the seedlings emerge, you can gradually reduce the watering frequency, allowing the soil to dry slightly between waterings.
Phase 2: Transplanting Seedlings
- Hardening Off: Before transplanting your seedlings outdoors, you need to “harden them off.” This process gradually acclimates them to the outdoor environment. Start by placing them outside for a few hours each day, gradually increasing the exposure time over a week or two.
- Choosing a Location: Select a sunny location in your garden that receives at least 6-8 hours of direct sunlight per day. Chili peppers are sun-worshippers!
- Soil Preparation: Prepare the soil by loosening it with a garden fork or tiller. Amend the soil with compost or other organic matter to improve drainage and fertility. Well-drained soil is crucial for preventing root rot.
- Transplanting: Once the danger of frost has passed, carefully transplant your seedlings into the garden. Dig holes slightly larger than the root balls of your seedlings. Gently remove the seedlings from their pots, being careful not to damage the roots. Place them in the holes, cover the roots with soil, and gently firm the soil around the base of each plant.
- Watering: Water deeply after transplanting to help the seedlings settle in. Continue to water regularly, especially during dry periods. Aim for consistently moist soil, but avoid overwatering.
Phase 3: Ongoing Care and Maintenance
- Watering: Water deeply and regularly, especially during hot and dry weather. The frequency will depend on your climate and soil type. Check the soil moisture regularly by sticking your finger a couple of inches into the soil. If it feels dry, it’s time to water.
- Fertilizing: Feed your chili plants every 2-3 weeks with a balanced liquid fertilizer. Follow the instructions on the fertilizer label. Over-fertilizing can harm your plants, so it’s better to err on the side of caution.
- Pest and Disease Control: Regularly inspect your plants for pests and diseases. Common pests include aphids, spider mites, and whiteflies. Treat infestations promptly with insecticidal soap or neem oil. Good air circulation can help prevent fungal diseases.
- Staking or Caging: Many chili pepper varieties benefit from staking or caging to support the plants and prevent them from falling over, especially when they are laden with fruit. Use stakes or cages appropriate for the size of your plants.
- Mulching: Applying a layer of mulch around your plants helps retain moisture, suppress weeds, and regulate soil temperature. Use organic mulch such as straw, shredded leaves, or wood chips.
- Pruning: Some chili pepper varieties benefit from pruning to improve air circulation and encourage more fruit production. Remove any dead or damaged leaves or stems. You can also pinch off the growing tips of some varieties to encourage bushier growth.
Phase 4: Harvesting Your Chili Peppers
- Harvest Time: Chili peppers are ready for harvest when they reach their mature color. The color will vary depending on the variety. Some chilies turn red, others orange, yellow, or even purple.
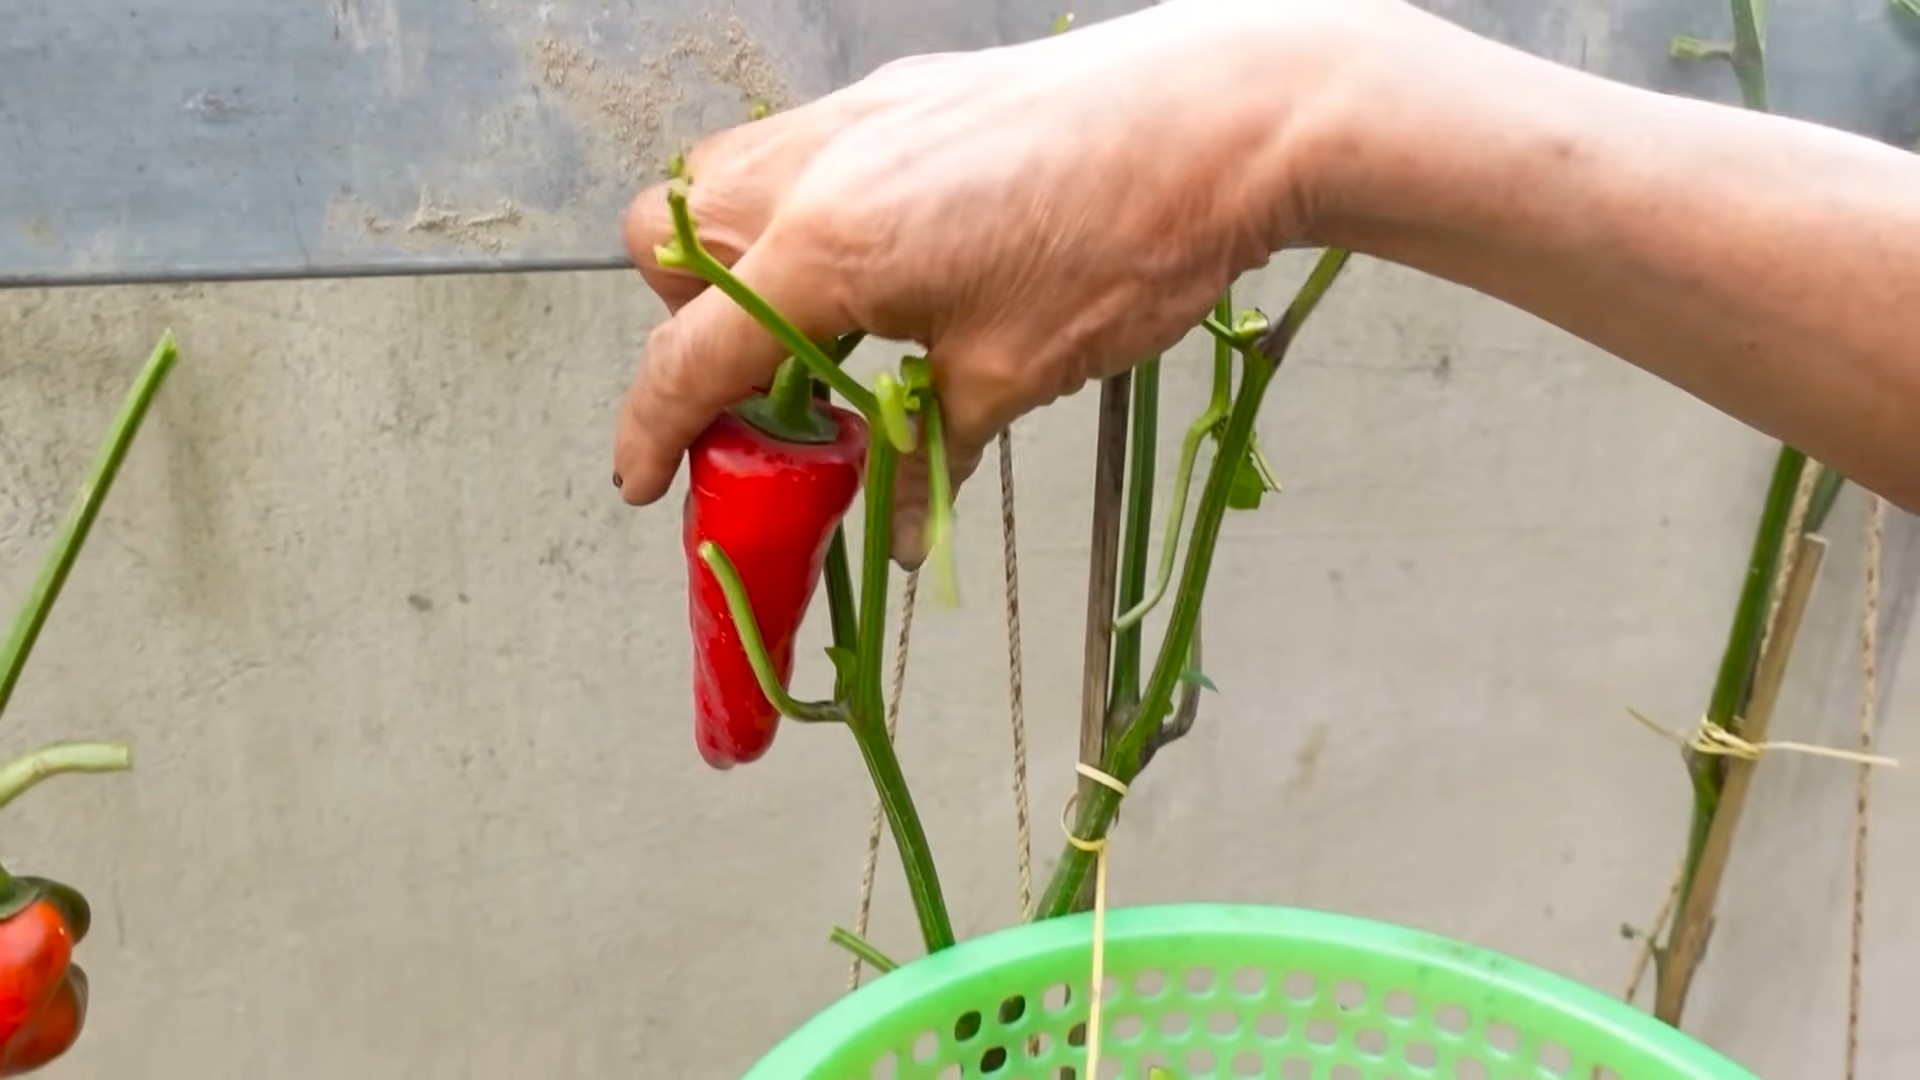
- Harvesting Technique: Use sharp scissors or pruning shears to carefully cut the chilies from the plant, leaving a short stem attached. Avoid pulling the chilies off, as this can damage the plant.
- Storage: Store your harvested chilies in a cool, dry place. You can also freeze them for later use. To freeze them, wash and dry the chilies, then place them in a freezer bag.
- Enjoying Your Harvest: Once you’ve harvested your chilies, you can use them in a variety of dishes, from salsas and sauces to stews and curries. Remember to wash your hands thoroughly after handling chilies, especially if you have sensitive skin.
Important Note:
Always wear gloves when handling hot chili peppers to avoid skin irritation. The capsaicin in chili peppers can cause burning and discomfort.

Conclusion
So there you have it! A comprehensive guide to successfully growing your own chili peppers. This DIY approach to cultivating these fiery fruits offers a rewarding experience unlike any other. From the satisfaction of nurturing a tiny seedling to the thrill of harvesting your own homegrown chilies, the journey is incredibly fulfilling. This DIY chili pepper growing method is a must-try for several reasons: it’s cost-effective, allows for greater control over the growing process, ensures you know exactly what’s gone into your peppers (no pesticides or questionable farming practices!), and provides a fantastic opportunity to connect with nature. You’ll be amazed at the flavor and freshness of chilies grown right in your own backyard or even on your windowsill!
Beyond the basic method outlined, there are countless ways to personalize your chili pepper growing experience. Experiment with different chili pepper varieties – from the mild sweetness of bell peppers to the intense heat of habaneros, the options are endless! Consider using different growing mediums, such as hydroponics or vertical gardening systems, to maximize space and yield. You can also explore companion planting, incorporating herbs and flowers that benefit chili pepper growth and deter pests. For instance, basil is a great companion plant, repelling insects and improving the overall health of your chili plants. Don’t be afraid to get creative and adapt the techniques to your specific environment and preferences. The beauty of this DIY approach is its flexibility.
Growing your own chili peppers is more than just a gardening project; it’s a journey of discovery and self-sufficiency. It’s about connecting with the natural world and experiencing the satisfaction of nurturing life from seed to harvest. The vibrant colors, the tantalizing aromas, and the incredible flavor of homegrown chilies are rewards in themselves. So, what are you waiting for? Embrace the challenge, get your hands dirty, and embark on this exciting adventure. We strongly encourage you to try this DIY method and share your experiences with us! Share your photos, tips, and success stories on social media using #GrowChiliPeppersDIY. Let’s build a community of chili pepper enthusiasts and inspire others to embark on their own growing journeys. We can’t wait to see what you grow!
Remember, even if your first attempt isn’t perfect, don’t be discouraged. Gardening is a learning process, and each experience brings you closer to mastering the art of growing your own delicious chili peppers. With a little patience, persistence, and the right techniques, you’ll be enjoying the fruits (or rather, the fiery peppers!) of your labor in no time.
Frequently Asked Questions
What type of soil is best for growing chili peppers?
Chili peppers thrive in well-draining soil that is rich in organic matter. A slightly acidic pH level (around 6.0-7.0) is ideal. You can amend your soil with compost or other organic materials to improve its drainage and fertility. Using a high-quality potting mix specifically designed for vegetables is also a great option, especially if you’re growing in containers.
How much sunlight do chili peppers need?
Chili peppers are sun-worshippers! They need at least 6-8 hours of direct sunlight per day to flourish. Choose a location in your garden or on your patio that receives ample sunlight. If you’re growing indoors, a sunny south-facing window is ideal, or consider using grow lights to supplement natural sunlight.
How often should I water my chili peppers?
Consistent watering is crucial, but avoid overwatering, which can lead to root rot. Water deeply when the top inch or two of soil feels dry. The frequency will depend on factors like weather conditions, pot size, and soil type. It’s better to slightly underwater than overwater. Observe your plants closely; wilting leaves are a sign of thirst.
When can I expect to harvest my chili peppers?
The time it takes for chili peppers to mature varies greatly depending on the variety. Some varieties are ready to harvest in as little as 60 days, while others may take up to 120 days or longer. Check the seed packet or plant tag for specific information on the expected harvest time for your chosen chili pepper variety. The peppers are typically ready for harvest when they reach their full size and color, and feel firm to the touch.
What are some common problems when growing chili peppers and how can I solve them?
Common problems include pests (aphids, spider mites), diseases (blight, fungal infections), and nutrient deficiencies. Regularly inspect your plants for signs of pests or diseases. Use organic pest control methods like insecticidal soap or neem oil to combat pests. Ensure proper soil drainage to prevent fungal diseases. If you suspect a nutrient deficiency, consider using a balanced fertilizer specifically formulated for vegetables.
Can I grow chili peppers from seeds I’ve saved from previous harvests?
Absolutely! Saving seeds from your homegrown chili peppers is a rewarding way to continue your gardening journey. Allow the peppers to fully ripen on the plant before harvesting. Remove the seeds and let them dry completely before storing them in a cool, dry place. Remember to label the seeds with the variety name.
What are some tips for growing chili peppers in containers?
Growing chili peppers in containers offers flexibility and is ideal for those with limited space. Use large containers (at least 5 gallons) with drainage holes. Choose a well-draining potting mix and ensure the containers receive ample sunlight. Water regularly, checking the soil moisture frequently, as containers dry out faster than in-ground plantings. Consider using self-watering containers for added convenience.
Leave a Comment