
Growing Water Spinach Easily is simpler than you might think, and I’m here to show you how! Have you ever dreamt of harvesting fresh, vibrant greens right from your own backyard, adding a delicious and nutritious boost to your meals? Well, dream no more! This DIY guide will unlock the secrets to cultivating this amazing vegetable, also known as Ong Choy, right at home.
Water spinach, a staple in Southeast Asian cuisine, has a rich history, deeply intertwined with the culinary traditions of the region. For generations, it has been a readily available and affordable source of essential vitamins and minerals. But you don’t need to travel to Asia to enjoy this delightful vegetable; you can grow it yourself, no matter where you live!
In today’s world, where access to fresh, healthy produce can sometimes be a challenge, learning how to grow water spinach easily offers a fantastic solution. Not only will you have a constant supply of organic greens, free from harmful pesticides, but you’ll also experience the immense satisfaction of nurturing your own food. Plus, it’s a surprisingly low-maintenance plant, perfect for both beginner and experienced gardeners. So, let’s dive in and discover the simple steps to bringing this culinary gem to your home garden!
Easily Grow Water Spinach Yourself: Your DIY Guide for the Garden or Balcony
Hey folks! Water spinach, also known as Ong Choy or Morning Glory, is a super delicious and fast-growing vegetable that is very popular in Asian cuisine. And the best part? You can easily grow it yourself! I’ll show you how to harvest your own water spinach in a few simple steps, whether you have a garden or just a small balcony. Let’s get started!
What You Need: The Materials List
Before we begin, here is a list of everything you’ll need for your water spinach project:
- Seeds: Water spinach seeds are available online or in well-stocked garden centers. Make sure to buy fresh seeds to ensure a good germination rate.
- Container: You can use pots, tubs, buckets, or even an old bathtub. The important thing is that the container is large enough (at least 30 cm deep and wide) and has drainage holes.
- Soil: A good mixture of garden soil, compost, and coconut coir is ideal. Water spinach likes nutrient-rich and well-draining soil.
- Water: Water spinach loves water, so ensure you have a reliable water source.
- Fertilizer: An organic liquid fertilizer or compost tea will help the water spinach grow strong.
- Optional: A seed tray or small pots for pre-cultivation.
- Optional: A trellis or support if you want to let the water spinach climb.
Phase 1: Preparation – Bringing Seeds to Life
Before the seeds go into the soil, it’s advisable to pre-germinate them. This speeds up the germination process and increases the success rate. Here’s how:
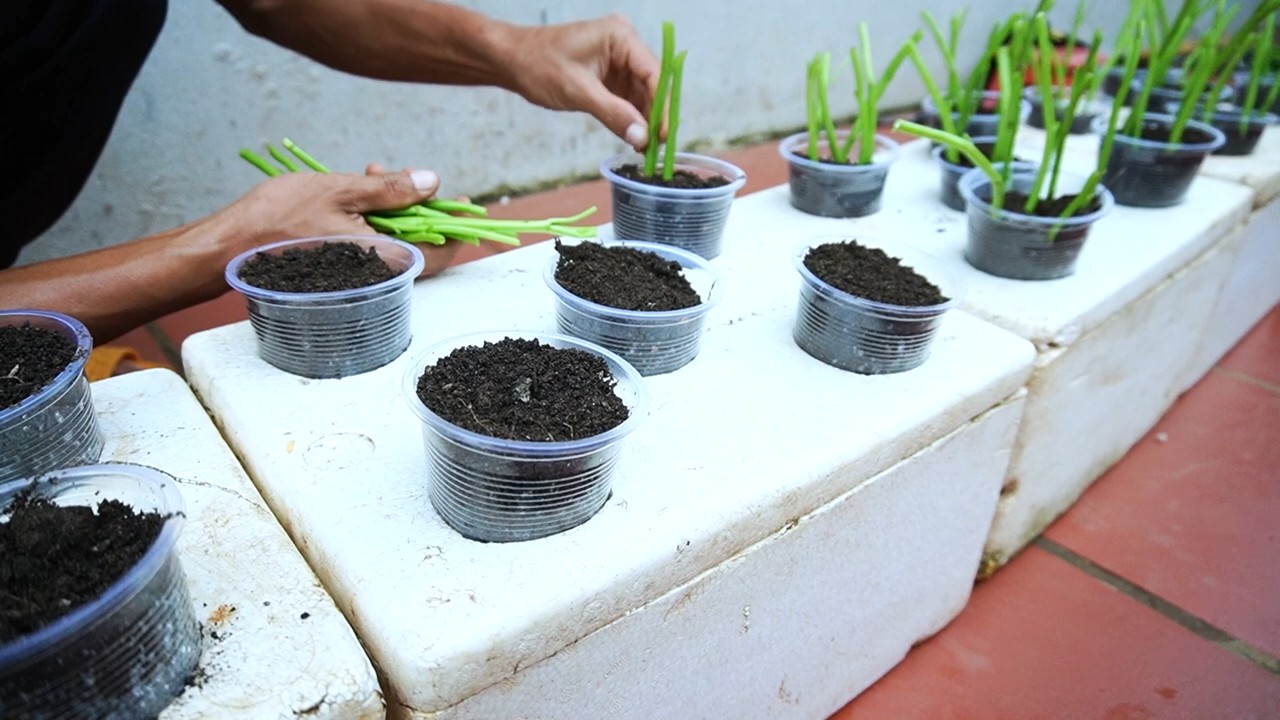
- Soak seeds: Place the water spinach seeds in a bowl of lukewarm water and let them soak for 12-24 hours. This softens the hard seed coat and makes germination easier.
- Sow in seed trays (optional): Fill a seed tray or small pots with seed-starting mix. Place the soaked seeds about 1 cm deep in the soil and cover them lightly with soil.
- Keep moist: Spray the soil regularly with water so that it is moist but not wet.
- Keep warm: Place the seed tray in a warm place (20-25°C). A mini-greenhouse or a windowsill above a radiator is ideal.
- Be patient: After about 3-7 days, the first seedlings should appear.
Phase 2: Planting – Into the Soil!
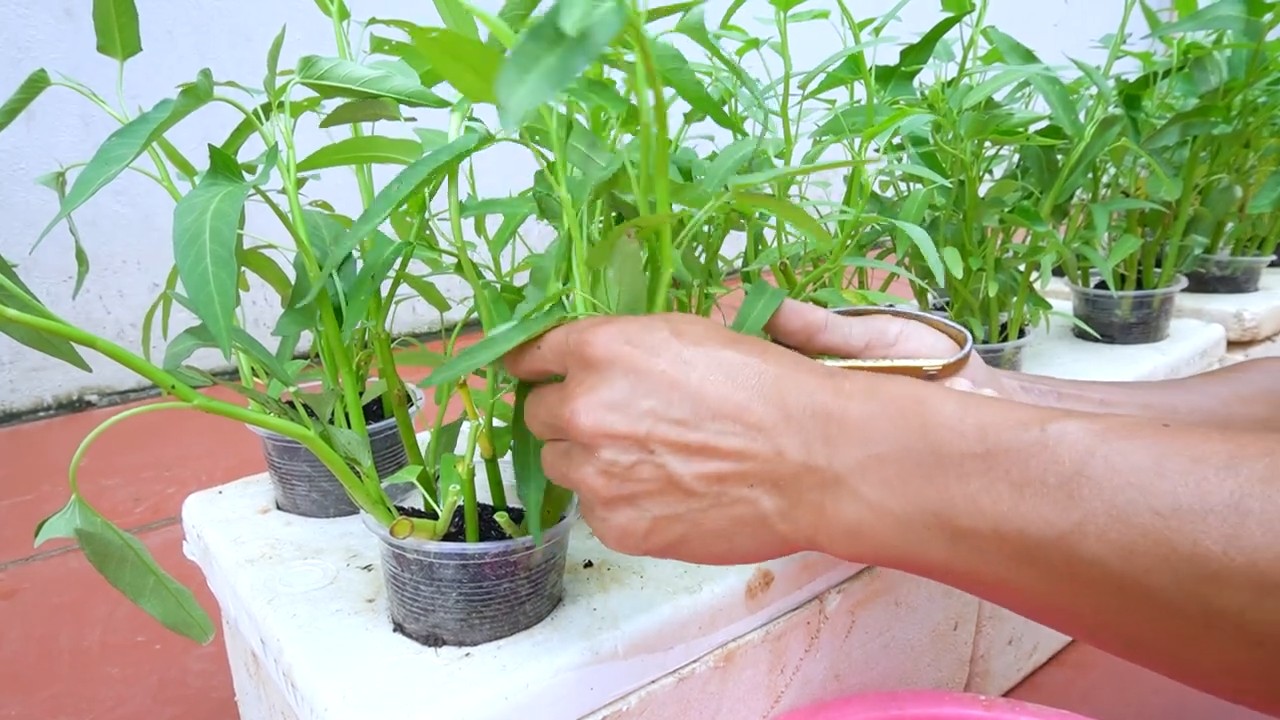
Once the seedlings are a few centimeters tall (or if you have sown the seeds directly into the container), it’s time to plant them out or thin them.
- Prepare the container: Fill your container with the prepared soil mixture. Leave about 5 cm of space to the rim.
- Planting out: If you sowed the seeds directly into the container, thin the plants so they are about 10-15 cm apart. If you pre-cultivated the plants, dig small holes in the soil and carefully place the seedlings in them.
- Water in: Water the plants thoroughly after planting.
Phase 3: Care – Pampering Your Water Spinach
Water spinach is relatively easy to care for, but you should keep a few things in mind for it to grow well:
- Watering: Water spinach loves water! Always keep the soil moist, but avoid waterlogging. On hot days, you may need to water several times a day. A layer of mulch made of straw or grass clippings helps to retain moisture in the soil.
- Fertilizing: Fertilize the water spinach every 2-3 weeks with an organic liquid fertilizer or compost tea. This ensures strong growth and a bountiful harvest.
- Sunlight: Water spinach needs a lot of sun, at least 6 hours a day. A sunny location is ideal.
- Support (optional): If you want to let the water spinach climb, you can offer it a support. This can be a bamboo stick, a trellis, or a wire grid.
- Pests and diseases: Water spinach is relatively resistant to pests and diseases. Aphids may occasionally appear. You can combat them with a jet of water or a mild soap solution.
Phase 4: The Harvest – Finally, Enjoy!
After about 4-6 weeks, you can harvest your first water spinach!
- Harvesting: Cut the stems with a sharp knife or scissors about 10-15 cm above the ground. The water spinach will then grow back, so you can harvest it multiple times.
- Harvest regularly: The more often you harvest, the more new shoots the water spinach will produce.
- Storage: Water spinach does not keep for long. It is best to process it immediately after harvesting. It will keep in the refrigerator for about 2-3 days wrapped in a damp cloth.
Extra Tips for the Perfect Water Spinach
- Growing water spinach in water: You can also grow water spinach directly in water. Simply place the cut stems in a glass of water. They will then form roots and continue to grow.
- Try different varieties: There are different varieties of water spinach. Try out different types to find out which one you like best.
- Water spinach as a ground cover: If you don’t let the water spinach climb, it can also be used as a ground cover. It will then cover the ground and keep it moist.
- Pay attention to the temperature: Water spinach is sensitive to frost. If the temperatures drop below 10°C, you should bring it indoors or cover it with fleece.
- Observe your plants: Pay attention to changes in the appearance of the plants. Yellow leaves can be a sign of a nutrient deficiency or too much water.
Water Spinach in the Kitchen: Delicious Recipe Ideas
Water spinach is versatile in the kitchen. Here are a few ideas:
- Stir-fried water spinach with garlic: A classic of Asian cuisine. Simply stir-fry water spinach with garlic, chili, and soy sauce.
- Water spinach in soups and stews: Water spinach adds a fresh touch to soups and stews.
- Water spinach in salads: Young water spinach leaves can be eaten raw in a salad.
- Water spinach as a side dish: Steamed or blanched water spinach is a delicious side dish for meat and fish.
- Water spinach in curries: Water spinach goes wonderfully with curries.
I hope this guide helps you to grow your own water spinach. It’s really easier than you think and it’s fun to watch the plants grow and thrive. Good luck and enjoy your meal!
Conclusion
So, there you have it! Growing water spinach easily at home is not only achievable but also incredibly rewarding. Forget those expensive trips to the Asian market or the disappointment of finding wilted, less-than-fresh bunches. With a little patience and this simple DIY trick, you can have a constant supply of crisp, vibrant water spinach right at your fingertips.
But why is this a must-try? Beyond the convenience and cost savings, growing your own water spinach allows you to control the entire process. You know exactly what goes into your food – no harmful pesticides, no questionable fertilizers, just pure, homegrown goodness. This is especially important for leafy greens, which tend to absorb chemicals easily. Plus, there’s something deeply satisfying about nurturing a plant from seed (or cutting!) to harvest. It connects you to your food in a way that simply buying it from the store never can.
And the possibilities don’t stop there! Feel free to experiment with different growing mediums. While we’ve highlighted the ease of growing in water, you can also try a soil-based approach, ensuring the soil is consistently moist. Consider adding a diluted liquid fertilizer every few weeks to boost growth and yield. For those with limited space, vertical gardening techniques can be adapted to water spinach, maximizing your harvest in a small area. You can even try growing different varieties of water spinach, each with its own unique flavor and texture. Some varieties are more tender, while others have a slightly nuttier taste.
Don’t be afraid to get creative with your harvest, too. Water spinach is incredibly versatile in the kitchen. Stir-fries are a classic, but it’s also delicious in soups, salads, and even as a side dish simply steamed with a drizzle of sesame oil and soy sauce. The tender shoots and leaves are perfect for adding a fresh, vibrant touch to any meal.
We genuinely believe that this DIY trick for growing water spinach easily is a game-changer for anyone who loves this delicious and nutritious vegetable. It’s simple, sustainable, and incredibly satisfying. So, what are you waiting for? Give it a try! We’re confident that you’ll be amazed at how easy it is to grow your own fresh water spinach.
And most importantly, we want to hear about your experience! Share your photos, tips, and any variations you try in the comments below. Let’s build a community of water spinach enthusiasts and learn from each other. Happy growing!
Frequently Asked Questions (FAQ)
1. What exactly is water spinach, and what does it taste like?
Water spinach, also known as ong choy, morning glory, or swamp cabbage, is a semi-aquatic leafy green vegetable popular in Asian cuisine. It has long, hollow stems and arrow-shaped leaves. The taste is mild and slightly sweet, with a subtle earthy undertone. When cooked, it has a slightly crunchy texture, similar to spinach but with a bit more bite. It’s a versatile vegetable that readily absorbs flavors, making it a great addition to stir-fries, soups, and salads.
2. Is water spinach safe to eat? Are there any precautions I should take?
Generally, water spinach is safe to eat, especially when grown at home where you control the growing environment. However, it’s crucial to source your water spinach from a reputable source or grow it yourself to avoid potential contamination. Water spinach can accumulate heavy metals and other pollutants from the water it grows in. If you’re buying it from a store, make sure it’s fresh and from a trusted supplier. If you’re growing it yourself, use clean, filtered water. Thoroughly wash the water spinach before cooking to remove any dirt or debris. People with kidney problems should consume water spinach in moderation due to its high oxalate content.
3. How long does it take to grow water spinach from cuttings or seeds?
Growing water spinach from cuttings is generally faster than starting from seeds. Cuttings can root within a week or two, and you can start harvesting leaves in about 4-6 weeks. Starting from seeds typically takes a bit longer. Seeds usually germinate within 5-10 days, and you can expect to harvest in about 6-8 weeks. The exact timeframe depends on factors like temperature, sunlight, and nutrient availability.
4. What kind of water is best for growing water spinach?
Clean, filtered water is ideal for growing water spinach. Avoid using tap water directly, as it may contain chlorine or other chemicals that can inhibit growth. If you must use tap water, let it sit out for 24 hours to allow the chlorine to evaporate. Rainwater is an excellent option if you have access to it. You can also use well water, but make sure it’s tested for contaminants. Regularly change the water in your growing container to prevent algae growth and maintain a healthy environment for your water spinach.
5. How much sunlight does water spinach need?
Water spinach thrives in full sun, requiring at least 6-8 hours of direct sunlight per day. However, it can tolerate partial shade, especially in hotter climates. If you’re growing water spinach indoors, place it near a sunny window or use grow lights to provide adequate illumination. Insufficient sunlight can result in leggy growth and reduced yields.
6. What are some common problems when growing water spinach, and how can I prevent them?
Some common problems include algae growth in the water, nutrient deficiencies, and pest infestations. To prevent algae growth, regularly change the water and ensure the growing container is not exposed to excessive sunlight. Nutrient deficiencies can be addressed by adding a diluted liquid fertilizer every few weeks. Pests like aphids and spider mites can be controlled with insecticidal soap or neem oil. Regularly inspect your plants for any signs of pests or diseases and take action promptly.
7. Can I grow water spinach indoors year-round?
Yes, you can grow water spinach indoors year-round, provided you can provide adequate light and warmth. Use grow lights to supplement natural sunlight, especially during the winter months. Maintain a consistent temperature of around 70-80°F (21-27°C). Ensure good air circulation to prevent fungal diseases. With proper care, you can enjoy a continuous harvest of fresh water spinach regardless of the season.
8. How do I harvest water spinach, and how often can I harvest it?
You can harvest water spinach by cutting the stems about 4-6 inches from the base of the plant. This encourages new growth and allows you to harvest multiple times. You can typically harvest every 2-3 weeks, depending on the growth rate. Avoid harvesting more than one-third of the plant at a time to allow it to recover and continue producing.
9. How do I store harvested water spinach?
Harvested water spinach is best used fresh, but it can be stored in the refrigerator for a few days. Wrap the leaves in a damp paper towel and place them in a plastic bag or container. This will help keep them crisp and prevent them from wilting. Avoid washing the water spinach before storing it, as this can promote spoilage. Wash it thoroughly just before cooking.
10. Can I use the same water spinach cuttings to grow new plants?
Yes, you can absolutely use the same water spinach cuttings to grow new plants. This is a great way to propagate your water spinach and expand your harvest. Simply take cuttings from healthy stems and place them in water to root. Once the roots are established, you can transplant them into a new container or growing medium. This is a sustainable and cost-effective way to enjoy a continuous supply of fresh water spinach.


Leave a Comment