
Grow Celery at Home? Absolutely! Imagine stepping into your garden and snipping fresh, crisp celery stalks whenever you need them. No more limp, store-bought celery that’s been sitting on the shelf for days! This isn’t just a dream; it’s an achievable reality with a few simple tricks and a little bit of DIY magic.
Celery, with its refreshing crunch, has been enjoyed for centuries. Originating in the Mediterranean, it was initially valued for its medicinal properties before becoming a culinary staple. Now, you can bring this historical vegetable right to your backyard.
But why bother with the effort? Well, growing your own celery allows you to control the quality and freshness, ensuring you’re getting the most nutrients and flavor. Plus, it’s incredibly satisfying to nurture a plant from seed to harvest. In this article, I’ll share some easy-to-follow DIY hacks that will help you grow celery at home, even if you have limited space or gardening experience. Get ready to enjoy the freshest celery you’ve ever tasted!
Grow Your Own Celery at Home: A Comprehensive DIY Guide
Hey everyone! Have you ever wondered if you can easily grow celery at home? The answer is a definite YES! It’s not only super easy, but also a great way to reduce kitchen waste and always have fresh celery on hand. I’ll show you how you can do it yourself very easily. Let’s get started!
What you need:
- A celery base (preferably with the root end intact)
- A glass or bowl
- Water
- Potting soil
- A pot or a bed in the garden
- Patience (but don’t worry, it goes faster than you think!)
The Simple Guide: Growing Celery from the Base
- Phase 1: The Revival in a Water Bath: We start by bringing the base back to life.
- Phase 2: Moving into the Soil: As soon as the roots sprout, we move!
- Phase 3: Care and Harvest: Now it’s time to water, fertilize, and look forward to the harvest.
Step-by-Step Instructions: Here’s How!
Phase 1: The Revival in a Water Bath
- Prepare the base: After you’ve bought your celery at the supermarket and used the stalks for your recipes, keep the base (the bottom end with the roots). Cut the base about 5-7 cm (2-3 inches) from the bottom end. Make sure the cut is clean.
- Prepare the water bath: Take a glass or a bowl and fill it with about 2-3 cm (about an inch) of water. The water should be clean and at room temperature.
- Place the base in the water: Place the base with the cut surface down in the water. Make sure that only the bottom part of the base is in the water. The top leaves should not be in the water, as they could rot.
- The location is important: Place the glass or bowl in a bright spot, but avoid direct sunlight. A windowsill is ideal.
- Don’t forget to change the water: Change the water every 1-2 days to prevent rot and to ensure the base always has fresh water.
- Patience is required: After about 5-7 days, you should see small roots sprouting from the base. Additionally, new green leaves will grow in the center of the base. This is a sign that your celery is coming back to life!
Phase 2: Moving into the Soil
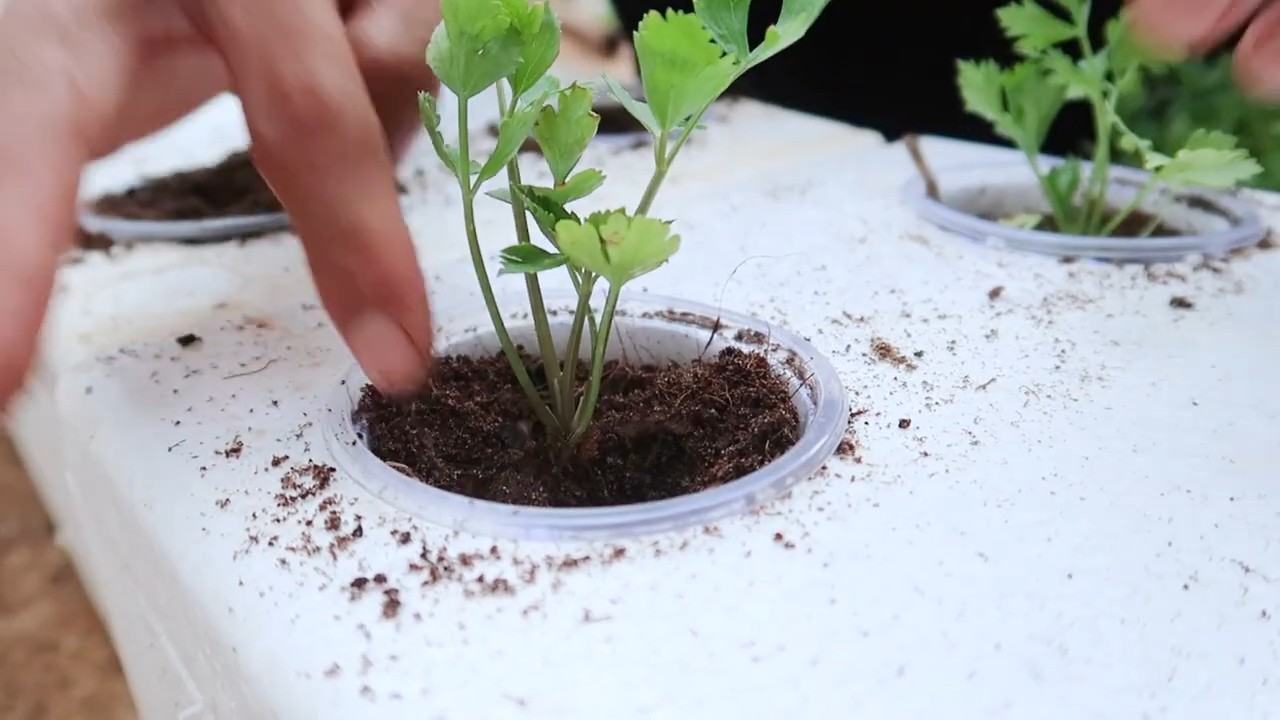
- Recognize the right time: As soon as the roots are about 5-7 cm (2-3 inches) long and you see significant leaf growth, it’s time to move it into the soil.
- Prepare the pot: Choose a pot with a diameter of at least 15 cm (6 inches). Fill the pot with high-quality potting soil. You can also mix in some compost to make the soil even more nutrient-rich.
- Planting: Make a hole in the soil large enough to accommodate the base. Carefully place the base in the hole and cover the roots with soil. Make sure that the upper part of the base, from where the leaves are growing, is not covered with soil.
- Watering in: After planting, water the celery thoroughly. This helps the soil settle around the roots and helps the base acclimate to its new location.
- Alternatively: Plant in a garden bed: If you have a garden, you can also plant the celery directly in a garden bed. Choose a sunny spot with well-draining soil. The distance between plants should be about 20-30 cm (8-12 inches).
Phase 3: Care and Harvest
- Watering: Celery needs a lot of water, especially during its growth phase. Water regularly, but avoid waterlogging. The soil should always be slightly moist.
- Fertilizing: Fertilize the celery every 2-3 weeks with an organic fertilizer or compost tea. This promotes growth and ensures strong plants.
- Sunlight: Celery prefers a sunny location, but direct midday sun can burn the leaves. A semi-shady spot is ideal.
- Pest protection: Watch out for pests like aphids or snails. If necessary, you can use natural pest control methods.
- Blanching (optional): If you prefer lighter-colored stalks, you can blanch the celery about 2-3 weeks before harvesting. To do this, wrap the stalks with paper or cardboard, leaving only the top leaves exposed. This prevents photosynthesis and results in lighter stalks.
- The Harvest: You can harvest the stalks as soon as they reach the desired size. Simply cut the stalks at the bottom end. The plant will continue to grow and produce new stalks. You can also harvest individual stalks, depending on how much you need at the moment.
Additional Tips and Tricks
- Different Varieties: There are different varieties of celery. Find out which variety is best suited for your climate and needs.
- Sowing: You can also grow celery from seeds. Growing from seed is a bit more involved, but it’s worth it if you want to grow a specific variety.
- Overwintering: In mild climates, celery can be overwintered outdoors. In colder regions, you should transplant the plants into pots and overwinter them in a frost-free location.
- Diseases: Watch out for diseases like celery leaf spot. Remove infected leaves immediately to prevent the spread of the disease.
- Use: Celery is versatile. You can eat it raw in salads, cook it in soups and stews, or enjoy it as a snack with dips.
Why Grow Your Own Celery?
- Freshness: Homegrown celery is always fresh and crisp.
- Sustainability: You reduce kitchen waste and save money.
- Health: Celery is rich in vitamins and minerals.
- Satisfaction: It’s a great feeling to grow and harvest something yourself.
I hope this guide has helped and inspired you to grow your own celery at home. It’s really easier than you think and a lot of fun! Give it a try and let me know how it goes! Good luck!
Conclusion
So, there you have it! Growing celery at home from scraps isn’t just a fun experiment; it’s a sustainable way to reduce food waste, enjoy fresh, flavorful celery, and connect with the natural world. It’s a surprisingly simple process that yields impressive results, transforming what would otherwise be kitchen scraps into a vibrant, productive plant.
Why is this DIY trick a must-try? Because it’s economical, environmentally friendly, and incredibly rewarding. Think about it: you’re essentially getting free celery! You’re also reducing your carbon footprint by minimizing trips to the grocery store and preventing food waste from ending up in landfills. Plus, the taste of homegrown celery is noticeably superior to store-bought varieties – crisper, sweeter, and bursting with fresh flavor.
But the benefits don’t stop there. Growing celery at home is also a fantastic educational opportunity, especially for children. It teaches them about plant life cycles, the importance of sustainability, and the satisfaction of nurturing something from start to finish. It’s a hands-on learning experience that fosters a deeper appreciation for the food we eat.
Looking for variations? Absolutely! Once your celery is established in soil, you can experiment with different growing conditions. Try moving it to a sunnier location to see if it affects the flavor or growth rate. You can also experiment with different types of soil or fertilizers to optimize its development. Consider companion planting – celery is known to thrive alongside tomatoes, onions, and cabbage, creating a mutually beneficial ecosystem in your garden.
Another fun variation is to try growing different varieties of celery. While the method remains the same, exploring different cultivars can introduce new flavors and textures to your kitchen. From the classic Pascal celery to the more delicate Golden Self-Blanching variety, there’s a whole world of celery to discover.
Don’t be afraid to get creative with your celery harvest! Use it in soups, salads, stir-fries, or as a healthy snack with your favorite dip. The possibilities are endless. And remember, even the celery leaves are edible and packed with flavor – add them to salads, pesto, or use them as a garnish.
We wholeheartedly encourage you to give this DIY trick a try. It’s a simple, satisfying, and sustainable way to enjoy fresh celery at home. We’re confident that you’ll be amazed by the results.
And most importantly, we want to hear about your experience! Share your photos, tips, and stories with us in the comments below. Let us know what challenges you faced, what successes you celebrated, and any variations you tried. Your feedback will help other readers learn and grow their own celery at home. Let’s create a community of home gardeners who are passionate about sustainability and fresh, flavorful food. So, grab that celery base, get your hands dirty, and start growing! You’ll be amazed at how easy it is to **grow celery at home** and enjoy the fruits (or rather, vegetables) of your labor.
Frequently Asked Questions (FAQ)
1. How long does it take to grow celery from a base?
The time it takes to grow celery from a base can vary depending on several factors, including the variety of celery, the growing conditions (sunlight, temperature, water), and the quality of the soil. Generally, you can expect to see new growth within a week or two after placing the celery base in water. Once you transplant it to soil, it can take anywhere from 2 to 4 months to grow a full-sized stalk of celery. Be patient and consistent with your care, and you’ll be rewarded with a delicious harvest.
2. What kind of water should I use to regrow celery?
You can use regular tap water to regrow celery. However, it’s best to let the tap water sit for a few hours or overnight to allow any chlorine to dissipate, as chlorine can sometimes inhibit plant growth. Filtered water or rainwater are also excellent options. Avoid using distilled water, as it lacks the minerals that plants need to thrive. Change the water every 1-2 days to keep it fresh and prevent the growth of bacteria or mold.
3. How much sunlight does celery need?
Celery thrives in full sun to partial shade. Ideally, it needs at least 6 hours of direct sunlight per day. However, in hotter climates, it can benefit from some afternoon shade to prevent the leaves from scorching. If you’re growing celery indoors, place it near a sunny window or use a grow light to provide adequate illumination. Insufficient sunlight can result in leggy growth and a less flavorful harvest.
4. What type of soil is best for growing celery?
Celery prefers rich, well-draining soil that is high in organic matter. A loamy soil is ideal. Before planting, amend the soil with compost or well-rotted manure to improve its fertility and drainage. Celery also prefers a slightly acidic to neutral soil pH (around 6.0 to 7.0). You can test your soil pH with a soil testing kit and adjust it accordingly.
5. How often should I water my celery plant?
Celery needs consistent moisture to thrive. Water your celery plant deeply whenever the top inch of soil feels dry to the touch. Avoid letting the soil dry out completely, as this can stress the plant and affect its growth. However, also avoid overwatering, as this can lead to root rot. A good rule of thumb is to water thoroughly every 2-3 days, depending on the weather conditions and the drainage of your soil.
6. Can I grow celery indoors year-round?
Yes, you can grow celery indoors year-round, provided you can provide the necessary growing conditions. This includes adequate sunlight (or a grow light), consistent moisture, and a suitable temperature range (ideally between 60°F and 70°F). Choose a pot that is large enough to accommodate the celery’s root system, and use a well-draining potting mix. Be sure to monitor your plant regularly for pests and diseases, and adjust your care as needed.
7. What are some common pests and diseases that affect celery?
Celery can be susceptible to several pests and diseases, including aphids, celery leaf miners, slugs, snails, and fungal diseases like early blight and late blight. Regularly inspect your plants for signs of infestation or disease. If you spot any problems, take action promptly. You can use insecticidal soap or neem oil to control aphids and leaf miners. Handpick slugs and snails. To prevent fungal diseases, ensure good air circulation around your plants and avoid overhead watering.
8. How do I know when my celery is ready to harvest?
Celery is ready to harvest when the stalks are at least 6-8 inches long and have reached a desirable thickness. The exact size will depend on the variety of celery you are growing. The stalks should be firm and crisp, not limp or wilted. You can harvest the entire plant at once by cutting it off at the base, or you can harvest individual stalks as needed.
9. Can I eat the celery leaves?
Yes, celery leaves are perfectly edible and packed with flavor! They can be used in a variety of ways, such as adding them to salads, soups, stews, or stir-fries. They can also be used to make pesto or as a garnish. Celery leaves have a slightly stronger flavor than the stalks, so use them sparingly at first until you get used to their taste.
10. My celery is bitter. What could be the reason?
Bitter celery can be caused by several factors, including insufficient watering, excessive heat, or nutrient deficiencies. Make sure you are watering your celery plants regularly and deeply, especially during hot weather. Also, ensure that your soil is rich in nutrients by amending it with compost or fertilizer. If your celery is growing in a very sunny location, try providing some afternoon shade to protect it from the intense heat.


Leave a Comment