
Grow Bean Sprouts at Home: Unlock the secrets to a vibrant, nutritious harvest right from your kitchen counter! Have you ever wondered how those crunchy, delicious bean sprouts make their way into your favorite Asian dishes? Well, wonder no more! This DIY guide will empower you to cultivate your own supply of fresh bean sprouts, bursting with flavor and packed with essential vitamins and minerals.
The practice of sprouting beans dates back thousands of years, with roots deeply embedded in ancient Chinese culinary traditions. For centuries, sprouting was a vital technique for extending food supplies, especially during harsh winters. Today, while we have access to a global food market, the appeal of growing your own bean sprouts remains strong. It’s a sustainable, cost-effective, and incredibly rewarding way to add fresh, healthy ingredients to your diet.
Why should you learn to grow bean sprouts at home? Because it’s easier than you think! Forget about complicated gardening setups or expensive equipment. With just a few simple supplies and our step-by-step instructions, you’ll be enjoying homegrown bean sprouts in a matter of days. Plus, you’ll avoid the preservatives and potential contaminants often found in store-bought varieties. I’m excited to share these simple tricks with you, so you can enjoy the satisfaction of nurturing your own food and adding a healthy boost to your meals!
Growing Your Own Bean Sprouts: A Simple Guide for Home
Hey everyone! Do you fancy fresh, crunchy bean sprouts but don’t feel like buying them at the supermarket? Don’t worry, I’ll show you how to easily grow them at home! It’s super easy, inexpensive, and you know exactly what’s in them. Let’s get started!
What you need:
- Beans: Mung beans are best, but lentils, chickpeas, or adzuki beans also work great. Make sure they are untreated and capable of germinating.
- A sprouting jar or another container: A canning jar, a special sprouting jar with a sieve lid, or even a plastic tray with gauze will work just fine.
- A sieve or a cloth: For rinsing the sprouts.
- Water: Preferably filtered water or boiled, cooled water.
- A dark place: A cupboard, a drawer, or a covered spot.
- Patience: It takes a few days for the sprouts to be ready.
Step-by-Step Guide:
1. Preparing the Beans:
- First, you should carefully sort the beans. Remove any damaged or discolored beans.
- Put the beans in your sprouting jar or container.
- Fill the container with plenty of water so that the beans are well covered. They will swell up and need space.
- Let the beans soak in the water for 8-12 hours or overnight. This makes them softer and facilitates germination.
2. Soaking and Rinsing:
- After soaking, pour off the water. Use your sieve or cloth to catch the beans.
- Rinse the beans thoroughly under running water. This removes germs and bacteria.
- Put the beans back into the sprouting jar or container.
3. Starting the Germination Process:
- Place the sprouting jar or container in a dark place. Darkness promotes germination.
- Make sure the container is well-ventilated. If you are using a jar, you can place it at an angle to allow air to circulate.
- Rinse the beans 2-3 times daily with fresh water. This is super important to prevent mold and to keep the beans moist.
- After each rinse, let the water drain well. The sprouts do not like waterlogging at all.
4. Observing and Caring:
- After 1-2 days, you should see the first small sprouts. Yay!
- Continue to rinse the sprouts 2-3 times daily.
- Watch out for mold. If you spot mold, you should remove the affected sprouts immediately and rinse the remaining ones thoroughly.
- Depending on the temperature and the type of bean, it will take 3-5 days for the sprouts to reach the desired length.
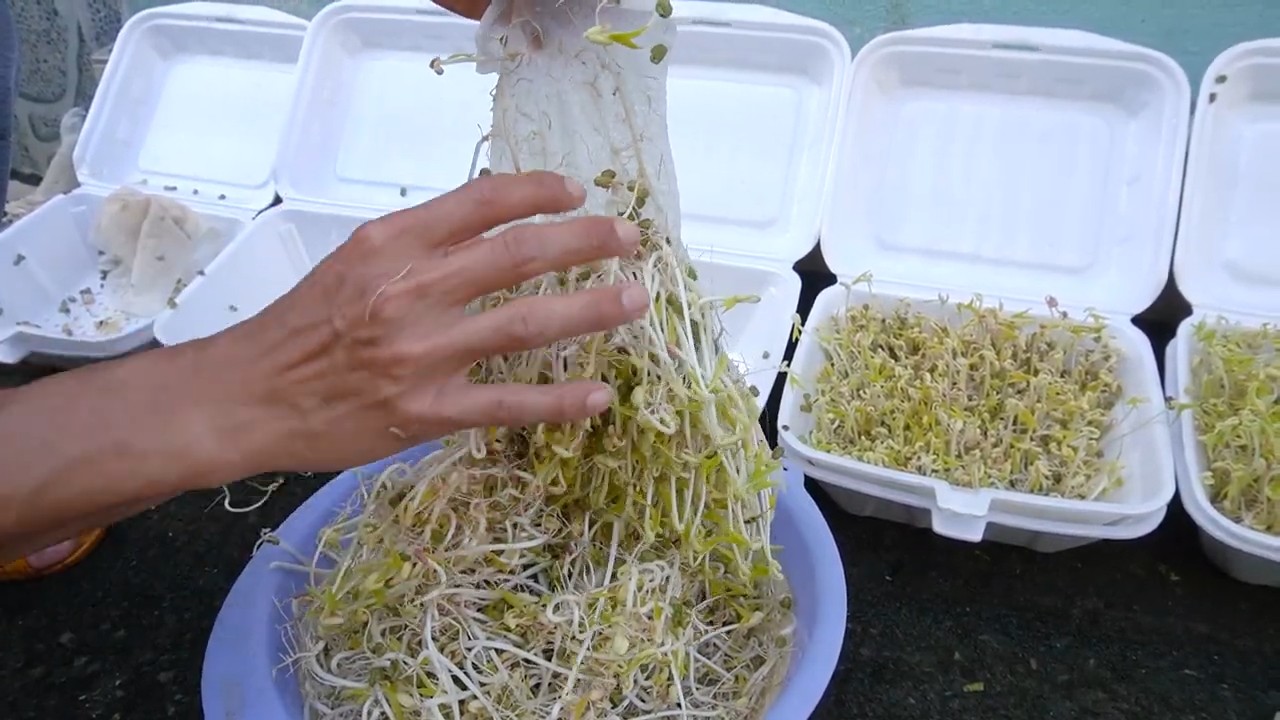
5. Harvesting and Enjoying:
- When the sprouts have reached the desired length (usually about 2-3 cm), you can harvest them.
- Rinse the sprouts thoroughly one more time.
- Remove the green hulls of the mung beans if you like. This is not a must.
- Let the sprouts drain well.
- Store the sprouts in the refrigerator. They will keep there for 2-3 days.
- Enjoy your homegrown bean sprouts in salads, soups, stir-fries, or simply as a snack!
Common Problems and Solutions:
- Mold formation: Mold is the most common problem when growing sprouts. To prevent mold, it is important to rinse the sprouts regularly and ensure good ventilation. If you discover mold, you should remove the affected sprouts immediately and rinse the remaining sprouts thoroughly.
- No germination: If the beans do not germinate, there can be various reasons. The beans may be too old or have been stored incorrectly. Make sure to use fresh, viable beans. It could also be that the beans were not soaked sufficiently or that the temperature is too low.
- Rotten sprouts: Rotten sprouts are a sign of waterlogging. Make sure that the water can drain well after rinsing.
Tips and Tricks for Perfect Sprouts:
- The right bean: Mung beans are ideal for beginners as they germinate quickly and reliably. But also try other varieties, like lentils, chickpeas, or adzuki beans. Each variety has its own taste and texture.
- The right temperature: The ideal temperature for germination is between 20 and 25 degrees Celsius (68-77 degrees Fahrenheit).
- The right ventilation: Good ventilation is important to prevent mold. Place the sprouting jar or container in a place where air can circulate.
- The right light: During the germination process, the sprouts need darkness. However, once they are a bit bigger, you can expose them to light for a few hours a day. This promotes the formation of chlorophyll and makes the sprouts greener.
- Regular rinsing: Regular rinsing is the key to healthy sprouts. Rinse the sprouts at least 2 times a day, or even better, 3 times.
- Cleanliness: Pay attention to cleanliness! Clean the sprouting jar or container thoroughly with hot water and dish soap before each use.
Variations and Experiments:
- Mix different types of beans: Try mixing different types of beans. This will give your sprouts an interesting flavor and a varied texture.
- Refine sprouts with herbs: Add a few fresh herbs, such as parsley, chives, or cilantro, during rinsing. This will give the sprouts a delicate aroma.
- Grow sprouts in soil: If you have even more patience, you can also grow the sprouts in soil. To do this, place the germinated beans in a tray with soil and keep the soil moist. After a few days, small plants will develop.
Why Bean Sprouts Are So Healthy:
Bean sprouts are true nutrient bombs! They are rich in vitamins, minerals, and enzymes. They are also easy to digest and contain few calories. Here are a few benefits:
- Rich in vitamins: Bean sprouts contain Vitamin C, Vitamin K, and various B vitamins.
- Rich in minerals: They are a good source of iron, potassium, magnesium, and zinc.
- Rich in enzymes: Enzymes aid digestion and help the body to better absorb nutrients.
- High in fiber: Fiber promotes digestion and provides a long-lasting feeling of fullness.
- Antioxidants: Bean sprouts contain antioxidants that protect the body from free radicals.
Bean Sprouts in the Kitchen:
Bean sprouts are versatile in the kitchen. Here are a few ideas:
Soups: Bean sprouts can be used as an ingredient in soups. They make the soup more nutritious and give it an Asian touch.
Salads: Bean sprouts are a great addition to salads. They give the salad a crunchy texture and a fresh taste.

Conclusion
So, there you have it! Growing your own bean sprouts at home is not only surprisingly simple, but it’s also incredibly rewarding. Forget those limp, flavorless sprouts from the grocery store. With just a few readily available supplies and a little patience, you can cultivate a vibrant, crunchy, and nutritious addition to your meals. This DIY trick is a game-changer for anyone looking to add fresh, healthy ingredients to their diet without breaking the bank.
Why is this a must-try? Because you’re in complete control. You know exactly what’s going into your sprouts – no hidden chemicals or preservatives. Plus, the flavor is undeniably superior. Homegrown bean sprouts boast a crisp, clean taste that elevates everything from salads and sandwiches to stir-fries and soups. The satisfaction of harvesting your own food, even on a small scale, is an added bonus that shouldn’t be underestimated.
Beyond the basic mung bean, don’t be afraid to experiment! You can try sprouting other beans and seeds like lentils, alfalfa, radish seeds, or even broccoli seeds. Each variety offers a unique flavor profile and nutritional benefit. Consider using different sprouting containers, too. While a mason jar works perfectly well, you might explore specialized sprouting trays or even a multi-tiered system for continuous harvests.
For a spicier kick, try adding a pinch of red pepper flakes to your sprouting water. If you prefer a milder flavor, a squeeze of lemon juice can brighten the taste. You can also adjust the sprouting time to achieve your desired level of crunchiness. Shorter sprouting times will result in smaller, more delicate sprouts, while longer times will yield larger, more robust ones.
We wholeheartedly encourage you to give this DIY trick a try. It’s an easy, affordable, and sustainable way to enhance your culinary creations and boost your overall well-being. Once you experience the joy of growing your own fresh, flavorful bean sprouts, you’ll never go back to store-bought again.
Don’t just take our word for it! We’re eager to hear about your experiences. Share your photos, tips, and variations in the comments below. Let’s build a community of home sprouters and inspire others to embrace the goodness of homegrown food. What are you waiting for? Get sprouting!
Frequently Asked Questions (FAQ)
What types of beans can I use to grow bean sprouts at home?
While mung beans are the most common and readily available option for growing bean sprouts, you’re not limited to just one type! You can successfully sprout a variety of other beans and seeds, each offering a unique flavor and nutritional profile. Some popular alternatives include:
* **Lentils:** Lentil sprouts have a slightly nutty flavor and are a great source of protein and fiber.
* **Alfalfa Seeds:** Alfalfa sprouts are known for their mild, slightly sweet taste and are packed with vitamins and minerals.
* **Radish Seeds:** Radish sprouts offer a peppery, spicy kick that adds a zesty flavor to salads and sandwiches.
* **Broccoli Seeds:** Broccoli sprouts are a nutritional powerhouse, rich in antioxidants and beneficial compounds.
* **Adzuki Beans:** Adzuki bean sprouts have a slightly sweet and earthy flavor.
* **Garbanzo Beans (Chickpeas):** Garbanzo bean sprouts offer a nutty flavor and a satisfying crunch. Note that these may take a bit longer to sprout than other varieties.
Remember to always use beans and seeds specifically intended for sprouting, as those sold for cooking may have been treated with chemicals that are not safe for consumption.
How long does it take to grow bean sprouts at home?
The sprouting time can vary depending on the type of bean or seed you’re using, as well as the ambient temperature. However, in general, you can expect to harvest your bean sprouts within 3 to 7 days. Mung beans typically sprout the fastest, often ready in just 3 to 5 days. Keep a close eye on your sprouts and harvest them when they reach your desired length and crunchiness.
What is the best container to use for growing bean sprouts?
A wide-mouth mason jar is a popular and convenient choice for sprouting beans at home. Its wide opening allows for easy rinsing and draining, and its clear glass allows you to monitor the sprouting process. However, you can also use other containers, such as:
* **Sprouting Trays:** These trays are specifically designed for sprouting and often feature multiple tiers for continuous harvests.
* **Sprouting Bags:** These mesh bags allow for excellent drainage and aeration.
* **Colanders:** A colander lined with cheesecloth or paper towels can also be used for sprouting.
Regardless of the container you choose, make sure it’s clean and allows for proper drainage to prevent mold growth.
How often should I rinse my bean sprouts?
Rinsing your bean sprouts regularly is crucial for preventing mold growth and ensuring they stay fresh and hydrated. Aim to rinse your sprouts at least twice a day, ideally in the morning and evening. Use cool, clean water and gently swirl the sprouts around to remove any debris. Be sure to drain the water thoroughly after each rinse.
How do I prevent mold from growing on my bean sprouts?
Mold growth is a common concern when sprouting beans at home, but it can be easily prevented by following these tips:
* **Use clean equipment:** Thoroughly wash your sprouting container and any other utensils you’re using with soap and water before each batch.
* **Rinse frequently:** As mentioned above, rinse your sprouts at least twice a day to remove any debris and prevent mold spores from taking hold.
* **Ensure proper drainage:** Make sure your sprouting container allows for adequate drainage to prevent water from pooling and creating a breeding ground for mold.
* **Provide good ventilation:** Avoid overcrowding your sprouts and ensure they have access to fresh air.
* **Use sprouting beans/seeds:** Only use beans and seeds specifically sold for sprouting.
* **Avoid high temperatures:** Keep your sprouts in a cool, dark place, as high temperatures can encourage mold growth.
If you do notice any mold growth, discard the entire batch of sprouts immediately.
How do I store bean sprouts after harvesting?
Once your bean sprouts have reached your desired length and crunchiness, it’s time to harvest them. To store them properly, rinse them thoroughly and drain them well. Then, place them in a clean container lined with paper towels. Store the container in the refrigerator for up to a week. Change the paper towels every day or two to absorb excess moisture.
Are there any health benefits to eating bean sprouts?
Yes! Bean sprouts are a nutritional powerhouse, packed with vitamins, minerals, and antioxidants. They are a good source of protein, fiber, and enzymes, which can aid in digestion. They are also low in calories and fat, making them a healthy addition to any diet. Different types of bean sprouts offer varying nutritional benefits, so be sure to research the specific type you’re consuming.
Can I eat bean sprouts raw?
Yes, you can eat bean sprouts raw. However, it’s important to rinse them thoroughly before consumption to remove any potential bacteria. Some people prefer to lightly cook their bean sprouts to reduce the risk of foodborne illness. If you choose to cook them, be careful not to overcook them, as they can become mushy.
What are some ways to use bean sprouts in my cooking?
Bean sprouts are incredibly versatile and can be used in a wide variety of dishes. Here are just a few ideas:
* **Salads:** Add bean sprouts to salads for a crunchy and refreshing element.
* **Sandwiches:** Use bean sprouts as a topping for sandwiches and wraps.
* **Stir-fries:** Toss bean sprouts into stir-fries for added texture and flavor.
* **Soups:** Add bean sprouts to soups and broths for a boost of nutrients.
* **Spring Rolls:** Use bean sprouts as a filling for spring rolls and summer rolls.
* **Omelets:** Incorporate bean sprouts into omelets and frittatas.
* **Garnish:** Use bean sprouts as a garnish for various dishes.
Let your creativity guide you and experiment with different ways to incorporate bean sprouts into your meals!
Leave a Comment