
Grow Asparagus Year Round? Yes, you read that right! Imagine stepping into your garden in the dead of winter and harvesting fresh, tender asparagus spears. Sounds like a dream, doesn’t it? Well, it’s a dream that can become a reality with a few clever tricks and DIY techniques. For centuries, asparagus has been prized for its delicate flavor and nutritional benefits, gracing the tables of royalty and commoners alike. From ancient Rome, where it was considered a delicacy, to modern-day kitchens, asparagus has remained a culinary staple.
But what if you could extend the asparagus season far beyond its typical spring window? That’s where these DIY hacks come in. Many gardeners struggle with the short asparagus harvest, leaving them craving this delicious vegetable for the rest of the year. This article will provide you with simple, effective methods to grow asparagus year round, regardless of your climate. I’m excited to share these secrets with you, so you can enjoy fresh, homegrown asparagus whenever you please. Get ready to transform your garden and your plate!
Grow Your Own Asparagus All Year Round: Here’s How!
Hey everyone! Are you tired of only getting asparagus when it’s in season? Me too! That’s why I went looking for a way to grow this delicious vegetable all year round. And what can I say? It’s possible! It’s not without some effort, but it’s definitely doable. Here, I’ll show you how to set up your own indoor asparagus garden to enjoy fresh asparagus even in winter.
What you need:
Before we get started, here is a list of all the materials and tools you will need for this project:
- Asparagus plants (crowns): Preferably 1-2 year old crowns. These are available at garden centers or online. Look for healthy, strong roots.
- Large containers: At least 45 cm (18 inches) deep and wide. Asparagus needs space for its roots!
- High-quality potting soil: A well-draining mix is important. I recommend a mixture of garden soil, compost, and sand.
- Drainage material: Expanded clay, gravel, or broken pottery shards for the bottom of the containers.
- Grow lights: Asparagus needs a lot of light, especially in winter. LED grow lights are energy-efficient and effective.
- Timer: To automatically turn the grow lights on and off.
- Spray bottle: For misting the plants.
- Watering can: For watering.
- Pruning shears: To remove dead shoots.
- Fertilizer: An organic fertilizer, specifically for vegetables, is ideal.
The Preparation: The Foundation for Your Asparagus Success
Before we start planting, we need to make a few preparations. This is important so that the asparagus feels comfortable and grows well.
- Prepare the containers: First, we place a layer of drainage material at the bottom of the containers. This prevents waterlogging, which asparagus really dislikes. Then we fill the containers with the potting soil. Leave a few centimeters of space at the top.
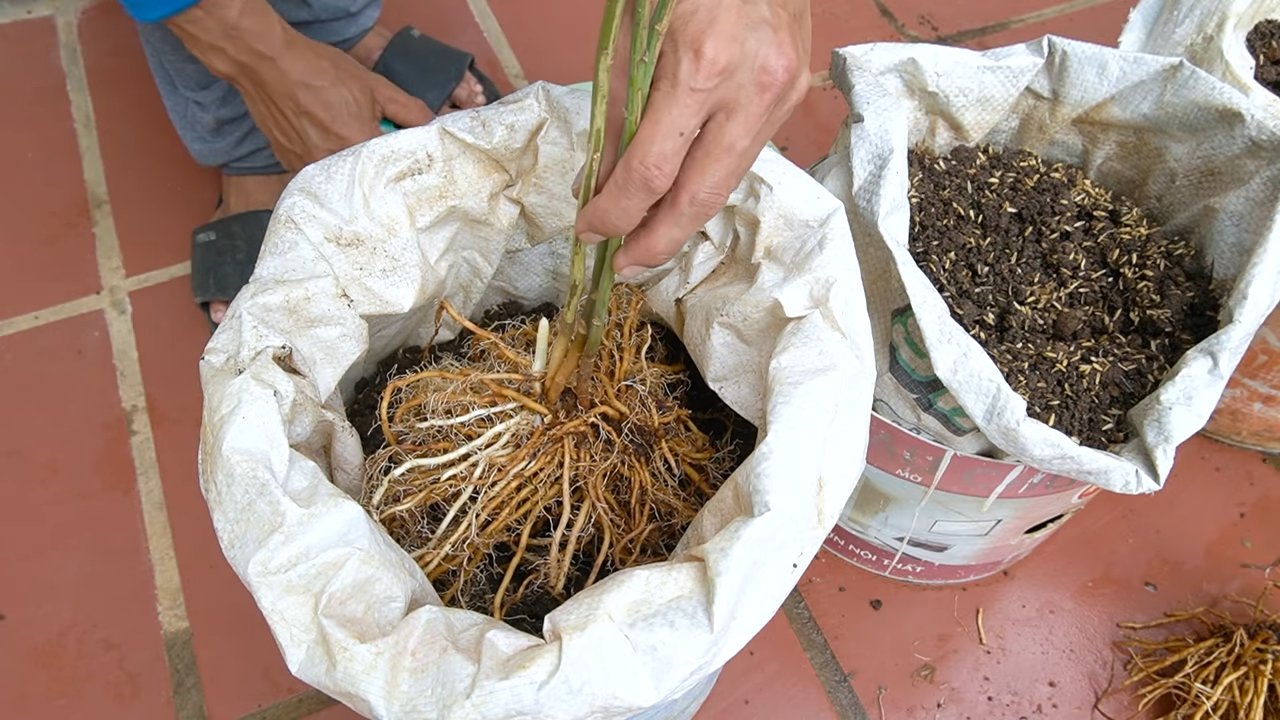
- Prepare the asparagus crowns: Before we plant the crowns, we briefly dip them in water. This helps them to hydrate and establish better.
- Prepare the location: Choose a location where the asparagus plants will get enough light. If you don’t have windows with lots of sunlight, grow lights are essential. Make sure you have enough space for the containers.
The Planting: How to Get Your Asparagus in the Soil
Now comes the exciting part: planting the asparagus crowns!
- Dig a planting hole: In the middle of the container, dig a hole that is about 15-20 cm (6-8 inches) deep.
- Insert the asparagus crown: Carefully place the asparagus crown in the hole. The roots should be pointing downwards.
- Cover with soil: Cover the crown with soil so that the top of the crown is about 5-7 cm (2-3 inches) below the soil surface.
- Water in: Gently water the soil so that it is moist, but not wet.
The Care: How to Keep Your Asparagus Happy and Healthy
Proper care is crucial for your asparagus to grow well so you can harvest soon.
- Watering: Asparagus likes it moist, but not wet. Water the plants regularly, but avoid waterlogging. Check the soil regularly and water when it feels dry.
- Lighting: Asparagus needs a lot of light, especially in winter. Set the grow lights to illuminate the plants for 14-16 hours a day. A timer is very helpful here.
- Fertilizing: Fertilize the plants every 2-3 weeks with an organic fertilizer. Follow the instructions on the packaging.
- Humidity: Asparagus likes high humidity. Mist the plants regularly with water, especially when the air is dry.
- Temperature: Asparagus prefers a temperature between 18 and 24 degrees Celsius (65-75°F). Avoid extreme temperature fluctuations.
- Pruning: Regularly remove dead or yellow shoots. This encourages the growth of new shoots.
The Harvest: Finally, Fresh Asparagus!
The harvest is the reward for your effort! But be careful: in the first year, you should not harvest any asparagus so the plants can develop well.
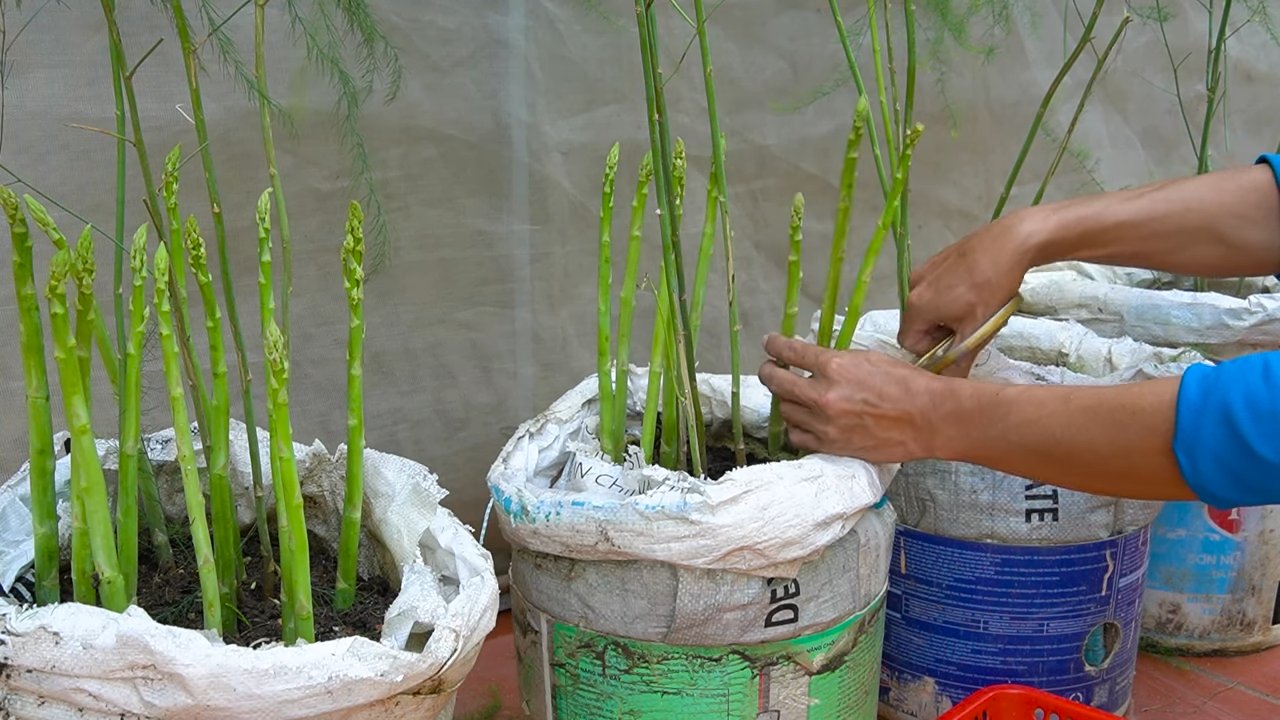
- When to harvest? Starting from the second year, you can begin harvesting as soon as the shoots are about 15-20 cm (6-8 inches) high.
- How to harvest? Cut the shoots just above the ground with a sharp knife or pruning shears.
- How often to harvest? Harvest the shoots regularly to encourage the growth of new ones.
Overwintering: How to Get Your Asparagus Through the Winter
Even if you want to grow asparagus all year round, the plants need a dormant period in winter.
- Reduce watering: Reduce watering in the fall when the shoots turn yellow and die back.
- Cut back the shoots: Cut back all shoots as soon as they have completely died off.
- Cool storage: Place the containers in a cool, dark place, e.g., in the basement or garage. The temperature should be between 0 and 5 degrees Celsius (32-41°F).
- Dormancy period: Let the plants rest for about 2-3 months. Water them very little during this time.
- Restart: In the spring, when temperatures rise, you can move the containers back to a bright, warm place and resume watering and fertilizing.
Additional Tips for Your Asparagus Success
- Variety selection: Choose asparagus varieties that are suitable for growing in pots. Some varieties are more compact and grow better in limited space.
- Pests and diseases: Watch for signs of pests or diseases. If necessary, you can use organic pesticides.
- Repotting: After a few years, it may be necessary to repot the asparagus plants into larger containers.
- Patience: Asparagus takes time to grow and thrive. Be patient and don’t be discouraged if it doesn’t work out right away.
Common Problems and Solutions
- Yellow shoots: Yellow shoots can be a sign of overwatering, nutrient deficiency, or too little light. Check your watering, fertilize the plants, and make sure they are getting enough light.
- Mold: Mold can be caused by excessive humidity. Ensure good ventilation and reduce the humidity.
- Pests: Aphids or spider mites can infest asparagus plants. Spray the plants with a solution of water and dish soap or use organic pesticides.
Why Indoor Asparagus? The Advantages at a Glance
Freshness: Your asparagus is always freshly harvested.
Year-round enjoyment: Fresh asparagus whenever you want!
Control: You have full control over the growing conditions.
Sustainability: You reduce your ecological footprint by not having to buy asparagus from distant countries.
Conclusion
So, there you have it! Growing asparagus year-round might seem like a distant dream, reserved for seasoned gardeners with sprawling greenhouses. But with this simple, effective DIY trick, you can extend your asparagus harvest far beyond its typical season and enjoy fresh, delicious spears even in the colder months. This isn’t just about having asparagus; it’s about taking control of your food source, reducing your reliance on store-bought produce, and experiencing the immense satisfaction of nurturing your own food from seed to table.
Why is this a must-try? Because it’s accessible, affordable, and yields impressive results. You don’t need expensive equipment or specialized knowledge. With a little planning, some basic materials, and a touch of patience, you can create a microclimate that allows your asparagus to thrive even when the weather outside is frightful. Imagine the delight of serving freshly harvested asparagus at your holiday dinner, a testament to your ingenuity and gardening prowess.
Beyond the basic method, there are numerous ways to customize this DIY approach to suit your specific needs and preferences. Consider experimenting with different varieties of asparagus to find the ones that perform best in your indoor environment. ‘Jersey Knight’ and ‘Purple Passion’ are popular choices known for their vigor and flavor. You can also explore different lighting options. While a sunny windowsill works well, supplementing with grow lights can significantly boost growth, especially during the darker winter months. Think about incorporating companion planting within your container. Herbs like basil and parsley can deter pests and enhance the flavor of your asparagus.
Don’t be afraid to get creative with your container design. While a large pot is essential, you can add decorative elements to make it a visually appealing addition to your indoor space. Consider using repurposed materials like old buckets or wooden crates to create a rustic, eco-friendly planter. Just ensure that your chosen container has adequate drainage to prevent waterlogging.
The key to success with this DIY trick is consistent care and attention. Regularly monitor the moisture levels in the soil, ensuring that it remains consistently moist but not soggy. Provide adequate ventilation to prevent fungal diseases. And be patient! Asparagus takes time to establish, so don’t be discouraged if you don’t see immediate results. With a little perseverance, you’ll be rewarded with a bountiful harvest of delicious, homegrown asparagus.
We wholeheartedly encourage you to give this DIY trick a try. It’s a rewarding experience that will not only provide you with fresh asparagus but also deepen your connection to the natural world. And most importantly, we want to hear about your experiences! Share your successes, your challenges, and any variations you’ve tried in the comments below. Your insights will help other aspiring asparagus growers and contribute to a thriving community of DIY gardeners. Let’s unlock the secrets of year-round asparagus growing together! This method is a great way to grow asparagus year round.
Frequently Asked Questions (FAQ)
1. What is the best variety of asparagus to grow indoors?
While many asparagus varieties can be grown indoors, some are better suited than others. ‘Jersey Knight’ is a popular choice due to its high yield and disease resistance. ‘Purple Passion’ is another excellent option, offering a unique color and slightly sweeter flavor. When selecting a variety, consider its size, growth habit, and adaptability to indoor conditions. Dwarf varieties may be a good choice if space is limited. Research different varieties and choose one that aligns with your preferences and growing environment.
2. How much light does indoor asparagus need?
Asparagus requires a significant amount of light to thrive. Ideally, it should receive at least six to eight hours of direct sunlight per day. A south-facing window is often the best location. However, during the winter months or in areas with limited sunlight, you may need to supplement with grow lights. LED grow lights are energy-efficient and provide the full spectrum of light that asparagus needs for optimal growth. Position the grow lights close to the plants, ensuring that they receive adequate illumination without burning the foliage.
3. What type of soil is best for growing asparagus in containers?
Asparagus prefers well-draining, fertile soil. A good potting mix for container-grown asparagus should consist of a blend of compost, peat moss, and perlite or vermiculite. Compost provides essential nutrients, while peat moss helps retain moisture. Perlite or vermiculite improves drainage and aeration. Avoid using heavy clay soils, as they can become waterlogged and inhibit root growth. You can also add a slow-release fertilizer to the potting mix to provide a steady supply of nutrients throughout the growing season.
4. How often should I water my indoor asparagus?
Watering frequency will depend on several factors, including the size of the container, the type of soil, and the ambient temperature. Generally, you should water your asparagus when the top inch of soil feels dry to the touch. Water thoroughly, ensuring that the water drains freely from the bottom of the container. Avoid overwatering, as this can lead to root rot. During the dormant season, reduce watering frequency, allowing the soil to dry out slightly between waterings.
5. How do I fertilize my indoor asparagus?
Asparagus is a heavy feeder and requires regular fertilization to maintain healthy growth. Use a balanced fertilizer with an NPK ratio of 10-10-10 or 20-20-20. Apply the fertilizer according to the package instructions, typically every two to four weeks during the growing season. You can also use organic fertilizers, such as compost tea or fish emulsion. Avoid over-fertilizing, as this can burn the roots.
6. How long does it take for asparagus to produce spears?
Asparagus typically takes two to three years to mature and produce a significant harvest. During the first year, focus on establishing a strong root system. In the second year, you can harvest a few spears, but avoid over-harvesting. By the third year, your asparagus should be producing a bountiful harvest.
7. How do I harvest asparagus spears?
Harvest asparagus spears when they are about six to eight inches tall and about as thick as your finger. Use a sharp knife to cut the spears at ground level. Avoid damaging the crown of the plant. Harvest spears regularly throughout the harvest season, which typically lasts for six to eight weeks.
8. How do I overwinter my indoor asparagus?
Asparagus requires a period of dormancy to rest and rejuvenate. In the fall, allow the foliage to turn yellow and brown. Cut back the foliage to ground level and move the container to a cool, dark location, such as a garage or basement. Reduce watering frequency during the dormant season. In the spring, move the container back to a sunny location and resume regular watering and fertilization.
9. What are some common pests and diseases that affect indoor asparagus?
Common pests that can affect indoor asparagus include aphids, spider mites, and asparagus beetles. Aphids and spider mites can be controlled with insecticidal soap or neem oil. Asparagus beetles can be handpicked or controlled with pyrethrin-based insecticides. Common diseases that can affect indoor asparagus include rust and crown rot. Rust can be prevented by providing good air circulation and avoiding overhead watering. Crown rot can be prevented by ensuring good drainage and avoiding overwatering.
10. Can I grow asparagus from seed indoors?
Yes, you can grow asparagus from seed indoors. Start seeds indoors in early spring, about 12-14 weeks before the last expected frost. Sow seeds in a seed-starting mix and keep them moist. Once the seedlings have developed several sets of true leaves, transplant them into individual pots. Grow the seedlings indoors for several months before transplanting them into larger containers or outdoors. Growing asparagus from seed requires patience, as it takes longer to produce a harvest compared to planting crowns.
Leave a Comment