
Growing Potatoes Easy? Absolutely! Imagine harvesting a bounty of fresh, earthy potatoes right from your own backyard. It’s not just a dream; it’s an achievable reality with a few simple tricks and DIY hacks. For centuries, potatoes have been a staple food in cultures around the globe, from the Andes Mountains where they originated, to the humble gardens of today. Their versatility and nutritional value have made them a beloved crop, and now, you too can experience the joy of cultivating your own spuds.
But why bother with growing your own potatoes when you can just buy them at the store? Well, for starters, the taste of a homegrown potato is simply unmatched. Plus, you have complete control over the growing process, ensuring that your potatoes are free from harmful chemicals and pesticides. In this article, I’m going to share some easy-to-follow DIY tricks that will make growing potatoes easy, even if you have limited space or gardening experience. Get ready to dig in and discover the secrets to a successful potato harvest!
Growing Potatoes: Your Simple DIY Guide for a Bountiful Harvest
Hey garden friends! Have you ever dreamed of growing your own potatoes? It’s easier than you think and incredibly satisfying when you can harvest and enjoy your homegrown potatoes. In this article, I’ll show you how you can achieve a bountiful potato harvest with simple means and a few tricks. Let’s get started!
What you need: The Preparation
Before we get started, we’ll of course need the right equipment and materials. Here is a list so you have everything at hand:
- Seed potatoes: Choose a variety that you like and that is suitable for your climate. Early potatoes are ready to harvest sooner, while late varieties can be stored for longer. You can buy seed potatoes at a garden center or online. Make sure they are labeled as “seed potatoes,” as these have been specially bred for cultivation and are more resistant to diseases.
- Garden tools: A shovel, a hoe, and possibly a garden claw are essential.
- Garden gloves: Protect your hands from dirt and minor injuries.
- Compost or organic fertilizer: Potatoes are hungry and need nutrients. Compost is a great, natural option.
- Mulch material: Straw, hay, or grass clippings help to retain moisture in the soil and suppress weeds.
- A sunny location: Potatoes love the sun! Choose a spot in your garden that gets at least six hours of sun per day.
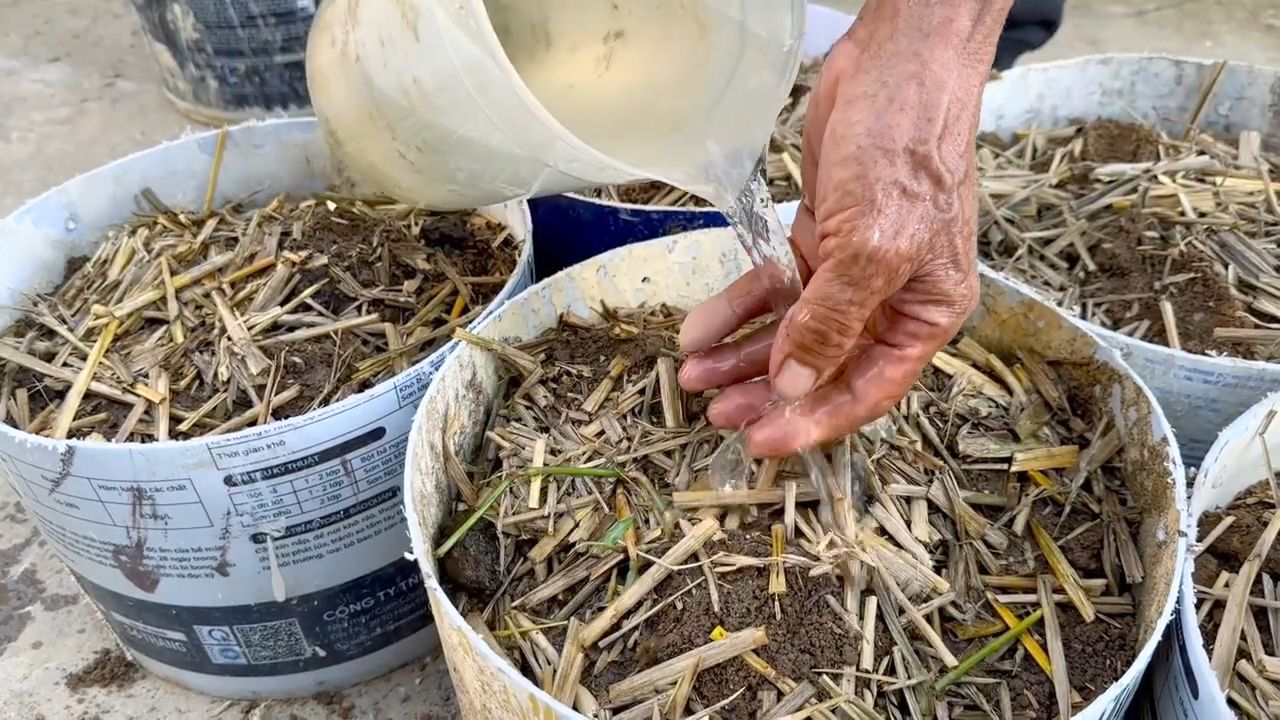
- A suitable planting spot: This can be a garden bed, a raised bed, or even a large grow bag.
Step-by-Step Guide: Planting Potatoes
Now let’s get down to it! Here is a detailed guide on how to plant your potatoes:
1. Chitting the seed potatoes (optional, but recommended):
- About 4-6 weeks before the planned planting date, place your seed potatoes in a bright, cool place (approx. 10-15°C / 50-59°F).
- You can place them in egg cartons or shallow boxes.
- The potatoes will now form small, green shoots, the so-called “eyes.” These shoots are a sign that the potato is ready to sprout.
- Chitting speeds up growth and leads to an earlier harvest.
2. Soil preparation:
- Loosen the soil thoroughly. Remove stones, roots, and weeds.
- Work plenty of compost or organic fertilizer into the soil. Potatoes need loose, nutrient-rich soil.
- The soil should be well-draining to prevent waterlogging.
3. Digging planting holes:
- Dig planting holes about 10-15 cm (4-6 inches) deep.
- The distance between the holes should be about 30-40 cm (12-16 inches), and the distance between rows about 60-70 cm (24-28 inches). This gives the plants enough space to grow.
4. Placing the seed potatoes:
- Place one seed potato in each planting hole with the shoots facing up.
- If the potato is very large, you can cut it into pieces. Make sure each piece has at least one “eye.” Let the cut surfaces dry for a few days before planting to prevent rot.
5. Closing the holes:
- Cover the seed potatoes with soil.
- Press the soil down lightly.
6. Watering:
- Water the freshly planted potatoes thoroughly.
The Care: How to Keep Your Potatoes Happy
After planting comes the care! Here are a few tips on how to keep your potatoes healthy and thriving:
1. Regular watering:
- Potatoes need sufficient moisture, especially during tuber formation.
- Water regularly, but avoid waterlogging.
- It’s best to water in the morning so the leaves can dry off during the day.
2. Hilling up:
- As soon as the potato plants are about 20-30 cm (8-12 inches) high, you should “hill them up.”
- Pull soil up from the sides towards the plants, so that only the top leaves are showing.
- Hilling promotes tuber formation and protects the potatoes from sunlight, which turns them green.
- Repeat the hilling process every few weeks until the plants have reached a height of about 50-60 cm (20-24 inches).
3. Weed control:
- Keep the bed free of weeds so the potatoes don’t have to compete for nutrients.
- Weed regularly by hand or use a hoe.
4. Mulching:
- Apply a layer of mulch material (straw, hay, grass clippings) around the plants.
- Mulching helps to retain moisture in the soil, suppress weeds, and fertilize the soil.
5. Fertilizing:
- Potatoes are heavy feeders and need sufficient nutrients.
- Fertilize the plants regularly during the growing season with compost, organic fertilizer, or a special potato fertilizer.
- Be sure to follow the dosage instructions on the fertilizer.
6. Protection from pests and diseases:
- Check your potato plants regularly for pests and diseases.
- Colorado potato beetles are common pests. It’s best to pick them off by hand or use a biological insecticide.
- Late blight is a fungal disease that occurs especially in wet weather. Watch for brown spots on the leaves and remove infected leaves immediately. A fungicide may be necessary in case of a severe infestation.
- Good air circulation for the plants and a sunny location help to prevent diseases.
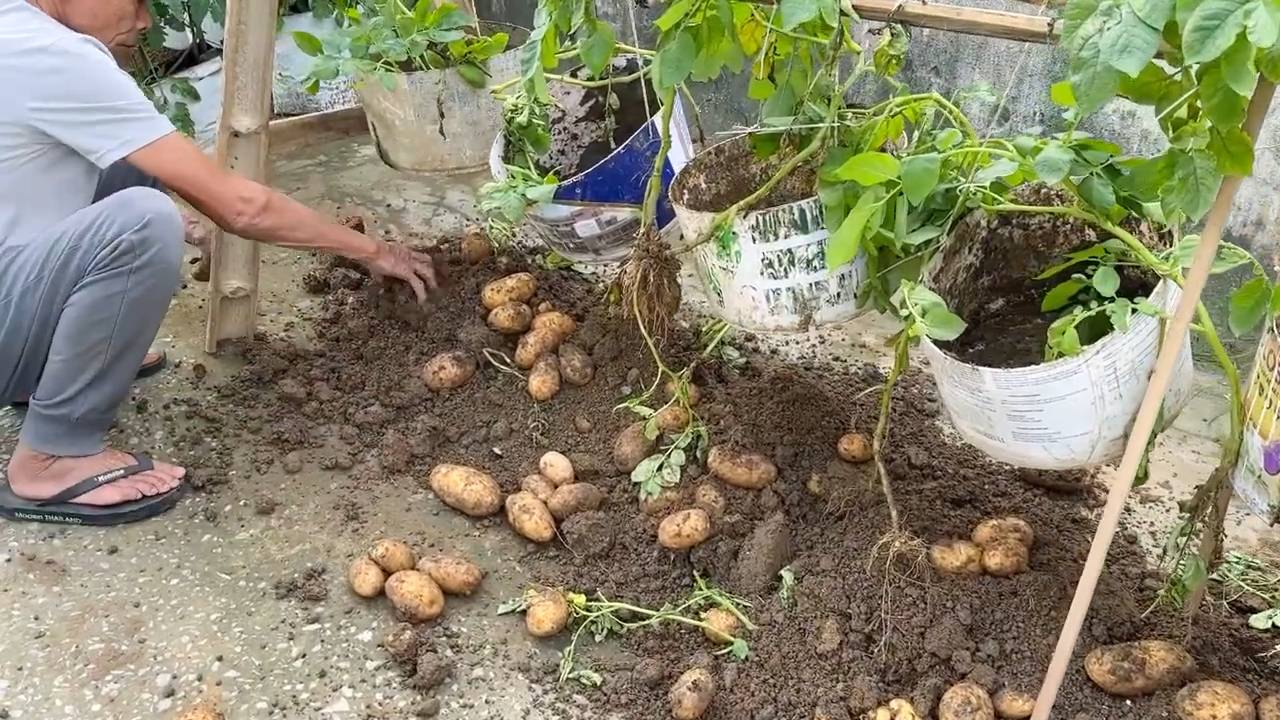
The Harvest: The Reward for Your Effort
After about 80-120 days (depending on the variety), your potatoes are ready for harvest. Here are a few tips for harvesting:
1. Harvest time:
- Early potatoes can be harvested as soon as the flowers have faded.
- Late potatoes are harvested when the foliage turns yellow and dies back.
2. Harvesting method:
- Loosen the soil around the plants with a digging fork or shovel.
- Carefully lift the plants out of the ground and collect the potatoes.
- Be careful not to damage the potatoes.
3. Storage:
- Let the harvested potatoes dry in the air for a few hours.
- Store the potatoes in a cool, dark, and dry place.
- A cellar or pantry is ideal.
- Remove damaged potatoes to prevent rot.
Additional Tips and Tricks
Observe crop rotation: Do not plant potatoes in the same location every year to prevent diseases. Rotate the planting area with other vegetable varieties.
Growing potatoes in containers: If you don’t have a garden, you can also grow potatoes in large pots or grow bags. Use high-quality potting soil and ensure good drainage.
Conclusion
So, there you have it! Growing potatoes doesn’t have to be a daunting task reserved for seasoned gardeners. This simple, effective DIY trick unlocks the potential for a bountiful harvest, even in limited spaces. We’ve shown you how to bypass the complexities and get straight to the rewarding experience of digging up your own homegrown spuds.
Why is this a must-try? Because it’s accessible, cost-effective, and incredibly satisfying. Imagine the taste of freshly dug potatoes, bursting with flavor and far superior to anything you’ll find in the supermarket. Think of the pride you’ll feel knowing you nurtured them from seed to table. And consider the environmental benefits of reducing your reliance on commercially grown produce. This method of growing potatoes is a win-win-win!
But don’t stop there! Experiment with different potato varieties to discover your favorites. Try using different containers, from repurposed burlap sacks to large plastic bins. Consider adding companion plants like marigolds or basil to deter pests and enhance growth. You can even try layering different types of compost to see which yields the best results. The possibilities are endless!
This isn’t just about growing potatoes; it’s about connecting with nature, learning new skills, and enjoying the fruits (or rather, vegetables) of your labor. It’s about taking control of your food source and experiencing the joy of self-sufficiency.
We’re confident that once you try this DIY trick, you’ll be hooked. The process is surprisingly simple, the results are incredibly rewarding, and the taste of homegrown potatoes is simply unbeatable.
So, grab some seed potatoes, gather your supplies, and get ready to embark on your potato-growing adventure. We can’t wait to hear about your experiences! Share your photos, tips, and triumphs in the comments below. Let’s create a community of potato enthusiasts and inspire others to discover the magic of growing their own food. Happy planting!
Frequently Asked Questions (FAQs)
What kind of potatoes are best for growing using this method?
The beauty of this method is its versatility. You can successfully grow a wide range of potato varieties, from early-season varieties like Yukon Gold and Red Norland to mid-season options like Kennebec and late-season choices like Russet Burbank. However, for beginners, we recommend starting with varieties that are known for their disease resistance and adaptability, such as Yukon Gold or Red Norland. These varieties tend to be more forgiving and produce reliable yields, making them ideal for first-time potato growers. Ultimately, the best potato variety for you will depend on your personal preferences and the specific growing conditions in your area. Consider factors like climate, soil type, and available sunlight when making your selection. Don’t be afraid to experiment with different varieties to discover which ones thrive in your garden.
How often should I water my potato plants?
Watering frequency is crucial for successful potato growth. The key is to keep the soil consistently moist, but not waterlogged. Overwatering can lead to root rot and other fungal diseases, while underwatering can stunt growth and reduce yields. As a general rule, water your potato plants deeply whenever the top inch of soil feels dry to the touch. The frequency of watering will depend on factors like weather conditions, soil type, and the size of your container. During hot, dry periods, you may need to water your plants daily, while during cooler, wetter periods, you may only need to water them every few days. A good way to check the moisture level of the soil is to insert your finger into the soil near the base of the plant. If the soil feels dry, it’s time to water. When watering, be sure to water deeply, allowing the water to penetrate the entire root zone. Avoid watering the foliage, as this can increase the risk of fungal diseases.
What kind of soil is best for growing potatoes?
Potatoes thrive in well-drained, loose soil that is rich in organic matter. The ideal soil pH for potatoes is between 6.0 and 6.8. Avoid heavy clay soils, as they can become waterlogged and restrict root growth. If you have clay soil, amend it with plenty of compost, peat moss, or other organic matter to improve drainage and aeration. A good soil mix for growing potatoes in containers is a combination of potting soil, compost, and perlite or vermiculite. The potting soil provides a base for the mix, the compost adds nutrients and improves drainage, and the perlite or vermiculite helps to aerate the soil and prevent compaction. Before planting, consider adding a slow-release fertilizer to the soil to provide your potato plants with a steady supply of nutrients throughout the growing season.
How much sunlight do potato plants need?
Potato plants need at least six hours of direct sunlight per day to thrive. Choose a location that receives plenty of sunlight throughout the day. If you are growing potatoes in containers, you can move them around to ensure they receive adequate sunlight. Insufficient sunlight can lead to leggy growth, reduced yields, and increased susceptibility to diseases. If you live in a particularly hot climate, you may need to provide some afternoon shade to protect your potato plants from scorching.
How do I know when my potatoes are ready to harvest?
The timing of your potato harvest will depend on the variety you are growing and the desired size of the potatoes. Early-season varieties can be harvested as “new potatoes” when the plants are still flowering. New potatoes are small, tender, and have thin skins. Mid-season and late-season varieties are typically harvested after the plants have flowered and the foliage has begun to die back. To check if your potatoes are ready to harvest, dig around the base of the plant and gently lift a few potatoes. If the skins are firm and the potatoes are the desired size, they are ready to harvest. If the skins are still thin and easily rub off, wait a few more weeks before harvesting.
What are some common pests and diseases that affect potato plants?
Potato plants are susceptible to a variety of pests and diseases, including potato beetles, aphids, blight, and scab. Regularly inspect your plants for signs of pests or diseases. If you detect any problems, take action immediately to prevent them from spreading. Common control methods include hand-picking pests, using insecticidal soap, and applying fungicides. Practicing good garden hygiene, such as removing diseased foliage and rotating crops, can also help to prevent pest and disease problems.
Can I grow potatoes in a small space?
Absolutely! One of the great things about this DIY trick is that it allows you to grow potatoes even in limited spaces. Containers, grow bags, and even repurposed buckets can be used to grow potatoes on patios, balconies, or small gardens. Just be sure to choose a container that is large enough to accommodate the growing roots and tubers.
How do I store my harvested potatoes?
Proper storage is essential for preserving the quality and flavor of your harvested potatoes. Store your potatoes in a cool, dark, and well-ventilated place. The ideal storage temperature is between 40 and 50 degrees Fahrenheit. Avoid storing potatoes in direct sunlight or near ethylene-producing fruits like apples and bananas, as this can cause them to sprout prematurely. Store your potatoes in a breathable container, such as a burlap sack or a wire basket. Do not wash your potatoes before storing them, as this can promote rot. Check your stored potatoes regularly and remove any that are showing signs of spoilage. With proper storage, your harvested potatoes can last for several months.
Leave a Comment