
Cowpea Garden Easy Care: Unlock the secrets to a thriving and bountiful harvest, even if you’re a beginner! Have you ever dreamed of stepping into your backyard and picking fresh, delicious cowpeas for dinner? It’s easier than you think, and this guide is your key to making that dream a reality. Forget complicated gardening techniques and endless hours of labor. We’re diving into simple, effective DIY tricks and hacks that will transform your cowpea garden into a low-maintenance paradise.
Cowpeas, also known as black-eyed peas, have a rich history, deeply rooted in African and Southern American cultures. They’ve been a staple food source for centuries, prized for their nutritional value and ability to thrive in diverse climates. But beyond their historical significance, cowpeas are incredibly versatile and delicious, adding a unique flavor to soups, stews, and side dishes.
So, why do you need these cowpea garden easy care tips? Because gardening should be enjoyable, not a chore! Many people are intimidated by the thought of growing their own food, believing it requires extensive knowledge and time. But with the right strategies, you can cultivate a thriving cowpea garden with minimal effort. I’m here to show you how to avoid common pitfalls, maximize your yield, and enjoy the satisfaction of harvesting your own homegrown goodness. Let’s get started and turn your garden into a cowpea haven!
DIY: Black-Eyed Pea Garden – Easy Care for Beginners
Hey garden friends! Do you want to grow your own black-eyed peas? It’s easier than you think, and I’ll show you how. Black-eyed peas, also known as cowpeas, are not only delicious but also super easy to care for. This guide is perfect for anyone looking for an uncomplicated start to vegetable gardening. Let’s get started!
What you need for your black-eyed pea garden
Before we begin, here’s a list of everything you’ll need:
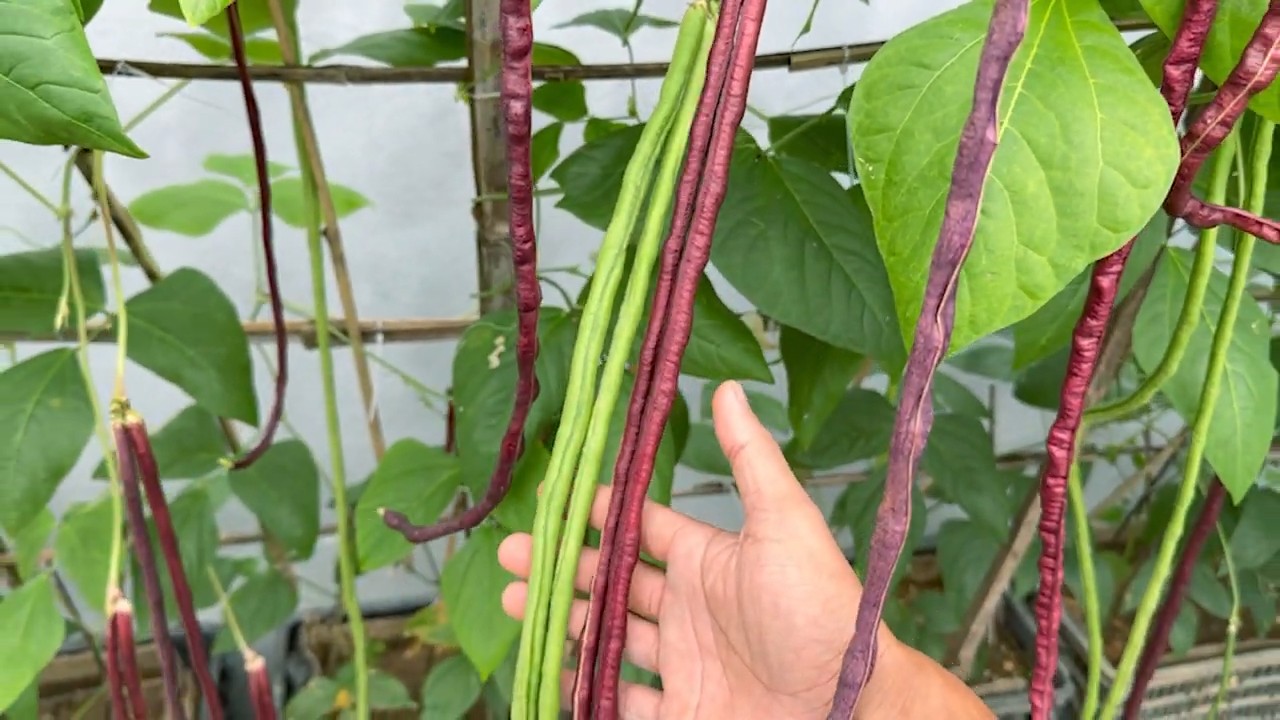
- Black-eyed pea seeds: Choose a variety you like. There are several that differ in size, color, and taste.
- Gardening tools: A shovel, a rake, and possibly a small trowel.
- Garden soil: Preferably a loose, well-draining soil.
- Compost or organic fertilizer: to enrich the soil.
- Pots (optional): If you don’t have a garden, you can also grow black-eyed peas in pots or containers.
- Trellis/Support (optional): Some black-eyed pea varieties grow as climbing plants and need a support.
- Watering can or garden hose: For watering.
- Mulch (optional): To retain moisture in the soil and suppress weeds.
Preparation: The Key to Success
Good preparation is the be-all and end-all for a successful black-eyed pea garden. Here are the steps you should follow:
- Choose the right location: Black-eyed peas love the sun! Find a spot in your garden or on your balcony that gets at least 6 hours of sun per day. The more sun, the better!
- Prepare the soil: Black-eyed peas prefer a loose, well-draining soil. If your soil is very clayey, you can improve it with compost or sand.
- First, remove all stones and weeds from the area.
- Loosen the soil with a shovel or rake.
- Mix compost or organic fertilizer into the soil. This gives the plants a good start.
- Prepare pots (optional): If you want to grow black-eyed peas in pots, choose containers with sufficient volume (at least 10 liters per plant). Make sure the pots have drainage holes so that water can run off. Fill the pots with garden soil.
Sowing: How to get the seeds in the ground
Now for the exciting part: sowing! Here are the steps you should follow:
- Choose the right time: Black-eyed peas are sensitive to frost. Wait to sow until there is no more danger of frost. In most regions, this is mid-May to early June.
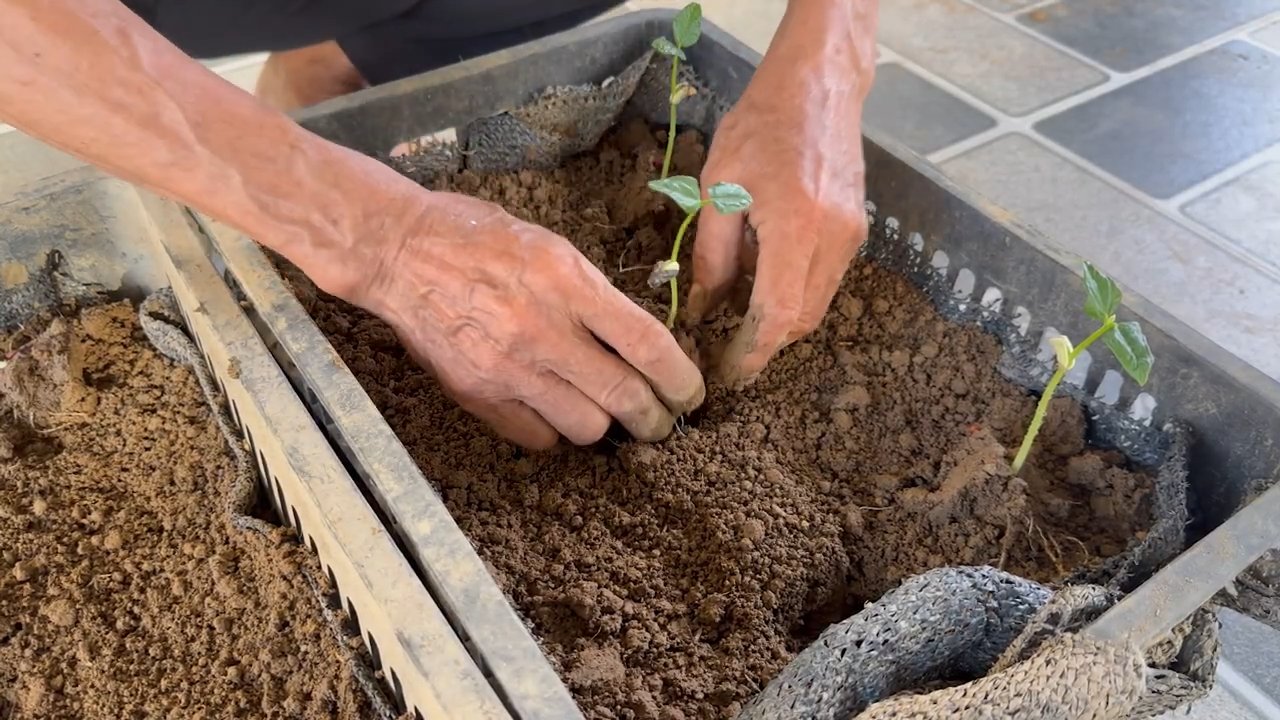
- Sow the seeds:
- Make small holes in the soil with your finger or a trowel (about 2-3 cm deep).
- Place 2-3 seeds in each hole. This increases the chance that at least one seed will germinate.
- Cover the seeds with soil and press down lightly.
- Water the soil gently.
- Mind the spacing: If you are planting several rows of black-eyed peas, you should maintain a distance of about 60-70 cm between the rows. Within the rows, you should sow the plants at a distance of about 15-20 cm.
- Install a trellis (optional): If you have chosen a climbing variety, you should now install a support. This can be a fence, a trellis, or a simple stake.
Care: Keeping your black-eyed peas healthy and happy
Black-eyed peas are relatively low-maintenance, but they still need a little attention. Here are the most important care measures:
- Watering: Black-eyed peas need regular water, especially during flowering and fruit formation. It’s best to water the plants early in the morning or late in the evening to avoid evaporation. Make sure the soil doesn’t dry out, but also isn’t too wet. Waterlogging can lead to root rot.
- Fertilizing: Black-eyed peas are not very demanding, but occasional fertilizing can’t hurt. It’s best to use an organic fertilizer or compost. Fertilize the plants during the flowering and fruiting period.
- Weed control: Regularly remove weeds that grow around the black-eyed peas. Weeds compete with the plants for water and nutrients.
- Mulching (optional): A layer of mulch around the plants helps to retain moisture in the soil and suppress weeds. It’s best to use organic mulch like straw, hay, or wood chips.
- Protection from pests and diseases: Black-eyed peas are relatively resistant to pests and diseases. Occasionally, aphids or bean beetles may appear. In case of an infestation, you can treat the plants with a natural insecticide. Watch for signs of fungal diseases like powdery mildew. If infested, you should remove the affected leaves and treat the plants with a fungicide.
The Harvest: The reward for your efforts
After about 60-90 days, you can harvest your black-eyed peas. Here are the most important points about harvesting:
- Choose the right time: Black-eyed peas can be harvested as soon as the pods are plumply filled and easy to open. The beans should not yet be completely dry.
- Harvesting: Carefully pick the pods from the plants. Be careful not to damage the plants.
- Processing the beans: Black-eyed peas can be eaten fresh, dried, or frozen. Fresh black-eyed peas are particularly delicious in salads or as a side dish. Dried black-eyed peas can be used for stews or soups.
Growing black-eyed peas in pots: How to do it on the balcony
No garden? No problem! Black-eyed peas can also be grown wonderfully in pots on the balcony or terrace. Here are the specifics:
- Choose the right pot size: Choose pots with sufficient volume (at least 10 liters per plant).
- Use the right soil: Use a high-quality garden soil that is well-draining.
- Water and fertilize regularly: Black-eyed peas in pots dry out faster than in the garden. Water the plants regularly and fertilize them during the flowering and fruiting period.
- Install a trellis (optional): If you have chosen a climbing variety, you should install a support.
- Consider the location: Place the pots in a sunny spot.
Avoiding common mistakes: Tips for beginners
Here are some common mistakes that beginners make when growing black-eyed peas, and how to avoid them:
- Sowing too early: Wait to sow until there is no more danger of frost.
- Wrong location: Black-eyed peas need a lot of sun. Choose a sunny location.
- Incorrect watering: Water the plants regularly, but avoid waterlogging.
- Lack of fertilization: Fertilize the plants during the flowering and fruiting period.
- Neglecting weeds: Remove weeds regularly.
Additional Tips and Tricks
Starting indoors: To get an earlier harvest, you can start the black-eyed peas indoors. Sow the seeds in pots about 4-6 weeks before the last frost.
Conclusion
So, there you have it! Mastering the art of easy care for your cowpea garden is not just about planting seeds and hoping for the best; it’s about understanding the plant’s needs and implementing simple, effective strategies to ensure a bountiful harvest. We’ve explored the key elements, from selecting the right variety and preparing the soil to providing adequate support and managing pests naturally.
Why is this DIY approach a must-try? Because it empowers you to take control of your food source, reduces your reliance on potentially harmful chemicals, and connects you more deeply with the natural world. Imagine the satisfaction of harvesting plump, delicious cowpeas knowing you nurtured them from seed to table with your own hands, using sustainable and environmentally friendly methods. The taste of homegrown cowpeas, bursting with freshness and flavor, is simply unmatched by anything you can find in a store.
But the beauty of gardening lies in its adaptability. Feel free to experiment with different companion plants to see what works best in your specific environment. Try intercropping cowpeas with corn or sunflowers for natural support and shade. Explore different mulching materials, such as straw, wood chips, or even shredded leaves, to find what best conserves moisture and suppresses weeds in your garden. Consider adding beneficial insects like ladybugs and lacewings to your garden to naturally control pests.
For those in hotter climates, consider planting cowpeas in partial shade during the hottest part of the day to prevent sunscald. If you’re dealing with particularly poor soil, amend it generously with compost and well-rotted manure before planting. And if you’re short on space, try growing bush-type cowpeas in containers on your patio or balcony.
Don’t be afraid to get your hands dirty and learn from your experiences. Gardening is a journey, not a destination. Each season brings new challenges and opportunities for growth. The most important thing is to start, to observe, and to adapt.
We’re confident that by following these tips and tricks, you’ll be well on your way to enjoying a thriving cowpea garden. Now it’s your turn! We encourage you to try these DIY techniques and share your experiences with us. What varieties of cowpeas did you plant? What challenges did you face, and how did you overcome them? What tips and tricks did you discover along the way? Share your photos, stories, and insights in the comments below. Let’s build a community of passionate gardeners who are dedicated to growing healthy, delicious food in a sustainable and environmentally friendly way. Let’s all enjoy the fruits (or rather, the legumes!) of our labor together. Remember, successful **cowpea garden easy care** is within your reach!
Frequently Asked Questions (FAQ)
1. How often should I water my cowpea plants?
Watering frequency depends on several factors, including your climate, soil type, and the stage of growth of your cowpea plants. As a general rule, water deeply and less frequently, rather than shallowly and often. This encourages deep root growth, which makes the plants more drought-tolerant. Check the soil moisture by sticking your finger about an inch deep into the soil. If it feels dry, it’s time to water. During hot, dry weather, you may need to water every day or every other day. During cooler, wetter weather, you may only need to water once a week or even less. Avoid overwatering, as this can lead to root rot. Aim to keep the soil consistently moist, but not waterlogged. Using a soaker hose or drip irrigation can help deliver water directly to the roots, minimizing water loss through evaporation.
2. What are some common pests that affect cowpea plants, and how can I control them naturally?
Cowpea plants can be susceptible to a variety of pests, including aphids, bean beetles, spider mites, and nematodes. Fortunately, there are many natural ways to control these pests without resorting to harmful chemicals.
* **Aphids:** These tiny, sap-sucking insects can weaken plants and transmit diseases. Control them by spraying plants with a strong stream of water, introducing beneficial insects like ladybugs and lacewings, or using insecticidal soap or neem oil.
* **Bean Beetles:** These beetles can defoliate cowpea plants, reducing yields. Handpick beetles and larvae from plants, use row covers to prevent beetles from accessing plants, or spray with neem oil or pyrethrin.
* **Spider Mites:** These tiny mites can cause stippling on leaves and eventually kill plants. Increase humidity around plants by misting them with water, introduce predatory mites, or spray with insecticidal soap or neem oil.
* **Nematodes:** These microscopic worms can damage plant roots, leading to stunted growth and reduced yields. Improve soil health by adding organic matter, rotate crops regularly, and consider using nematode-resistant cowpea varieties.
Regularly inspect your plants for signs of pests and take action promptly to prevent infestations from becoming severe.
3. How do I know when my cowpeas are ready to harvest?
The timing of harvest depends on the variety of cowpea you’re growing and how you plan to use them. For fresh shelling beans, harvest when the pods are plump and filled with beans, but still green and tender. The beans should be easy to shell from the pods. For dry beans, allow the pods to dry completely on the plant. The pods will turn brown and brittle, and the beans will rattle inside. Harvest the pods before they shatter and scatter the beans. For snap peas, harvest when the pods are young and tender, before the beans have fully developed. Regular harvesting encourages continued production.
4. Can I grow cowpeas in containers?
Yes, you can successfully grow cowpeas in containers, especially bush-type varieties. Choose a large container (at least 12 inches in diameter) with good drainage. Fill the container with a well-draining potting mix amended with compost. Provide a trellis or support for the plants to climb on, even if they are bush-type. Water regularly and fertilize every few weeks with a balanced fertilizer. Place the container in a sunny location that receives at least 6-8 hours of sunlight per day. Container-grown cowpeas may require more frequent watering and fertilization than those grown in the ground.
5. What are some good companion plants for cowpeas?
Companion planting can help improve the health and productivity of your cowpea garden. Some good companion plants for cowpeas include:
* **Corn:** Provides support for climbing cowpea varieties.
* **Sunflowers:** Also provide support and attract pollinators.
* **Marigolds:** Repel nematodes and other pests.
* **Basil:** Repels aphids and other pests.
* **Rosemary:** Repels bean beetles.
* **Carrots:** Improve soil structure and attract beneficial insects.
Avoid planting cowpeas near onions or garlic, as these can inhibit their growth.
6. How do I save seeds from my cowpea plants?
Saving seeds from your cowpea plants is a great way to preserve your favorite varieties and ensure a supply of seeds for future plantings. To save seeds, allow the pods to dry completely on the plant. Harvest the pods before they shatter and scatter the beans. Shell the beans and spread them out on a screen or tray to dry completely in a cool, dry place. Once the beans are thoroughly dry, store them in an airtight container in a cool, dark place. Label the container with the variety of cowpea and the date of harvest. Properly stored cowpea seeds can remain viable for several years.
7. My cowpea plants are flowering, but not producing pods. What could be the problem?
There are several reasons why your cowpea plants might be flowering but not producing pods.
* **Lack of Pollination:** Cowpeas are self-pollinating, but they can benefit from insect pollination. Attract pollinators to your garden by planting flowers that provide nectar and pollen.
* **High Temperatures:** High temperatures can interfere with pollination and pod development. Provide shade for your plants during the hottest part of the day.
* **Nutrient Deficiencies:** A lack of phosphorus or potassium can inhibit pod development. Amend your soil with bone meal or wood ash to provide these nutrients.
* **Water Stress:** Insufficient watering can also prevent pod development. Ensure that your plants are receiving adequate water, especially during flowering and pod formation.
* **Pest Infestations:** Severe pest infestations can weaken plants and prevent them from producing pods. Control pests promptly to protect your plants.
By addressing these potential issues, you can increase your chances of a successful cowpea harvest.
Leave a Comment