
Easy melon growing tips are what every gardener craves when those summer days start calling! Let’s be honest, there’s nothing quite like biting into a juicy, homegrown melon, the sweetness exploding in your mouth. It’s a taste of summer perfection that store-bought melons just can’t replicate. But the path to that perfect melon can sometimes feel like a thorny vine, right?
For centuries, melons have been cultivated across the globe, from the ancient Egyptians who buried them with their pharaohs to the vibrant watermelons enjoyed during Lunar New Year celebrations in Asia. They’re more than just a fruit; they’re a symbol of abundance and good fortune. But getting them to thrive in your own backyard? That’s where the challenge begins!
That’s why I’m so excited to share these easy melon growing tips with you. I know firsthand how frustrating it can be to nurture those little seedlings, only to end up with bland, small, or even diseased fruits. We’ve all been there! This DIY guide is packed with simple, effective hacks that will transform your melon-growing game. Whether you’re a seasoned gardener or just starting out, these tips will help you unlock the secrets to a bountiful melon harvest. Get ready to impress your friends and family with the sweetest, most delicious melons they’ve ever tasted!
Growing Melons Made Easy: Your DIY Guide for a Bountiful Harvest
Hey garden friends! Have you ever wondered how to grow those juicy, sweet melons yourself? I tried for years and finally came up with a system that really works. No more fear of small, tasteless melons! Here is my comprehensive DIY guide that will show you step-by-step how to harvest your own delicious melons. Let’s get started!
The Basics: What Melons Need to Grow
Before we begin, let’s briefly consider what melons really need to thrive. These are the most important points:
- Sun, sun, sun: Melons love the sun! They need at least 6-8 hours of direct sunlight per day. The more, the better!
- Warm temperatures: Melons are warm-weather plants. They like it when it’s warm during the day and not too cold at night. The soil temperature should ideally be above 18°C (65°F).
- Well-drained soil: Melons don’t like “wet feet.” The soil must be well-drained so that water can run off.
- Nutrient-rich soil: Melons are hungry! They need soil that is rich in nutrients, especially potassium and phosphorus.
- Sufficient water: Melons need a lot of water during the growing season, especially when the fruits are ripening.
- Space: Melon plants need space to spread out. Don’t plant them too close together!
Phase 1: Preparation – The Key to Success
Preparation is the be-all and end-all when it comes to growing melons. Here are the steps I always follow:
- Choosing the right location: Look for a sunny spot in your garden that gets at least 6-8 hours of sun per day. Make sure the soil is well-drained. If your soil is very clay-heavy, you can improve it with compost or sand.
- Preparing the soil: Melons love nutrient-rich soil. I dig over the soil in the fall or spring and work in plenty of compost, well-rotted manure, or organic fertilizer. This gives the melons a good start.
- Testing the soil (optional, but recommended): A soil test can tell you which nutrients are missing in your soil. You can buy a soil test kit at a garden center or send a sample to a lab. Based on the results, you can improve your soil in a targeted way.
- Creating mounds (optional): I like to create small mounds for my melons. This helps to warm the soil and improve drainage. Simply form the earth into small mounds (approx. 30 cm high and 60 cm wide).
- Using black plastic mulch (optional, but very helpful): Black plastic mulch helps to warm the soil, retain moisture, and suppress weeds. I lay the plastic over the prepared mounds and cut holes for the melon plants.
Phase 2: Sowing and Starting – The Beginning of a Melon’s Life
You have two options: either you sow the melons directly into the bed or you start them indoors. I prefer starting them indoors because it gives me a head start and protects the plants from slugs and other pests.
- Sowing indoors (approx. 4-6 weeks before the last frost): Fill small pots (approx. 8-10 cm in diameter) with seed starting mix. Place 2-3 seeds per pot about 1-2 cm deep in the soil. Water the soil gently and place the pots in a warm, bright place (e.g., on a windowsill or under a grow light).
- Germination: The seeds usually germinate within 7-10 days. Keep the soil moist, but not wet. As soon as the seedlings have emerged, remove the weakest seedling per pot.
- Caring for the seedlings: Make sure the seedlings get enough light. Rotate the pots regularly so that the plants don’t grow towards the light. Water the plants regularly, but avoid waterlogging.
- Hardening off: Before you plant the melon plants in the garden bed, you need to harden them off. This means you slowly get them used to the outdoor conditions. Place the plants outside for a few hours a day (in a sheltered place) and extend the time each day.
- Direct sowing (after the last frost): If you want to sow directly into the bed, wait until the soil temperature is at least 18°C (65°F). Place 2-3 seeds per planting spot about 2 cm deep in the soil. Keep the soil moist until the seeds germinate.
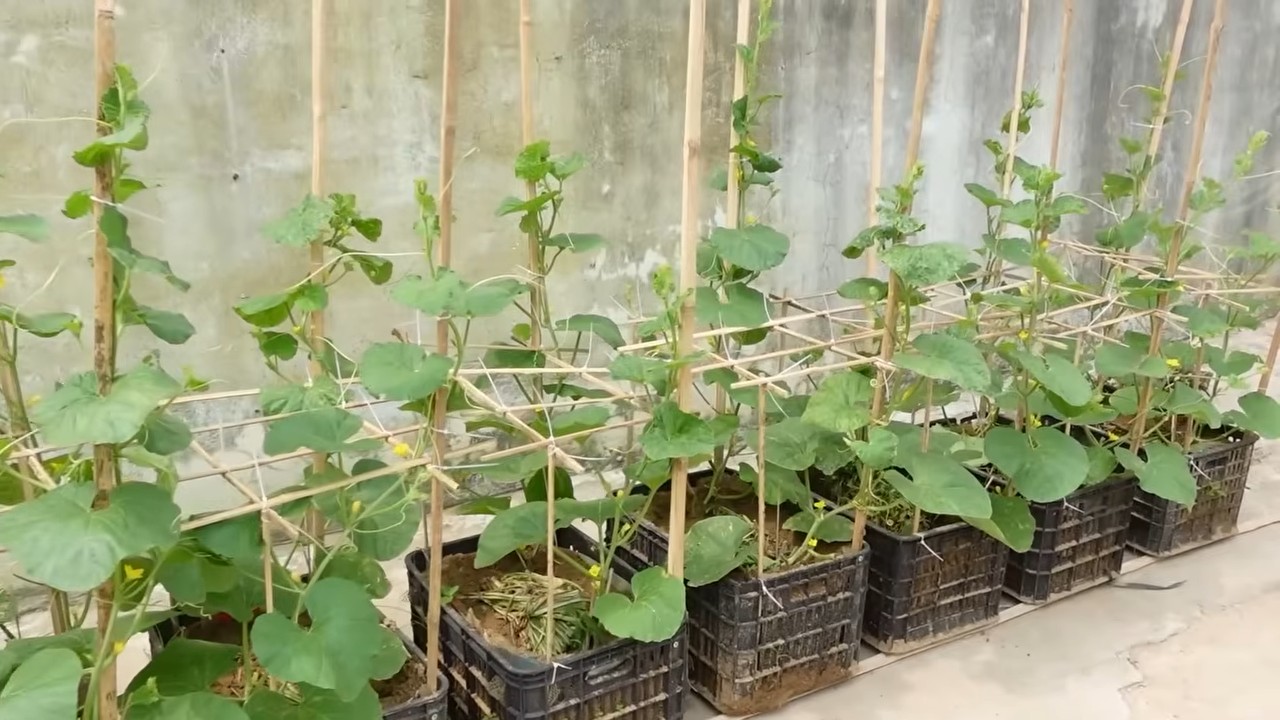
Phase 3: Planting Out and Care – Raising the Melons
Now comes the exciting part: The melon plants are going into the garden bed!
- The right time: Only plant the melon plants in the bed when there is no more danger of frost and the soil temperature is at least 18°C (65°F).
- Planting distance: Melons need space! Plan the plants at a distance of approx. 60-90 cm from each other. If you are creating rows, you should leave a distance of approx. 1.5-2 meters between the rows.
- Planting out: Dig a hole that is slightly larger than the root ball of the melon plant. Carefully place the plant in the hole and fill it with soil. Water the plant well.
- Watering: Melons need a lot of water during the growing season. Water the plants regularly, especially when it is dry. Avoid watering the leaves, as this can promote fungal diseases. I prefer to water directly at the roots.
- Fertilizing: Fertilize the melon plants regularly with an organic fertilizer or a special melon fertilizer. I fertilize every 2-3 weeks. Be sure to follow the instructions on the packaging.
- Mulching: Mulching helps to retain moisture, suppress weeds, and cool the soil. I like to use straw or wood chips for mulching.
- Trellis (optional): Some melon varieties (e.g., watermelons) can get very large and need a trellis. You can use a wire fence or a trellis.
- Pollination: Melons need bees and other insects for pollination. If you have few insects in your garden, you can hand-pollinate the flowers. To do this, take a small brush and transfer the pollen from the male flowers to the female flowers. You can recognize the female flowers by the small fruit at the base of the flower.
- Protection from pests and diseases: Melons can be affected by various pests and diseases. Watch for signs of infestation and act accordingly. I like to use natural pesticides such as neem oil or insecticidal soap.
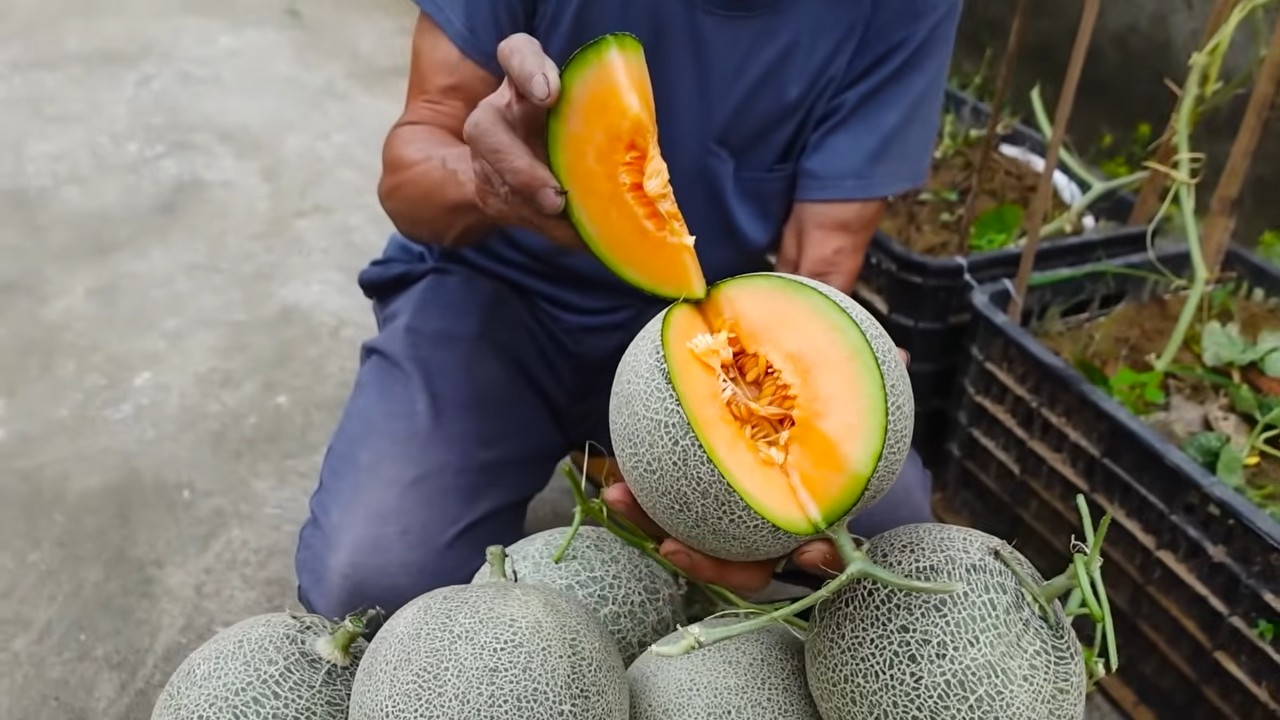
Phase 4: Harvest – The Reward for Your Work
Finally, the time has come: the melons are ripe! But how do you know when the right time to harvest is?
The harvest: Carefully cut the melon from the stem.
The thump test: Tap the melon. If it sounds hollow, it is probably ripe.
The stem: The stem that connects the melon to the plant should be dry and slightly cracked.
The color: The color of the melon should have changed. For watermelons, the underside that rests on the ground turns yellowish.
The scent: Some melon varieties (e.g., honeydew) will have a fragrant smell when they are ripe.
Conclusion
So, there you have it! Transforming your melon patch with this simple, yet incredibly effective DIY trick is more than just a gardening hack; it’s an investment in sweeter, healthier, and more abundant harvests. We’ve walked you through the process, highlighting the benefits of improved drainage, enhanced sunlight exposure, and protection from soilborne diseases – all crucial elements for successful melon growing.
Think about it: no more disappointing, bland melons. No more battling with root rot or pest infestations that decimate your precious crop. This method empowers you to take control of your melon’s environment, creating the ideal conditions for it to thrive. The satisfaction of biting into a juicy, homegrown melon, knowing you played a pivotal role in its creation, is truly unparalleled.
But the beauty of this DIY trick lies not only in its effectiveness but also in its adaptability. Feel free to experiment with different materials for your raised beds. Instead of wood, consider using recycled bricks, stones, or even repurposed tires (ensuring they are safe and non-toxic). For the soil mixture, tailor it to your specific melon variety. Watermelons, for instance, might benefit from a slightly sandier mix, while cantaloupes might prefer a richer, more compost-heavy blend.
Consider companion planting around your raised beds to further enhance your melon’s growth. Marigolds can deter nematodes, while basil can repel aphids. These natural allies can create a thriving ecosystem that supports your melon plants and minimizes the need for chemical interventions.
Don’t be afraid to get creative with your watering techniques, too. Drip irrigation is an excellent option for delivering water directly to the roots, minimizing water waste and reducing the risk of fungal diseases. Mulching around the base of your plants with straw or wood chips can also help retain moisture and suppress weeds.
We are confident that this DIY trick will revolutionize your melon growing experience. It’s a game-changer that will transform your garden into a melon paradise. But don’t just take our word for it – try it out for yourself!
We are incredibly eager to hear about your experiences. Did you notice a significant improvement in your melon yield? Did you encounter any challenges along the way? What variations did you try, and how did they work out? Share your stories, tips, and photos in the comments section below. Let’s create a community of melon enthusiasts who are passionate about growing the best possible fruit.
Remember, gardening is a journey of continuous learning and experimentation. Embrace the process, have fun, and don’t be afraid to make mistakes. With a little effort and the right techniques, you’ll be enjoying delicious, homegrown melons in no time. So, grab your tools, get your hands dirty, and embark on your melon growing adventure today! We can’t wait to see what you create. Happy gardening!
Frequently Asked Questions (FAQ)
What type of melons does this DIY trick work best for?
This DIY trick is beneficial for almost all types of melons, including watermelons, cantaloupes, honeydews, and even smaller varieties like Galia melons. The raised bed structure and improved soil conditions provide a favorable environment for root development and fruit production, regardless of the specific melon variety. However, keep in mind that different melon types have slightly different needs in terms of sunlight, water, and nutrients. Research your specific variety to fine-tune your approach.
How high should the raised bed be for optimal melon growing?
Generally, a raised bed height of 8-12 inches is sufficient for most melon varieties. This height provides adequate drainage and allows for healthy root growth. If you have particularly poor soil or are growing larger melon varieties like watermelons, you might consider increasing the height to 18-24 inches. The key is to ensure that the roots have enough space to develop without being waterlogged.
What is the best soil mixture for growing melons in a raised bed?
A well-draining and nutrient-rich soil mixture is crucial for successful melon growing. A good starting point is a blend of equal parts:
* Topsoil: Provides a base for the soil structure.
* Compost: Adds organic matter, improves drainage, and provides essential nutrients.
* Sand or Perlite: Enhances drainage and aeration.
You can also amend the soil with slow-release fertilizer or bone meal to provide a steady supply of nutrients throughout the growing season. Test your soil pH to ensure it’s within the optimal range for melons (typically between 6.0 and 7.0).
How often should I water my melon plants in a raised bed?
Watering frequency depends on several factors, including the weather, soil type, and melon variety. Generally, you should aim to keep the soil consistently moist but not waterlogged. Water deeply and less frequently, rather than shallowly and often. Check the soil moisture by sticking your finger about an inch into the soil. If it feels dry, it’s time to water. Drip irrigation is an excellent option for delivering water directly to the roots and minimizing water waste.
How can I protect my melon plants from pests and diseases?
Prevention is key when it comes to pest and disease management. Start by selecting disease-resistant melon varieties. Practice good sanitation by removing any dead or diseased leaves. Companion planting with beneficial herbs and flowers can also help deter pests. Regularly inspect your plants for signs of pests or diseases. If you spot any problems, address them promptly with appropriate organic or chemical controls.
Can I grow melons in containers using this DIY trick?
Yes, you can adapt this DIY trick for container gardening. Choose a large container with good drainage holes. Use a similar soil mixture as you would for a raised bed. Ensure that the container receives at least 6-8 hours of sunlight per day. You may need to water more frequently, as containers tend to dry out faster than raised beds. Select bush or compact melon varieties that are better suited for container growing.
What are some common mistakes to avoid when growing melons?
Some common mistakes include:
* Overwatering: Can lead to root rot and fungal diseases.
* Underwatering: Can stunt growth and reduce fruit production.
* Insufficient sunlight: Melons need at least 6-8 hours of sunlight per day.
* Poor soil drainage: Can lead to waterlogged roots.
* Lack of nutrients: Melons are heavy feeders and need a steady supply of nutrients.
* Ignoring pests and diseases: Can quickly decimate your crop.
By avoiding these mistakes and following the tips outlined in this article, you’ll be well on your way to a successful melon harvest.
How do I know when my melons are ripe?
Determining ripeness varies slightly depending on the melon variety. Here are some general guidelines:
* Watermelons: Look for a dull rind, a yellowish spot on the bottom where it rested on the ground, and a hollow sound when you thump it.
* Cantaloupes: Should have a fragrant aroma and a stem that slips easily from the vine.
* Honeydews: Should have a creamy yellow color and a slightly waxy feel.
Experience is the best teacher when it comes to determining ripeness. As you grow more melons, you’ll develop a better sense of when they’re ready to harvest.

Leave a Comment