
Hanging lettuce no water? Sounds like a magic trick, right? Well, it’s not quite magic, but it’s pretty darn close! Imagine fresh, crisp lettuce readily available right outside your kitchen door, without the daily watering hassle. That’s the beauty of this ingenious DIY project we’re about to dive into.
For centuries, humans have cultivated lettuce, tracing its roots back to ancient Egypt where it was initially grown for its seeds and oil. Over time, it evolved into the leafy green we know and love, becoming a staple in salads and sandwiches worldwide. But traditional gardening methods can be time-consuming and water-intensive. That’s where our innovative, water-saving technique comes in!
In today’s busy world, who has time to constantly water their garden? We’re all looking for ways to simplify our lives and be more sustainable. This hanging lettuce no water method not only saves you precious time and water, but it also minimizes pests and maximizes space, especially if you’re working with a small balcony or patio. I’m excited to share this simple yet effective way to enjoy fresh, homegrown lettuce with minimal effort. Let’s get started and transform your gardening experience!
DIY Hanging Lettuce Garden: Fresh Lettuce Without Watering!
Hello dear garden friends! Are you also tired of your lettuce in the garden bed always being nibbled on by snails or just not wanting to grow properly? Then I have the perfect solution for you today: a hanging lettuce garden! And the best part? It requires almost no watering! Sounds crazy, but it’s true. I’ll show you how you can easily build this ingenious lettuce garden yourself.
What you’ll need:
- A large, sturdy bucket (approx. 10-20 liter capacity)
- A drill with various bits (for wood and plastic)
- A jigsaw or a sharp knife
- Potting soil (preferably organic quality)
- Lettuce seedlings (different varieties for a colorful mix!)
- Coconut coir or peat moss (for water retention)
- An old cotton diaper or a piece of jute (as a filter)
- A chain or a sturdy rope for hanging
- A few stones or some gravel (for drainage)
- Gloves (to protect your hands)
- Scissors or a knife
- Optional: Spray paint (to decorate the bucket)
Step-by-Step Instructions:
1. Preparing the Bucket:
- Cleaning: First, you should clean the bucket thoroughly. Remove all labels and residues. I washed my bucket with warm water and a little dish soap.
- Drilling drainage holes: Drill several drainage holes (about 6-8) in the bottom of the bucket. These holes are important so that excess water can run off and the roots don’t rot. I used a drill bit with a diameter of about 8 mm for this.
- Holes for the lettuce seedlings: Now for the exciting part! We drill holes in the side walls of the bucket, through which the lettuce seedlings will later be inserted. The number of holes depends on the size of the bucket and the desired amount of lettuce. I drilled about 10-12 holes in my bucket.
- Positioning: Distribute the holes evenly over the side walls of the bucket. Make sure there is enough space between the holes so that the lettuce plants have enough room to grow.
- Size: The holes should be large enough for the root balls of the lettuce seedlings to fit through. I used a drill bit with a diameter of about 5 cm for this. You can also cut the holes with a jigsaw or a sharp knife. But please be careful!
- Optional: Decoration: If you like, you can now decorate the bucket with spray paint. I painted my bucket a cheerful green. Let the paint dry completely before you proceed to the next step.
2. Preparing the Water Reservoir:
- Insert the filter: At the bottom of the bucket, we lay out an old cotton diaper or a piece of jute. This filter prevents the soil from getting into the water reservoir and clogging it.
- Add the drainage layer: On top of the filter, we add a layer of stones or gravel (about 5-10 cm high). This drainage layer ensures that the water can drain well and the roots are not sitting in water.
- Add coconut coir/peat moss: Over the drainage layer, we spread a layer of coconut coir or peat moss (about 5-10 cm high). These materials store water and release it slowly to the soil. This is the trick to why we hardly need to water! I used coconut coir because it is more environmentally friendly than peat moss.
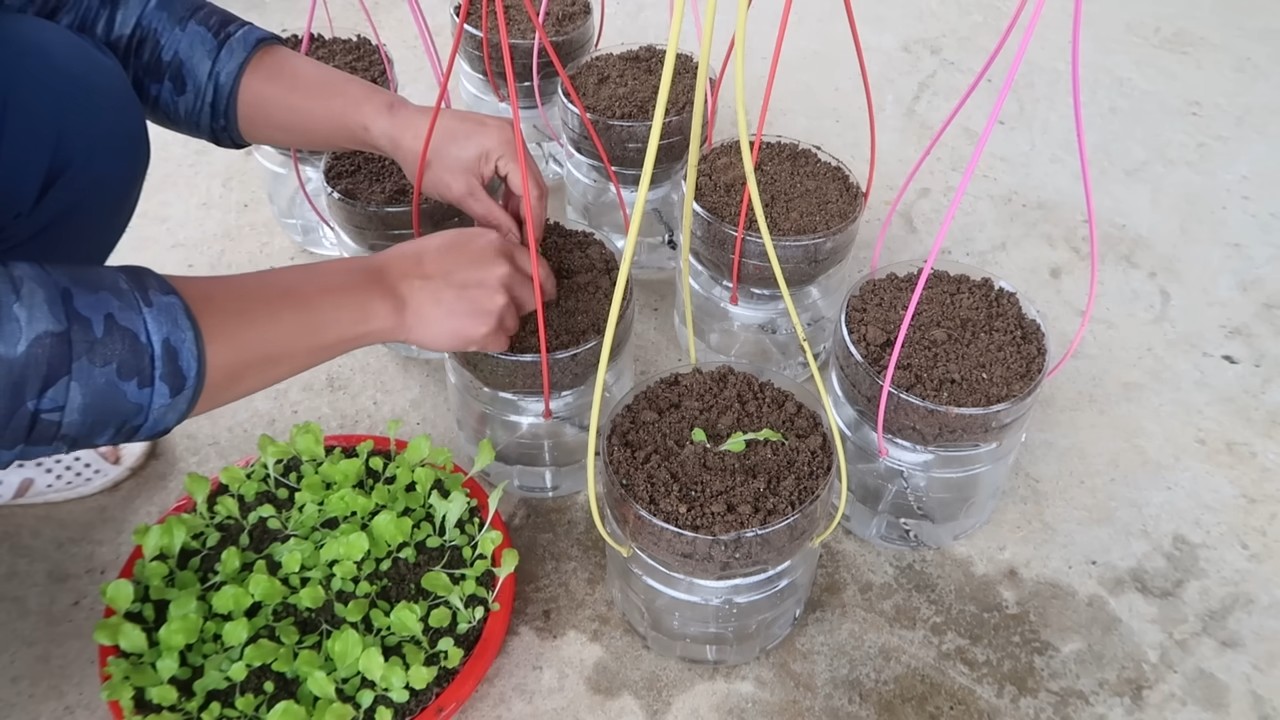
3. Planting the Bucket:
- Fill with soil: Fill the bucket with potting soil. Leave about 5-10 cm of space to the top edge.
- Insert the lettuce seedlings: Now we can insert the lettuce seedlings.
- Side holes: Take a lettuce seedling and gently push it through one of the side holes. Make sure the roots are well-seated in the soil. Repeat this process for all the side holes.
- Top: You can also plant lettuce seedlings on the top of the bucket. Distribute them evenly over the surface.
- Watering: Gently water the lettuce seedlings after planting. Make sure the soil is well moistened.
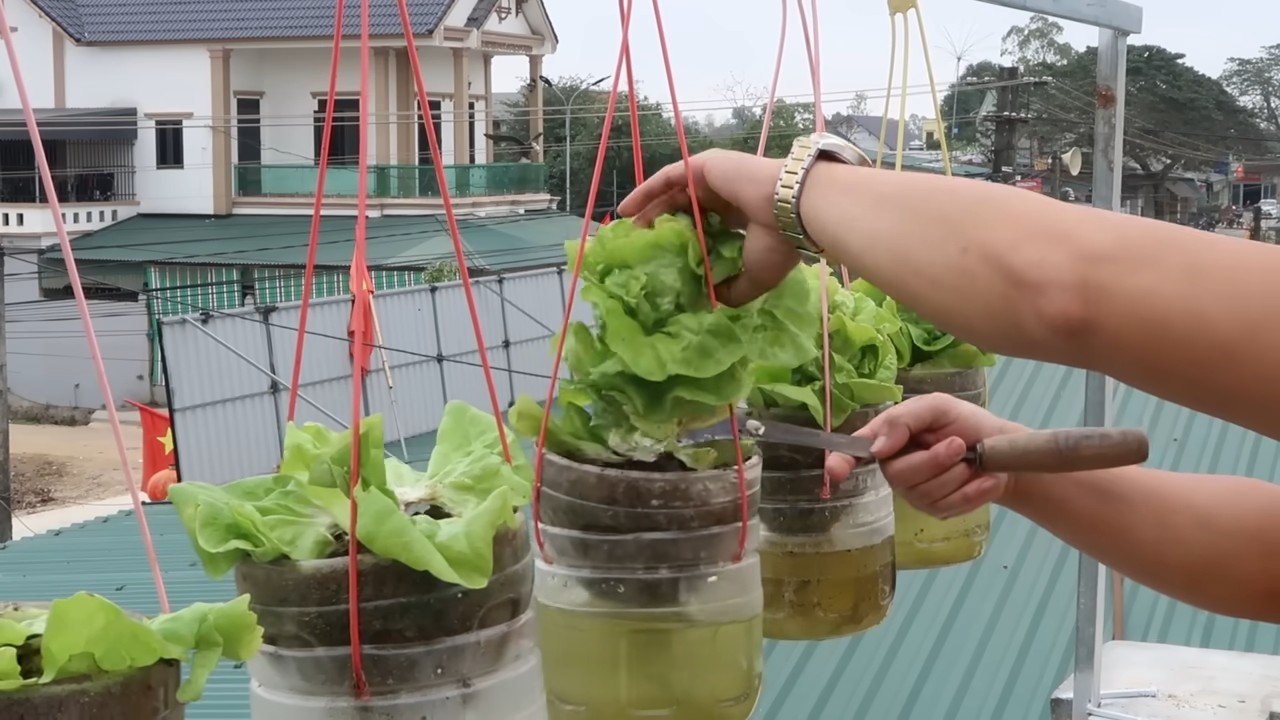
4. Hanging the Lettuce Garden:
- Attach hanging points: Drill four holes at the top rim of the bucket, spaced equally apart. We will thread the chain or rope for hanging through these holes.
- Attach the chain/rope: Attach the chain or rope to the holes. Make sure the attachment is stable and can support the weight of the bucket. I used carabiner hooks to attach the chain to the holes.
- Hanging: Find a suitable place to hang the lettuce garden. The spot should be sunny, but not in the direct midday sun. I hung my lettuce garden on my balcony.
Care Instructions:
- Watering: Since we have created a water reservoir, we only need to water the lettuce garden rarely. Check the moisture of the soil regularly. If it feels dry, water gently from the top. Make sure the water can drain well.
- Fertilizing: To promote the growth of the lettuce plants, you can fertilize them regularly. I use an organic liquid fertilizer for this.
- Harvesting: The lettuce leaves can be harvested as soon as they are large enough. Simply cut the leaves with scissors. The lettuce plants will then grow back.
- Pest protection: Although the hanging lettuce garden is less susceptible to snails, other pests like aphids can occur. Check the plants regularly and remove pests if necessary with a natural pesticide.
Why this lettuce garden is so brilliant:
- Space-saving: The hanging lettuce garden is ideal for small balconies or terraces.
- Less watering: Thanks to the water reservoir, we only need to water the lettuce garden rarely.
- Protection from snails: The lettuce plants are protected from snails because they are not on the ground.
- Decorative: The hanging lettuce garden is a real eye-catcher and beautifies any balcony or garden.
- Fresh lettuce: We always have fresh lettuce on hand without having to buy it at the supermarket.
I hope you enjoyed this guide and feel inspired to build your own hanging lettuce garden. It’s really easy and fun! And the best part: you will be rewarded with fresh, homegrown lettuce. Happy gardening!
Conclusion
So, there you have it! Hanging lettuce without water might sound unconventional, but it’s a game-changer for extending the life of your leafy greens and minimizing food waste. We’ve explored the science behind why this method works, highlighting how it combats the common culprits of wilted lettuce: excess moisture and ethylene gas buildup. By providing a dry, airy environment, you’re essentially creating a mini-preservation chamber for your lettuce, keeping it crisp and fresh for significantly longer than traditional storage methods.
This isn’t just a neat trick; it’s a practical solution for anyone who buys lettuce regularly and hates throwing away slimy, unusable leaves. Think about the money you’ll save, the reduced trips to the grocery store, and the satisfaction of always having fresh salad ingredients on hand. Plus, it’s incredibly simple to implement, requiring minimal effort and readily available materials.
But don’t just take our word for it! We encourage you to experiment with different types of lettuce. While this method works exceptionally well for romaine, butter lettuce, and leafy green mixes, you might find it also extends the life of other delicate herbs and vegetables. Consider variations like using a breathable mesh bag instead of a plastic bag with holes, or adding a paper towel at the bottom of the bag to absorb any residual moisture. You could even try hanging different types of greens together to see which combinations work best.
The key to success with hanging lettuce is consistency. Make sure to thoroughly dry the lettuce before hanging it, and check it regularly for any signs of spoilage. Remove any wilted or discolored leaves immediately to prevent them from affecting the rest of the bunch.
We’re confident that once you try this method, you’ll be amazed by the results. It’s a simple, effective, and eco-friendly way to keep your lettuce fresh and delicious for longer. So, ditch the soggy lettuce blues and embrace the hanging method!
Now, we want to hear from you! Have you tried hanging lettuce before? What were your results? Do you have any tips or tricks to share? Leave a comment below and let us know your experience. We’re excited to learn from your successes and challenges. Let’s build a community of lettuce-loving enthusiasts who are committed to reducing food waste and enjoying fresh, crisp salads every day. Share your photos and videos on social media using #HangingLettuce and let’s spread the word about this amazing DIY trick!
Frequently Asked Questions (FAQ)
Why does hanging lettuce without water actually work?
The secret lies in controlling moisture and airflow. Traditional lettuce storage often involves placing lettuce in a plastic bag or container, which can trap moisture and accelerate spoilage. Lettuce naturally releases ethylene gas, a ripening agent that contributes to wilting and browning. Hanging the lettuce allows for better air circulation, preventing moisture buildup and dissipating ethylene gas. The dry environment inhibits the growth of bacteria and mold, which are major causes of lettuce spoilage. By minimizing these factors, you significantly extend the shelf life of your lettuce.
What types of lettuce work best with this method?
While the hanging method is effective for most types of lettuce, it tends to work particularly well for varieties with sturdy leaves, such as romaine, butter lettuce, and green leaf lettuce. These types of lettuce are less prone to bruising and wilting, making them ideal candidates for hanging. However, you can also try it with more delicate varieties like spinach or arugula, but be sure to handle them gently and check them more frequently for signs of spoilage. Experimenting with different types of greens is part of the fun!
How long will lettuce last when hung using this method?
The lifespan of hung lettuce can vary depending on the initial freshness of the lettuce and the environmental conditions. However, in general, you can expect lettuce to last significantly longer – often up to two weeks or even longer – when hung compared to traditional storage methods. This is a considerable improvement over the typical 3-5 days you might get with lettuce stored in the refrigerator drawer. Regularly checking the lettuce and removing any wilted leaves will further extend its lifespan.
What’s the best way to dry the lettuce before hanging it?
Thoroughly drying the lettuce is crucial for preventing moisture buildup and maximizing its shelf life. After washing the lettuce, use a salad spinner to remove excess water. Then, gently pat the leaves dry with a clean kitchen towel or paper towels. Make sure to get into all the nooks and crannies to remove as much moisture as possible. The drier the lettuce is before hanging, the longer it will last.
Can I use a different type of bag besides a plastic bag with holes?
Yes, absolutely! While a plastic bag with holes is a common and readily available option, you can also use other types of bags that allow for good air circulation. A breathable mesh bag, such as those used for storing onions or potatoes, is an excellent alternative. You can also use a reusable produce bag made of cotton or linen. The key is to choose a bag that allows air to circulate freely while still protecting the lettuce from dust and debris.
What if I don’t have space to hang the lettuce?
If you don’t have a suitable place to hang the lettuce, you can still adapt the method to fit your needs. Instead of hanging the bag, you can place it in the crisper drawer of your refrigerator. Just make sure to leave the bag slightly open to allow for air circulation. You can also place a paper towel at the bottom of the bag to absorb any excess moisture. While hanging is the most effective method, this alternative can still help extend the life of your lettuce.
Is it necessary to wash the lettuce before hanging it?
Washing the lettuce before hanging it is generally recommended, as it helps remove any dirt, debris, or pesticides that may be present. However, it’s essential to dry the lettuce thoroughly after washing it to prevent moisture buildup. If you prefer not to wash the lettuce before hanging it, you can simply rinse it just before you’re ready to use it.
How often should I check the lettuce for signs of spoilage?
It’s a good idea to check the lettuce every few days for any signs of spoilage, such as wilting, browning, or sliminess. Remove any affected leaves immediately to prevent them from affecting the rest of the bunch. Regular inspection will help you maintain the freshness of your lettuce and maximize its shelf life.
Can I use this method for other leafy greens besides lettuce?
Yes, the hanging method can also be used for other leafy greens, such as spinach, kale, and arugula. However, some greens may be more delicate than others and require more frequent monitoring. Experiment with different types of greens to see which ones benefit most from this storage method.
Does the temperature of the refrigerator affect the effectiveness of this method?
Yes, the temperature of your refrigerator can affect the effectiveness of the hanging method. Ideally, your refrigerator should be set to a temperature between 34°F and 40°F (1°C and 4°C) to maintain optimal freshness. Avoid storing the lettuce near the back of the refrigerator, where temperatures may be colder and cause the lettuce to freeze.

Leave a Comment