
Mushroom Growing Hack: Unlock the secrets to cultivating your own delicious fungi right in the comfort of your home! Have you ever dreamt of harvesting fresh, gourmet mushrooms without trekking to a specialty store or foraging in the woods? Well, dream no more! This DIY guide is your passport to a thriving indoor mushroom garden, revealing simple yet effective techniques that will have you enjoying homegrown goodness in no time.
Mushrooms have been prized for centuries, not only for their unique flavor but also for their nutritional and medicinal properties. From ancient civilizations using them in rituals to modern chefs incorporating them into culinary masterpieces, mushrooms hold a special place in human history. But you don’t need to be an expert mycologist to enjoy the fruits (or rather, fungi!) of your labor.
In today’s world, where access to fresh, organic produce can be a challenge, mastering a mushroom growing hack is more valuable than ever. Imagine the satisfaction of knowing exactly where your food comes from, reducing your carbon footprint, and saving money – all while indulging in the earthy, savory taste of homegrown mushrooms. This DIY guide will empower you to take control of your food supply and experience the joy of nurturing your own little mushroom kingdom. Let’s get started!
Grow Your Own Gourmet Mushrooms at Home: A Simple DIY Hack
Hey there, fellow fungi fanatics! Ever dreamed of harvesting your own delicious, fresh mushrooms right in your kitchen? Well, dream no more! I’m going to walk you through a super easy DIY hack for growing oyster mushrooms using coffee grounds. Yes, you read that right – coffee grounds! It’s a fantastic way to recycle, reduce waste, and enjoy some seriously tasty homegrown goodness. Let’s get started!
What You’ll Need: The Mushroom Growing Arsenal
Before we dive in, let’s gather our supplies. This is a relatively low-cost project, which is always a win in my book!
* Oyster Mushroom Spawn: This is the most crucial ingredient! You can find oyster mushroom spawn online or at some garden centers. Make sure it’s a reputable source to ensure healthy growth. I usually go for the pearl oyster variety, but feel free to experiment!
* Used Coffee Grounds: Save those grounds! They’re packed with nutrients that mushrooms love. Make sure they’re from coffee only, no flavored syrups or additives.
* Heat-Resistant Bags: These are essential for pasteurizing the coffee grounds. Oven bags or specialized mushroom growing bags work great.
* Spray Bottle with Water: For keeping things nice and humid.
* Rubbing Alcohol: For sanitizing everything. We want happy mushrooms, not mold!
* Gloves: To keep your hands clean and prevent contamination.
* A Well-Ventilated Area: Somewhere with indirect sunlight is ideal.
* Optional: Micropore tape (for covering air holes in the bag).
Phase 1: Preparing the Coffee Grounds – The Foundation of Our Fungi Farm
Coffee grounds are a fantastic substrate for oyster mushrooms, but we need to make sure they’re properly prepared to prevent contamination. This involves pasteurization, which kills off any unwanted organisms that might compete with our mushrooms.
1. Collect Your Coffee Grounds: Start saving your used coffee grounds. The fresher, the better! I usually collect them over a week or two, storing them in a clean container in the fridge to prevent mold growth.
2. Pasteurize the Coffee Grounds: This is a crucial step! We need to eliminate any competing organisms. There are a couple of ways to do this:
* Oven Method: Preheat your oven to 170°F (77°C). Spread the coffee grounds evenly on a baking sheet lined with parchment paper. Bake for about 2 hours, stirring occasionally to ensure even heating. Let them cool completely before moving on to the next step.
* Boiling Water Method: This is my preferred method because it’s a bit quicker. Bring a large pot of water to a boil. Carefully pour the boiling water over the coffee grounds in a heat-resistant container. Let them sit for about an hour, then drain off the excess water using a colander. Make sure they’re cool enough to handle before proceeding.
3. Let the Coffee Grounds Cool: After pasteurization, it’s essential to let the coffee grounds cool down completely. This prevents the heat from killing the mushroom spawn.
Phase 2: Inoculating the Coffee Grounds – Planting the Seeds of Deliciousness
Now for the fun part – introducing the mushroom spawn to the coffee grounds! This is where the magic happens.
1. Sanitize Everything: Before you even think about touching the spawn, sanitize your work area, your gloves, and the inside of your heat-resistant bag with rubbing alcohol. This is super important to prevent contamination.
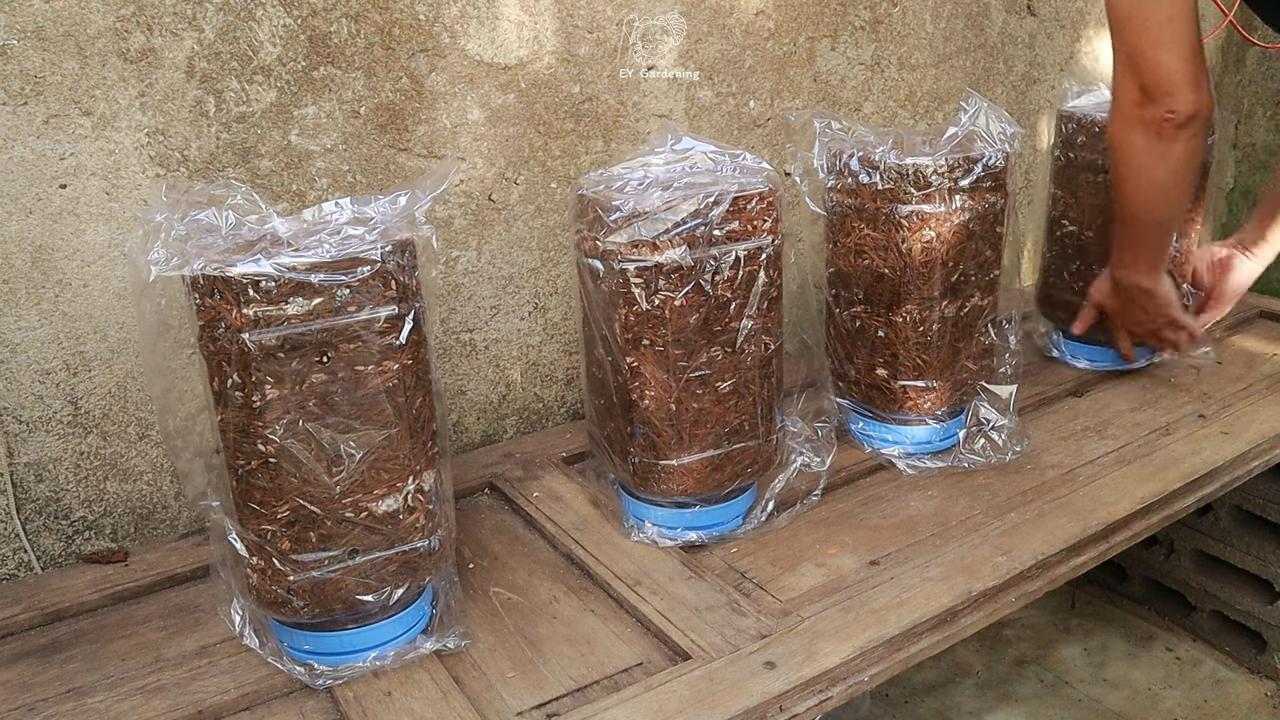
2. Layer the Coffee Grounds and Spawn: In the sanitized bag, create layers of coffee grounds and mushroom spawn. Start with a layer of coffee grounds, then sprinkle a layer of spawn on top. Repeat this process until you’ve used up all the coffee grounds and spawn, ending with a layer of spawn. I usually aim for about a 1:10 spawn-to-substrate ratio (1 part spawn to 10 parts coffee grounds).
3. Seal the Bag: Seal the bag tightly, leaving a little bit of air inside. If you’re using a regular oven bag, you can use a zip tie or heat-seal it. If you’re using a specialized mushroom growing bag, it will likely have a self-sealing closure.
4. Create Air Exchange: Mushrooms need air to breathe! Carefully poke a few small holes in the bag using a sterilized needle or knife. Cover the holes with micropore tape to prevent contamination while still allowing for air exchange. If you don’t have micropore tape, you can just leave the holes uncovered, but be extra vigilant about keeping the area clean.
Phase 3: Incubation – The Waiting Game (But It’s Worth It!)
This is where patience comes in. The mycelium (the vegetative part of the mushroom) needs time to colonize the coffee grounds.
1. Find the Right Spot: Place the bag in a dark, warm (around 70-75°F or 21-24°C), and well-ventilated area. Avoid direct sunlight, as this can overheat the bag and kill the mycelium.
2. Monitor the Bag: Check the bag regularly for signs of colonization. You should start to see white, fuzzy growth spreading throughout the coffee grounds. This is the mycelium, and it’s a good sign!
3. Be Patient: Colonization can take anywhere from 2 to 4 weeks, depending on the temperature and humidity. Don’t get discouraged if it takes a little longer. Just keep an eye on it and make sure the environment is right.
Phase 4: Fruiting – The Grand Finale: Mushroom Time!
Once the coffee grounds are fully colonized (they should be almost completely white), it’s time to initiate fruiting! This is where the mushrooms actually start to grow.
1. Increase Humidity: Mushrooms love humidity! Mist the inside of the bag with water several times a day to keep the humidity high. You can also place the bag in a humidity tent or a plastic container with a damp towel.
2. Increase Light: Move the bag to a location with indirect light. Mushrooms need light to trigger fruiting.
3. Cut a Slit in the Bag: Carefully cut a slit in the bag where you want the mushrooms to grow. This will provide them with an opening to emerge.
4. Maintain Humidity and Ventilation: Continue to mist the bag regularly and ensure good ventilation.
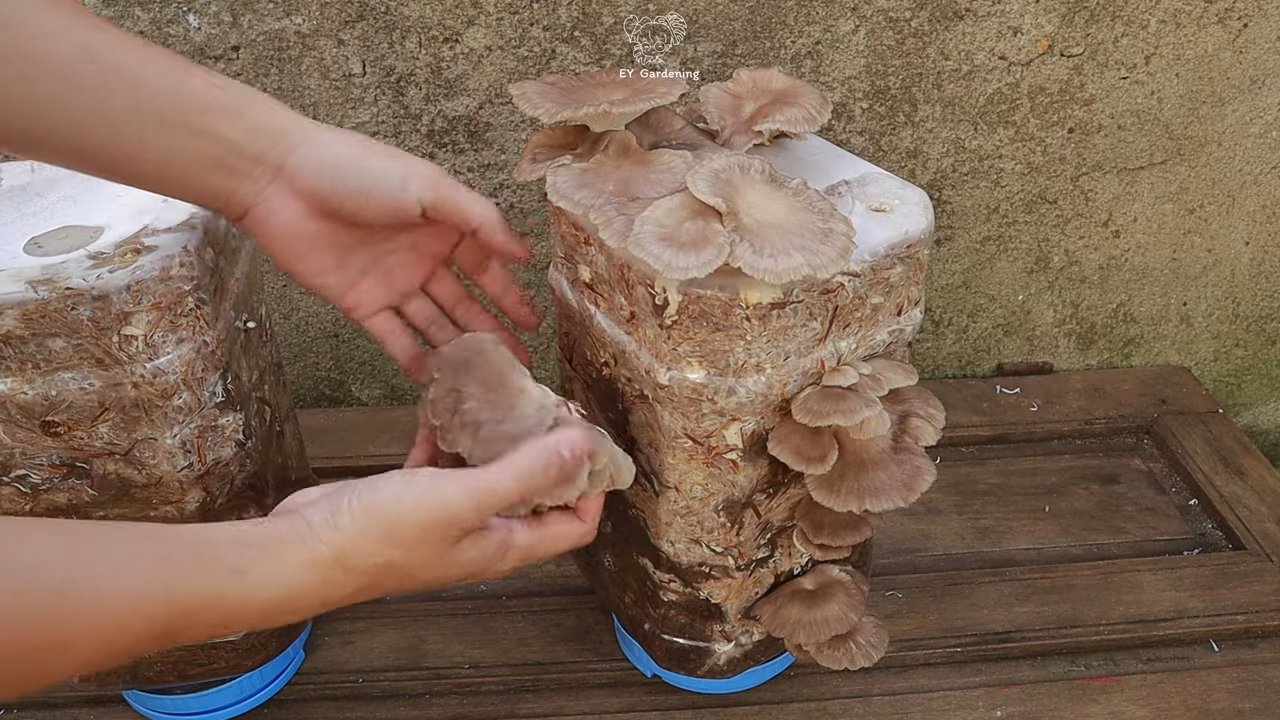
5. Watch Them Grow! Within a few days, you should start to see tiny mushroom pins forming. These will quickly grow into mature oyster mushrooms.
Phase 5: Harvesting and Enjoying Your Homegrown Goodness
The moment you’ve been waiting for!
1. Harvest the Mushrooms: Harvest the mushrooms when the caps are fully formed but before they start to drop spores. You can gently twist them off the substrate or cut them off with a clean knife.
2. Enjoy Your Harvest: Cook your freshly harvested oyster mushrooms and enjoy! They’re delicious sautéed, grilled, or added to soups and stews.
3. Second Flush (Optional): After harvesting, you can often get a second flush of mushrooms. Simply continue to mist the bag and maintain humidity. You may need to cut a new slit in the bag for the second flush.
4. Dispose of the Spent Substrate: Once the substrate is exhausted (no more mushrooms are growing), you can compost it or use it as mulch in your garden.
Troubleshooting Tips: Keeping Your Mushroom Farm Thriving
* Mold: If you see any green, black, or other colored mold growing in the bag, it’s likely contaminated. Unfortunately, you’ll need to discard the bag to prevent the mold from spreading. This is why sanitation is so important!
* Slow Colonization: If the mycelium is colonizing slowly, try increasing the temperature slightly.
* No Fruiting: If the coffee grounds are fully colonized but no mushrooms are fruiting, make sure the humidity is high enough and that the bag is getting enough light.
* Small Mushrooms: If the mushrooms are small, it could be due to lack of humidity or nutrients. Try misting the bag more frequently and consider adding a small amount of nutrient-rich supplement to the coffee grounds (like bran or gypsum) in future grows.
Growing your own oyster mushrooms is a rewarding and sustainable hobby. With a little patience and attention to detail, you can enjoy fresh, delicious mushrooms right from your own home. Happy growing!
Conclusion
So, there you have it! This simple, yet incredibly effective, mushroom growing hack is a game-changer for anyone looking to cultivate their own delicious and nutritious fungi at home. Forget complicated setups and expensive equipment. This method, focusing on readily available materials and a straightforward process, makes growing mushrooms accessible to everyone, regardless of their experience level or budget.
Why is this a must-try? Because it offers a significant return on minimal investment. Imagine the satisfaction of harvesting your own fresh, flavorful mushrooms, knowing exactly where they came from and how they were grown. No more mystery ingredients or concerns about pesticides – just pure, unadulterated mushroom goodness. Plus, it’s an incredibly rewarding experience to witness the entire life cycle of these fascinating organisms.
But the benefits extend beyond just the culinary. Growing mushrooms at home is a sustainable practice, reducing your reliance on commercially produced options and minimizing your carbon footprint. It’s also a fantastic way to recycle organic waste, turning coffee grounds, cardboard, and other materials into a valuable resource.
Don’t be afraid to experiment! While this guide provides a solid foundation, there’s plenty of room for customization. Try different types of mushrooms, such as oyster mushrooms (a great beginner-friendly option), shiitake, or even more exotic varieties. Adjust the substrate composition to see what works best for your local climate and available materials. Consider adding supplements like gypsum or bran to boost yields.
Variations to Explore:
* Container Size: Experiment with different container sizes to optimize space and yield. Smaller containers are great for starting out, while larger containers can accommodate more substrate and potentially produce larger harvests.
* Substrate Mix: While coffee grounds and cardboard are excellent staples, you can also incorporate other materials like straw, sawdust, or even shredded paper. Just be sure to pasteurize or sterilize them properly to prevent contamination.
* Environmental Control: While this method is relatively low-maintenance, you can further optimize your growing environment by controlling temperature and humidity. A simple humidity tent or a cool, dark room can make a significant difference.
* Mushroom Species: Oyster mushrooms are highly recommended for beginners due to their resilience and rapid growth. However, once you gain experience, you can explore other species with different flavor profiles and growing requirements.
We encourage you to dive in and give this mushroom growing hack a try. It’s a fun, educational, and ultimately delicious project that will transform the way you think about food. And most importantly, don’t be afraid to fail! Mushroom growing can be unpredictable, and setbacks are a natural part of the learning process.
Once you’ve had a chance to experiment, we’d love to hear about your experience. Share your successes, your failures, and any tips or tricks you’ve discovered along the way. Let’s build a community of home mushroom growers and learn from each other. Post your photos and stories on social media using #HomeGrownMushrooms and #MushroomGrowingHack. We can’t wait to see what you create!
Remember, the key to successful mushroom cultivation is patience, observation, and a willingness to learn. With a little effort and this simple hack, you’ll be enjoying fresh, homegrown mushrooms in no time. Happy growing!
Frequently Asked Questions (FAQ)
What types of mushrooms can I grow using this hack?
This method is particularly well-suited for growing oyster mushrooms, which are known for their resilience and ability to thrive on a variety of substrates. However, you can also experiment with other types of mushrooms, such as shiitake, lion’s mane, or even wine cap mushrooms, depending on your experience level and the specific requirements of each species. Research the specific needs of the mushroom you want to grow to ensure optimal conditions.
How do I pasteurize or sterilize the substrate?
Pasteurization and sterilization are crucial steps to eliminate competing organisms that can hinder mushroom growth. For pasteurization, you can submerge the substrate in hot water (around 160-180°F or 71-82°C) for about an hour. For sterilization, which is more effective but also more demanding, you’ll need to use a pressure cooker or autoclave to heat the substrate to a higher temperature (around 250°F or 121°C) for a longer period (typically 90 minutes). Always allow the substrate to cool completely before inoculating it with mushroom spawn.
Where can I get mushroom spawn?
Mushroom spawn can be purchased from a variety of online retailers, local nurseries, or specialty mushroom farms. When selecting spawn, make sure to choose a reputable supplier and select a strain that is well-suited for your climate and growing conditions. Consider the type of substrate you plan to use and choose spawn that is compatible.
How long does it take for mushrooms to grow?
The time it takes for mushrooms to grow can vary depending on the species, the growing conditions, and the quality of the spawn. Oyster mushrooms typically fruit within a few weeks of inoculation, while other species may take longer. Be patient and monitor your substrate regularly for signs of growth.
What are the ideal growing conditions for mushrooms?
Mushrooms generally prefer cool, dark, and humid environments. The ideal temperature range varies depending on the species, but most mushrooms thrive in temperatures between 60-75°F (15-24°C). Humidity is also crucial, as mushrooms need a moist environment to develop properly. You can maintain humidity by misting the substrate regularly or by using a humidity tent.
How do I know when the mushrooms are ready to harvest?
Mushrooms are typically ready to harvest when the caps have fully expanded and the gills are visible. The exact timing will depend on the species, but generally, you want to harvest them before they start to release spores. To harvest, gently twist or cut the mushrooms from the substrate.
What if my substrate gets contaminated?
Contamination is a common problem in mushroom growing, but it doesn’t necessarily mean your entire project is ruined. If you notice mold or other unwanted growth, try to isolate the affected area and remove it carefully. If the contamination is widespread, it’s best to discard the substrate and start over. To prevent contamination, always use clean materials and maintain a sterile environment.
Can I reuse the substrate after harvesting mushrooms?
Yes, you can often get multiple flushes (harvests) from the same substrate. After harvesting the first flush, rehydrate the substrate by soaking it in water for a few hours. Then, drain the excess water and return the substrate to its growing environment. You may get smaller yields with subsequent flushes, but it’s still a worthwhile way to maximize your harvest. Eventually, the substrate will become depleted of nutrients and will need to be replaced.
Is this mushroom growing hack safe?
Yes, this method is generally safe, but it’s important to take precautions to avoid contamination and ensure that you are growing edible mushroom species. Always wash your hands thoroughly before handling the substrate or mushrooms. Only consume mushrooms that you have positively identified as edible. If you are unsure about the identity of a mushroom, do not eat it.
What do I do with the spent substrate?
Spent mushroom substrate is an excellent soil amendment. It is rich in nutrients and organic matter, making it ideal for composting or adding directly to your garden. It can improve soil structure, water retention, and fertility.
Leave a Comment