
Mushroom Growing Hack: Unlock the Secrets to a Bountiful Harvest Right at Home!
Have you ever dreamt of strolling into your backyard and harvesting a basketful of delicious, earthy mushrooms? It sounds like something out of a fairytale, right? Well, what if I told you that dream could become a reality with a simple mushroom growing hack? For centuries, mushrooms have been revered across cultures – from ancient Egyptians who considered them a delicacy reserved for royalty, to traditional Chinese medicine practitioners who valued their potent healing properties. Today, we can tap into that ancient wisdom and cultivate these fascinating fungi ourselves!
But let’s be honest, the thought of growing mushrooms can seem intimidating. Many believe it requires specialized equipment, a degree in mycology, and a whole lot of luck. That’s where this DIY guide comes in! I’m going to share a game-changing trick that simplifies the entire process, making it accessible to even the most novice gardener. Forget complicated setups and expensive kits. This hack is all about using readily available materials and a little bit of ingenuity to create the perfect environment for your mushrooms to thrive.
Why do you need this hack? Because fresh, homegrown mushrooms are not only incredibly flavorful and nutritious, but they also offer a sustainable and rewarding gardening experience. Plus, imagine the bragging rights when you serve up a dish featuring mushrooms you grew yourself! So, get ready to ditch the grocery store and embark on a fun and fulfilling journey into the wonderful world of home-grown mushrooms. Let’s get started!
DIY Mushroom Growing Hack: Turn Your Laundry Basket into a Fruiting Paradise!
Hey there, fellow fungi fanatics! Ever dreamed of harvesting your own delicious mushrooms right at home? Well, I’m here to tell you it’s easier than you think, and you probably already have the perfect vessel sitting in your laundry room: a laundry basket! This guide will walk you through transforming a simple laundry basket into a thriving mushroom fruiting chamber. Get ready to impress your friends (and your taste buds) with this surprisingly simple and rewarding DIY project.
Why a Laundry Basket?
Before we dive in, you might be wondering, “Why a laundry basket?” Great question! Here’s why it’s a fantastic choice:
* Excellent Ventilation: The holes in the basket provide crucial airflow, preventing stagnant air and promoting healthy mushroom growth.
* Humidity Control: Easy to mist and maintain a humid environment, essential for fruiting.
* Affordable and Accessible: Laundry baskets are inexpensive and readily available. You might even have one you’re not using!
* Lightweight and Portable: Easy to move around to find the perfect spot for your mushrooms.
* Size Matters: The size is perfect for a small to medium sized mushroom grow.
Materials You’ll Need:
* A plastic laundry basket (preferably with small holes)
* A clear plastic bag or sheet (large enough to cover the basket)
* Spray bottle filled with distilled water
* Mushroom substrate (e.g., supplemented sawdust, straw, or wood chips – choose based on the mushroom species you’re growing)
* Mushroom spawn (the “seeds” of your mushrooms – oyster, shiitake, and wine cap are good beginner-friendly options)
* Optional: Perlite (for added humidity)
* Optional: Small fan (for increased airflow, if needed)
* Gloves
* Mask
Choosing Your Mushroom Species
This is a crucial step! Not all mushrooms are created equal, and some are much easier to grow than others, especially for beginners. I highly recommend starting with one of these:
* Oyster Mushrooms (Pleurotus spp.): These are incredibly versatile, fast-growing, and relatively forgiving. They can thrive on a variety of substrates, including straw, coffee grounds, and even cardboard.
* Shiitake Mushrooms (Lentinula edodes): While they take a bit longer to fruit, shiitakes are prized for their rich, savory flavor. They prefer hardwood substrates like oak or maple.
* Wine Cap Mushrooms (Stropharia rugosoannulata): These are great for outdoor gardens and can even be grown in wood chip beds. They’re relatively easy to cultivate and produce large, meaty mushrooms.
Do your research and choose a species that suits your experience level and the resources you have available.
Preparing Your Substrate
The substrate is the food source for your mushrooms, so it’s essential to prepare it properly. The specific preparation method will depend on the type of substrate you’re using.
* For Straw: Pasteurize the straw by soaking it in hot water (around 160-180°F) for at least an hour. This kills off competing organisms that could hinder mushroom growth. Let the straw cool completely before using.
* For Sawdust: Supplemented sawdust is often available pre-sterilized from mushroom supply companies. If you’re preparing your own, you’ll need to sterilize it in a pressure cooker or autoclave to eliminate contaminants.
* For Wood Chips: Wood chips can be pasteurized similarly to straw, or you can use them directly if you’re growing wine cap mushrooms outdoors.
Important Safety Note: When working with hot water or a pressure cooker, always follow safety precautions to avoid burns or other injuries.
Step-by-Step Instructions: Building Your Laundry Basket Fruiting Chamber
Okay, let’s get our hands dirty! Here’s how to assemble your laundry basket fruiting chamber:
1. Clean Your Laundry Basket: Thoroughly clean the laundry basket with soap and water to remove any dirt or debris. Rinse well and let it dry completely. This helps prevent contamination.
2. Prepare Your Work Area: Choose a clean, well-ventilated area to work in. This will minimize the risk of introducing unwanted mold or bacteria to your mushroom culture.
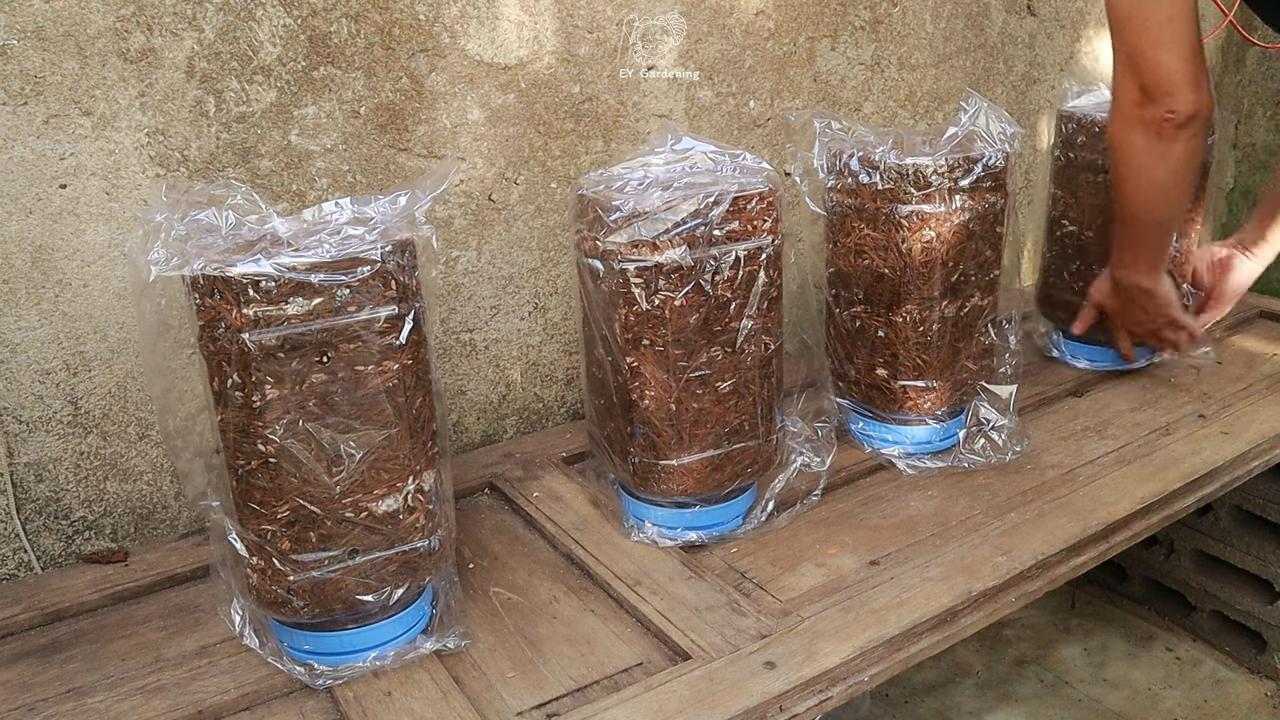
3. Layering the Substrate and Spawn: This is the heart of the process! Put on your gloves and mask. We’re going to create layers of substrate and spawn in the laundry basket.
* Start with a layer of substrate at the bottom of the basket, about 2-3 inches thick.
* Sprinkle a generous layer of mushroom spawn over the substrate.
* Add another layer of substrate, followed by more spawn.
* Continue layering until you’ve used all of your substrate and spawn, ending with a layer of substrate on top.
* Gently press down on each layer to compact it slightly. This helps the mycelium (the vegetative part of the mushroom) colonize the substrate more effectively.
4. Adding Perlite (Optional): If you’re using perlite to increase humidity, spread a layer of perlite on the bottom of the plastic bag or sheet before placing the laundry basket inside. This will create a humid microclimate around your mushrooms.
5. Covering the Basket: Carefully place the laundry basket inside the clear plastic bag or sheet. Make sure the bag is large enough to completely cover the basket, leaving some extra space at the top.
6. Creating Airflow: Leave the top of the bag slightly open to allow for airflow. You can also poke a few small holes in the bag to improve ventilation. If you’re using a small fan, position it near the opening of the bag to gently circulate air.
7. Finding the Right Location: Place your laundry basket fruiting chamber in a location that meets the following criteria:
* Indirect Light: Mushrooms don’t need direct sunlight. In fact, too much sunlight can be harmful. Choose a spot that receives indirect or filtered light.
* Cool Temperature: Most mushroom species prefer temperatures between 60-75°F (15-24°C).
* High Humidity: Mushrooms thrive in humid environments. Aim for a humidity level of 80-90%.
8. Maintaining Humidity: Use your spray bottle to mist the inside of the bag regularly, especially if you live in a dry climate. The goal is to keep the substrate moist but not waterlogged. You should see condensation forming on the inside of the bag.
9. Monitoring and Patience: Now comes the waiting game! Check your fruiting chamber daily for signs of contamination or dryness. Be patient, as it can take several weeks for the mycelium to fully colonize the substrate and for mushrooms to start forming.
Troubleshooting Tips
Even with the best preparation, things can sometimes go wrong. Here are a few common problems and how to address them:
* Contamination: If you see mold or other unwanted growth in your fruiting chamber, it’s likely contaminated. Remove the contaminated area immediately and try to improve ventilation and hygiene. If the contamination is widespread, you may need to discard the entire batch.
* Dryness: If the substrate is drying out, mist it more frequently. You can also add a layer of damp perlite to the bottom of the bag to increase humidity.
* Lack of Airflow: If the air inside the bag feels stagnant, increase ventilation by opening the bag further or adding a small fan.
* Slow Growth: If the mycelium is growing slowly, make sure the temperature is within the optimal range for your chosen mushroom species. You can also try adding a small amount of nutrient-rich supplement to the substrate.
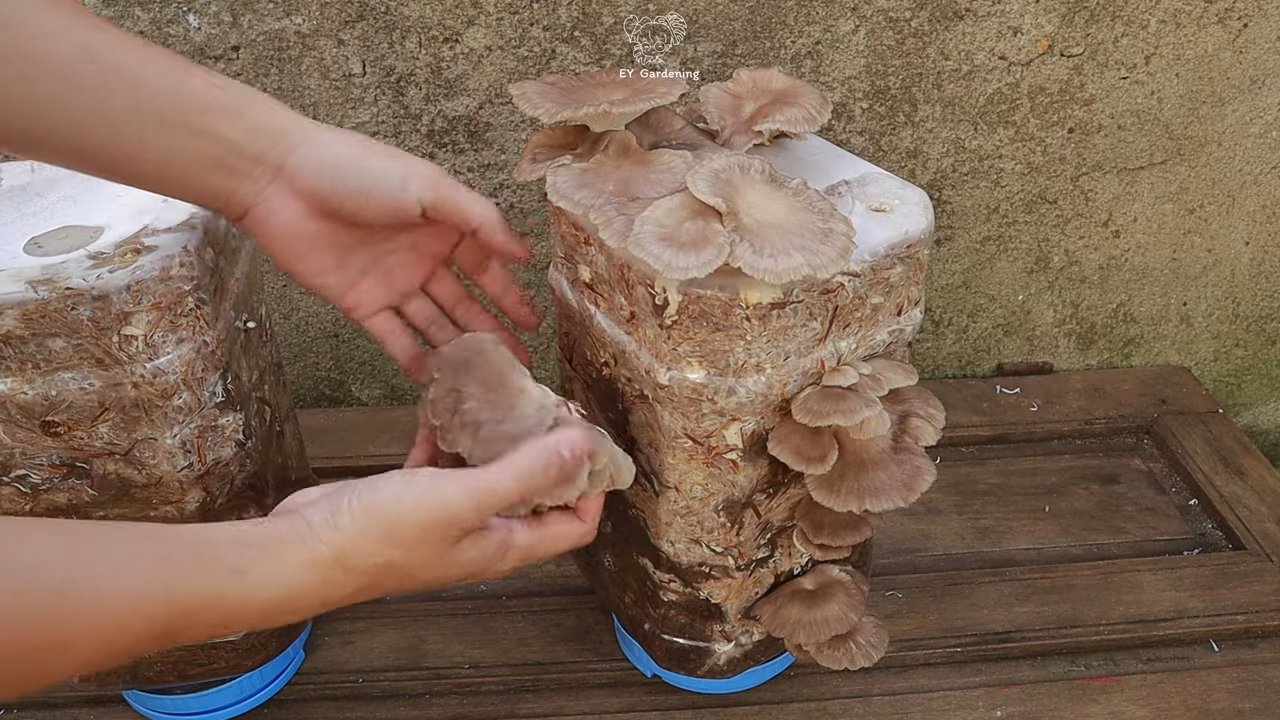
Harvesting Your Mushrooms
The moment you’ve been waiting for! Once your mushrooms have reached their mature size (usually when the caps have fully opened), it’s time to harvest.
* Gently Twist and Pull: Grasp the base of the mushroom and gently twist and pull it away from the substrate.
* Avoid Damaging the Substrate: Be careful not to damage the surrounding substrate when harvesting.
* Harvest All Mushrooms at Once: It’s best to harvest all of the mushrooms in a cluster at the same time.
Enjoying Your Homegrown Mushrooms
Congratulations! You’ve successfully grown your own mushrooms. Now it’s time to enjoy the fruits (or rather, fungi) of your labor.
* Store Properly: Store your harvested mushrooms in a paper bag in the refrigerator. They should last for several days.
* Cook Thoroughly: Always cook mushrooms thoroughly before eating them.
* Experiment with Recipes: Get creative in the kitchen! Mushrooms are incredibly versatile and can be used in a wide variety of dishes.
Second Flush and Beyond
After harvesting your first flush of mushrooms, you can often get a second (or even third) flush from the same substrate. Simply continue to maintain humidity and airflow, and you
Conclusion
So, there you have it! This simple, yet incredibly effective, mushroom growing hack is a game-changer for anyone looking to cultivate their own delicious fungi at home. Forget expensive kits and complicated setups. This method is all about accessibility, sustainability, and, most importantly, results. We’ve shown you how to leverage readily available materials and a little bit of patience to unlock a world of fresh, homegrown mushrooms.
Why is this a must-try? Because it empowers you to take control of your food source, reduce your reliance on store-bought produce, and experience the unique satisfaction of nurturing life from scratch. Imagine the pride of serving a dish featuring mushrooms you personally cultivated! Beyond the culinary benefits, this project offers a fascinating glimpse into the world of mycology, fostering a deeper appreciation for the intricate processes of nature.
But don’t stop there! This method is ripe for experimentation. Try different types of substrate, such as coffee grounds mixed with straw, or even shredded cardboard. Explore various mushroom species suited to indoor cultivation, like oyster mushrooms (a great beginner choice), shiitake, or even the more adventurous lion’s mane. Adjust the humidity and temperature levels to optimize growth for your chosen variety. The possibilities are truly endless.
We encourage you to embark on this mushroom growing adventure. It’s a rewarding experience that connects you with nature and provides a sustainable source of delicious food. Don’t be afraid to get your hands dirty, embrace the learning process, and most importantly, have fun!
Once you’ve successfully harvested your first batch of homegrown mushrooms, we’d love to hear about your experience. Share your photos, tips, and variations in the comments below. Let’s build a community of mushroom enthusiasts and learn from each other’s successes (and even the occasional setbacks!). Your insights could inspire others to take the plunge and discover the joys of DIY mushroom cultivation. This **mushroom growing hack** is more than just a technique; it’s a gateway to a world of flavor, sustainability, and personal fulfillment. So, what are you waiting for? Get growing!
Frequently Asked Questions (FAQ)
What types of mushrooms can I grow using this method?
The best mushrooms for beginners using this method are oyster mushrooms. They are relatively easy to cultivate and tolerate a wider range of environmental conditions. Shiitake mushrooms are another good option, but they require a bit more patience and attention to detail. Lion’s mane mushrooms are also gaining popularity for home cultivation, but they can be slightly more challenging. Avoid trying to grow morels or other wild-foraged mushrooms using this method, as they have very specific and complex growing requirements that are difficult to replicate indoors. Always research the specific needs of the mushroom species you choose to ensure success.
What is the best substrate to use?
The ideal substrate depends on the type of mushroom you’re growing. For oyster mushrooms, straw is a popular and readily available choice. You can also use coffee grounds mixed with straw, or even shredded cardboard. Shiitake mushrooms typically prefer hardwood sawdust or wood chips. It’s crucial to properly pasteurize or sterilize your substrate before inoculation to eliminate competing molds and bacteria. Pasteurization involves heating the substrate to a temperature that kills harmful organisms without destroying beneficial ones, while sterilization involves heating to a higher temperature to kill all organisms.
How do I pasteurize or sterilize my substrate?
Pasteurization can be achieved by soaking your substrate in hot water (around 160-180°F) for 1-2 hours. For larger quantities, you can use a large pot or even a clean trash can. Sterilization requires a pressure cooker or autoclave. The substrate is placed in jars or bags and then heated under pressure for a specific amount of time, depending on the size of the container and the type of substrate. Always follow safety precautions when working with hot water or pressure cookers.
How do I know if my substrate is contaminated?
Contamination is a common problem in mushroom cultivation. Look for signs of mold, such as green, black, or orange spots. A sour or unpleasant odor is another indication of contamination. If you suspect contamination, it’s best to discard the affected substrate to prevent the spread of mold to other cultures. Proper pasteurization or sterilization is essential to minimize the risk of contamination.
How long does it take for mushrooms to grow?
The time it takes for mushrooms to grow depends on the species, the substrate, and the environmental conditions. Oyster mushrooms typically fruit within 1-2 weeks after inoculation, while shiitake mushrooms can take several months. Maintaining optimal humidity and temperature levels is crucial for faster growth.
What are the ideal temperature and humidity levels?
Oyster mushrooms generally prefer temperatures between 60-75°F and high humidity (85-95%). Shiitake mushrooms prefer slightly cooler temperatures (50-65°F) and similar humidity levels. You can use a humidifier or a spray bottle to maintain the desired humidity. A thermometer and hygrometer can help you monitor the temperature and humidity levels in your growing area.
How often should I water my mushrooms?
Watering frequency depends on the humidity levels and the type of substrate. Generally, you should mist your mushrooms daily to keep them moist but not waterlogged. Avoid spraying water directly onto the mushroom caps, as this can cause them to rot. Instead, mist the surrounding air and the substrate.
How do I harvest my mushrooms?
Harvest your mushrooms when the caps are fully developed but before they start to release spores. Gently twist or cut the mushrooms from the substrate. Avoid pulling them out, as this can damage the mycelium and prevent future flushes.
Can I get multiple flushes from the same substrate?
Yes, you can typically get multiple flushes of mushrooms from the same substrate. After harvesting the first flush, soak the substrate in water for a few hours to rehydrate it. Then, return it to the growing area and maintain the optimal conditions. You may get several flushes from the same substrate, but the yield will typically decrease with each subsequent flush.
Where can I buy mushroom spawn?
Mushroom spawn can be purchased from online retailers specializing in mushroom cultivation supplies. You can also find spawn at some local nurseries or garden centers. Make sure to buy spawn from a reputable source to ensure its quality and viability.
Is this mushroom growing hack safe?
Yes, this **mushroom growing hack** is generally safe, but it’s important to take certain precautions. Always use clean materials and equipment to prevent contamination. Avoid growing mushrooms in areas where pesticides or other chemicals have been used. And most importantly, only consume mushrooms that you have positively identified as edible. If you are unsure about the identity of a mushroom, do not eat it.
Leave a Comment