
Black tomato growing tips are what you need to unlock the secrets to cultivating these intriguing and delicious fruits right in your own backyard! Have you ever seen those deep, almost gothic-looking tomatoes at the farmer’s market and wondered how they achieve that unique color? Well, wonder no more! This article is your ultimate guide to successfully growing these beauties.
The allure of the black tomato isn’t just its striking appearance. These varieties, often heirlooms, boast a rich, complex flavor profile that sets them apart from your average red tomato. Their history is fascinating, with many originating from Eastern Europe and Russia, where they’ve been cherished for generations for their unique taste and nutritional benefits. Imagine impressing your friends and family with salads and sauces made from tomatoes you grew yourself, bursting with flavor and a touch of the exotic!
But let’s be honest, growing black tomatoes can sometimes feel like a bit of a challenge. They can be a little more demanding than other varieties, requiring specific conditions to truly thrive. That’s where these DIY tricks and hacks come in. I’m going to share my tried-and-true methods for ensuring you get a bountiful harvest of these dark delights. From soil preparation to pest control, I’ll cover everything you need to know to master black tomato growing tips and enjoy the satisfaction of harvesting your own homegrown treasures. So, grab your gardening gloves, and let’s get started!
Growing Gorgeous Black Tomatoes: A DIY Guide for the Home Gardener
Hey there, fellow tomato enthusiasts! I’m so excited to share my tried-and-true methods for growing those stunning, almost-mystical black tomatoes. They’re not just visually striking; their flavor is complex, rich, and absolutely delicious. Trust me, once you taste a homegrown black tomato, you’ll be hooked! This guide will walk you through everything you need to know, from seed starting to harvesting those beauties.
Choosing Your Black Tomato Variety
Before we dive into the nitty-gritty, let’s talk varieties. “Black tomato” isn’t just one type; it’s a category encompassing several cultivars, each with its own unique characteristics. Here are a few of my favorites:
* Black Krim: This is probably the most popular and widely available black tomato. It’s known for its slightly flattened shape, deep mahogany color, and intensely sweet and smoky flavor. It’s a good all-around choice for slicing, salads, and sauces.
* Cherokee Purple: While technically more of a dusky rose-purple than true black, Cherokee Purple is a heritage variety with a devoted following. It’s large, juicy, and has a complex, slightly acidic flavor that’s simply divine.
* Black Prince: This Russian heirloom is a smaller, more compact plant, making it a good option for smaller gardens or containers. The fruits are smaller, too, but they pack a punch of flavor. They’re known for their rich, earthy taste.
* Paul Robeson: Another Russian variety, Paul Robeson is named after the famous singer and actor. It produces medium-sized, slightly flattened fruits with a deep, smoky flavor. It’s a bit more finicky than some other varieties, but the flavor is worth the effort.
* Japanese Black Trifele: This pear-shaped tomato is a real showstopper. It’s a beautiful dark mahogany color and has a sweet, slightly tangy flavor. It’s also a good producer.
Pro Tip: Do some research and choose a variety that suits your climate and growing conditions. Some varieties are more heat-tolerant than others, while some are better suited for cooler climates.
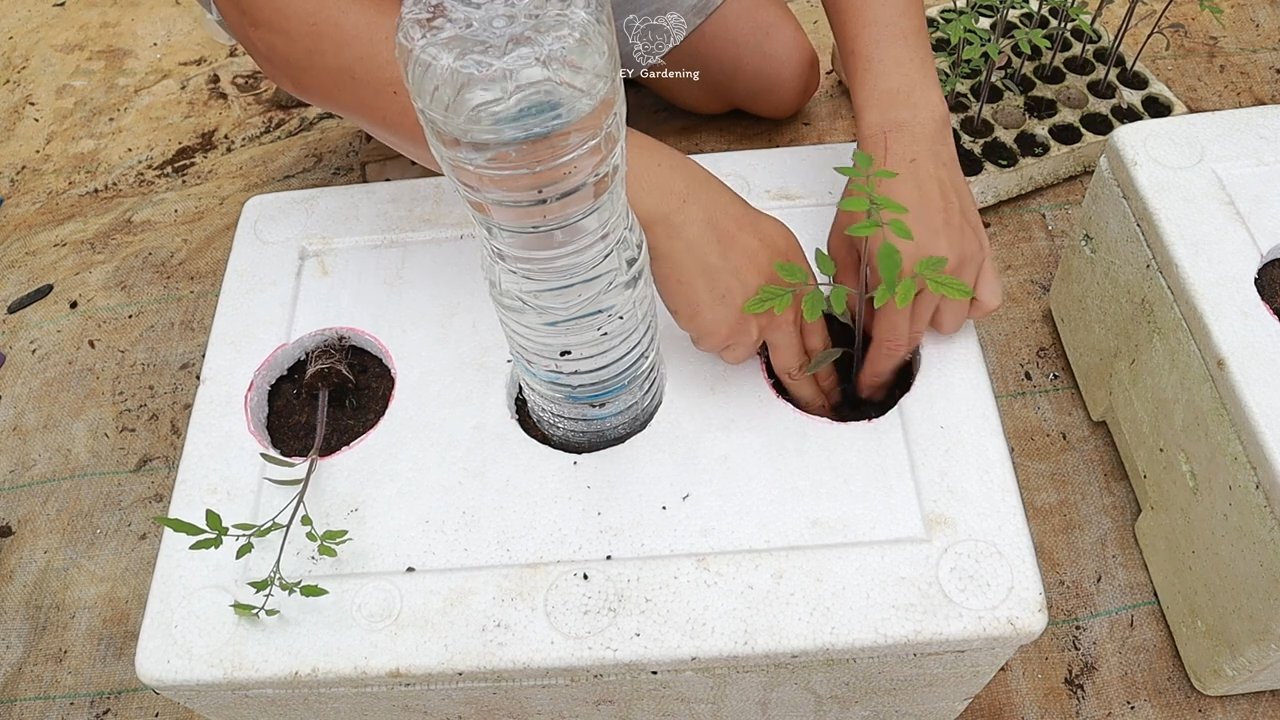
Starting Your Black Tomato Seeds
I always recommend starting your tomato seeds indoors, especially if you live in a region with a short growing season. This gives your plants a head start and allows them to develop a strong root system before they’re exposed to the elements.
What You’ll Need:
* Tomato seeds (of your chosen black tomato variety)
* Seed starting trays or small pots
* Seed starting mix (a sterile, lightweight mix specifically designed for starting seeds)
* A heat mat (optional, but highly recommended)
* A grow light (essential for strong, healthy seedlings)
* A spray bottle filled with water
Step-by-Step Instructions:
1. Prepare your seed starting trays or pots: Fill each cell or pot with seed starting mix, leaving about half an inch of space at the top. Gently tap the trays or pots to settle the mix.
2. Sow your seeds: Place 2-3 seeds in the center of each cell or pot. Cover the seeds with a thin layer of seed starting mix (about 1/4 inch).
3. Water gently: Use a spray bottle to moisten the seed starting mix. Be careful not to overwater, as this can lead to damping off (a fungal disease that can kill seedlings).
4. Provide warmth: Place the seed starting trays or pots on a heat mat. This will help to speed up germination. If you don’t have a heat mat, you can place them in a warm spot in your house.
5. Provide light: Place the seed starting trays or pots under a grow light. Keep the light on for 14-16 hours per day. Adjust the height of the light as the seedlings grow, keeping it a few inches above the plants.
6. Monitor moisture levels: Check the seed starting mix daily and water as needed to keep it moist but not soggy.
7. Thin the seedlings: Once the seedlings have developed their first true leaves (the leaves that appear after the initial seed leaves), thin them to one plant per cell or pot. Choose the strongest, healthiest-looking seedling and snip off the others at the soil line.
Transplanting Your Black Tomato Seedlings
Once your seedlings are about 6-8 inches tall and the weather has warmed up (nighttime temperatures consistently above 50°F), it’s time to transplant them outdoors.
What You’ll Need:
* Your tomato seedlings
* Gardening gloves
* A trowel or shovel
* Tomato cages or stakes
* Compost or well-rotted manure
* Tomato fertilizer (organic is best)
* Mulch (straw, wood chips, or shredded leaves)
Step-by-Step Instructions:
1. Harden off your seedlings: Before transplanting, you need to harden off your seedlings. This means gradually exposing them to outdoor conditions over a period of 7-10 days. Start by placing them in a sheltered spot outdoors for a few hours each day, gradually increasing the amount of time they spend outside.
2. Prepare your planting site: Choose a sunny spot in your garden that gets at least 6-8 hours of sunlight per day. Amend the soil with compost or well-rotted manure to improve drainage and fertility.
3. Dig your planting holes: Dig holes that are slightly larger than the root balls of your seedlings. Space the holes about 2-3 feet apart, depending on the variety of tomato you’re growing.
4. Plant your seedlings: Gently remove the seedlings from their pots or trays. If the roots are tightly bound, gently loosen them with your fingers. Place the seedlings in the planting holes and backfill with soil.
5. Water thoroughly: Water the seedlings thoroughly after planting.
6. Add support: Install tomato cages or stakes to support the plants as they grow. Black tomato varieties can get quite large and heavy, so it’s important to provide them with adequate support.
7. Fertilize: Apply a tomato fertilizer according to the package directions. I prefer to use an organic fertilizer, as it’s gentler on the plants and the environment.
8. Mulch: Apply a layer of mulch around the base of the plants to help retain moisture, suppress weeds, and regulate soil temperature.
Caring for Your Black Tomato Plants
Once your black tomato plants are established, it’s important to provide them with proper care to ensure a bountiful harvest.
Watering: Water your tomato plants deeply and regularly, especially during hot, dry weather. Aim to water at the base of the plants to avoid wetting the foliage, which can lead to fungal diseases.
Fertilizing: Continue to fertilize your tomato plants every 2-3 weeks throughout the growing season.
Pruning: Prune your tomato plants regularly to remove suckers (the small shoots that grow in the crotch between the main stem and the branches). Pruning helps to improve air circulation and prevent disease. It also encourages the plant to focus its energy on producing fruit rather than foliage.
Pest and Disease Control: Keep an eye out for common tomato pests and diseases, such as aphids, tomato hornworms, and early blight. Take action promptly to control any problems that arise. I prefer to use organic pest and disease control methods whenever possible.
Sun Scald Prevention: Black tomatoes, due to their dark color, can be more susceptible to sun scald than red tomatoes. Make sure your plants have adequate foliage cover to protect the fruits from direct sunlight. You can also use shade cloth to provide additional protection during periods of intense heat.
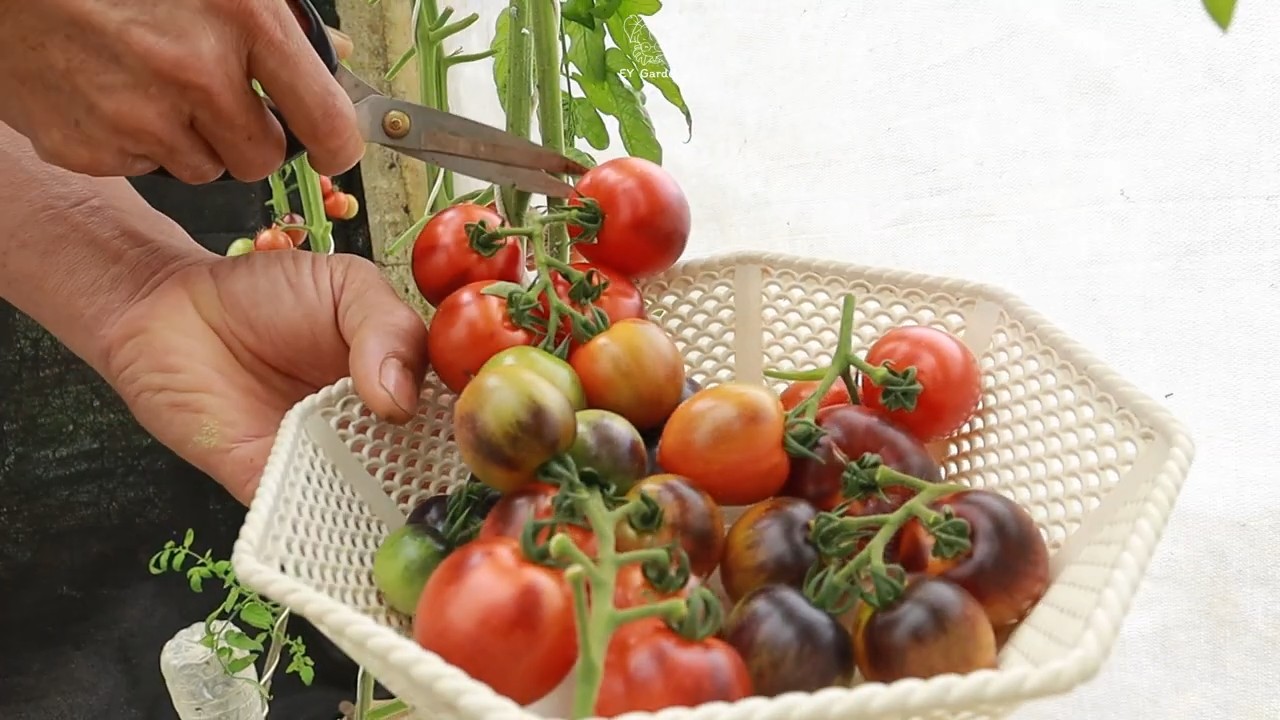
Harvesting Your Black Tomatoes
The moment you’ve been waiting for! Harvesting your black tomatoes is the most rewarding part of the process.
When to Harvest: Black tomatoes are ripe when they are a deep, rich color and slightly soft to the touch. The color will vary depending on the variety, but generally, they should be a deep mahogany, purple, or almost black. Don’t wait until they are completely soft, as they will be overripe.
How to Harvest: Gently twist the tomato from the vine. If it doesn’t come off easily, use pruning shears to cut the stem just above the fruit.
Storing: Store your harvested black tomatoes at room temperature. Avoid refrigerating them, as this can affect their flavor and texture. They will keep for several days at room temperature.
Enjoying: Now for the best part – eating your delicious, homegrown black tomatoes! They’re fantastic sliced and eaten fresh, added to salads, used in sauces, or grilled. The possibilities are endless!
Troubleshooting Common Problems
Even with the best care, you might encounter some problems while growing black tomatoes. Here are a few common issues and how to address them:
* Blossom End Rot: This is a common problem that causes the bottom of the tomato to turn black and le
Conclusion
So, there you have it! Mastering the art of growing black tomatoes isn’t just about following a recipe; it’s about understanding the nuances of these unique fruits and providing them with the specific care they crave. We’ve explored the essential elements, from selecting the right variety and preparing the soil to providing optimal sunlight and consistent watering. But the real magic lies in the DIY trick we’ve unveiled: the Epsom salt foliar spray.
Why is this a must-try? Because it’s a game-changer for black tomato production. Epsom salt, rich in magnesium sulfate, addresses a common deficiency that can plague these plants, leading to blossom-end rot, stunted growth, and lackluster fruit. By providing a readily available source of magnesium, you’re essentially giving your black tomatoes a nutritional boost, enabling them to thrive and produce an abundance of those deeply colored, intensely flavored fruits.
Think of it as a secret weapon in your gardening arsenal. It’s simple, cost-effective, and yields remarkable results. You’ll notice stronger stems, healthier leaves, and, most importantly, a significant increase in the size and quality of your black tomato harvest. The difference can be truly astounding.
But don’t stop there! Experiment with variations to tailor the technique to your specific garden conditions. Consider adding a small amount of seaweed extract to your Epsom salt spray for an extra dose of micronutrients. Or, if you’re growing your black tomatoes in containers, you might want to supplement with a magnesium-rich fertilizer throughout the growing season. Remember to always monitor your plants closely and adjust your approach as needed.
Beyond the Epsom salt spray, remember the other key elements we discussed. Consistent watering is crucial, especially during fruit development. Mulching helps retain moisture and suppress weeds. And providing adequate support, whether it’s staking or caging, will prevent your plants from collapsing under the weight of their bountiful harvest.
Growing black tomatoes is a rewarding experience, and with the right knowledge and a little bit of effort, you can enjoy a delicious and unique addition to your garden. The deep, smoky flavor of these tomatoes is unlike anything you’ll find in the supermarket, and the satisfaction of harvesting your own homegrown produce is simply unparalleled.
We wholeheartedly encourage you to try this DIY trick and embark on your own black tomato growing adventure. Don’t be afraid to experiment, adapt, and learn from your experiences. And most importantly, share your results with us! We’d love to hear about your successes, your challenges, and any variations you’ve discovered along the way. Post your photos and stories in the comments section below. Let’s build a community of black tomato enthusiasts and learn from each other’s expertise. Happy gardening!
Frequently Asked Questions (FAQs)
What exactly is Epsom salt, and why is it beneficial for black tomatoes?
Epsom salt is a naturally occurring mineral compound consisting of magnesium sulfate. Magnesium is an essential nutrient for plant growth, playing a vital role in photosynthesis, chlorophyll production, and nutrient uptake. Sulfate, on the other hand, aids in the absorption of nitrogen, phosphorus, and potassium – all crucial elements for healthy tomato development. Black tomatoes, like other tomato varieties, can sometimes suffer from magnesium deficiencies, leading to problems like blossom-end rot (a dark, sunken spot on the bottom of the fruit), yellowing leaves, and stunted growth. Epsom salt provides a readily available source of magnesium, helping to prevent and correct these deficiencies, resulting in healthier, more productive plants and better-quality fruit.
How often should I apply the Epsom salt foliar spray to my black tomato plants?
A good rule of thumb is to apply the Epsom salt foliar spray every two to three weeks, starting when the plants begin to set fruit. You can continue this application throughout the growing season. However, it’s important to observe your plants closely. If you notice signs of magnesium deficiency, such as yellowing leaves or blossom-end rot, you can increase the frequency of application to once a week until the symptoms subside. Conversely, if your plants appear healthy and vigorous, you may be able to reduce the frequency to once a month. Avoid over-application, as excessive magnesium can interfere with the uptake of other nutrients.
What is the best time of day to apply the Epsom salt foliar spray?
The best time to apply the Epsom salt foliar spray is in the early morning or late evening, when the sun is not at its strongest. This will help prevent the leaves from burning, as the spray can act as a magnifying glass in direct sunlight. Also, avoid spraying during windy conditions, as the spray can drift and potentially harm other plants. Choose a calm day when the leaves will have ample time to absorb the solution before it evaporates.
Can I use Epsom salt as a soil amendment instead of a foliar spray?
Yes, you can use Epsom salt as a soil amendment, but a foliar spray is generally more effective for addressing immediate magnesium deficiencies. When using it as a soil amendment, mix about one tablespoon of Epsom salt per gallon of water and apply it to the base of the plant. You can do this every few weeks. However, it’s important to test your soil before adding Epsom salt, as excessive magnesium can create imbalances in the soil and hinder the uptake of other nutrients. A soil test will reveal whether your soil is actually deficient in magnesium and whether Epsom salt is necessary.
Are there any precautions I should take when using Epsom salt on my black tomato plants?
Yes, there are a few precautions to keep in mind. First, always use Epsom salt that is specifically labeled for horticultural use. Avoid using Epsom salt intended for bath use, as it may contain additives that could harm your plants. Second, avoid over-application. Excessive magnesium can interfere with the uptake of other nutrients, such as calcium and potassium. Third, test your soil regularly to monitor nutrient levels and ensure that you’re not creating imbalances. Finally, always wear gloves and eye protection when handling Epsom salt, as it can be irritating to the skin and eyes.
What are some other tips for growing healthy black tomatoes?
Besides using Epsom salt, there are several other things you can do to ensure healthy black tomato plants. Choose a sunny location with well-drained soil. Amend the soil with compost or other organic matter to improve its fertility and drainage. Water regularly, especially during fruit development. Mulch around the plants to retain moisture and suppress weeds. Provide support, such as staking or caging, to prevent the plants from collapsing under the weight of their fruit. Fertilize regularly with a balanced fertilizer. And finally, monitor your plants for pests and diseases and take action promptly if you notice any problems.
What are some common problems that affect black tomato plants, and how can I prevent them?
Some common problems that affect black tomato plants include blossom-end rot, early blight, and tomato hornworms. Blossom-end rot can be prevented by ensuring consistent watering and providing adequate calcium and magnesium. Early blight can be prevented by practicing good sanitation, such as removing infected leaves and avoiding overhead watering. Tomato hornworms can be controlled by handpicking them off the plants or using Bacillus thuringiensis (Bt), a natural insecticide. Regular monitoring and prompt action are key to preventing and controlling these problems.
What varieties of black tomatoes are best for beginners?
Several varieties of black tomatoes are relatively easy to grow and are a good choice for beginners. ‘Black Krim’ is a popular variety known for its rich, smoky flavor and good disease resistance. ‘Cherokee Purple’ is another excellent choice, with a sweet, slightly tangy flavor and a beautiful dark purple color. ‘Black Prince’ is a smaller, more compact variety that is well-suited for container gardening. And ‘Paul Robeson’ is a Russian heirloom variety with a complex, earthy flavor. Experiment with different varieties to find the ones that you enjoy the most and that thrive in your local climate.

Leave a Comment