
Sugarcane growing in plastic bottles might sound like something out of a sci-fi movie, but trust me, it’s a surprisingly simple and rewarding DIY project! Have you ever dreamed of sipping on freshly squeezed sugarcane juice, knowing you grew the star ingredient yourself? Well, get ready to turn that dream into reality, even if you don’t have acres of farmland.
Sugarcane has a rich history, dating back thousands of years to Southeast Asia. It gradually spread across the globe, becoming a vital crop and a symbol of sweetness and prosperity in many cultures. While traditionally grown in large fields, modern ingenuity allows us to enjoy this tropical treat in our own homes, regardless of space constraints.
Why should you try this DIY trick? Because it’s a fantastic way to recycle those plastic bottles cluttering your home, learn about plant propagation, and enjoy the satisfaction of growing your own food. Plus, imagine the bragging rights when you offer friends a glass of homemade sugarcane juice! This method of sugarcane growing in plastic bottles is perfect for urban gardeners, apartment dwellers, or anyone looking for a fun and sustainable project. I’m excited to share my tips and tricks to help you succeed!
Growing Sugarcane in Plastic Bottles: A Sweet DIY Project
Hey there, fellow gardening enthusiasts! Ever thought about growing your own sugarcane? It might sound like a tropical dream best left to large plantations, but guess what? You can absolutely cultivate this sweet treat right in your backyard (or even on your balcony!) using recycled plastic bottles. I’m going to walk you through the entire process, step-by-step, so you can enjoy fresh, homegrown sugarcane. Let’s get started!
What You’ll Need
Before we dive in, let’s gather our supplies. This is a relatively low-cost project, especially since we’re repurposing plastic bottles.
* Sugarcane stalks (seed canes): You can usually find these at local nurseries, agricultural supply stores, or even from a friend who already grows sugarcane. Look for healthy stalks with visible nodes (the little bumps where roots and shoots will emerge).
* Large plastic bottles: Think 2-liter soda bottles, juice bottles, or even larger water bottles. The bigger, the better, as sugarcane needs room to grow.
* Potting mix: A well-draining potting mix is crucial. You can buy a pre-made mix or create your own by combining garden soil, compost, and perlite or vermiculite.
* Sharp knife or pruning shears: For cutting the sugarcane stalks.
* Drill or sharp object: To create drainage holes in the plastic bottles.
* Water: For watering the sugarcane.
* Optional: Fertilizer: A balanced fertilizer can help boost growth.
* Gloves: To protect your hands.
Preparing the Plastic Bottles
This is a crucial step to ensure proper drainage and support for your sugarcane plants.
1. Clean the bottles: Thoroughly wash the plastic bottles with soap and water to remove any residue. Rinse them well and let them dry completely.
2. Cut the bottles: There are a couple of ways to do this, depending on the size of your bottles and your preference.
* Option 1 (For larger bottles): Cut the bottle in half horizontally. You’ll use the bottom half as the planting container. The top half can be discarded or used for another project.
* Option 2 (For smaller bottles): Cut off the top third of the bottle, creating a wide opening. This method is good if you want to keep the bottle relatively tall.
3. Create drainage holes: This is super important! Sugarcane needs well-draining soil to prevent root rot. Use a drill or a sharp object (like a screwdriver or nail) to create several drainage holes in the bottom of the bottle. I usually aim for at least 5-6 holes, spaced evenly.
4. Optional: Add a support structure: If you’re using taller bottles, you might want to add a support structure to help the sugarcane stay upright as it grows. You can use bamboo stakes, wooden dowels, or even sturdy twigs. Insert them into the soil after planting.
Preparing the Sugarcane Stalks
Now, let’s get those sugarcane stalks ready for planting!
1. Select healthy stalks: Choose stalks that are firm, plump, and free from any signs of disease or damage. The nodes should be visible and slightly swollen.
2. Cut the stalks into sections: Using a sharp knife or pruning shears, cut the sugarcane stalks into sections, each containing at least two nodes. I usually aim for sections that are about 6-8 inches long.
3. Optional: Treat the cut ends: To prevent fungal infections, you can dip the cut ends of the sugarcane sections in a fungicide solution. This is especially helpful if you live in a humid climate. You can also use cinnamon powder as a natural fungicide.
4. Callus the cut ends (optional but recommended): Allow the cut ends to callus over for a day or two before planting. This helps to prevent rot. Simply place the cut sections in a cool, dry place and let them air dry.
Planting the Sugarcane
Alright, the moment we’ve been waiting for! Let’s get those sugarcane sections planted in our prepared plastic bottles.
1. Fill the bottles with potting mix: Fill the plastic bottles with potting mix, leaving about an inch of space at the top. Gently press down on the soil to remove any air pockets.
2. Plant the sugarcane sections: There are two main ways to plant the sugarcane sections:
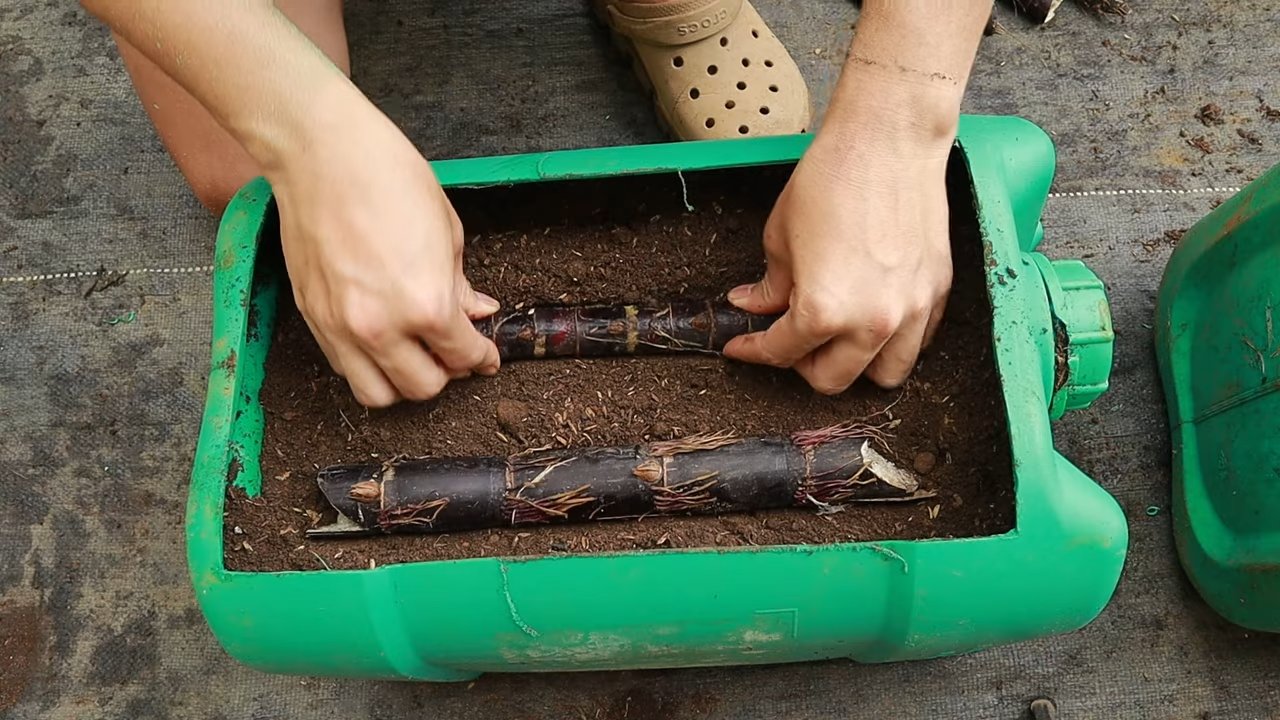
* Horizontal planting: Lay the sugarcane section horizontally on top of the soil, with the nodes facing upwards. Cover the section with about an inch of soil. This method encourages multiple shoots to emerge from the nodes.
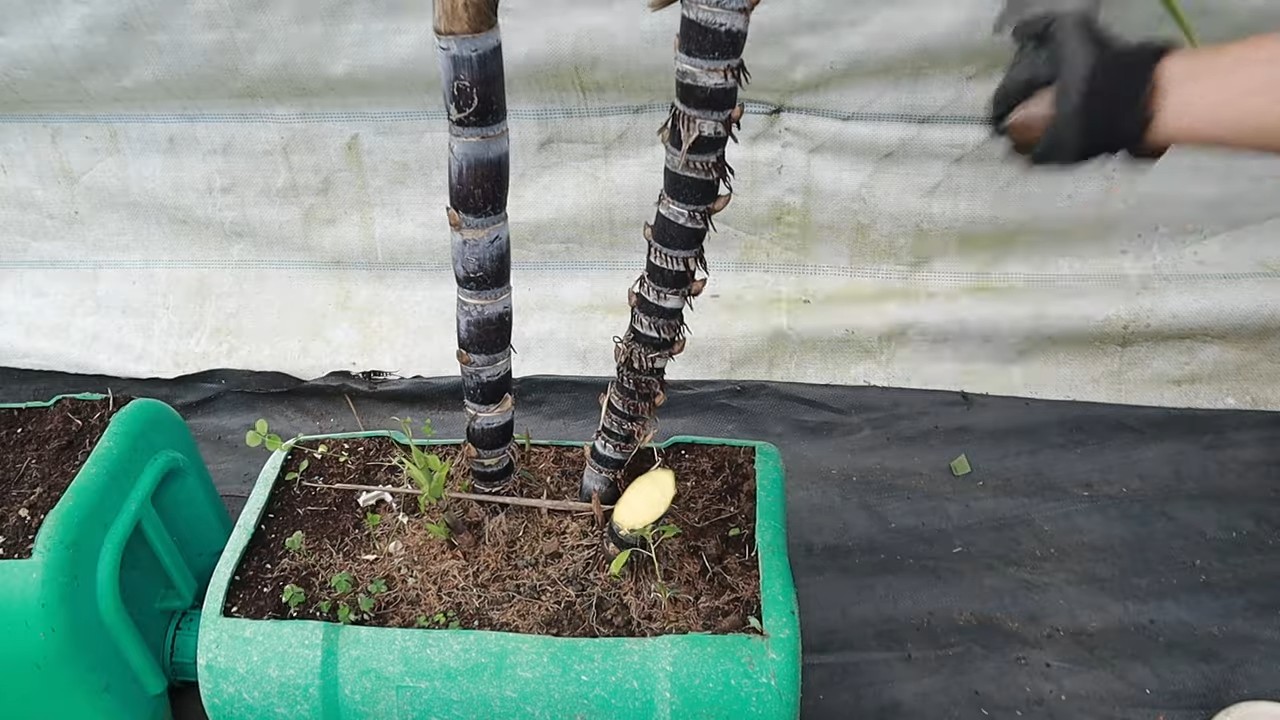
* Vertical planting: Insert the sugarcane section vertically into the soil, with one node buried and the other exposed. This method is good if you want to focus on a single, strong shoot.
I personally prefer horizontal planting, as it tends to result in more shoots and a bushier plant.
3. Water thoroughly: After planting, water the soil thoroughly until water drains out of the drainage holes. This helps to settle the soil and provide moisture to the sugarcane sections.
4. Place in a sunny location: Sugarcane needs plenty of sunlight to thrive. Place the plastic bottles in a location that receives at least 6-8 hours of direct sunlight per day. A south-facing window or a sunny balcony is ideal.
Caring for Your Sugarcane
Now that your sugarcane is planted, it’s time to provide the care it needs to grow and flourish.
1. Watering: Sugarcane needs consistent moisture, especially during the growing season. Water the plants regularly, keeping the soil consistently moist but not waterlogged. Check the soil moisture by sticking your finger into the soil. If the top inch feels dry, it’s time to water. In hot weather, you may need to water daily.
2. Fertilizing: To encourage healthy growth, fertilize your sugarcane plants every 2-3 weeks with a balanced fertilizer. Follow the instructions on the fertilizer package. You can also use organic fertilizers like compost tea or fish emulsion.
3. Weeding: Keep the plastic bottles free from weeds. Weeds can compete with the sugarcane for nutrients and water.
4. Pest and disease control: Keep an eye out for any signs of pests or diseases. Common sugarcane pests include aphids, mealybugs, and sugarcane borers. Treat infestations promptly with insecticidal soap or neem oil. Fungal diseases can be prevented by ensuring good air circulation and avoiding overwatering.
5. Support: As the sugarcane grows taller, it may need support to prevent it from falling over. Use bamboo stakes, wooden dowels, or even sturdy twigs to provide support. Tie the sugarcane stalks to the supports with twine or plant ties.
6. Pruning: Remove any dead or yellowing leaves to keep the plants healthy and attractive.
Harvesting Your Sugarcane
After several months of care, your sugarcane will be ready for harvest!
1. Timing: Sugarcane typically takes 9-12 months to mature, depending on the climate and growing conditions. The stalks will be thick and hard when they are ready to harvest.
2. Harvesting: Use a sharp knife or machete to cut the sugarcane stalks at the base.
3. Processing: To extract the juice, you can use a sugarcane juicer, a mortar and pestle, or even a blender. Peel the outer layer of the stalk and cut it into smaller pieces. Then, juice the pieces and enjoy the sweet, refreshing juice! You can also chew on the sugarcane stalks directly to extract the juice.
Troubleshooting
Even with the best care, you might encounter some challenges along the way. Here are a few common problems and how to address them:
* Yellowing leaves: This could be a sign of overwatering, underwatering, nutrient deficiency, or pest infestation. Check the soil moisture, fertilize the plants, and inspect for pests.
* Slow growth: This could be due to insufficient sunlight, poor soil, or lack of fertilizer. Move the plants to a sunnier location, amend the soil with compost, and fertilize regularly.
* Root rot: This is caused by overwatering and poor drainage. Ensure that the plastic bottles have adequate drainage holes and avoid overwatering.
* Pest infestations: Treat infestations promptly with insecticidal soap or neem oil.
Growing sugarcane in plastic bottles is a fun and rewarding project that allows you to enjoy fresh, homegrown sugarcane, even if you don’t have a lot of space. With a little bit of care and attention, you can successfully cultivate this sweet treat right in your own backyard. Happy gardening!
Conclusion
So, there you have it! Growing sugarcane in plastic bottles isn’t just a quirky gardening experiment; it’s a surprisingly effective and rewarding way to cultivate your own sweet stalks, even with limited space. We’ve explored the step-by-step process, from preparing your bottles and soil to nurturing your sugarcane plants until they’re ready for harvest.
Why is this DIY trick a must-try? Because it democratizes sugarcane cultivation. No longer is this tropical treat confined to large farms and warm climates. With a few repurposed plastic bottles, some well-draining soil, and a sunny spot, you can bring a taste of the tropics to your own balcony, patio, or even a sunny windowsill. It’s a fantastic way to reduce waste by upcycling plastic bottles, learn about plant propagation, and enjoy the satisfaction of growing your own food. Plus, imagine the bragging rights when you offer friends a refreshing glass of homemade sugarcane juice, grown right in your own home!
But the fun doesn’t stop there. Feel free to experiment with different varieties of sugarcane. Some varieties are better suited for container growing than others. Research local nurseries or online suppliers to find sugarcane cuttings that thrive in your region. You can also explore different soil amendments to optimize growth. Try adding compost, aged manure, or even a slow-release fertilizer to provide your sugarcane plants with the nutrients they need to flourish.
Another exciting variation is to create a vertical sugarcane garden by stacking multiple plastic bottles on top of each other. This is a great way to maximize space and create a visually stunning display. Just be sure to provide adequate support for the bottles and ensure that the plants receive enough sunlight.
Don’t be afraid to get creative with your bottle designs, too. Paint them, decorate them with colorful tape, or even create a mosaic pattern. This is a great way to personalize your sugarcane garden and make it a true reflection of your own style.
Ultimately, the key to success with growing sugarcane in plastic bottles is patience and observation. Pay close attention to your plants’ needs, water them regularly, and provide them with plenty of sunlight. With a little bit of care and attention, you’ll be rewarded with a bountiful harvest of sweet, juicy sugarcane.
We are confident that you will find this method of growing sugarcane a fun and rewarding experience. We encourage you to try this DIY trick and share your experience with us! Post photos of your sugarcane plants on social media using #SugarcaneInBottles and tag us so we can see your amazing creations. We’re eager to learn from your successes and challenges, and together, we can spread the joy of growing sugarcane in plastic bottles to gardeners everywhere. Let’s transform discarded plastic into a thriving sugarcane oasis, one bottle at a time!
Frequently Asked Questions (FAQ)
1. What type of plastic bottles are best for growing sugarcane?
The ideal plastic bottles are those that are sturdy and can hold a good amount of soil. Two-liter soda bottles or larger water bottles work well. Ensure the bottles are clean and free of any residue before using them. Darker colored bottles might heat up more in direct sunlight, so clear or lighter-colored bottles are generally preferred. Consider the thickness of the plastic as well; thinner bottles might degrade more quickly under prolonged sun exposure.
2. What kind of soil should I use for growing sugarcane in plastic bottles?
Sugarcane thrives in well-draining soil that is rich in organic matter. A good mix would be equal parts of potting soil, compost, and perlite or vermiculite. The potting soil provides a base, the compost adds nutrients, and the perlite or vermiculite improves drainage and aeration. Avoid using heavy clay soil, as it can become waterlogged and hinder root development. You can also add a slow-release fertilizer to the soil mix to provide a steady supply of nutrients to the sugarcane plants.
3. How much sunlight does sugarcane need when grown in plastic bottles?
Sugarcane requires at least 6-8 hours of direct sunlight per day to thrive. Place your plastic bottle sugarcane garden in a sunny location, such as a south-facing balcony or patio. If you don’t have access to enough natural sunlight, you can supplement with grow lights. Rotate the bottles regularly to ensure that all sides of the plants receive adequate sunlight. Insufficient sunlight can lead to stunted growth and reduced sugar content in the sugarcane stalks.
4. How often should I water sugarcane grown in plastic bottles?
Water sugarcane regularly, especially during hot and dry weather. The soil should be kept consistently moist but not waterlogged. Check the soil moisture level by sticking your finger into the soil. If the top inch feels dry, it’s time to water. Water deeply until excess water drains out of the drainage holes in the bottom of the bottles. Reduce watering during cooler months or when the plants are not actively growing. Overwatering can lead to root rot, so it’s important to strike a balance.
5. How do I fertilize sugarcane grown in plastic bottles?
Sugarcane is a heavy feeder and benefits from regular fertilization. Use a balanced fertilizer with an NPK ratio of 10-10-10 or 14-14-14. Apply the fertilizer according to the package instructions, typically every 4-6 weeks during the growing season. You can also use organic fertilizers, such as compost tea or fish emulsion. Avoid over-fertilizing, as this can burn the roots of the plants. Monitor the plants for signs of nutrient deficiencies, such as yellowing leaves, and adjust the fertilization accordingly.
6. How long does it take for sugarcane to mature when grown in plastic bottles?
Sugarcane typically takes 9-12 months to mature, depending on the variety and growing conditions. The stalks are ready for harvest when they are thick and juicy, and the leaves start to turn brown. You can test the ripeness by cutting a small piece of the stalk and tasting it. If it’s sweet and flavorful, it’s ready to harvest.
7. How do I harvest sugarcane from plastic bottles?
To harvest sugarcane, use a sharp knife or pruning shears to cut the stalks at the base, close to the soil level. Be careful not to damage the roots of the plants. You can then peel the outer layer of the stalks and chew on the sweet, juicy flesh. Alternatively, you can use a sugarcane juicer to extract the juice.
8. Can I grow sugarcane in plastic bottles indoors?
Yes, you can grow sugarcane in plastic bottles indoors, but you’ll need to provide adequate sunlight or grow lights. Place the bottles near a sunny window or use grow lights to supplement the natural light. Ensure that the plants receive at least 6-8 hours of light per day. Indoor sugarcane may not grow as tall or produce as much sugar as outdoor sugarcane, but it can still be a rewarding experience.
9. What are some common pests and diseases that affect sugarcane grown in plastic bottles?
Some common pests that can affect sugarcane include aphids, mealybugs, and sugarcane borers. These pests can be controlled with insecticidal soap or neem oil. Common diseases include rust and smut, which can be prevented by providing good air circulation and avoiding overwatering. If you notice any signs of pests or diseases, treat the plants promptly to prevent them from spreading.
10. Can I reuse the plastic bottles for growing sugarcane again?
Yes, you can reuse the plastic bottles for growing sugarcane again, but it’s important to clean them thoroughly before replanting. Remove any remaining soil and debris, and wash the bottles with soap and water. You can also disinfect the bottles with a diluted bleach solution to kill any pathogens. Allow the bottles to dry completely before reusing them. Inspect the bottles for any cracks or damage, and replace them if necessary.
Leave a Comment