
Hanging Eggplants Upside Down: Sounds a little crazy, right? But trust me, this quirky gardening trick might just be the secret to a healthier, more bountiful eggplant harvest! For centuries, gardeners have been experimenting with innovative techniques to coax the best from their plants, and while I can’t pinpoint the exact origin of this upside-down eggplant method, the spirit of resourceful gardening is as old as agriculture itself.
Why would anyone want to hang their eggplants upside down? Well, the answer lies in a few key benefits. First, it can help protect your precious eggplants from pests and diseases that thrive in soil. By elevating the fruit, you’re creating a barrier against slugs, snails, and soil-borne fungi. Second, hanging eggplants upside down can improve air circulation around the plant, reducing the risk of fungal infections and promoting stronger growth. And finally, some gardeners swear that this method results in larger, more uniformly shaped eggplants.
Let’s face it, growing eggplants can be a bit of a challenge. They’re susceptible to a variety of problems, and getting a good yield can feel like a real victory. That’s why I’m so excited to share this simple yet effective DIY trick with you. Whether you’re a seasoned gardener or just starting out, this guide will walk you through the steps of hanging your eggplants upside down, so you can enjoy a delicious and rewarding harvest. Get ready to turn your eggplant growing game upside down – literally!
DIY: Grow Bountiful Eggplants by Hanging Them Upside Down!
Hey there, fellow gardening enthusiasts! I’m super excited to share a quirky yet incredibly effective method I’ve discovered for growing eggplants: hanging them upside down! Yes, you read that right. It might sound a little crazy, but trust me, this technique can lead to healthier plants, better yields, and even save you some precious garden space. I’ve been experimenting with this for a couple of seasons now, and the results have been fantastic. So, grab your gardening gloves, and let’s dive into the wonderful world of upside-down eggplant growing!
Why Upside Down? The Benefits Explained
Before we get our hands dirty, let’s talk about why this method works. It’s not just a gimmick; there are some solid advantages to growing eggplants upside down:
* Improved Air Circulation: Hanging the plants allows for better airflow around the leaves and stems. This helps to prevent fungal diseases like powdery mildew, which can be a real pain for eggplant growers.
* Reduced Pest Problems: Many ground-dwelling pests have a harder time reaching the plant when it’s hanging. This means fewer aphids, slugs, and other unwanted visitors munching on your precious eggplants.
* Space Saving: If you’re short on garden space, this method is a lifesaver! You can hang your eggplants from a porch, balcony, or even a sturdy tree branch.
* Better Drainage: Upside-down containers naturally drain excess water, preventing root rot, a common problem with container gardening.
* Increased Sunlight Exposure: Hanging plants can be positioned to receive optimal sunlight, which is crucial for healthy growth and fruit production.
* Novelty and Fun: Let’s be honest, it’s just plain cool to see eggplants growing upside down! It’s a great conversation starter and adds a unique touch to your garden.
Materials You’ll Need
Okay, now that you’re convinced (I hope!), let’s gather the supplies. Here’s what you’ll need to get started:
* Eggplant Seedlings: Choose healthy, vigorous seedlings from your local nursery or start your own from seed. I recommend varieties that are known to do well in containers, like ‘Patio Baby’ or ‘Fairy Tale’.
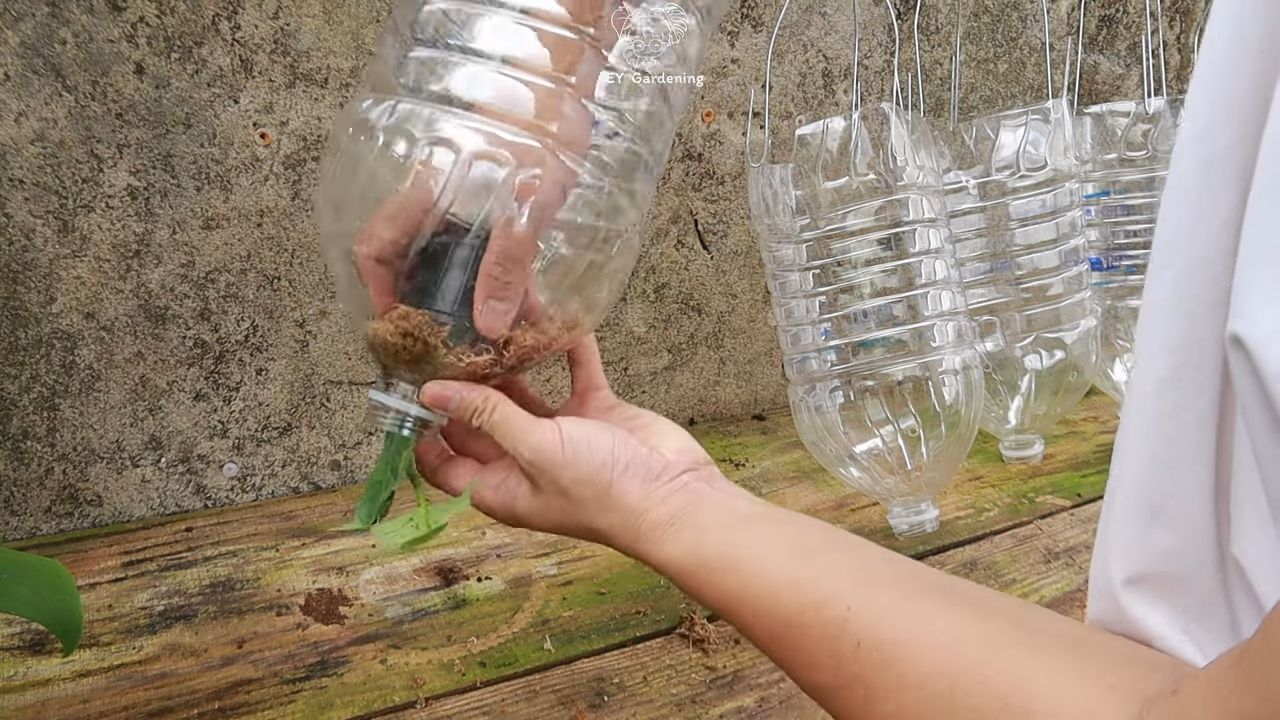
* Large Buckets or Containers: You’ll need containers that are at least 5 gallons in size. Plastic buckets, hanging baskets, or even repurposed containers will work. Make sure they have drainage holes (we’ll modify them later).
* Potting Mix: Use a high-quality potting mix that’s well-draining and rich in nutrients. Avoid using garden soil, as it can become compacted in containers.
* Landscape Fabric or Burlap: This will help to keep the soil from falling out of the hole we’ll create for the plant.
* Sharp Knife or Scissors: For cutting the hole in the container.
* Watering Can or Hose: For watering your plants.
* Fertilizer: A balanced, slow-release fertilizer or liquid fertilizer specifically formulated for vegetables.
* Hanging Hardware: Strong hooks, chains, or rope for hanging the containers. Make sure they can support the weight of the container when it’s full of soil and plants.
* Gloves: To protect your hands.
* Safety Glasses: To protect your eyes when cutting the container.
Step-by-Step Instructions: Creating Your Upside-Down Eggplant Planter
Alright, let’s get to the fun part! Here’s how to create your upside-down eggplant planter:
Phase 1: Preparing the Container
1. Drill Drainage Holes (if needed): If your container doesn’t already have drainage holes, drill several holes in the bottom. This is crucial for preventing waterlogging.
2. Cut the Hole: This is the most important step! Carefully cut a hole in the *bottom* of the container. The hole should be just large enough to accommodate the stem and root ball of your eggplant seedling. I usually aim for a diameter of about 2-3 inches. Be very careful when using the knife or scissors. Safety first!
3. Line the Hole: Cut a piece of landscape fabric or burlap that’s slightly larger than the hole. This will act as a barrier to prevent the soil from falling out. Make a small slit in the center of the fabric and gently push the edges through the hole, creating a sort of “collar.”
Phase 2: Planting the Eggplant
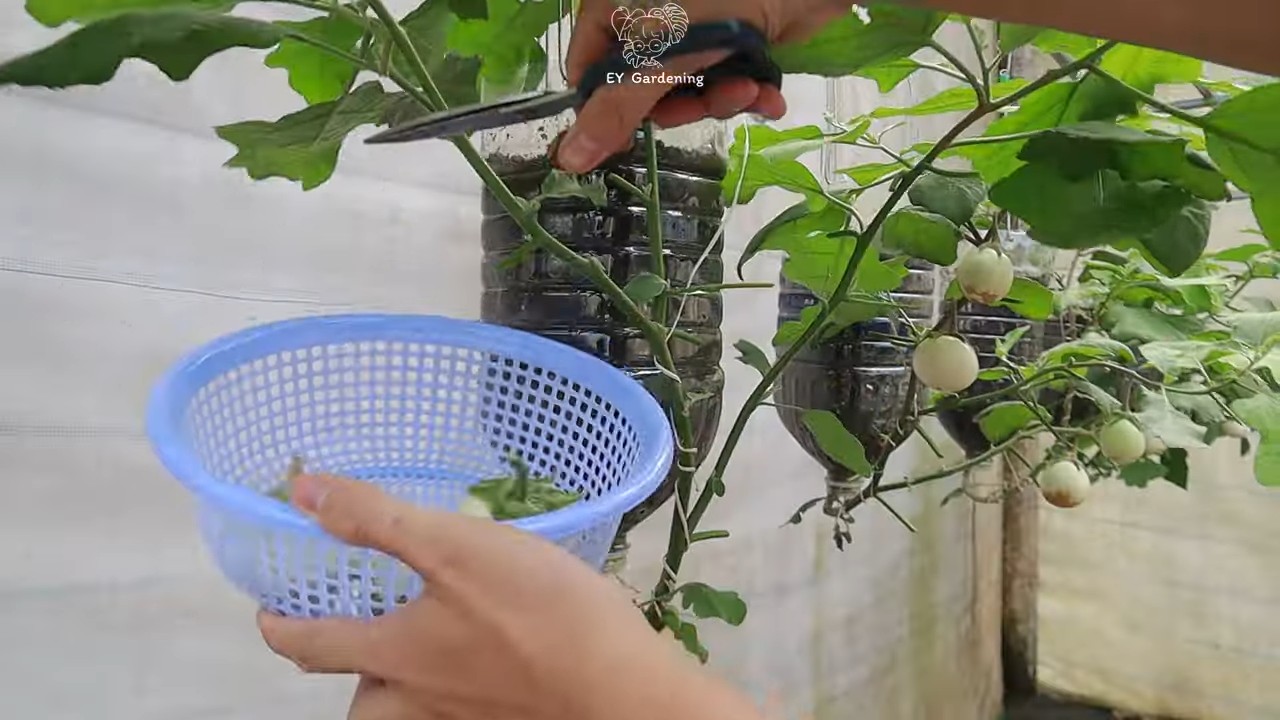
1. Gently Insert the Seedling: Carefully turn the container upside down. Gently guide the root ball of your eggplant seedling through the hole, making sure the leaves are facing downwards. Be as gentle as possible to avoid damaging the roots.
2. Secure the Plant: Gently arrange the landscape fabric or burlap around the stem of the plant to help hold it in place. This will prevent soil from escaping when you fill the container.
3. Add Potting Mix: While still holding the plant in place, carefully add potting mix to the container. Fill it up to about an inch or two from the top. Gently pat the soil down to remove any air pockets.
4. Water Thoroughly: Water the container thoroughly until water drains out of the drainage holes. This will help to settle the soil and ensure that the roots are properly hydrated.
Phase 3: Hanging and Maintaining Your Upside-Down Eggplant
1. Attach Hanging Hardware: Attach your chosen hanging hardware (hooks, chains, or rope) to the container. Make sure it’s securely attached and can support the weight of the container.
2. Choose a Sunny Location: Select a location that receives at least 6-8 hours of direct sunlight per day. This is essential for healthy eggplant growth.
3. Hang the Container: Carefully hang the container in your chosen location. Make sure it’s hanging securely and won’t be easily knocked over by wind or other factors.
4. Water Regularly: Water your eggplant regularly, especially during hot, dry weather. Check the soil moisture by sticking your finger into the soil. If the top inch or two feels dry, it’s time to water.
5. Fertilize Regularly: Eggplants are heavy feeders, so fertilize them regularly with a balanced, slow-release fertilizer or liquid fertilizer. Follow the instructions on the fertilizer packaging. I usually fertilize every 2-3 weeks.
6. Monitor for Pests and Diseases: Keep an eye out for any signs of pests or diseases. If you spot any problems, take action immediately to prevent them from spreading. Insecticidal soap or neem oil can be effective for controlling many common eggplant pests.
7. Prune as Needed: As your eggplant grows, you may need to prune it to encourage branching and fruit production. Remove any dead or yellowing leaves. You can also pinch off the tips of the branches to encourage bushier growth.
8. Support the Fruit (if needed): As your eggplants grow larger, they may become heavy and weigh down the plant. If necessary, provide support for the fruit by tying them to the hanging hardware with twine or soft cloth.
Troubleshooting Tips
Even with the best planning, things can sometimes go wrong. Here are a few troubleshooting tips to help you overcome common challenges:
* Plant Wilting: If your plant is wilting, it could be due to underwatering, overwatering, or transplant shock. Check the soil moisture and adjust your watering schedule accordingly. If the plant is newly transplanted, give it some time to adjust.
* Yellowing Leaves: Yellowing leaves can be a sign of nutrient deficiency. Fertilize your plant with a balanced fertilizer to provide the necessary nutrients.
* Pest Infestations: If you notice pests on your plant, take action immediately to control them. Insecticidal soap, neem oil, or other organic pest control methods can be effective.
* Lack of Fruit Production: If your plant is not producing fruit, it could be due to lack of sunlight, poor pollination, or nutrient deficiency. Make sure your plant is getting enough sunlight and fertilize it regularly. You can also try hand-pollinating the flowers by gently brushing them with a small paintbrush.
* Container Too Heavy: If your container is too heavy, it could be putting too much stress on the hanging hardware. Consider using a lighter-weight potting mix or reducing the size of the container.
Choosing the Right Eggplant Variety
Not all eggplant varieties are created equal when it comes to upside-down growing. Here are a few varieties that I’ve found to be particularly well-suited for this method:
* ‘Patio Baby’: This compact variety produces small, bite-sized eggplants that are perfect for containers.
* ‘Fairy Tale’: This variety produces beautiful, striped eggplants that are both ornamental and delicious.
* ‘Hansel’: This variety produces clusters of small, elongated eggplants that are perfect for grilling or roasting.
*
Conclusion
So, there you have it! Hanging your eggplants upside down might seem like an unconventional approach, but the benefits are undeniable. From extending their shelf life and preventing bruising to maintaining their firmness and flavor, this simple DIY trick is a game-changer for any eggplant enthusiast. It’s a small change that yields significant results, allowing you to enjoy your harvest for longer and reduce food waste.
Think of the possibilities! Imagine perfectly grilled eggplant slices, creamy baba ghanoush, or hearty eggplant parmesan, all made with eggplants that are as fresh as the day they were picked. No more soft spots, no more bitter surprises – just consistently delicious eggplants ready to be transformed into culinary masterpieces.
But don’t just take our word for it. We encourage you to try this method for yourself. Experiment with different hanging locations – a cool, dark pantry, a well-ventilated garage, or even a shaded spot on your porch. See what works best for your environment and your eggplants.
Consider variations too! While we’ve focused on hanging individual eggplants, you could also try hanging them in small clusters, especially if you have smaller varieties. Just ensure there’s enough space between each eggplant to allow for proper air circulation. You can also use different types of string or twine, depending on what you have available. The key is to find a method that’s secure and doesn’t damage the delicate skin of the eggplant.
Ultimately, the goal is to preserve the quality of your eggplants and maximize their flavor potential. This DIY trick is a simple, effective, and eco-friendly way to achieve that. It’s a testament to the fact that sometimes, the most innovative solutions are also the most straightforward.
We’re confident that once you try hanging your eggplants upside down, you’ll never go back to storing them any other way. It’s a small investment of time and effort that pays off in spades, delivering fresher, tastier eggplants that are ready to be enjoyed whenever you are.
So, go ahead, give it a try! We’re eager to hear about your experiences. Share your tips, tricks, and photos in the comments below. Let’s create a community of eggplant enthusiasts who are dedicated to preserving the quality and flavor of this versatile vegetable. Let us know if this **DIY trick** worked for you!
Frequently Asked Questions (FAQ)
Why should I bother hanging my eggplants upside down? What are the real benefits?
The primary benefits of hanging eggplants upside down are extended shelf life, prevention of bruising, and maintenance of firmness. When eggplants sit on a surface, the weight of the fruit can cause pressure points, leading to bruising and softening. Hanging them allows air to circulate around the entire eggplant, preventing moisture buildup and slowing down the ripening process. This results in eggplants that stay fresh for a significantly longer period, reducing food waste and ensuring you have high-quality ingredients for your meals.
What’s the best way to hang eggplants? What kind of string should I use?
The best way to hang eggplants is to use a soft, sturdy string or twine. Avoid using wire or anything that could cut into the skin of the eggplant. Gently tie the string around the stem, leaving enough length to hang the eggplant securely. Make sure the knot is tight enough to hold the weight of the eggplant but not so tight that it damages the stem. You can use kitchen twine, cotton string, or even repurposed fabric strips. The key is to choose a material that’s strong, gentle, and readily available.
Where is the ideal place to hang my eggplants? Does temperature matter?
The ideal location for hanging eggplants is a cool, dark, and well-ventilated space. A pantry, cellar, or even a garage can work well, as long as the temperature is relatively stable and the air is circulating. Avoid hanging them in direct sunlight or near sources of heat, as this can accelerate ripening and cause them to spoil more quickly. The optimal temperature range is between 50°F and 55°F (10°C and 13°C). If you don’t have a dedicated cool storage space, you can try hanging them in a shaded area of your porch or balcony, but be sure to protect them from extreme weather conditions.
How long can I expect my eggplants to last when hung upside down?
When stored properly, eggplants hung upside down can last for up to two weeks, or even longer in some cases. This is significantly longer than the typical shelf life of eggplants stored in the refrigerator, which is usually only a few days. The exact duration will depend on the initial freshness of the eggplant, the storage conditions, and the variety of eggplant. Regularly check your eggplants for any signs of spoilage, such as soft spots, discoloration, or an unpleasant odor.
Can I hang all types of eggplants upside down, or are some varieties better suited for this method?
Yes, you can hang all types of eggplants upside down. This method is beneficial for all varieties, regardless of size, shape, or color. However, larger and heavier eggplants may require stronger string or twine to ensure they are securely supported. Smaller varieties can be hung in clusters, but be sure to leave enough space between each eggplant for proper air circulation.
What if I don’t have a place to hang my eggplants? Are there any alternative storage methods?
If you don’t have a suitable place to hang your eggplants, you can still extend their shelf life by storing them properly in the refrigerator. Wrap each eggplant individually in paper towels to absorb excess moisture, and then place them in a perforated plastic bag. Store them in the crisper drawer of your refrigerator. This method will help to keep them fresh for a few days, but it’s not as effective as hanging them upside down.
Will hanging eggplants upside down affect their flavor or texture?
No, hanging eggplants upside down should not negatively affect their flavor or texture. In fact, it can help to preserve their firmness and prevent them from becoming bitter. By allowing air to circulate around the entire eggplant, this method helps to maintain its natural moisture content and prevent it from drying out.
Is there anything else I should know about storing eggplants?
Avoid washing eggplants before storing them, as this can introduce moisture and accelerate spoilage. Only wash them right before you’re ready to use them. Also, be gentle when handling eggplants, as they are easily bruised. Store them away from ethylene-producing fruits and vegetables, such as apples and bananas, as ethylene can speed up the ripening process.
What are some creative ways to use up my eggplants before they go bad?
Eggplants are incredibly versatile and can be used in a wide variety of dishes. Some popular options include eggplant parmesan, baba ghanoush, ratatouille, grilled eggplant slices, and eggplant curry. You can also add them to soups, stews, and stir-fries. Get creative and experiment with different flavors and cuisines to find your favorite eggplant recipes.
I tried hanging my eggplants upside down, and it worked great! Where can I share my experience?
We’re thrilled to hear that you had success with this DIY trick! We encourage you to share your experience in the comments section below. You can also share photos of your hanging eggplants on social media using relevant hashtags, such as #EggplantStorage, #DIYGardening, or #FoodPreservation. We’d love to see your results and hear your tips and tricks!

Leave a Comment