
Grow pineapple, you say? In a plastic chair? Sounds crazy, right? But trust me, it’s not only possible, it’s surprisingly rewarding! Forget those expensive store-bought pineapples – imagine harvesting your own juicy, tropical treat right from your backyard (or even your balcony!). This isn’t just about saving money; it’s about connecting with nature, learning a new skill, and impressing your friends with your green thumb prowess.
For centuries, pineapples have been a symbol of hospitality and luxury. Originating in South America, they were once so rare and prized that they were rented out as status symbols for parties! While thankfully more accessible today, the joy of growing your own pineapple harkens back to that sense of wonder and accomplishment.
But why a plastic chair, you ask? Well, that’s where the DIY magic comes in! This simple hack provides the perfect support and drainage for your pineapple plant, especially if you’re short on space or dealing with less-than-ideal soil conditions. Plus, it’s a fantastic way to upcycle those old chairs you might have lying around. So, if you’re ready to embark on a fun and unconventional gardening adventure, keep reading! I’m going to show you exactly how to grow pineapple using this clever plastic chair method, turning your outdoor space into a mini-tropical paradise.
DIY: From Plastic Chair to Pineapple Paradise!
Hey there, fellow DIY enthusiasts! Ever looked at that slightly-worse-for-wear plastic chair in your backyard and thought, “There has to be something more I can do with this?” Well, I have! I’m going to show you how to transform a basic plastic chair into a vibrant, eye-catching pineapple planter. It’s a fun, relatively easy project that adds a tropical touch to any space. Plus, it’s a great way to upcycle and give that old chair a new lease on life.
What You’ll Need:
Before we dive in, let’s gather our supplies. This is crucial for a smooth and enjoyable DIY experience.
* **A Plastic Chair:** Obviously! Choose one that’s sturdy but maybe a little faded or scratched. The color doesn’t matter too much, as we’ll be painting it.
* **Acrylic Paints:** Yellow, green, and brown are essential for the pineapple look. I also recommend a white or cream color for a base coat. Get good quality outdoor acrylic paints to withstand the elements.
* **Paintbrushes:** A variety of sizes will be helpful. A larger brush for the base coat and smaller, detail brushes for the pineapple “scales” and leaves.
* **Clear Acrylic Sealer:** This is super important to protect your paint job from the sun and rain. Choose a sealer specifically designed for outdoor use.
* **Potting Soil:** You’ll need enough to fill the seat of the chair.
* **Pineapple Plant (or other plant of your choice):** A small to medium-sized pineapple plant works best, but you could also use succulents, herbs, or flowers. Consider the size of the chair seat when choosing your plant.
* **Drill (with various sized drill bits):** For creating drainage holes in the chair seat.
* **Sandpaper (medium grit):** To lightly sand the chair before painting, helping the paint adhere better.
* **Painter’s Tape (optional):** For creating clean lines if you want to add stripes or other patterns.
* **Gloves:** To protect your hands from paint.
* **Drop Cloth or Newspaper:** To protect your work surface.
* **Safety Glasses:** To protect your eyes when drilling.
* **Measuring Tape or Ruler:** To help with spacing the pineapple “scales.”
* **Pencil or Marker:** For marking where to drill and paint.
Prepping the Chair: The Foundation for Success
This step is all about getting the chair ready for its pineapple transformation. A little prep work goes a long way in ensuring a long-lasting and beautiful result.
1. **Clean the Chair:** Use soap and water to thoroughly clean the plastic chair. Remove any dirt, grime, or loose debris. This will help the paint adhere properly. Let it dry completely.
2. **Sand the Chair (Lightly):** Use medium-grit sandpaper to lightly sand the entire surface of the chair. This creates a slightly rough surface that the paint can grip onto. Don’t overdo it; just a light scuffing is enough. Wipe away any sanding dust with a damp cloth.
3. **Drill Drainage Holes:** This is crucial for preventing your plant from becoming waterlogged. Turn the chair upside down and drill several drainage holes in the seat. Start with a small drill bit and gradually increase the size until you have holes that are about 1/4 to 1/2 inch in diameter. I usually aim for at least 5-6 holes, evenly spaced.
4. **Apply Base Coat (Optional but Recommended):** If your chair is a dark color, or if you want a brighter, more vibrant pineapple, apply a base coat of white or cream acrylic paint. This will help the yellow paint pop. Let the base coat dry completely before moving on.
Painting the Pineapple: Bringing the Vision to Life
Now for the fun part! This is where your creativity can really shine.
1. **Paint the Chair Yellow:** Apply a generous coat of yellow acrylic paint to the entire chair, including the legs and backrest. Make sure to get into all the nooks and crannies. Let the first coat dry completely, then apply a second coat for even coverage.
2. **Creating the Pineapple “Scales”:** This is where the detail work comes in. Using a small, angled paintbrush and brown acrylic paint, create the diamond-shaped “scales” that are characteristic of a pineapple.
* **Method 1 (Freehand):** If you’re feeling confident, you can freehand the scales. Start at the bottom of the chair seat and work your way up, creating rows of overlapping diamonds. Vary the size and shape of the diamonds slightly for a more natural look.
* **Method 2 (Using a Template):** If you prefer a more uniform look, you can create a template. Cut a diamond shape out of cardboard or paper. Use the template to trace the diamonds onto the chair with a pencil or marker, then fill them in with brown paint.
* **Adding Depth:** To add depth and dimension to the scales, use a slightly darker shade of brown to outline one side of each diamond. You can also add a touch of white or cream paint to the other side to create a highlight.
3. **Painting the “Leaves”:** Now it’s time to add the pineapple’s signature spiky leaves. Using green acrylic paint and a small, pointed paintbrush, paint long, thin leaves extending upwards from the backrest of the chair.
* **Vary the Length and Angle:** Don’t make all the leaves the same length or angle. Varying them will create a more natural and dynamic look.
* **Adding Detail:** Use a slightly darker shade of green to add veins to the leaves. You can also add a touch of yellow to the tips of the leaves to create a sun-kissed effect.
4. **Let the Paint Dry Completely:** This is crucial before moving on to the next step. I usually let the paint dry for at least 24 hours to ensure it’s fully cured.
Planting and Sealing: The Finishing Touches
Almost there! Now we’re going to add the plant and protect our masterpiece.
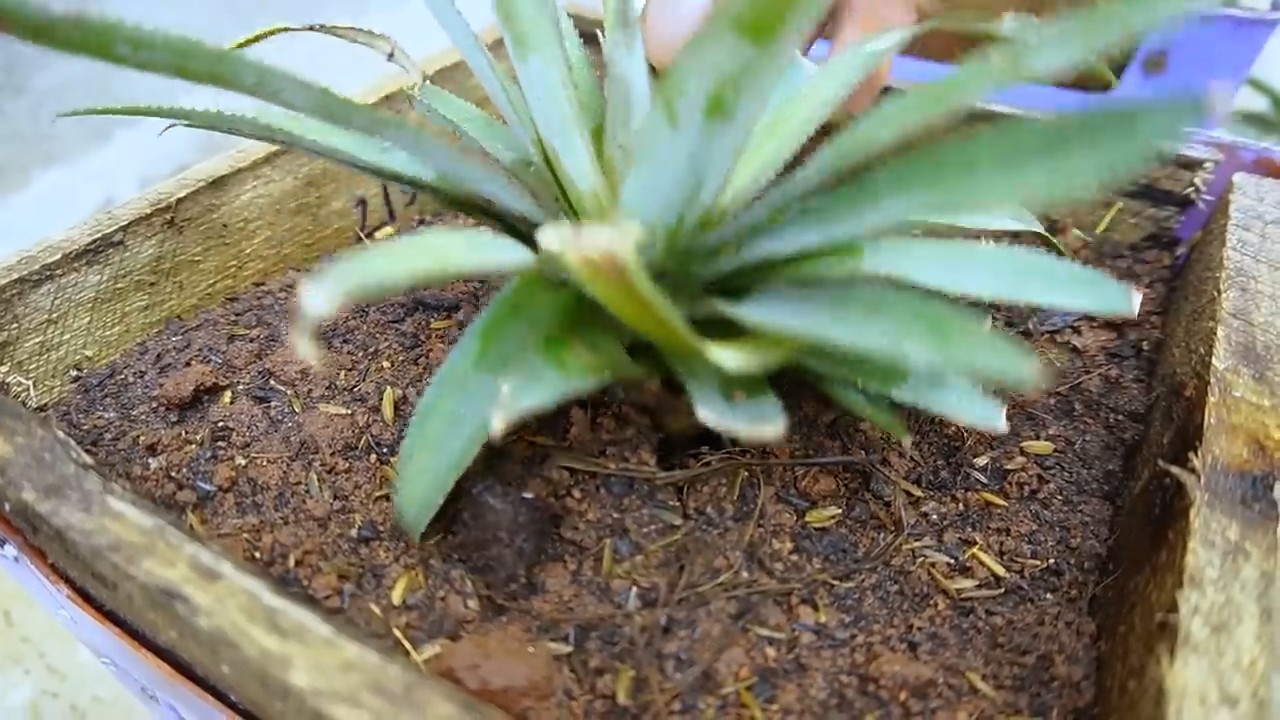
1. **Add Potting Soil:** Fill the seat of the chair with potting soil, leaving enough space at the top for your plant.
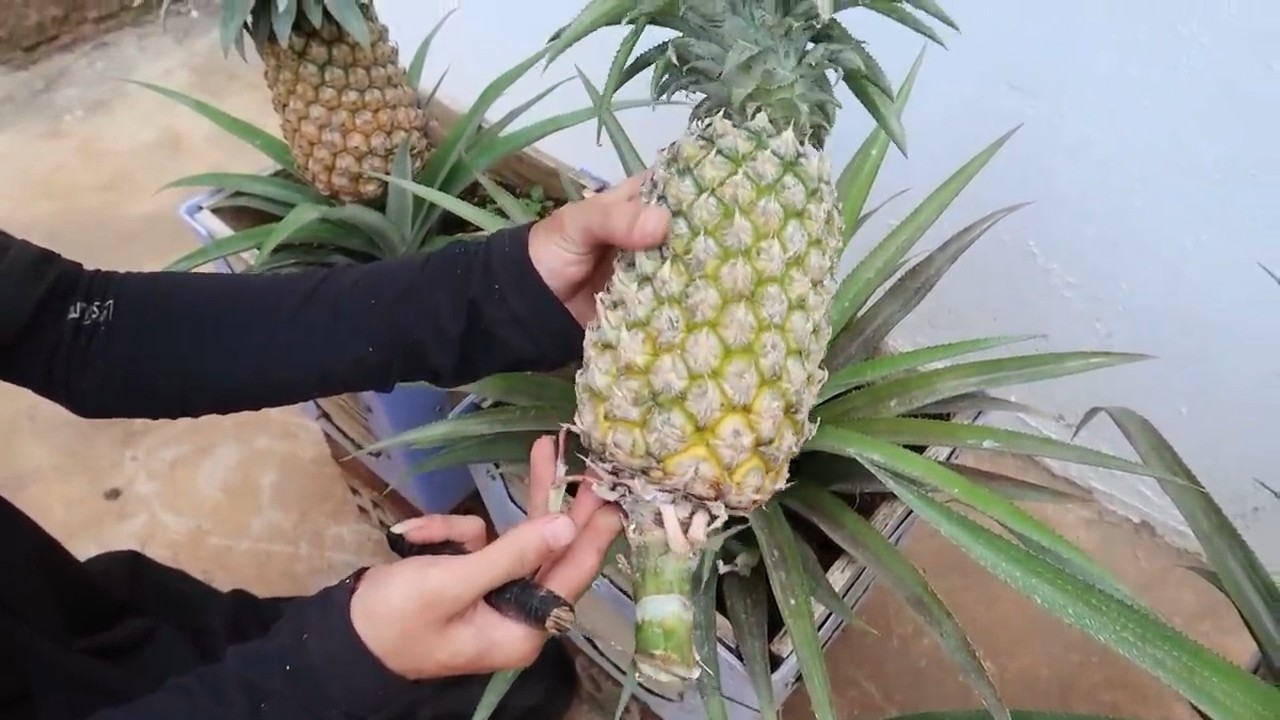
2. **Plant Your Pineapple Plant:** Carefully remove the pineapple plant from its pot and gently loosen the roots. Place the plant in the center of the chair seat and fill in around it with more potting soil.
3. **Water the Plant:** Water the plant thoroughly, allowing the excess water to drain out through the drainage holes.
4. **Apply Clear Acrylic Sealer:** Once the paint is completely dry and the plant is in place, apply several coats of clear acrylic sealer to the entire chair, including the painted areas and the legs. This will protect the paint from the elements and help your pineapple chair last for years to come. Follow the manufacturer’s instructions for application and drying time. I usually apply at least three coats, allowing each coat to dry completely before applying the next.
5. **Let the Sealer Dry Completely:** Allow the sealer to dry completely before placing your pineapple chair in its final location. This usually takes at least 24 hours.
Tips and Tricks for a Perfect Pineapple Chair:
* Don’t be afraid to experiment! This is your project, so feel free to get creative with the colors, patterns, and plant choices.
* Use high-quality materials. Investing in good quality paints and sealers will ensure a long-lasting and beautiful result.
* Take your time. Don’t rush the process. Allow each coat of paint and sealer to dry completely before moving on to the next step.
* Consider the environment. Choose a plant that is suitable for the climate and sunlight conditions in your area.
* Maintenance is key. Regularly water and fertilize your plant, and clean the chair as needed to keep it looking its best.
* Personalize it! Add other decorative elements like small stones, shells, or even fairy lights to make your pineapple chair truly unique.
* Safety First! Always wear safety glasses when drilling and gloves when painting. Work in a well-ventilated area when using paints and sealers.
And there you have it! Your very own pineapple chair planter. I hope you enjoyed this DIY project as much as I did. Now go forth and spread some tropical cheer! Remember to share your creations with me – I’d love to see them! Happy crafting!
Conclusion
So, there you have it! Transforming an ordinary plastic chair into a thriving pineapple planter is not just a fun DIY project; it’s a statement. It’s a statement about resourcefulness, creativity, and bringing a touch of the tropics to your own backyard, balcony, or even indoor space. This isn’t just about growing a pineapple; it’s about growing an experience, a conversation starter, and a unique piece of living art.
Why is this DIY trick a must-try? Because it’s incredibly accessible. You likely already have a plastic chair destined for the landfill, and the other materials are readily available and affordable. It’s also a fantastic way to recycle and repurpose, contributing to a more sustainable lifestyle. Beyond the environmental benefits, the sheer joy of watching a pineapple plant flourish in such an unexpected container is immensely rewarding. Imagine the look on your friends’ faces when they see your pineapple growing out of a chair!
But the best part? The possibilities are endless. Feel free to experiment with different varieties of pineapples. Perhaps a smaller, ornamental pineapple would be perfect for a smaller chair or indoor setting. You could also try painting the chair in vibrant colors to complement the tropical theme or adding decorative elements like shells or pebbles around the base of the plant. Consider using different types of potting mix to cater to the specific needs of your pineapple plant. Some gardeners even incorporate a slow-release fertilizer directly into the potting mix for sustained nutrient delivery.
Don’t be afraid to get creative with the drainage system. While the drilled holes are essential, you can enhance drainage by adding a layer of gravel or broken pottery at the bottom of the chair before adding the potting mix. This will prevent waterlogging and ensure healthy root development.
We encourage you to embrace this unique approach to gardening and give the **grow pineapple plastic chair** method a try. It’s a project that’s both satisfying and visually stunning. Once you’ve created your own pineapple chair planter, we’d love to see your results! Share your photos and experiences with us on social media using [Your Hashtag Here]. Let’s inspire others to think outside the box and transform everyday objects into thriving gardens. We are confident that you will find this project to be a rewarding and enjoyable experience. Happy growing!
Frequently Asked Questions (FAQ)
Q: What type of plastic chair is best for this project?
A: Ideally, you want a sturdy plastic chair that can withstand the weight of the potting mix and the mature pineapple plant. Avoid chairs with thin or brittle plastic, as they may crack or break under the pressure. Chairs with a solid seat are generally better than those with a slatted seat, as they provide a more stable base for the potting mix. However, you can adapt a slatted chair by lining it with landscape fabric or burlap to contain the soil. Recycled plastic chairs are a great eco-friendly option.
Q: What kind of potting mix should I use for growing pineapples in a chair?
A: Pineapples thrive in well-draining, slightly acidic soil. A mix of equal parts potting soil, perlite, and peat moss is a good starting point. You can also add some compost to enrich the soil with nutrients. Avoid using heavy clay soil, as it can retain too much moisture and lead to root rot. Ensure the potting mix is loose and airy to allow for proper root aeration. Consider adding a slow-release fertilizer specifically formulated for tropical plants to provide a steady supply of nutrients.
Q: How often should I water my pineapple plant in a plastic chair?
A: Water your pineapple plant thoroughly when the top inch of soil feels dry to the touch. Avoid overwatering, as this can lead to root rot. The frequency of watering will depend on the climate, the size of the chair, and the drainage. In hot, dry weather, you may need to water more frequently. In cooler, wetter weather, you can water less often. Always check the soil moisture before watering. A good rule of thumb is to water deeply but infrequently.
Q: How much sunlight does a pineapple plant need when grown in a chair?
A: Pineapples need at least six hours of direct sunlight per day to thrive. Place your pineapple chair planter in a sunny location where it will receive ample sunlight. If you live in a particularly hot climate, you may need to provide some afternoon shade to prevent the leaves from scorching. If you are growing your pineapple plant indoors, place it near a south-facing window or supplement with grow lights. Rotate the chair regularly to ensure even sunlight exposure on all sides of the plant.
Q: How long does it take to grow a pineapple from a crown in a plastic chair?
A: Growing a pineapple from a crown can take anywhere from 2 to 3 years, depending on the climate, growing conditions, and the variety of pineapple. Be patient and provide your plant with the proper care, and you will eventually be rewarded with a delicious homegrown pineapple. Remember that the first year is primarily focused on root development, so don’t be discouraged if you don’t see significant growth above ground. Consistent watering, fertilization, and adequate sunlight are key to accelerating the growth process.
Q: How do I protect my pineapple plant from pests and diseases when it’s in a chair?
A: Regularly inspect your pineapple plant for signs of pests or diseases. Common pests include mealybugs, scale, and spider mites. You can control these pests by spraying the plant with insecticidal soap or neem oil. To prevent diseases, ensure good air circulation around the plant and avoid overwatering. If you notice any signs of disease, such as leaf spots or root rot, treat the plant with a fungicide or remove the affected parts. Maintaining a healthy growing environment is the best defense against pests and diseases.
Q: Can I move the plastic chair with the pineapple plant inside during the winter?
A: Yes, if you live in a climate with cold winters, you can move the plastic chair with the pineapple plant indoors to protect it from frost and freezing temperatures. Place the chair in a sunny location indoors and continue to water it as needed. You may need to supplement with grow lights if the plant is not receiving enough natural light. Gradually acclimate the plant to the outdoor environment in the spring before moving it back outside permanently.
Q: What are some other creative variations of this grow pineapple plastic chair DIY?
A: Beyond painting and adding decorative elements, consider these variations:
* **Vertical Garden:** Use multiple chairs stacked or arranged vertically to create a stunning vertical pineapple garden.
* **Herb Garden Combo:** Plant herbs around the base of the pineapple plant to create a companion planting system.
* **Water Feature:** Incorporate a small water feature into the chair planter to add a touch of tranquility.
* **Glow-in-the-Dark:** Paint the chair with glow-in-the-dark paint for a unique nighttime display.
* **Mosaic Design:** Cover the chair with a mosaic design using broken tiles or glass for a colorful and artistic touch.
Q: How do I know when my pineapple is ripe and ready to harvest from the chair?
A: Several factors indicate that a pineapple is ripe. The color of the skin will change from green to yellow or golden. The pineapple will also emit a sweet, fragrant aroma. The leaves at the top of the pineapple should be easy to pull out. You can also gently tap the pineapple; a ripe pineapple will sound hollow. Once the pineapple is ripe, carefully cut it from the plant using a sharp knife. Enjoy your homegrown pineapple!
Leave a Comment