
Baking Soda Sponge Cleaning Trick: Are you tired of battling stubborn grime and lingering odors in your kitchen and bathroom? I know I am! It feels like no matter how much I scrub, some spots just refuse to sparkle. But what if I told you there’s a simple, inexpensive, and surprisingly effective solution hiding in your pantry?
Baking soda, also known as sodium bicarbonate, has been a household staple for centuries. From ancient Egyptians using it for cleaning and hygiene to our grandmothers relying on it for baking and deodorizing, this humble powder boasts a rich history. Its mild abrasive and alkaline properties make it a natural cleaning powerhouse, and when combined with the absorbent magic of a sponge, you’ve got a DIY cleaning dream team!
Let’s face it, commercially available cleaning products can be harsh on our skin, our wallets, and the environment. That’s why I’m so excited to share this baking soda sponge cleaning trick with you. It’s a fantastic way to ditch the harsh chemicals, save some money, and achieve a sparkling clean home using ingredients you probably already have. This simple hack will not only remove stubborn stains and grime, but also neutralize unpleasant odors, leaving your surfaces fresh and clean. Get ready to transform your cleaning routine with this easy and effective DIY solution!
DIY Baking Soda Sponge Cleaning Power-Up!
Hey there, fellow cleaning enthusiasts! Are you tired of sponges that just seem to smear grime around instead of actually cleaning? I know I was! That’s why I’m so excited to share this super simple, yet incredibly effective, trick to boost your sponge’s cleaning power using the magic of baking soda. Get ready to say goodbye to stubborn stains and hello to sparkling surfaces!
What You’ll Need:
Before we dive in, let’s gather our supplies. This is a pretty low-key project, so you probably already have most of these things on hand:
* A clean sponge (new or thoroughly rinsed)
* Baking soda (the star of the show!)
* A small bowl or container
* Warm water
* Optional: A few drops of your favorite essential oil (for a fresh scent!)
* Optional: Gloves (if you have sensitive skin)
The Magic Formula: Baking Soda Paste
The key to this trick is creating a powerful baking soda paste. This paste will act as a gentle abrasive, helping to lift dirt and grime without scratching your surfaces.
**Here’s how to make it:**
1. **Combine Baking Soda and Water:** In your bowl or container, add about 1/4 cup of baking soda. Slowly add warm water, a tablespoon at a time, mixing as you go.
2. **Achieve the Right Consistency:** You’re aiming for a thick, spreadable paste. It should be similar to the consistency of toothpaste. If you add too much water, just add a little more baking soda to thicken it up.
3. **Optional Scent Boost:** If you want to add a pleasant scent to your cleaning routine, now’s the time to add a few drops of your favorite essential oil. Lavender, lemon, or tea tree oil are all great choices. Just be sure to use essential oils that are safe for the surfaces you’ll be cleaning.
Supercharging Your Sponge: The Application Process
Now that we have our magic paste, let’s get that sponge ready for action!
1. **Wet the Sponge:** Thoroughly wet your clean sponge with warm water. Squeeze out any excess water so it’s damp, but not dripping.
2. **Apply the Baking Soda Paste:** Using your fingers or a spoon, generously apply the baking soda paste to the abrasive side of the sponge (if it has one). Make sure to cover the entire surface.
3. **Work the Paste In:** Gently rub the paste into the sponge, working it into the fibers. You want the baking soda to really penetrate the sponge.
4. **Let it Sit (Optional):** For extra cleaning power, you can let the paste sit on the sponge for a few minutes. This will give the baking soda time to work its magic. I usually let it sit for about 5-10 minutes.
Putting Your Supercharged Sponge to Work: Cleaning Time!
Alright, the moment we’ve been waiting for! Let’s put that supercharged sponge to the test.
1. **Test in an Inconspicuous Area:** Before you go wild cleaning everything in sight, it’s always a good idea to test the sponge on a small, hidden area of the surface you’re planning to clean. This will ensure that the baking soda doesn’t scratch or damage the material.
2. **Gentle Scrubbing:** Using the abrasive side of the sponge, gently scrub the surface you want to clean. Apply light pressure and let the baking soda do the work.
3. **Rinse Frequently:** As you clean, rinse the sponge frequently with warm water to remove any dirt and grime. This will prevent you from just spreading the mess around.
4. **Wipe Clean:** After scrubbing, wipe the surface clean with a damp cloth or paper towel.
5. **Admire Your Work:** Step back and admire your sparkling clean surface!
Where to Use Your Baking Soda Sponge: Cleaning Applications
This baking soda sponge trick is incredibly versatile. Here are just a few ideas of where you can use it:
* **Kitchen:**
* **Sinks:** Remove stubborn stains and water spots from stainless steel or porcelain sinks.
* **Countertops:** Clean up spills and messes on laminate, granite, or quartz countertops. (Always test in an inconspicuous area first, especially with natural stone.)
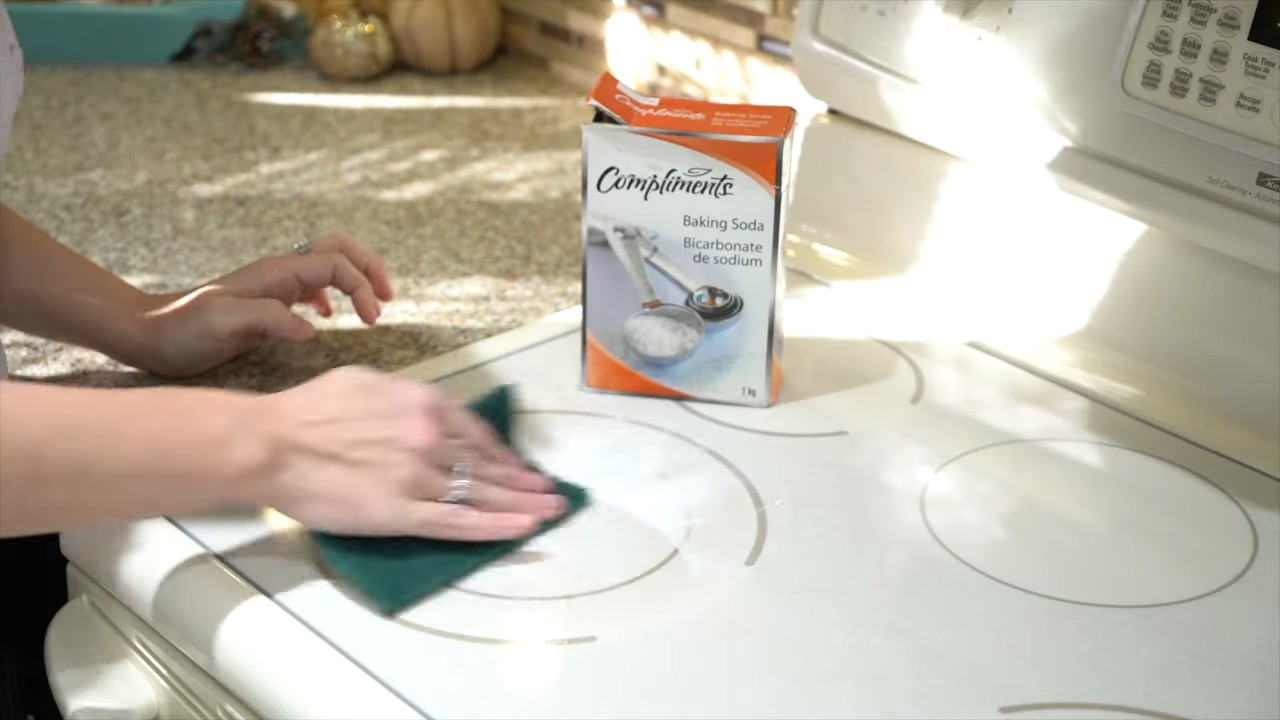
* **Stovetops:** Remove baked-on food and grease from stovetops.
* **Ovens:** Clean up spills and splatters inside your oven. (Make sure the oven is cool before cleaning.)
* **Microwaves:** Remove food splatters and odors from your microwave.
* **Cutting Boards:** Sanitize and deodorize wooden or plastic cutting boards.
* **Bathroom:**
* **Sinks and Faucets:** Remove soap scum and water spots from sinks and faucets.
* **Showers and Tubs:** Clean up soap scum and mildew from shower walls and tubs.
* **Toilets:** Clean the exterior of the toilet bowl.
* **Tiles:** Clean grout and remove stains from tiles.
* **General Cleaning:**
* **Walls:** Remove scuff marks and dirt from walls.
* **Baseboards:** Clean up dust and dirt from baseboards.
* **Shoes:** Clean scuff marks from sneakers and other shoes.
* **Gardening Tools:** C
Hey there, fellow cleaning enthusiasts! Are you tired of sponges that just seem to smear grime around instead of actually cleaning? I know I was! That’s why I’m so excited to share this super simple, yet incredibly effective, trick to boost your sponge’s cleaning power using the magic of baking soda. Get ready to say goodbye to stubborn stains and hello to sparkling surfaces!
What You’ll Need:
Before we dive in, let’s gather our supplies. This is a pretty low-key project, so you probably already have most of these things on hand:
* A clean sponge (new or thoroughly rinsed)
* Baking soda (the star of the show!)
* A small bowl or container
* Warm water
* Optional: A few drops of your favorite essential oil (for a fresh scent!)
* Optional: Gloves (if you have sensitive skin)
The Magic Formula: Baking Soda Paste
The key to this trick is creating a powerful baking soda paste. This paste will act as a gentle abrasive, helping to lift dirt and grime without scratching your surfaces.
**Here’s how to make it:**
1. **Combine Baking Soda and Water:** In your bowl or container, add about 1/4 cup of baking soda. Slowly add warm water, a tablespoon at a time, mixing as you go.
2. **Achieve the Right Consistency:** You’re aiming for a thick, spreadable paste. It should be similar to the consistency of toothpaste. If you add too much water, just add a little more baking soda to thicken it up.
3. **Optional Scent Boost:** If you want to add a pleasant scent to your cleaning routine, now’s the time to add a few drops of your favorite essential oil. Lavender, lemon, or tea tree oil are all great choices. Just be sure to use essential oils that are safe for the surfaces you’ll be cleaning.
Supercharging Your Sponge: The Application Process
Now that we have our magic paste, let’s get that sponge ready for action!
1. **Wet the Sponge:** Thoroughly wet your clean sponge with warm water. Squeeze out any excess water so it’s damp, but not dripping.
2. **Apply the Baking Soda Paste:** Using your fingers or a spoon, generously apply the baking soda paste to the abrasive side of the sponge (if it has one). Make sure to cover the entire surface.
3. **Work the Paste In:** Gently rub the paste into the sponge, working it into the fibers. You want the baking soda to really penetrate the sponge.
4. **Let it Sit (Optional):** For extra cleaning power, you can let the paste sit on the sponge for a few minutes. This will give the baking soda time to work its magic. I usually let it sit for about 5-10 minutes.
Putting Your Supercharged Sponge to Work: Cleaning Time!
Alright, the moment we’ve been waiting for! Let’s put that supercharged sponge to the test.
1. **Test in an Inconspicuous Area:** Before you go wild cleaning everything in sight, it’s always a good idea to test the sponge on a small, hidden area of the surface you’re planning to clean. This will ensure that the baking soda doesn’t scratch or damage the material.
2. **Gentle Scrubbing:** Using the abrasive side of the sponge, gently scrub the surface you want to clean. Apply light pressure and let the baking soda do the work.
3. **Rinse Frequently:** As you clean, rinse the sponge frequently with warm water to remove any dirt and grime. This will prevent you from just spreading the mess around.
4. **Wipe Clean:** After scrubbing, wipe the surface clean with a damp cloth or paper towel.
5. **Admire Your Work:** Step back and admire your sparkling clean surface!
Where to Use Your Baking Soda Sponge: Cleaning Applications
This baking soda sponge trick is incredibly versatile. Here are just a few ideas of where you can use it:
* **Kitchen:**
* **Sinks:** Remove stubborn stains and water spots from stainless steel or porcelain sinks.
* **Countertops:** Clean up spills and messes on laminate, granite, or quartz countertops. (Always test in an inconspicuous area first, especially with natural stone.)
* **Stovetops:** Remove baked-on food and grease from stovetops.
* **Ovens:** Clean up spills and splatters inside your oven. (Make sure the oven is cool before cleaning.)
* **Microwaves:** Remove food splatters and odors from your microwave.
* **Cutting Boards:** Sanitize and deodorize wooden or plastic cutting boards.
* **Bathroom:**
* **Sinks and Faucets:** Remove soap scum and water spots from sinks and faucets.
* **Showers and Tubs:** Clean up soap scum and mildew from shower walls and tubs.
* **Toilets:** Clean the exterior of the toilet bowl.
* **Tiles:** Clean grout and remove stains from tiles.
* **General Cleaning:**
* **Walls:** Remove scuff marks and dirt from walls.
* **Baseboards:** Clean up dust and dirt from baseboards.
* **Shoes:** Clean scuff marks from sneakers and other shoes.
* **Gardening Tools:** Clean dirt and grime from gardening tools.
Important Considerations and Safety Tips
While baking soda is generally safe, it’s always a good idea to keep these things in mind:
* **Test First:** As I mentioned before, always test the baking soda paste on a small, hidden area before cleaning the entire surface. This is especially important for delicate or sensitive materials.
* **Avoid Abrasive Surfaces:** While baking soda is a gentle abrasive, it can still scratch certain surfaces. Avoid using it on polished or varnished wood, soft plastics, or delicate metals.
* **Don’t Mix with Vinegar:** While baking soda and vinegar are both great cleaning agents, they shouldn’t be mixed together. When combined, they create carbon dioxide gas, which can be dangerous in a closed space.
* **Wear Gloves (Optional):** If you have sensitive skin, you may want to wear gloves while using the baking soda paste.
* **Rinse Thoroughly:** Always rinse the cleaned surface thoroughly with water to remove any remaining baking soda residue.
* **Storage:** Store leftover baking soda paste in an airtight container. It should last for a few days.
Maintaining Your Supercharged Sponge: Keeping it Fresh
To keep your supercharged sponge in tip-top shape, here are a few tips:
* **Rinse After Each Use:** After each cleaning session, rinse the sponge thoroughly with warm water to remove any dirt and grime.
* **Squeeze Out Excess Water:** Squeeze out as much water as possible from the sponge after rinsing. This will help prevent the growth of bacteria.
* **Air Dry:** Allow the sponge to air dry completely between uses. You can place it on a sponge holder or in a well-ventilated area.
* **Microwave for Disinfection:** To disinfect your sponge, you can microwave it for 1-2 minutes. Make sure the sponge is wet before microwaving.
* **Replace Regularly:** Even with proper care, sponges will eventually wear out and become less effective. Replace your sponge every 2-4 weeks, or sooner if it starts to smell or look dirty.
Troubleshooting: Common Issues and Solutions
Sometimes, things don’t go exactly as planned. Here are a few common issues you might encounter and how to solve them:
* **Paste is Too Runny:** If your baking soda paste is too runny, simply add more baking soda until you achieve the desired consistency.
* **Paste is Too Thick:** If your baking soda paste is too thick, add a little more water until it’s spreadable.
* **Baking Soda is Leaving a Residue:** If you’re finding that the baking soda is leaving a white residue on the surface you’re cleaning, make sure you’re rinsing thoroughly with water. You can also try using a slightly damp cloth to wipe away the residue.
* **Sponge is Smelling Bad:** If your sponge starts to smell bad, it’s a sign that bacteria is growing. Disinfect the sponge by microwaving it or soaking it in a solution of bleach and water. If the smell persists, it’s time to replace the sponge.
* **Surface is Scratched:** If you accidentally scratch a surface while cleaning with the baking soda sponge, stop immediately and assess the damage. You may be able to buff out minor scratches with a polishing compound.
Beyond the Basics: Advanced Baking Soda Cleaning Techniques
Once you’ve mastered the basic baking soda sponge trick, you can start experimenting with other baking soda cleaning techniques. Here are a few ideas:
* **Baking Soda and Lemon Juice:** Combine baking soda with lemon juice to create a powerful cleaning paste for removing stains and odors.
* **Baking Soda and Hydrogen Peroxide:** Mix baking soda with hydrogen peroxide to create a whitening paste for cleaning grout and

Conclusion
So, there you have it! The baking soda sponge cleaning trick – a simple, effective, and surprisingly powerful way to tackle grime and stains around your home. We’ve walked you through the process, highlighted its benefits, and hopefully, convinced you that this is one DIY cleaning solution you absolutely need in your arsenal.
Why is this a must-try? Because it’s more than just a cleaning hack; it’s a testament to the power of simple ingredients. You’re likely already familiar with baking soda, a staple in most kitchens, and its cleaning prowess is truly remarkable when combined with the gentle abrasiveness of a sponge. Forget harsh chemicals and expensive cleaning products loaded with questionable ingredients. This method is eco-friendly, budget-friendly, and safe for your family and pets. It’s a win-win-win!
But the best part? It’s incredibly versatile. While we’ve focused on general cleaning applications, don’t be afraid to experiment. For tougher stains, consider adding a few drops of lemon essential oil to your baking soda paste for an extra boost of cleaning power and a refreshing scent. You can also adjust the consistency of the paste to suit different surfaces. A thicker paste is ideal for scrubbing grout, while a thinner consistency works well for delicate surfaces like stainless steel.
Another variation to consider is using different types of sponges. A melamine sponge (like a Magic Eraser) can be incredibly effective for removing scuff marks and stubborn stains, but be sure to test it in an inconspicuous area first, as it can be abrasive. For everyday cleaning, a standard cellulose sponge works perfectly well.
We’re confident that once you try this baking soda sponge cleaning trick, you’ll be amazed by the results. It’s a game-changer for tackling everything from soap scum in the bathroom to burnt-on food in the kitchen. It’s a simple solution to a common problem, and it’s one that you can feel good about using.
So, ditch the harsh chemicals and embrace the power of baking soda! We encourage you to give this DIY cleaning trick a try and see for yourself how effective it can be. And most importantly, we want to hear about your experience! Share your before-and-after photos, your tips and tricks, and any variations you’ve discovered in the comments below. Let’s build a community of clean-loving DIYers who are passionate about finding simple, effective, and eco-friendly cleaning solutions. Your insights could help others discover the magic of baking soda and transform their cleaning routines. We can’t wait to hear from you!
Frequently Asked Questions (FAQ)
1. What exactly is the baking soda sponge cleaning trick?
The baking soda sponge cleaning trick involves creating a paste of baking soda and water (or sometimes other ingredients like lemon juice or essential oils) and using a sponge to apply it to surfaces you want to clean. The mild abrasive properties of baking soda, combined with the scrubbing action of the sponge, help to lift dirt, grime, and stains without harsh chemicals. It’s a simple, effective, and eco-friendly alternative to many commercial cleaning products.
2. What surfaces can I safely clean with baking soda and a sponge?
Baking soda is generally safe for a wide range of surfaces, but it’s always a good idea to test it in an inconspicuous area first, especially on delicate or easily scratched materials. Some surfaces that are typically safe to clean with baking soda include:
* Stainless steel (avoid excessive scrubbing to prevent scratching)
* Ceramic tile
* Porcelain
* Sinks and bathtubs
* Ovens and stovetops
* Countertops (excluding marble and granite, see below)
* Grout
* Plastic
* Glass (for light cleaning)
Avoid using baking soda on marble, granite, or other natural stone surfaces, as it can etch and damage them. Also, avoid using it on wood furniture with a delicate finish.
3. How do I make the baking soda paste? What’s the right consistency?
The basic recipe is simple: mix baking soda with enough water to form a paste. Start with a small amount of water and gradually add more until you achieve the desired consistency.
* For general cleaning, a slightly runny paste is ideal. It should be thick enough to cling to the sponge but thin enough to spread easily.
* For tougher stains or grout cleaning, a thicker paste is recommended. This will provide more abrasive power.
You can also experiment with adding other ingredients to the paste, such as lemon juice (for extra cleaning power and a fresh scent) or a few drops of your favorite essential oil.
4. Can I use this trick to clean my oven?
Yes, the baking soda sponge cleaning trick is excellent for cleaning ovens! Here’s how:
1. Remove any loose debris from the oven.
2. Make a thick baking soda paste.
3. Spread the paste evenly throughout the oven, avoiding the heating elements.
4. Let the paste sit overnight (or for at least several hours).
5. The next day, use a damp sponge to scrub away the loosened grime and baking soda paste.
6. Rinse thoroughly with clean water.
For stubborn burnt-on food, you may need to repeat the process or use a more abrasive sponge.
5. Is baking soda safe to use around children and pets?
Yes, baking soda is generally considered safe to use around children and pets. It’s a non-toxic substance, unlike many commercial cleaning products that contain harsh chemicals. However, it’s always a good idea to keep baking soda out of reach of young children and pets to prevent accidental ingestion. While ingesting small amounts of baking soda is unlikely to cause serious harm, it can lead to stomach upset.
6. How often should I use the baking soda sponge cleaning trick?
The frequency with which you use this cleaning trick depends on your cleaning habits and the level of grime in your home. For general cleaning, you can use it as often as needed. For tougher stains or areas that require more frequent cleaning (like the kitchen sink or bathroom), you may want to use it once or twice a week.
7. What kind of sponge should I use?
The type of sponge you use depends on the surface you’re cleaning and the level of scrubbing required.
* For general cleaning, a standard cellulose sponge works well.
* For tougher stains or scuff marks, a melamine sponge (like a Magic Eraser) can be very effective, but be sure to test it in an inconspicuous area first, as it can be abrasive.
* For delicate surfaces, use a soft sponge or cloth to avoid scratching.
8. Can I use this trick to remove hard water stains?
Yes, baking soda can be effective in removing hard water stains. The mild abrasive properties of baking soda help to loosen the mineral deposits that cause hard water stains. For best results, make a thick baking soda paste and apply it to the affected area. Let it sit for a few minutes, then scrub with a sponge and rinse thoroughly. You can also try combining baking soda with vinegar for an even more powerful cleaning solution (but be careful, as this mixture can create a fizzing reaction).
9. What if the baking soda paste dries out and becomes difficult to remove?
If the baking soda paste dries out and becomes difficult to remove, simply dampen it with a wet sponge or cloth. Let the water soak in for a few minutes to soften the paste, then scrub it away. You can also use a spray bottle filled with water to re-wet the paste.
10. Can I use this trick to clean my grout?
Absolutely! The baking soda sponge cleaning trick is fantastic for cleaning grout. Make a thick paste of baking soda and water, apply it to the grout lines, and let it sit for a few minutes. Then, use a stiff-bristled brush (like an old toothbrush) to scrub the grout. Rinse thoroughly with clean water. For stubborn stains, you can try adding a little vinegar to the baking soda paste.

Leave a Comment