
Bucket Potato Growing: Unlock the secrets to a bountiful harvest, even without a sprawling garden! Have you ever dreamed of harvesting your own homegrown potatoes, bursting with flavor and freshness, but felt limited by space? Well, dream no more! This DIY guide is your passport to potato paradise, right on your balcony, patio, or even a sunny windowsill.
Growing potatoes in containers, particularly buckets, isn’t a newfangled fad. In fact, resourceful gardeners have been employing similar techniques for generations, adapting to urban environments and limited land availability. Think of it as a modern twist on the age-old tradition of cultivating your own food, a practice deeply rooted in human history and self-sufficiency.
But why bucket potato growing, you ask? In today’s fast-paced world, many of us lack the time, space, or resources for traditional gardening. This method offers a simple, efficient, and incredibly rewarding way to enjoy the taste of homegrown potatoes without the commitment of a large garden plot. Imagine the satisfaction of digging into a bucket overflowing with freshly dug potatoes, knowing you nurtured them from tiny seed potatoes to delicious dinner staples. Plus, it’s a fantastic way to reduce your carbon footprint and connect with nature, even in the heart of the city. Let’s get started and I’ll show you how!
Grow Potatoes in a Bucket: A Beginner’s Guide
Hey there, fellow gardening enthusiasts! Ever dreamed of harvesting your own potatoes, but thought you didn’t have the space? Well, I’m here to tell you that you absolutely can, even if you only have a balcony or a small patio. The secret? Growing potatoes in a bucket! It’s a super fun, surprisingly productive, and incredibly easy DIY project. Let me walk you through the whole process, step-by-step.
What You’ll Need
Before we dive in, let’s gather our supplies. This is a pretty low-cost project, which is always a win in my book!
* A Large Bucket: Aim for a 5-gallon bucket at a minimum. The bigger, the better, as it gives the potatoes more room to grow. You can find these at most hardware stores, or even recycle an old one. Just make sure it’s clean!
* Seed Potatoes: These aren’t just any potatoes! Seed potatoes are specifically grown for planting and are certified disease-free. You can find them at garden centers or online. Choose a variety you love to eat! I personally love Yukon Gold for their creamy texture.
* Potting Mix: Don’t use garden soil directly in your bucket. It’s too heavy and doesn’t drain well. A good quality potting mix is essential for healthy potato growth.
* Optional: Compost: Adding compost to your potting mix will give your potatoes an extra boost of nutrients.
* Drill (Optional): If your bucket doesn’t have drainage holes, you’ll need a drill to create some.
* Water: Of course, we need water to keep our potatoes happy and hydrated.
* Fertilizer (Optional): A balanced fertilizer can help your potatoes grow even bigger and stronger. I like to use an organic fertilizer.
Preparing Your Bucket
This is a crucial step to ensure proper drainage and prevent your potatoes from rotting.
1. Drill Drainage Holes: If your bucket doesn’t already have them, drill several drainage holes in the bottom. I usually go for about 4-5 holes, spaced evenly around the bottom. This will prevent water from pooling and causing root rot.
2. Clean the Bucket: Give your bucket a good scrub with soap and water to remove any dirt or debris. This is especially important if you’re using a recycled bucket.
Preparing Your Seed Potatoes
Now, let’s get those seed potatoes ready for planting!
1. Chitting (Optional but Recommended): Chitting is the process of encouraging your seed potatoes to sprout before planting. This gives them a head start and can result in an earlier harvest. To chit your potatoes, place them in a cool, bright location (but not in direct sunlight) for a few weeks. You’ll see small sprouts, called “eyes,” start to emerge.
2. Cutting (If Necessary): If your seed potatoes are large, you can cut them into smaller pieces. Each piece should have at least one or two “eyes.” Let the cut pieces dry for a day or two before planting to prevent rotting. This allows the cut surfaces to callous over.
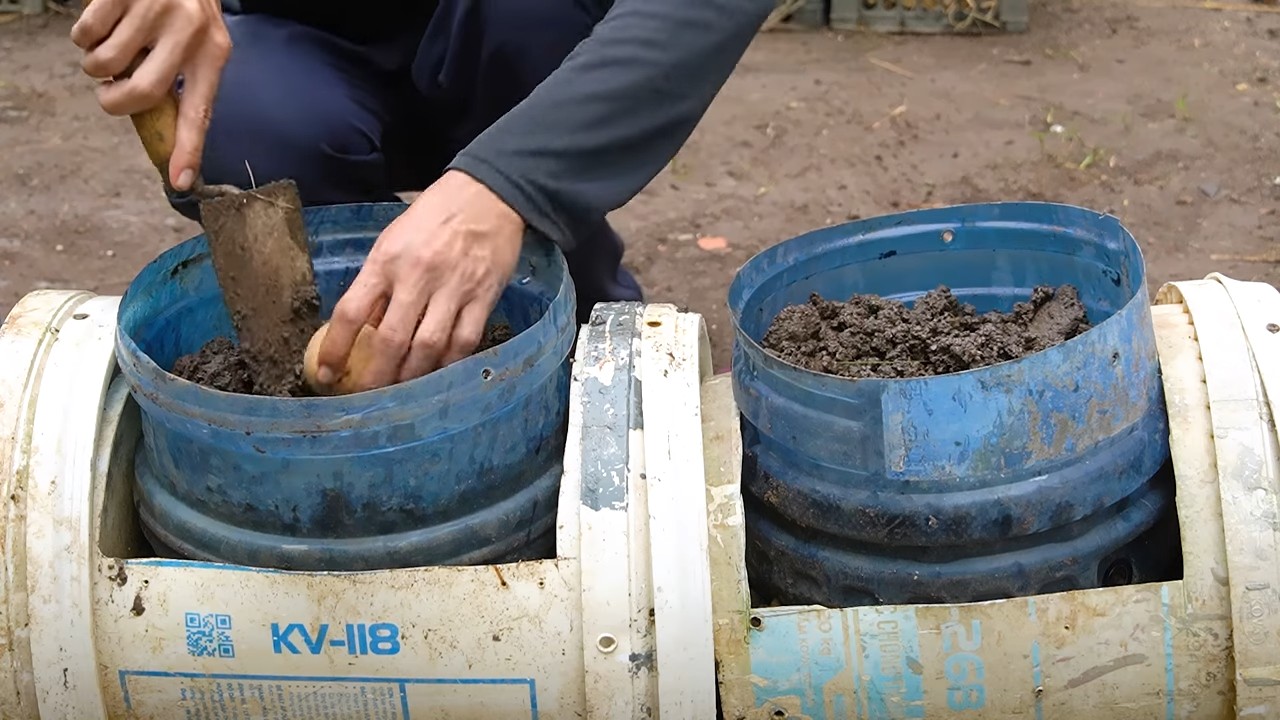
Planting Your Potatoes
Alright, the fun part! Let’s get those potatoes in the ground (or, in this case, the bucket!).
1. Add Soil to the Bucket: Fill the bottom of the bucket with about 4-6 inches of potting mix. Mix in some compost if you’re using it.
2. Place the Seed Potatoes: Place the seed potatoes on top of the soil, with the “eyes” facing upwards. Space them evenly if you’re planting multiple pieces.
3. Cover with Soil: Cover the seed potatoes with another 4-6 inches of potting mix. Gently pat the soil down.
4. Water Thoroughly: Water the soil well until water drains out of the drainage holes.
“Hilling” Your Potatoes
This is where the magic happens! “Hilling” is the process of adding more soil to the bucket as the potato plants grow. This encourages the plants to produce more potatoes along the stem.
1. Wait for Sprouts: Wait until the potato plants have grown about 6-8 inches tall.
2. Add More Soil: Add more potting mix to the bucket, covering the stems of the plants, leaving only the top few leaves exposed.
3. Repeat: Repeat this process every few weeks as the plants continue to grow, until the bucket is almost full. This encourages the plant to produce more potatoes along the buried stem.
4. Water After Hilling: Water thoroughly after each hilling.
Caring for Your Potato Plants
Now that your potatoes are planted, it’s important to give them the care they need to thrive.
1. Watering: Water your potato plants regularly, especially during dry weather. The soil should be consistently moist, but not waterlogged. Check the soil moisture by sticking your finger into the soil. If it feels dry an inch or two down, it’s time to water.
2. Sunlight: Potato plants need at least 6-8 hours of sunlight per day. Place your bucket in a sunny location.
3. Fertilizing (Optional): If you’re using fertilizer, follow the instructions on the package. I like to use a balanced organic fertilizer every few weeks.
4. Pest Control: Keep an eye out for pests, such as aphids or potato beetles. If you spot any, you can try hand-picking them off or using an organic insecticide.
5. Monitor for Diseases: Watch for signs of diseases, such as blight. If you suspect your plants have a disease, remove the affected leaves and dispose of them properly.
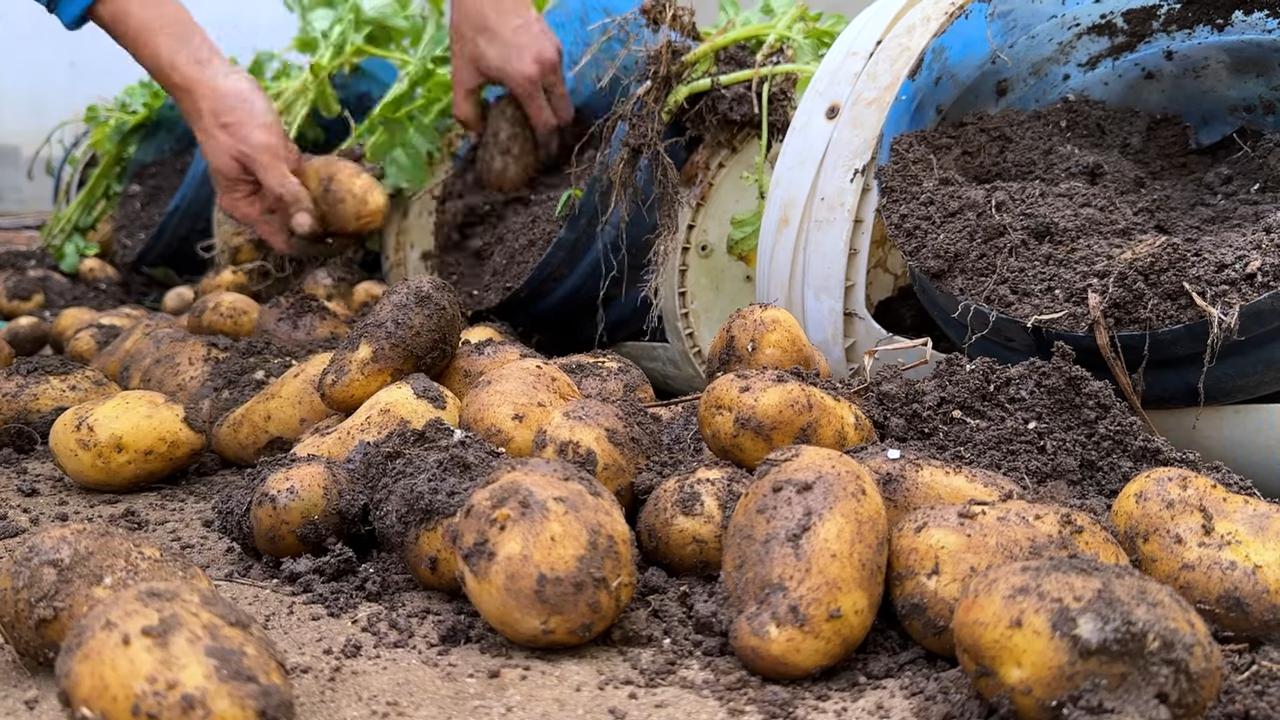
Harvesting Your Potatoes
The moment we’ve all been waiting for! Harvesting your own potatoes is incredibly rewarding.
1. When to Harvest: You can start harvesting “new potatoes” (small, immature potatoes) a few weeks after the plants flower. For larger, mature potatoes, wait until the plants start to die back and the foliage turns yellow or brown. This usually takes about 80-100 days.
2. How to Harvest: The easiest way to harvest potatoes from a bucket is to simply dump the bucket out onto a tarp or other surface. Gently sift through the soil to find the potatoes.
3. Curing (Optional): If you’re harvesting mature potatoes, you can cure them to help them store longer. To cure potatoes, spread them out in a cool, dark, and well-ventilated place for a week or two. This allows the skins to harden and helps prevent rotting.
Troubleshooting
Even with the best planning, sometimes things don’t go exactly as expected. Here are a few common problems you might encounter and how to deal with them:
* Potato Blight: This fungal disease can cause brown spots on the leaves and stems. To prevent blight, choose disease-resistant varieties and avoid overhead watering. If your plants get blight, remove the affected leaves and dispose of them properly.
* Pests: Aphids, potato beetles, and other pests can damage your potato plants. To control pests, try hand-picking them off, using an organic insecticide, or introducing beneficial insects.
* Lack of Potatoes: If your plants are growing well but not producing many potatoes, it could be due to a lack of sunlight, poor soil, or insufficient hilling. Make sure your plants are getting enough sunlight, use a good quality potting mix, and hill them regularly.
* Rotting Potatoes: Rotting potatoes can be caused by overwatering or poor drainage. Make sure your bucket has adequate drainage holes and avoid overwatering.
Choosing the Right Potato Variety
The type of potato you choose to grow will impact the taste, texture, and even the growing time. Here are a few popular varieties to consider:
* Yukon Gold: These are my personal favorite! They have a creamy texture and a slightly sweet flavor. They’re great for boiling, mashing, or roasting.
* Red Potatoes: These have a waxy texture and a slightly nutty flavor. They’re great for boiling, salads, or roasting.
* Russet Potatoes: These are the classic baking potato. They have a fluffy texture and a mild flavor.
* Fingerling Potatoes: These are small, elongated potatoes with a firm texture and a unique flavor. They’re great for roasting or salads.
* Purple Potatoes: These have a vibrant purple color and a slightly earthy flavor. They’re great for adding color to your dishes.
Tips for Success
Here are a few extra tips to help you grow the best potatoes possible:
* Use a dark-colored bucket: Dark-colored buckets absorb more heat, which can help the potatoes grow faster.
* Rotate your crops: Don’t plant potatoes in the same spot every year. This can help prevent diseases and pests.
* Add mulch: Mulch can help
Conclusion
So, there you have it! Growing potatoes in buckets is not just a gardening trend; it’s a game-changer for anyone who wants fresh, homegrown potatoes, regardless of their space limitations. We’ve walked you through the simple steps, highlighting the ease and efficiency of this method. But why is this DIY trick a must-try?
Firstly, it’s incredibly accessible. You don’t need acres of land or specialized equipment. A few buckets, some seed potatoes, and a bit of soil are all you need to embark on this rewarding journey. This makes it perfect for apartment dwellers, balcony gardeners, or anyone with limited yard space. Imagine stepping outside your door and harvesting your own delicious potatoes – a truly satisfying experience!
Secondly, bucket potato growing offers unparalleled control. You can easily manage the soil quality, watering, and sunlight exposure, ensuring optimal growing conditions for your potatoes. This level of control often translates to a higher yield and healthier, more flavorful potatoes compared to traditional in-ground gardening. Plus, the mobility of buckets allows you to chase the sun or protect your plants from unexpected frost.
Thirdly, it’s a fantastic learning experience. Whether you’re a seasoned gardener or a complete novice, growing potatoes in buckets is a fun and educational way to connect with nature and learn about the life cycle of plants. It’s also a great project to involve children, teaching them about where their food comes from and fostering a love for gardening.
But the beauty of bucket potato growing lies in its adaptability. Feel free to experiment with different potato varieties to find your favorites. Russets, Yukon Golds, fingerlings – the possibilities are endless! You can also try adding companion plants like marigolds or basil to your buckets to deter pests and attract beneficial insects. Consider using different types of soil mixes to see which one yields the best results in your specific climate.
For those looking to maximize their yield, consider using larger buckets or even stacking multiple buckets on top of each other to create a “potato tower.” This allows you to add more soil as the plants grow, encouraging the development of more potatoes along the stem. Remember to keep the soil consistently moist but not waterlogged, and fertilize regularly with a balanced fertilizer.
We are confident that once you try this method, you’ll be hooked. The satisfaction of harvesting your own homegrown potatoes is simply unmatched. So, grab some buckets, get your hands dirty, and experience the joy of bucket potato growing for yourself!
We encourage you to share your experiences with us! Post photos of your potato plants, share your tips and tricks, and let us know how your harvest went. We’re eager to hear your success stories and learn from your experiences. Let’s build a community of bucket potato growers and share the bounty of our gardens! Don’t forget to use the hashtag #BucketPotatoGrowing when you share your photos and stories on social media. Happy gardening!
Frequently Asked Questions (FAQ)
What size bucket is best for growing potatoes?
The ideal bucket size is generally between 5 and 10 gallons. A 5-gallon bucket is a good starting point, but a 10-gallon bucket will provide more room for the potatoes to develop and potentially increase your yield. The larger the bucket, the more soil you can add as the potato plants grow, encouraging the formation of more tubers along the stem. Make sure the bucket has drainage holes at the bottom to prevent waterlogging.
What kind of soil should I use for bucket potato growing?
A well-draining potting mix is essential for successful bucket potato growing. Avoid using garden soil, as it can be too heavy and compact, hindering root growth and drainage. A good potting mix should be light, airy, and rich in organic matter. You can also amend your potting mix with compost or aged manure to provide additional nutrients. A mix of equal parts potting soil, compost, and perlite or vermiculite is a great option.
How often should I water my potato plants in buckets?
Water your potato plants regularly, keeping the soil consistently moist but not waterlogged. The frequency of watering will depend on the weather conditions and the size of your bucket. In hot, dry weather, you may need to water daily, while in cooler, wetter weather, you may only need to water every few days. Check the soil moisture by sticking your finger about an inch into the soil. If it feels dry, it’s time to water. Avoid overwatering, as this can lead to root rot.
How much sunlight do potato plants need?
Potato plants need at least 6-8 hours of direct sunlight per day to thrive. Choose a location for your buckets that receives plenty of sunlight. If you live in a particularly hot climate, you may need to provide some afternoon shade to prevent the plants from overheating. The mobility of buckets makes it easy to move your plants to follow the sun or protect them from extreme weather conditions.
When is the best time to plant potatoes in buckets?
The best time to plant potatoes in buckets is in early spring, after the last frost. You can start your seed potatoes indoors a few weeks before planting to give them a head start. To do this, place the seed potatoes in a cool, bright location and allow them to sprout. Once the sprouts are about an inch long, you can plant the potatoes in your buckets.
How do I “hill” potatoes in buckets?
“Hilling” is the process of adding more soil to the bucket as the potato plants grow. This encourages the development of more potatoes along the stem. When you first plant your seed potatoes, fill the bucket with about 4-6 inches of soil. As the plants grow, gradually add more soil, covering the lower portion of the stem. Continue this process until the bucket is almost full.
How do I know when my potatoes are ready to harvest?
Potatoes are typically ready to harvest about 70-90 days after planting. The foliage will start to turn yellow and die back when the potatoes are mature. You can also gently dig around the base of the plant to check the size of the potatoes. If they are the size you desire, you can harvest them. To harvest, simply tip the bucket over and carefully remove the potatoes from the soil.
Can I reuse the soil from my potato buckets?
Yes, you can reuse the soil from your potato buckets, but it’s important to amend it with fresh compost or other organic matter to replenish the nutrients. You should also avoid planting potatoes in the same soil year after year, as this can increase the risk of disease. Rotate your crops or use fresh soil each year to ensure healthy potato plants.
What are some common pests and diseases that affect potato plants?
Some common pests that affect potato plants include aphids, potato beetles, and flea beetles. Common diseases include early blight, late blight, and potato scab. You can prevent pests and diseases by using healthy seed potatoes, providing good air circulation, and avoiding overwatering. If you do encounter pests or diseases, you can treat them with organic pesticides or fungicides.
Can I grow potatoes in buckets indoors?
While it’s possible to grow potatoes in buckets indoors, it can be challenging to provide them with the necessary sunlight and ventilation. If you do grow potatoes indoors, you’ll need to use grow lights to supplement the natural sunlight. You’ll also need to ensure good air circulation to prevent fungal diseases. Outdoor bucket potato growing is generally more successful and easier to manage.
Leave a Comment