
Chili pepper soil bag hack: Ever dreamt of harvesting fiery chilies right from your own backyard, but felt intimidated by the complexities of gardening? I get it! The thought of soil mixtures, drainage, and potential plant diseases can be overwhelming. But what if I told you there’s a super simple, almost foolproof way to grow thriving chili peppers, even if you’re a complete beginner?
For centuries, chili peppers have held a special place in cultures around the world, adding zest to cuisines and even playing a role in traditional medicine. From the ancient Aztecs to modern-day foodies, the love for these spicy fruits is undeniable. But you don’t need to be an expert gardener to enjoy the fruits (literally!) of your labor.
This DIY article unveils a game-changing chili pepper soil bag hack that simplifies the entire process. Forget about complicated garden beds and expensive pots! This method utilizes a readily available soil bag as your growing container, providing excellent drainage and aeration for your chili pepper plants. It’s perfect for small spaces, balconies, or anyone looking for a low-maintenance gardening solution. Plus, it’s incredibly budget-friendly! So, ditch the gardening anxieties and get ready to spice up your life with homegrown chili peppers. Let’s get started!

DIY: Boost Your Chili Plants with the Soil Bag Hack!
Hey everyone, today I’m going to show you a super simple and effective trick to really give your chili plants a boost! It’s all about reusing the empty soil bag that your chili soil came in and turning it into a small but potent nutrient booster. Sound strange? It’s actually brilliant! I’ve tried this myself and was totally thrilled with the results. So, let’s get started!
What you need:
- An empty soil bag from chili soil (or tomato soil works well too)
- A pair of scissors or a knife
- Water
- Optional: A watering can or a bucket
- Your chili plants (obviously!)
Why this hack works:
Before we go into detail, a brief explanation: A lot of organic material and nutrients always remain in empty soil bags. We can reactivate these by washing them out with water and making them available to our plants. Furthermore, the soil often still contains traces of fertilizer, which we can make optimal use of this way. This is not only good for the plants but also for the environment because we are conserving resources!
Step-by-Step Instructions:
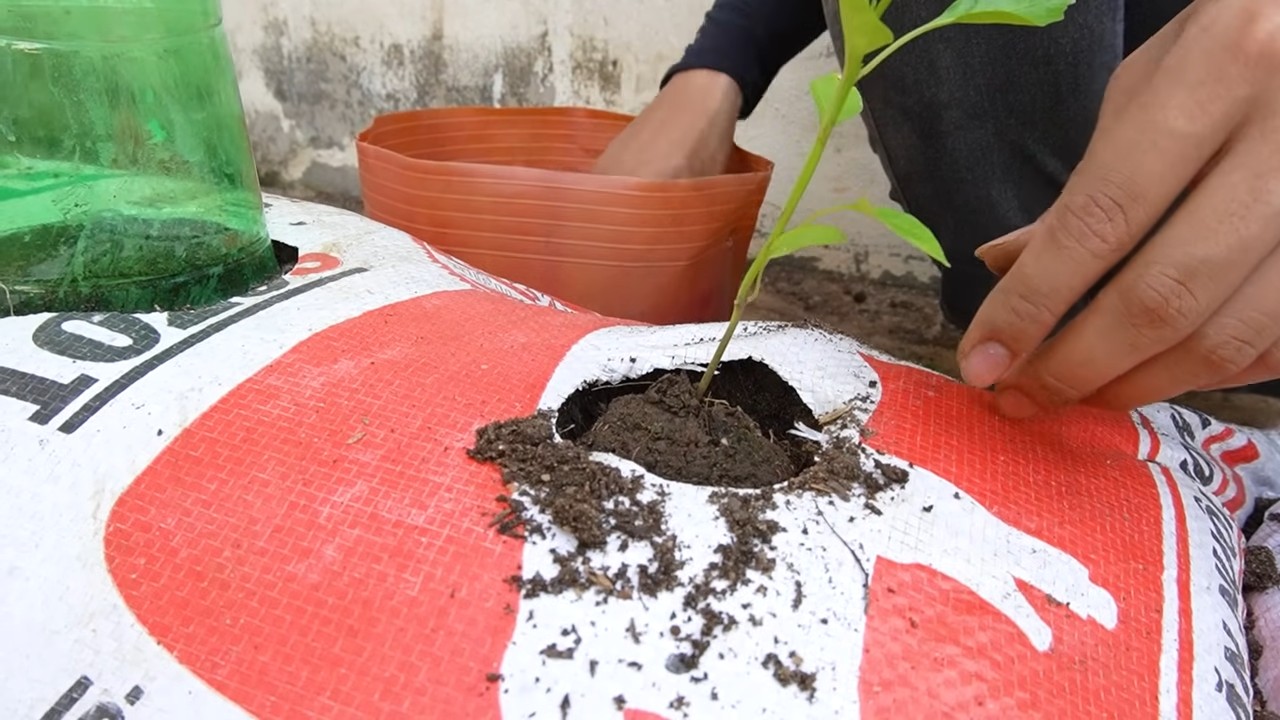
1. Prepare the bag: First, you cut open the empty soil bag. It’s best to cut along one side so you can open it completely. This makes it easier to get to the remaining soil and nutrients. Be careful not to lose too much soil; we want to use it!
2. Loosen the soil: Now, loosen the remaining soil in the bag. Sometimes it’s a bit hardened, so feel free to break it up a bit with your fingers or a small tool (e.g., a garden trowel). This will allow the water to penetrate better later.
3. Add water: Now, water comes into play. You can either fill the bag directly with a watering can or place it in a bucket and pour water over it there. I prefer the bucket method because you can better control how much water you use.
- Important: Don’t use too much water! The bag should not be completely flooded. It’s enough if the soil is well-moistened. I would say enough water to fill the bag about halfway.
4. Let it soak: Now it’s time to wait! Let the bag soak with the water for at least 24 hours. The longer, the better, as this allows the nutrients to dissolve optimally. I usually let it stand for 48 hours. You will see that the water turns brownish after some time – this is a good sign, as it means the nutrients are dissolving!
5. Pour off the “tea”: After the soaking time, you pour off the brown water. This is our chili plant tea! It’s best to use a watering can or a bucket for this. Be careful not to pour out the soil from the bag. You can also gently wring out the bag to get as much liquid as possible.
6. Water the plants: And now comes the best part: watering your chili plants! Water them with the chili plant tea, just as you would normally water them. Be careful not to overwater; the soil should be moist, but not wet.
- Dosage: I use the chili plant tea undiluted, but you can also dilute it with normal water if you want to be on the safe side. It is especially advisable to dilute the tea for young plants. A ratio of 1:1 (tea:water) is a good start.
7. Repeat: You can repeat this hack every few weeks to regularly supply your chili plants with nutrients. I usually do this every 2-3 weeks. You will see that your plants grow stronger and produce more fruit as a result!
Additional Tips and Tricks:
- Reuse the soil: By the way, you can also reuse the soil that remains in the bag! Simply mix it into your normal potting soil or use it for repotting your chili plants. This saves you money and helps the environment.
- Suitable for other plants: This hack works not only for chili plants but also for other vegetable and ornamental plants that have high nutrient requirements. Tomatoes, peppers, and eggplants especially benefit from it.
- Smell: The chili plant tea can have a bit of a strong smell, especially if it has been sitting for a few days. But that is completely normal and no cause for concern. The smell dissipates quickly.
- Alternative: Nettle Tea: If you want to go a step further, you can also combine the chili plant tea with nettle tea (nettle manure). Nettle tea is a natural fertilizer rich in nitrogen. Simply mix some nettle tea into the chili plant tea before watering your plants. But be warned: nettle tea smells even stronger than the chili plant tea!
Troubleshooting:
- Mold formation: If mold forms on the soil in the bag, it’s not a problem. The mold is harmless and does not affect the effectiveness of the chili plant tea. You can simply remove the mold before pouring off the water.
- Plants react negatively: Should your plants react negatively to the chili plant tea (e.g., with yellow leaves or stunted growth), dilute the tea more next time or use it less frequently. Every plant is different and reacts differently to fertilizer.
A few final words:
I hope this DIY hack helps you to really give your chili plants a boost! It’s truly a super simple and effective trick that costs hardly anything and can still make a big difference. Just give it a try and let me know how it worked out! I’m excited to hear about your experiences! And remember: gardening should be fun! So, good luck and a bountiful chili harvest!
Conclusion
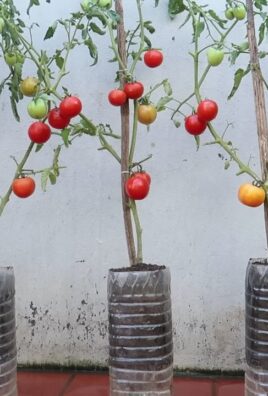
So, there you have it! This simple chili pepper soil bag hack is more than just a gardening shortcut; it’s a game-changer for anyone serious about growing vibrant, productive chili pepper plants. We’ve walked you through the steps, highlighting the benefits of improved drainage, enhanced warmth, and reduced transplant shock. But why is this method a must-try?
Firstly, it’s incredibly cost-effective. Instead of investing in expensive pots and specialized potting mixes, you’re repurposing the very bag your soil came in. This is a win for your wallet and a win for the environment. Secondly, it’s remarkably convenient. The bag acts as a self-contained growing environment, minimizing mess and making watering and feeding a breeze. Thirdly, and perhaps most importantly, it works! The improved drainage and warmth create the ideal conditions for chili pepper roots to thrive, leading to healthier plants and a bountiful harvest.
But the beauty of this chili pepper soil bag hack lies in its adaptability. Feel free to experiment with different soil amendments to tailor the growing medium to your specific chili pepper variety. Consider adding perlite for even better drainage, or compost for an extra boost of nutrients. You can also adjust the size of the drainage holes based on your local climate and watering habits. If you live in a particularly rainy area, larger holes might be necessary to prevent waterlogging. Conversely, in drier climates, smaller holes can help retain moisture.
For those looking to take this hack to the next level, consider creating a mini-greenhouse effect by placing a clear plastic bag over the top of the chili pepper plant during cooler evenings. This will trap heat and humidity, further accelerating growth. Another variation is to use different types of soil bags. While standard potting soil bags work perfectly well, you could also experiment with bags of compost or even bags of manure (ensure it’s well-rotted!).
We understand that trying new gardening techniques can be daunting, but we urge you to give this chili pepper soil bag hack a try. It’s simple, effective, and incredibly rewarding. Imagine the satisfaction of harvesting your own homegrown chili peppers, knowing that you nurtured them from seed to fruit using this ingenious method.
Don’t just take our word for it – experience the difference for yourself! We’re confident that you’ll be amazed by the results. And once you’ve tried it, we’d love to hear about your experience. Share your photos, tips, and variations in the comments section below. Let’s create a community of chili pepper enthusiasts who are passionate about growing their own delicious, fiery peppers using this innovative and sustainable technique. Your insights could inspire others to embark on their own chili pepper growing journey. Happy gardening!
FAQ
What type of soil is best for this chili pepper soil bag hack?
The best type of soil for this hack is a well-draining potting mix specifically formulated for vegetables. Avoid using garden soil, as it tends to be too heavy and can compact in the bag, hindering drainage and root growth. Look for a potting mix that contains ingredients like peat moss, perlite, and vermiculite. These components help to improve drainage, aeration, and water retention. You can also amend your potting mix with compost for added nutrients. For specific chili pepper varieties, research their preferred soil pH and nutrient requirements and adjust your soil mix accordingly.
How often should I water my chili pepper plants grown in soil bags?
Watering frequency depends on several factors, including the size of the plant, the weather conditions, and the type of soil used. As a general rule, water when the top inch of soil feels dry to the touch. Avoid overwatering, as this can lead to root rot. When you water, water deeply until water drains out of the drainage holes at the bottom of the bag. During hot, sunny weather, you may need to water daily, while during cooler, cloudy weather, you may only need to water every few days. Monitor your plants closely and adjust your watering schedule as needed. A good way to check is to lift the bag. If it feels light, it’s likely time to water.
What kind of fertilizer should I use for chili peppers in soil bags?
Chili peppers are heavy feeders and require regular fertilization to produce a bountiful harvest. Use a balanced fertilizer with an NPK ratio (nitrogen, phosphorus, potassium) of around 5-10-10 or 10-10-10. You can also use a fertilizer specifically formulated for tomatoes or vegetables, as these typically contain the nutrients that chili peppers need. Start fertilizing your plants a few weeks after transplanting them into the soil bags. Follow the instructions on the fertilizer package for application rates and frequency. You can also supplement with organic fertilizers like compost tea or fish emulsion. Avoid over-fertilizing, as this can burn the roots and damage the plants.
How do I prevent pests and diseases when using this chili pepper soil bag hack?
Prevention is key when it comes to pests and diseases. Start by using healthy, disease-free seedlings. Ensure good air circulation around your plants by spacing them adequately. Regularly inspect your plants for signs of pests or diseases, such as aphids, whiteflies, or powdery mildew. If you spot any problems, take action immediately. You can use organic pest control methods like insecticidal soap or neem oil to control pests. For diseases, remove any infected leaves or stems and treat the plants with a fungicide if necessary. Good drainage is also crucial for preventing root rot and other soilborne diseases.
Can I reuse the soil bags for multiple seasons?
While you can technically reuse the soil bags, it’s generally not recommended. Over time, the soil in the bags can become depleted of nutrients and may harbor pests or diseases. The bags themselves can also degrade and become brittle. If you do choose to reuse the bags, make sure to thoroughly clean them with a bleach solution and replace the soil with fresh potting mix. It’s also a good idea to rotate your crops each season to prevent the buildup of soilborne diseases. For best results, it’s recommended to use fresh soil bags each year.
What if my chili pepper plants outgrow the soil bag?
While the soil bag hack is great for starting chili pepper plants, some varieties, especially larger ones, might eventually outgrow the bag. If you notice your plant becoming root-bound (roots circling the inside of the bag) or if it’s showing signs of stress, it’s time to transplant it into a larger container or directly into the ground. Carefully cut away the soil bag and gently loosen the roots before transplanting. Choose a location with well-draining soil and plenty of sunlight.
Can I use this method for other plants besides chili peppers?
Yes, this soil bag hack can be used for a variety of other plants, especially vegetables like tomatoes, peppers, eggplants, and herbs. The key is to choose plants that have similar growing requirements in terms of sunlight, water, and nutrients. You may need to adjust the size of the drainage holes or the type of soil used depending on the specific plant. Experiment and see what works best for you!
Leave a Comment