
Chili propagation from cuttings might sound intimidating, but trust me, it’s a surprisingly simple and rewarding way to expand your fiery pepper patch! Forget constantly buying new seedlings; with a few easy steps, you can clone your favorite chili plants and enjoy a continuous harvest of spicy goodness.
For centuries, gardeners have used cuttings to propagate plants, a technique rooted in ancient agricultural practices. While the exact origins of using cuttings for chili propagation are a bit hazy, the principle remains the same: harnessing a plant’s natural ability to regenerate and create new roots. Think of it as a botanical shortcut, bypassing the need for seeds and giving you a head start on the growing season.
Why should you bother with chili propagation from cuttings? Well, for starters, it’s incredibly cost-effective. Instead of shelling out money for new plants, you can simply use cuttings from your existing ones. Plus, it’s a fantastic way to preserve the unique characteristics of your favorite chili varieties. If you’ve got a plant that produces exceptionally flavorful or prolific peppers, cloning it ensures you’ll have more of the same. I’ve personally saved money and expanded my garden using this method, and I’m excited to share my tips and tricks with you! This DIY guide will walk you through the entire process, from selecting the right cuttings to nurturing them into thriving new chili plants. Get ready to unleash your inner gardener and experience the satisfaction of growing your own spicy peppers from scratch!
Propagating Chili Plants from Cuttings: A Spicy DIY Adventure!
Hey there, fellow chili enthusiasts! Ever wished you could clone your favorite chili plant, preserving its unique heat and flavor profile? Well, you absolutely can! Propagating chili plants from cuttings is a fantastic way to expand your chili garden without relying on seeds, and it’s surprisingly easy once you get the hang of it. I’m going to walk you through the entire process, step-by-step, so you can start creating chili clones in no time.
What You’ll Need: The Essential Toolkit
Before we dive in, let’s gather our supplies. Having everything ready beforehand will make the whole process smoother and more enjoyable.
* A Healthy Mother Plant: This is crucial! Choose a chili plant that’s thriving, disease-free, and producing the kind of chilies you want to replicate.
* Sharp, Sterile Cutting Tool: A clean razor blade, scalpel, or sharp pruning shears are essential. Sterilize them with rubbing alcohol to prevent the spread of diseases.
* Rooting Hormone (Optional but Recommended): This powder or gel encourages root development and increases your success rate. I highly recommend using it, especially if you’re a beginner.
* Rooting Medium: You have a few options here:
* Seed Starting Mix: A fine, well-draining mix is ideal.
* Perlite or Vermiculite: These provide excellent aeration and drainage.
* Coco Coir: A sustainable and effective option.
* Water: You can even root chili cuttings in water, although I find the success rate is higher with a solid medium.
* Small Pots or Containers: Choose pots that are about 2-3 inches in diameter.
* Clear Plastic Bag or Humidity Dome: This will help maintain high humidity around the cuttings, which is crucial for root development.
* Spray Bottle with Water: For misting the cuttings.
* Warm, Bright Location: Indirect sunlight is best. Avoid direct sunlight, which can scorch the cuttings.
* Labels: To keep track of your different chili varieties. Trust me, you’ll thank yourself later!
Taking the Cuttings: The Art of the Snip
Now for the fun part! Taking the cuttings is a delicate process, but don’t worry, I’ll guide you through it.
1. Timing is Key: The best time to take cuttings is in the morning when the plant is well-hydrated.
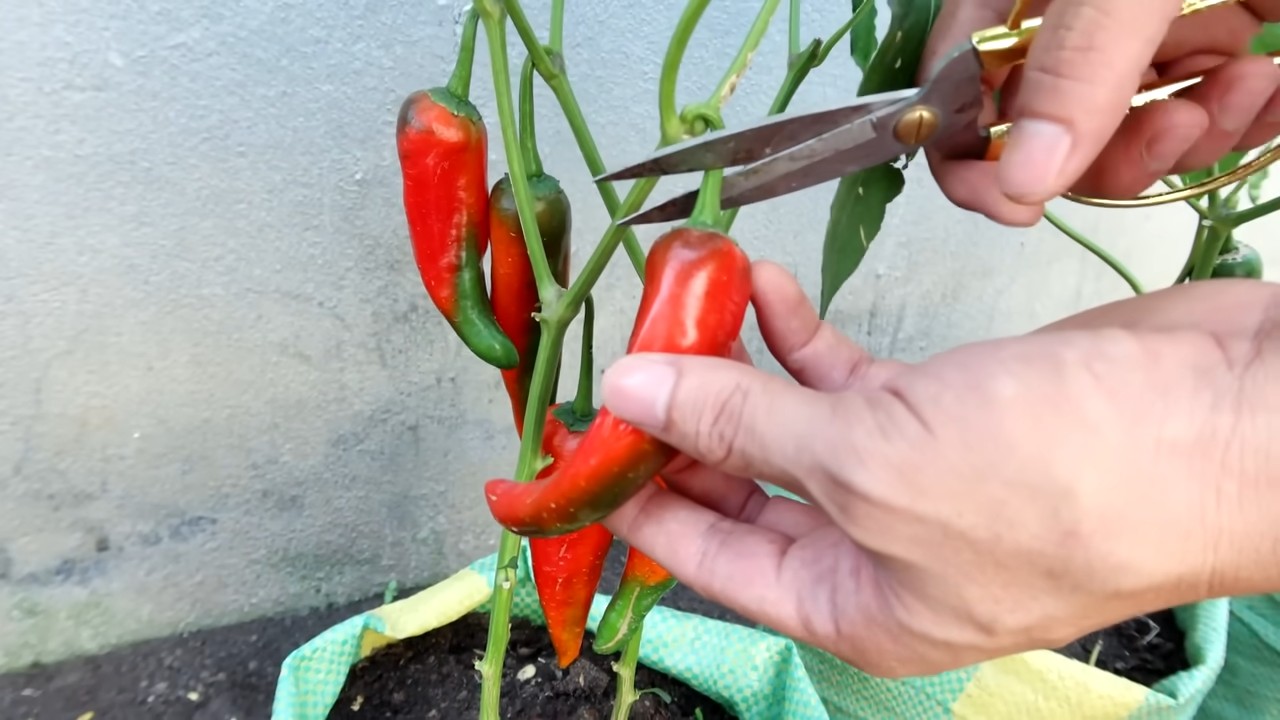
2. Choose the Right Stems: Look for healthy, non-flowering stems that are about 4-6 inches long. These are typically new growth.
3. Make the Cut: Using your sterilized cutting tool, make a clean, angled cut just below a node (the point where leaves emerge from the stem). An angled cut increases the surface area for root development.
4. Remove Lower Leaves: Remove the leaves from the bottom 1-2 inches of the cutting. This prevents them from rotting in the rooting medium and encourages root growth.
5. Reduce Leaf Size (Optional): If the remaining leaves are large, you can cut them in half to reduce water loss. This is especially helpful in drier environments.
Rooting the Cuttings: Nurturing New Life
This is where the magic happens! We’ll now prepare the cuttings for rooting and create the ideal environment for them to thrive.
1. Apply Rooting Hormone (Optional but Recommended): Dip the cut end of the cutting into the rooting hormone powder or gel. Tap off any excess. This will stimulate root growth and increase your chances of success.
2. Prepare the Rooting Medium: Moisten your chosen rooting medium with water. It should be damp but not soggy.
3. Plant the Cuttings: Make a small hole in the rooting medium with a pencil or your finger. Gently insert the cutting into the hole, ensuring that the bottom 1-2 inches are buried.
4. Gently Firm the Soil: Lightly press the soil around the cutting to secure it in place.
5. Water the Cuttings: Gently water the cuttings to settle the soil and provide moisture.
6. Create a Humid Environment: Place the pot inside a clear plastic bag or under a humidity dome. This will help maintain high humidity, which is essential for root development. If using a plastic bag, make sure it doesn’t touch the leaves to prevent rot. You can use skewers or straws to prop it up.
7. Provide Indirect Light: Place the cuttings in a warm, bright location that receives indirect sunlight. Avoid direct sunlight, which can scorch the leaves.
8. Maintain Humidity and Moisture: Mist the cuttings with water every day or two to keep the humidity high. Check the rooting medium regularly and water it if it starts to dry out.
9. Ventilate Regularly: Open the plastic bag or humidity dome for a few minutes each day to allow for air circulation and prevent fungal growth.
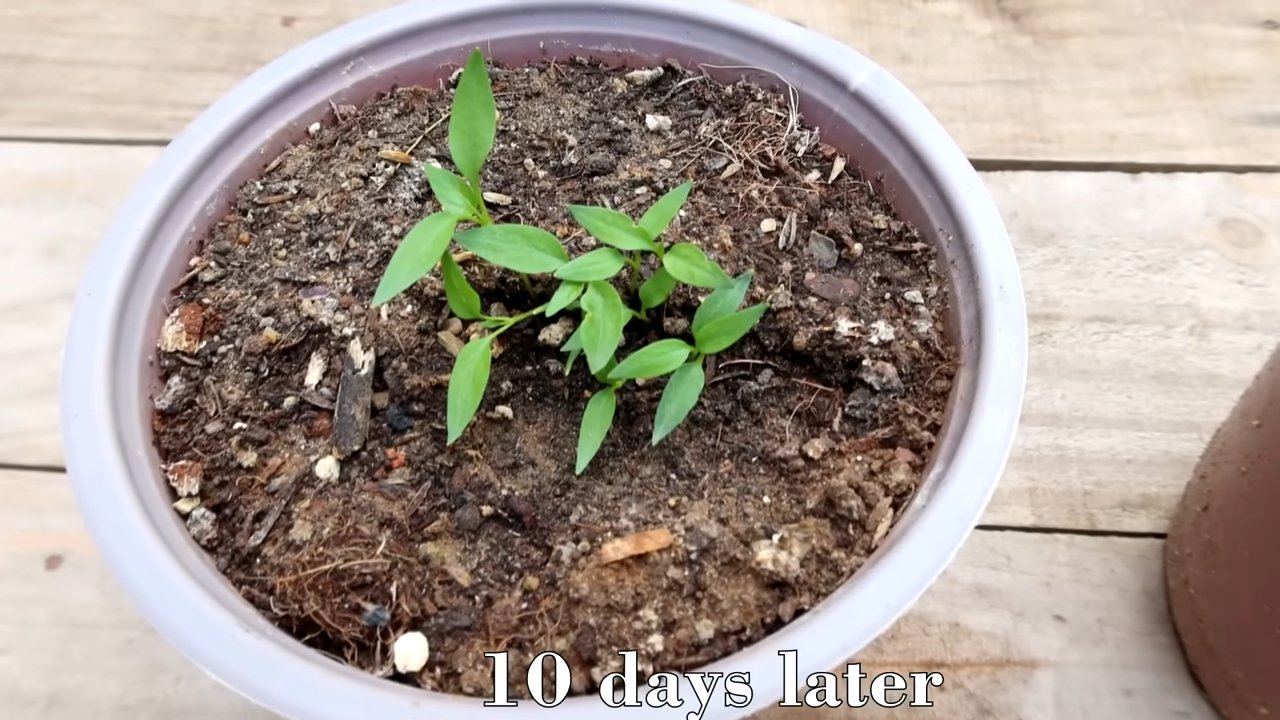
Checking for Roots: The Waiting Game
Patience is key! It typically takes 2-4 weeks for chili cuttings to develop roots.
1. Gently Tug Test: After about 2 weeks, gently tug on the cutting. If you feel resistance, it means roots have started to form.
2. Visual Confirmation: You can also gently remove the cutting from the rooting medium to check for roots. Be very careful not to damage the delicate roots.
3. Don’t Disturb Too Often: Avoid checking for roots too frequently, as this can disturb the cuttings and hinder their development.
Transplanting: Moving to a Bigger Home
Once the cuttings have developed a good root system, it’s time to transplant them into larger pots.
1. Choose the Right Pot: Select a pot that is at least 4 inches in diameter.
2. Prepare the Potting Mix: Use a well-draining potting mix that is suitable for chili plants.
3. Gently Remove the Cutting: Carefully remove the rooted cutting from the rooting medium, being careful not to damage the roots.
4. Plant the Cutting: Place the cutting in the new pot and fill it with potting mix. Gently firm the soil around the plant.
5. Water Thoroughly: Water the plant thoroughly to settle the soil and provide moisture.
6. Provide Sunlight: Place the plant in a sunny location that receives at least 6 hours of sunlight per day.
7. Fertilize Regularly: Fertilize the plant regularly with a balanced fertilizer to promote growth.
Troubleshooting: Common Issues and Solutions
Even with the best care, you might encounter some challenges along the way. Here are some common problems and how to address them:
* Cuttings Rotting: This is usually caused by excessive moisture or poor ventilation. Make sure the rooting medium is well-draining and that you’re ventilating the cuttings regularly. You can also try using a fungicide to prevent fungal growth.
* Cuttings Wilting: This is usually caused by insufficient humidity or water. Make sure the cuttings are in a humid environment and that you’re watering them regularly.
* Cuttings Not Rooting: This can be caused by a variety of factors, including poor quality cuttings, lack of rooting hormone, or unfavorable environmental conditions. Make sure you’re using healthy cuttings, applying rooting hormone, and providing adequate warmth, humidity, and light.
* Pests and Diseases: Keep an eye out for pests and diseases, such as aphids, spider mites, and fungal infections. Treat any infestations or infections promptly with appropriate pesticides or fungicides.
Tips for Success: My Personal Insights
Over the years, I’ve learned a few tricks that can significantly improve your success rate when propagating chili plants from cuttings:
* Take Multiple Cuttings: Not all cuttings will root, so it’s always a good idea to take multiple cuttings to increase your chances of success.
* Use a Heat Mat: Providing bottom heat can significantly speed up root development. A heat mat designed for seed starting is perfect for this.
* Be Patient: Rooting cuttings takes time, so don’t get discouraged if you don’t see results immediately. Just keep providing the right conditions and eventually, you’ll see roots emerge.
* Experiment with Different Rooting Mediums: Try different rooting mediums to see which one works best for you and your chili varieties.
* Keep Records: Keep track of your cuttings, including the date they were taken, the variety of chili, and the rooting medium used. This will help you learn from your successes and failures.
Enjoy Your Chili Clones!
And there you have it! You’ve successfully propagated chili plants from cuttings. Now you can enjoy an endless supply of your favorite chilies, all grown from clones of your best plants. Happy growing! I hope this detailed guide helps you on your chili propagation journey. Remember to be patient, observant,
Conclusion
So, there you have it! Propagating chili plants from cuttings is not just a fun gardening experiment; it’s a game-changer for chili lovers. It’s a cost-effective way to expand your chili garden, ensuring you have a continuous supply of your favorite peppers. More importantly, it allows you to clone your most productive and flavorful plants, guaranteeing consistent results year after year. Forget the uncertainty of seeds and the wait for them to mature. With this simple DIY trick, you can have new chili plants ready to fruit in a fraction of the time.
This method is particularly beneficial if you have a chili plant that’s producing exceptional peppers. Perhaps it’s a particularly spicy variety, or maybe it has a unique flavor profile. By taking cuttings, you’re essentially creating exact copies of that plant, preserving its desirable traits. This is something you can’t guarantee with seeds, as they can sometimes produce offspring with different characteristics.
But the benefits don’t stop there. Propagating from cuttings is also a great way to rescue a struggling chili plant. If your plant is damaged or diseased, you can often take healthy cuttings and start anew, giving you a second chance to enjoy its bounty. It’s also a fantastic way to share your favorite chili varieties with friends and family. Imagine gifting someone a cutting from your prized ghost pepper plant – a truly unique and thoughtful present!
Don’t be afraid to experiment with different types of chili plants. While this method works well for most varieties, some may be easier to propagate than others. Try taking cuttings from different parts of the plant, such as the top or side shoots, to see which ones root best. You can also experiment with different rooting mediums, such as perlite, vermiculite, or even just plain water.
Consider these variations to enhance your success:
* Rooting Hormone Boost: While not strictly necessary, dipping the cut ends in rooting hormone powder or gel can significantly speed up the rooting process and increase your chances of success.
* Humidity Control: Creating a humid environment around your cuttings is crucial for preventing them from drying out. You can achieve this by placing a plastic bag or dome over the cuttings, or by using a humidity tray.
* Light Management: While cuttings need light to photosynthesize, direct sunlight can be too harsh and cause them to wilt. Provide them with bright, indirect light, such as from a north-facing window or a grow light.
* Watering Wisely: Keep the rooting medium consistently moist, but not waterlogged. Overwatering can lead to root rot, which can kill your cuttings.
This DIY trick for chili propagation is a must-try for any chili enthusiast. It’s easy, affordable, and incredibly rewarding. So, grab your pruning shears, choose your favorite chili plant, and get started! We’re confident that you’ll be amazed at how simple and effective this method is.
We encourage you to try this method and share your experiences with us! Let us know which chili varieties you’ve propagated, what rooting medium you used, and any tips or tricks you’ve discovered along the way. Your feedback will help us improve this guide and help other chili lovers succeed in their propagation efforts. Happy growing!
Frequently Asked Questions (FAQ)
What types of chili plants can I propagate from cuttings?
Most chili varieties can be propagated from cuttings, including popular types like jalapenos, habaneros, serranos, and bell peppers (though bell peppers are less spicy, they are still part of the *Capsicum* family). However, some varieties may be easier to root than others. Experimenting with different types is part of the fun! Generally, younger, more vigorous plants will provide better cuttings than older, stressed plants. Also, consider the thickness of the stem; stems that are too thin may not have enough energy reserves to root successfully.
How long does it take for chili cuttings to root?
The rooting time can vary depending on several factors, including the chili variety, the rooting medium, the temperature, and the humidity. Generally, you can expect to see roots forming within 2-4 weeks. Be patient and avoid disturbing the cuttings too much during this time. You can gently tug on the cutting after a couple of weeks to feel if roots have started to form. If you feel resistance, it’s a good sign that roots are developing.
What is the best rooting medium for chili cuttings?
There are several suitable rooting mediums for chili cuttings, each with its own advantages and disadvantages. Some popular options include:
* Perlite: Perlite is a lightweight, porous material that provides excellent drainage and aeration. It’s a good choice for beginners as it’s relatively forgiving.
* Vermiculite: Vermiculite is another lightweight material that retains moisture well. It’s a good option for cuttings that need a consistently moist environment.
* Coco Coir: Coco coir is a sustainable alternative to peat moss. It has good water retention and aeration properties.
* Water: Rooting cuttings in water is a simple and effective method. Just make sure to change the water every few days to prevent algae growth.
* Seed Starting Mix: A fine-textured seed starting mix can also be used, but be careful not to overwater it.
Ultimately, the best rooting medium is the one that works best for you and your growing conditions. Experiment with different options to see which one yields the best results.
Do I need to use rooting hormone?
While not strictly necessary, using rooting hormone can significantly increase your chances of success and speed up the rooting process. Rooting hormone contains auxins, which are plant hormones that promote root development. You can find rooting hormone in powder or gel form at most garden centers. To use it, simply dip the cut end of the cutting in the hormone before planting it in the rooting medium.
How much light do chili cuttings need?
Chili cuttings need light to photosynthesize and produce energy for root development. However, direct sunlight can be too harsh and cause them to wilt. Provide them with bright, indirect light, such as from a north-facing window or a grow light. If you’re using a grow light, keep it a few inches away from the cuttings to prevent them from burning.
How often should I water chili cuttings?
Keep the rooting medium consistently moist, but not waterlogged. Overwatering can lead to root rot, which can kill your cuttings. Check the moisture level of the rooting medium regularly and water when the top inch feels dry to the touch. You can also use a spray bottle to mist the cuttings with water to keep them hydrated.
How do I know when the cuttings are ready to be transplanted?
You’ll know the cuttings are ready to be transplanted when they have developed a healthy root system. This usually takes 2-4 weeks. Gently tug on the cutting to feel if it’s firmly rooted in the rooting medium. You should also be able to see roots emerging from the bottom of the container.
What kind of soil should I use for transplanting chili cuttings?
Use a well-draining potting mix that’s rich in organic matter. You can also amend the soil with compost or other organic amendments to improve its fertility. Avoid using garden soil, as it can be too heavy and compacted.
Can I propagate chili plants from cuttings in the winter?
Yes, you can propagate chili plants from cuttings in the winter, but you’ll need to provide them with adequate light and warmth. Use a grow light to supplement natural light and keep the cuttings in a warm location, such as a heated greenhouse or a sunny windowsill.
What are some common problems when propagating chili plants from cuttings?
Some common problems when propagating chili plants from cuttings include:
* Root rot: This is caused by overwatering and can be prevented by using a well-draining rooting medium and avoiding overwatering.
* Wilting: This is caused by dehydration and can be prevented by keeping the cuttings in a humid environment and misting them with water regularly.
* Fungal diseases: These can be prevented by using sterile tools and a clean rooting medium.
* Lack of root development: This can be caused by insufficient light, warmth, or humidity. Make sure to provide the cuttings with optimal growing conditions.
By following these tips and troubleshooting any problems that arise, you can successfully propagate chili plants from cuttings and enjoy a bountiful harvest of your favorite peppers.
Leave a Comment