
Coconut shell lettuce planter: Ever dreamt of snipping fresh, vibrant lettuce right from your own backyard, or even your balcony? Imagine the satisfaction of knowing exactly where your food comes from, and the joy of nurturing life with your own hands. Well, you can turn that dream into reality with a charming and eco-friendly project: a DIY coconut shell lettuce planter!
For centuries, cultures around the world have utilized every part of the coconut palm, recognizing its incredible versatility. From building materials to nourishing food and drink, the coconut has been a symbol of resourcefulness and sustainability. Now, we’re taking that tradition a step further by repurposing the humble coconut shell into a delightful home for your leafy greens.
Why should you embrace this DIY trick? Because it’s more than just a cute planter! In today’s world, where concerns about food security and environmental impact are growing, creating your own coconut shell lettuce planter is a small but meaningful step towards a more sustainable lifestyle. Plus, it’s incredibly easy and affordable. I’ll guide you through the process, showing you how to transform a discarded coconut shell into a thriving mini-garden. Not only will you have fresh lettuce at your fingertips, but you’ll also be reducing waste and adding a touch of tropical charm to your space. Let’s get started!
DIY Coconut Shell Salad Planters: A Tropical Touch for Your Garden
Hey garden friends! Have you ever wondered what to do with the empty coconut shells after a delicious tropical drink? Throw them away? Never! Let’s turn them into unique and eco-friendly salad planters that will add a touch of the exotic to your garden or balcony. I’ll show you how to transform these shells into beautiful mini-gardens with simple materials and a little creativity.
Required Materials and Tools
Before we get started, here’s a list of the things you’ll need:
- Empty coconut shells (halved and cleaned)
- Drill with a small drill bit
- Potting soil
- Lettuce seeds or small lettuce plants
- Optional: Coconut coir substrate or expanded clay for drainage
- Optional: Acrylic paint and brushes for decoration
- Optional: Clear varnish to seal the paint
- Optional: Jute or hemp rope for hanging
Preparing the Coconut Shells
This step is crucial to ensure your planters last a long time and that water can drain well.
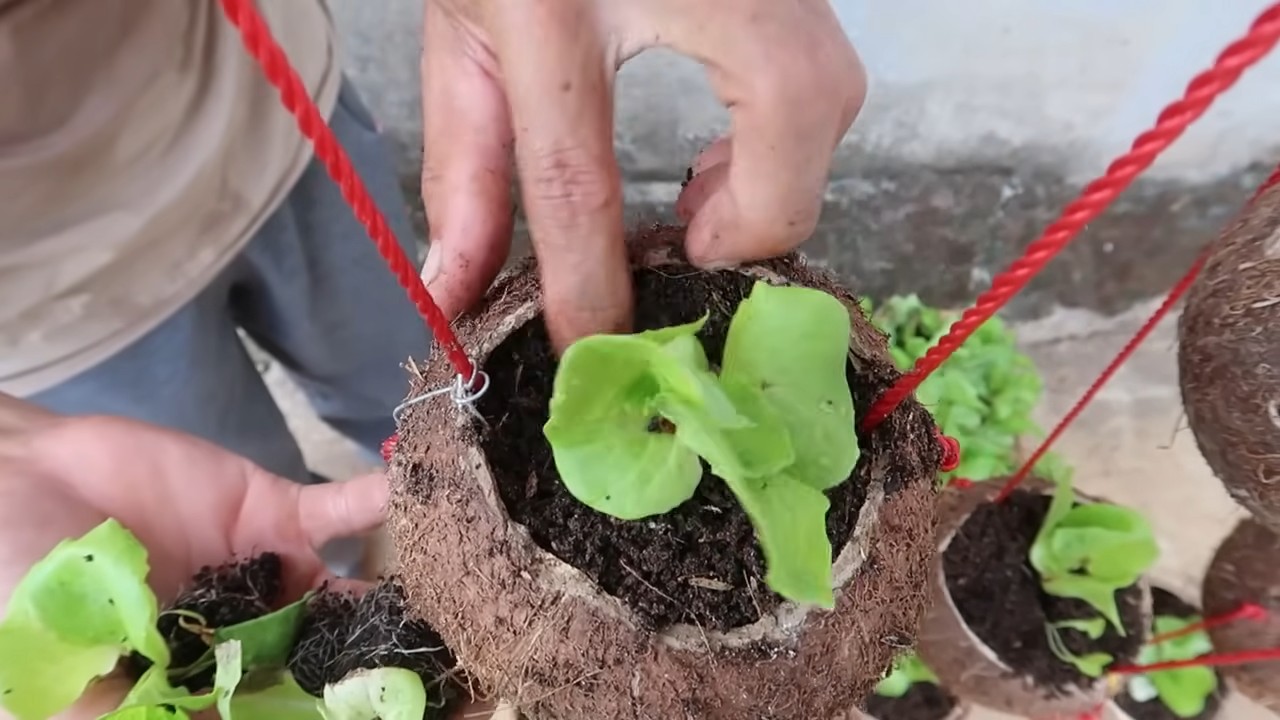
- Cleaning the Shells: After you’ve enjoyed the coconut water and flesh, clean the shells thoroughly with warm water and dish soap. Remove all remnants of the flesh to prevent mold from forming. Let the shells dry completely.
- Drilling Drainage Holes: Take your drill and carefully drill 3-4 small holes in the bottom of each coconut shell. These holes are important so that excess water can drain away and the roots of your lettuce plants don’t rot. Be careful not to apply too much pressure, as the shell could break.
- Optional: Sanding the Edges: If the edges of the shells are sharp, you can smooth them with sandpaper to avoid injuries.
Design and Decoration (Optional)
Here you can let your creativity run wild! Turn your coconut shells into little works of art.
- Painting the Shells: If you want to make your planters more colorful, you can paint them with acrylic paint. Choose colors that you like and that match your garden or balcony well. Let the paint dry completely before moving on to the next step.
- Sealing the Paint: To protect the paint from the elements, you can seal the painted shells with clear varnish. Apply the varnish evenly and let it dry well.
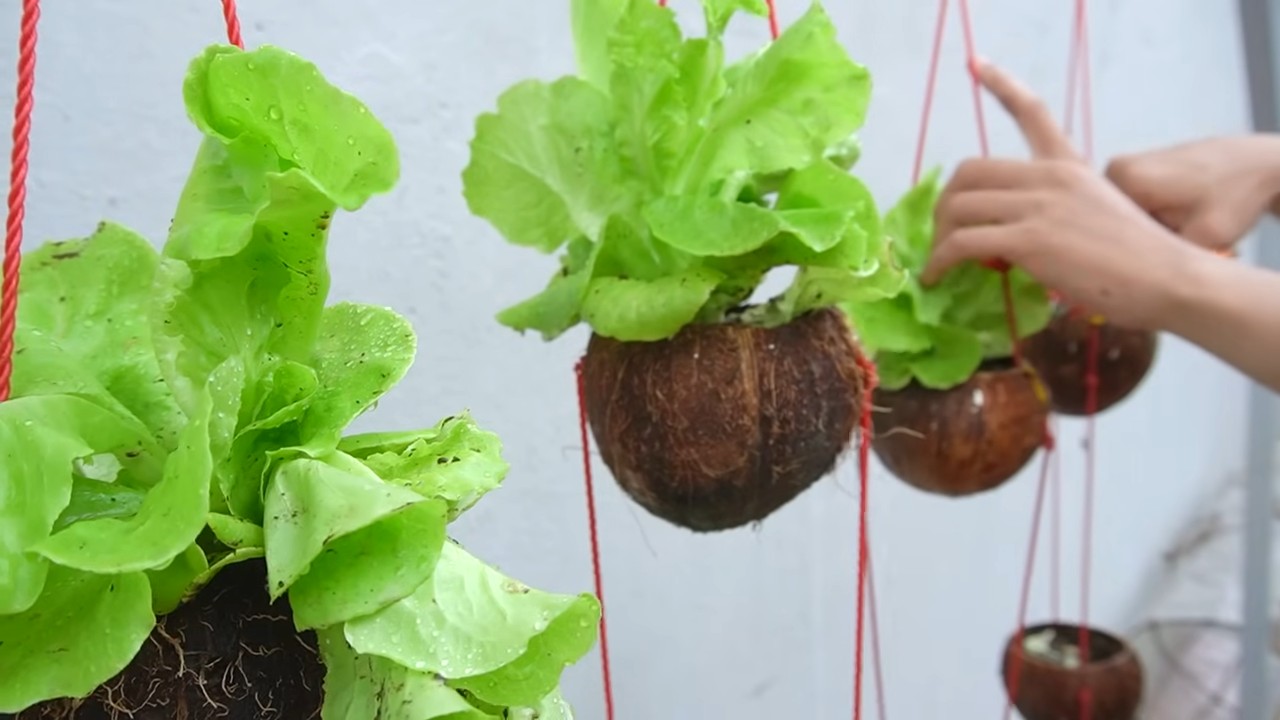
- Attaching Ropes for Hanging: If you want to hang your salad planters, drill two holes opposite each other at the top edge of the shell. Thread a piece of jute or hemp rope through the holes and tie it securely. Make sure the rope is strong enough to support the weight of the planted shell.
Planting the Coconut Shells
Now comes the fun part: planting!
- Adding a Drainage Layer (Optional): To ensure good drainage, you can add a layer of coconut coir substrate or expanded clay to the bottom of the shell. This prevents waterlogging and promotes healthy growth of the lettuce plants.
- Filling with Potting Soil: Fill the coconut shell with high-quality potting soil. Make sure the soil is loose and well-draining.
- Planting Lettuce: Make small holes in the soil and place your lettuce seeds or small lettuce plants inside. Make sure the roots are well covered with soil.
- Watering: Gently water the planted shells until the soil is well moistened. Avoid waterlogging.
Caring for Your Coconut Shell Salad Planters
Proper care is important for your lettuce plants to thrive.
- Location: Place your coconut shell salad planters in a sunny spot that receives at least 6 hours of sunlight per day. Lettuce prefers a cool location, so avoid direct midday sun.
- Watering: Water your lettuce plants regularly, especially on hot days. The soil should always be slightly moist, but not wet. Check the soil’s moisture by inserting your finger about 2 cm deep into the soil.
- Fertilizing: Fertilize your lettuce plants every 2-3 weeks with an organic liquid fertilizer. Follow the instructions on the packaging.
- Pest Protection: Regularly check your lettuce plants for pests like snails or aphids. Remove pests by hand if necessary or use an organic pesticide.
- Harvesting: Harvest your lettuce as soon as the leaves are large enough. Cut off the outer leaves so that the inner leaves can continue to grow.
Additional Tips and Tricks
- Different Lettuce Varieties: Experiment with different types of lettuce to create your own favorite mixes. Leaf lettuce, romaine lettuce, lamb’s lettuce, or arugula are good options for growing in coconut shells.
- Combination with Other Herbs: Plant other herbs like parsley, chives, or basil in your coconut shells alongside the lettuce. These herbs complement the taste of the lettuce and help deter pests.
- Upcycling Other Materials: Use old T-shirts or fabric scraps to line the coconut shells. This helps retain moisture and prevents soil from escaping through the drainage holes.
- Hardy Lettuce Varieties: If you want to grow lettuce in the winter, choose hardy varieties like lamb’s lettuce or winter purslane. These varieties can tolerate colder temperatures.
- Labeling the Planters: Label your coconut shell salad planters with small signs so you know which type of lettuce is growing in which shell. You can use small wooden sticks or labels for this.
- Coconut Shells as a Gift: Planted coconut shells also make a great gift idea for friends and family who enjoy gardening.
Avoiding Common Mistakes
- Overwatering: Avoid waterlogging, as this can lead to root rot. Make sure the water can drain well.
- Too Little Sunlight: Lettuce needs enough sunlight to grow well. Place your planters in a sunny location.
- Wrong Soil: Use high-quality potting soil that is loose and well-draining. Avoid heavy garden soil.
- Neglecting Care: Water, fertilize, and check your lettuce plants regularly to ensure they stay healthy.
With these tips and tricks, you can easily make your own coconut shell salad planters and beautify your garden or balcony with a tropical touch. Happy gardening! And remember: every coconut shell you reuse is a small contribution to protecting the environment. Let’s make the world a little greener together!
Conclusion
So, there you have it! Transforming discarded coconut shells into charming and functional lettuce planters is not just a fun DIY project; it’s a sustainable and aesthetically pleasing way to grow your own fresh greens. This simple yet effective method offers a multitude of benefits, from reducing waste and promoting eco-consciousness to providing you with a constant supply of delicious, homegrown lettuce right at your fingertips.
Why is this DIY trick a must-try? Because it’s incredibly easy, cost-effective, and yields impressive results. You’re not just planting lettuce; you’re creating a miniature ecosystem, a conversation starter, and a testament to the beauty of repurposing. Imagine the satisfaction of harvesting crisp, vibrant lettuce leaves from a planter you crafted yourself, knowing you’ve contributed to a more sustainable lifestyle. Plus, the natural aesthetic of the coconut shell adds a rustic charm to any garden, balcony, or windowsill.
But the possibilities don’t stop there! Feel free to experiment with different variations to personalize your coconut shell lettuce planters. Consider painting the shells with vibrant colors or intricate designs to match your décor. You could also add drainage holes to the bottom for improved water flow, especially if you live in a humid climate. Another fantastic idea is to create a hanging planter by attaching sturdy ropes or chains to the coconut shell, adding a touch of bohemian flair to your space.
For a more advanced project, you could even try creating a tiered planter system using multiple coconut shells of varying sizes, creating a visually stunning and highly productive vertical garden. Think about adding companion plants like herbs (basil, chives, or parsley) to your coconut shell lettuce planter to enhance the flavor of your lettuce and deter pests naturally. You can also use different types of lettuce seeds to create a colorful and diverse salad mix.
Don’t be afraid to get creative and adapt this DIY trick to suit your own preferences and needs. The beauty of this project lies in its versatility and the endless opportunities for customization.
We wholeheartedly encourage you to try this DIY coconut shell lettuce planter project. It’s a rewarding experience that connects you with nature, promotes sustainability, and provides you with fresh, healthy food. Once you’ve created your own coconut shell lettuce garden, we’d love to hear about your experience! Share your photos, tips, and variations with us in the comments below. Let’s inspire each other to embrace sustainable living and enjoy the simple pleasures of homegrown food. Happy planting!
Frequently Asked Questions (FAQ)
1. What type of lettuce grows best in a coconut shell planter?
Almost any type of lettuce can thrive in a coconut shell planter, but some varieties are particularly well-suited due to their compact size and relatively shallow root systems. Loose-leaf varieties like Romaine, Butterhead, and Oakleaf lettuce are excellent choices. These types of lettuce are easy to harvest leaf by leaf, allowing you to enjoy a continuous supply of fresh greens. Mesclun mixes, which contain a variety of different lettuce types, are also a great option for adding diversity to your salads. Avoid head lettuce varieties like iceberg, as they require more space and may not thrive as well in a smaller container.
2. How do I prepare the coconut shell for planting?
Preparing the coconut shell is a crucial step for ensuring the success of your lettuce planter. First, thoroughly clean the shell to remove any remaining coconut flesh or fibers. You can use a stiff brush and warm, soapy water to scrub the inside and outside of the shell. Rinse it well and allow it to dry completely. Next, consider adding drainage holes to the bottom of the shell. This will prevent waterlogging and ensure that the lettuce roots don’t rot. You can drill a few small holes using a drill or carefully poke holes with a nail and hammer. Finally, line the inside of the shell with a layer of landscape fabric or burlap to prevent the soil from washing out through the drainage holes.
3. What type of soil should I use for my coconut shell lettuce planter?
The ideal soil for your coconut shell lettuce planter is a well-draining potting mix that is rich in organic matter. A good quality potting mix will provide the necessary nutrients for healthy lettuce growth and will retain moisture without becoming waterlogged. You can also amend the potting mix with compost or aged manure to further enrich the soil and improve its drainage. Avoid using garden soil, as it can be too heavy and compacted for container gardening.
4. How often should I water my coconut shell lettuce planter?
The frequency of watering will depend on several factors, including the climate, the type of soil you’re using, and the size of the coconut shell. As a general rule, you should water your lettuce planter whenever the top inch of soil feels dry to the touch. Avoid overwatering, as this can lead to root rot. When watering, water thoroughly until the water drains out of the drainage holes. During hot, dry weather, you may need to water your lettuce planter more frequently.
5. Where should I place my coconut shell lettuce planter?
Lettuce thrives in a location that receives at least six hours of sunlight per day. However, in hot climates, it’s best to provide some afternoon shade to prevent the lettuce from bolting (going to seed). A balcony, patio, or windowsill that receives morning sun and afternoon shade is an ideal location for your coconut shell lettuce planter. You can also use grow lights to supplement natural sunlight if needed.
6. How do I harvest lettuce from my coconut shell planter?
Harvesting lettuce from your coconut shell planter is easy and rewarding. Simply use a pair of scissors or a knife to cut off the outer leaves of the lettuce plant, leaving the inner leaves to continue growing. This method, known as “cut-and-come-again” harvesting, allows you to enjoy a continuous supply of fresh lettuce over several weeks. Avoid harvesting more than one-third of the plant at a time, as this can stress the plant and reduce its productivity.
7. How can I protect my coconut shell lettuce planter from pests?
Several pests can attack lettuce, including aphids, slugs, and snails. To protect your coconut shell lettuce planter from pests, you can use a variety of organic methods. Companion planting with herbs like basil, chives, or parsley can help deter pests naturally. You can also use insecticidal soap or neem oil to control aphids and other soft-bodied insects. To protect your lettuce from slugs and snails, you can place copper tape around the rim of the coconut shell or use diatomaceous earth. Regularly inspect your lettuce plants for signs of pests and take action promptly to prevent infestations from becoming severe.
8. How long will my coconut shell lettuce planter last?
With proper care, your coconut shell lettuce planter can last for several months or even a year. The lifespan of the planter will depend on the quality of the coconut shell and the environmental conditions. To extend the lifespan of your planter, avoid exposing it to extreme temperatures or direct sunlight for prolonged periods. You can also apply a sealant to the outside of the shell to protect it from moisture and decay.
9. Can I reuse the coconut shell for planting other things after the lettuce is finished?
Absolutely! Once your lettuce has finished producing, you can reuse the coconut shell for planting other herbs, flowers, or vegetables. Simply remove the old soil and compost, clean the shell thoroughly, and replant with your desired plants. The coconut shell provides a natural and sustainable container for a variety of different plants.
10. Is this DIY coconut shell lettuce planter project suitable for children?
Yes, this DIY project is a fantastic way to introduce children to gardening and sustainable living. With adult supervision, children can help with preparing the coconut shell, planting the lettuce seeds, and watering the plants. It’s a fun and educational activity that can teach children about the importance of growing their own food and caring for the environment.

Leave a Comment