
Colorful bell pepper growing can seem like a daunting task, especially if you’re new to home gardening. But trust me, with a few clever tricks and a little DIY magic, you can transform your backyard (or even your balcony!) into a vibrant pepper paradise. Have you ever imagined plucking your own sunshine-yellow, fiery-red, and deep-purple bell peppers straight from the vine? It’s not just a dream; it’s an achievable reality!
Bell peppers have a rich history, originating in South America and spreading throughout the world thanks to their delicious flavor and versatility. They’ve been a staple in cuisines for centuries, adding a burst of color and nutrition to countless dishes. But beyond their culinary appeal, growing your own bell peppers offers a unique connection to nature and a sense of accomplishment that’s hard to beat.
Why do you need these DIY tricks for colorful bell pepper growing? Well, let’s face it, store-bought peppers can be expensive and sometimes lack that fresh, vibrant flavor. Plus, knowing exactly where your food comes from and how it’s grown is incredibly rewarding. I’m here to share some simple, effective hacks that will help you overcome common challenges, maximize your yield, and enjoy a bountiful harvest of beautiful, colorful bell peppers. Get ready to roll up your sleeves and let’s get growing!
Paprika selbst ziehen: Ein farbenfrohes DIY-Projekt für deinen Garten oder Balkon
Hallo liebe Gartenfreunde! Habt ihr euch jemals gefragt, wie ihr diese knackigen, farbenfrohen Paprika, die wir so lieben, selbst anbauen könnt? Ich zeige euch, wie ihr das ganz einfach zu Hause machen könnt. Es ist ein super befriedigendes Gefühl, die eigenen Paprika wachsen zu sehen und dann frisch zu ernten!
Was du brauchst: Die Zutaten für deinen Paprika-Erfolg
Bevor wir loslegen, hier eine Liste mit allem, was du für dein Paprika-Abenteuer benötigst:
* Paprikasamen: Du kannst Samen aus gekauften Paprika gewinnen (Achtung: Hybridsorten können abweichende Ergebnisse liefern) oder spezielle Paprikasamen im Gartencenter kaufen. Ich empfehle, mit verschiedenen Sorten zu experimentieren!
* Anzuchterde: Diese ist nährstoffarm und locker, ideal für die Keimung.
* Anzuchttöpfe oder -schalen: Kleine Töpfe oder Schalen mit Drainagelöchern sind perfekt.
* Mini-Gewächshaus oder Frischhaltefolie: Um eine hohe Luftfeuchtigkeit zu gewährleisten.
* Sprühflasche: Zum Befeuchten der Erde.
* Pikierstab oder Bleistift: Zum Vereinzeln der Sämlinge.
* Gemüseerde: Für das spätere Umpflanzen in größere Töpfe oder ins Beet.
* Dünger: Spezieller Gemüsedünger oder organischer Dünger.
* Pflanzstäbe: Für die Stabilität der Pflanzen, besonders bei größeren Sorten.
* Gießkanne oder Schlauch: Zum Bewässern.
* Ein sonniger Standort: Paprika lieben die Sonne!
Phase 1: Die Aussaat – Der Start in dein Paprika-Paradies
Die Aussaat ist der erste und wichtigste Schritt. Hier legen wir den Grundstein für eine reiche Ernte.
1. Vorbereitung der Anzuchttöpfe: Fülle die Anzuchttöpfe oder -schalen mit Anzuchterde. Drücke die Erde leicht an.
2. Aussaat der Samen: Lege 2-3 Samen pro Topf oder Schale. Die Samen sollten etwa 0,5-1 cm tief in die Erde gedrückt werden.
3. Befeuchten der Erde: Besprühe die Erde vorsichtig mit einer Sprühflasche, sodass sie gut durchfeuchtet ist, aber nicht zu nass.
4. Schaffen eines Mini-Gewächshauses: Decke die Töpfe oder Schalen mit einem Mini-Gewächshaus oder Frischhaltefolie ab. Das sorgt für eine hohe Luftfeuchtigkeit, die die Keimung fördert.
5. Der richtige Standort: Stelle die Töpfe oder Schalen an einen warmen und hellen Ort. Eine Temperatur von 22-25°C ist ideal für die Keimung.
6. Geduld ist gefragt: Die Keimung dauert in der Regel 1-3 Wochen. Achte darauf, dass die Erde während dieser Zeit feucht bleibt. Lüfte das Mini-Gewächshaus oder die Folie regelmäßig, um Schimmelbildung zu vermeiden.
Phase 2: Pikieren – Den kleinen Paprika-Pflänzchen mehr Raum geben
Sobald die ersten Blätter erscheinen, ist es Zeit zum Pikieren. Das bedeutet, dass wir die kleinen Pflänzchen vereinzeln und ihnen mehr Platz zum Wachsen geben.
1. Der richtige Zeitpunkt: Pikieren solltest du, sobald die Sämlinge 2-4 echte Blätter (neben den Keimblättern) entwickelt haben.
2. Vorbereitung der neuen Töpfe: Fülle größere Töpfe (ca. 8-10 cm Durchmesser) mit Anzuchterde oder einer Mischung aus Anzucht- und Gemüseerde.
3. Herauslösen der Sämlinge: Befeuchte die Erde in den Anzuchttöpfen oder -schalen leicht. Löse die Sämlinge vorsichtig mit einem Pikierstab oder Bleistift aus der Erde. Achte darauf, die Wurzeln nicht zu beschädigen.
4. Einpflanzen der Sämlinge: Setze jeden Sämling in einen eigenen Topf. Die Pflanze sollte etwas tiefer sitzen als zuvor, bis zu den ersten Blättern.
5. Andrücken der Erde: Drücke die Erde um die Pflanze herum leicht an.
6. Bewässern: Gieße die Pflanzen vorsichtig an.
7. Der richtige Standort: Stelle die pikierten Pflanzen an einen hellen, aber nicht direkt sonnigen Ort.
Phase 3: Die Aufzucht – Starke Paprika-Pflanzen für eine reiche Ernte
Nach dem Pikieren beginnt die eigentliche Aufzucht. Jetzt geht es darum, die Pflanzen optimal zu versorgen, damit sie kräftig wachsen und viele Früchte tragen.
1. Der richtige Standort: Paprika lieben die Sonne! Stelle die Pflanzen an einen möglichst sonnigen Standort. Ideal sind mindestens 6 Stunden Sonne pro Tag.
2. Bewässerung: Gieße die Pflanzen regelmäßig, aber vermeide Staunässe. Die Erde sollte immer leicht feucht sein. Am besten gießt du morgens, damit die Blätter über den Tag abtrocknen können.
3. Düngung: Beginne etwa 2-3 Wochen nach dem Pikieren mit dem Düngen. Verwende einen speziellen Gemüsedünger oder organischen Dünger. Beachte die Dosierungsanleitung auf der Verpackung.
4. Regelmäßiges Drehen: Drehe die Pflanzen regelmäßig, damit sie gleichmäßig wachsen und nicht zum Licht hin wachsen.
5. Ausgeizen (optional): Bei einigen Paprikasorten ist es sinnvoll, die Seitentriebe (Geiztriebe) auszugeizen. Das fördert die Bildung von größeren Früchten. Informiere dich, ob das für deine Sorte empfehlenswert ist.
6. Unterstützung: Wenn die Pflanzen größer werden und Früchte tragen, kann es sinnvoll sein, sie mit Pflanzstäben zu stützen. Das verhindert, dass sie unter dem Gewicht der Früchte umknicken.
Phase 4: Auspflanzen – Ab ins Beet oder in den Kübel
Sobald die Temperaturen steigen und keine Frostgefahr mehr besteht, können die Paprika-Pflanzen ins Beet oder in größere Kübel umgepflanzt werden.
1. Der richtige Zeitpunkt: Warte mit dem Auspflanzen, bis keine Frostgefahr mehr besteht. In der Regel ist das Mitte Mai nach den Eisheiligen.
2. Vorbereitung des Beets oder Kübels: Lockere die Erde im Beet gut auf und reicher sie mit Kompost oder anderem organischen Material an. Wähle für den Kübel eine ausreichend große Größe (mindestens 10 Liter) und verwende Gemüseerde.
3. Auspflanzen: Hebe ein Loch aus, das etwas größer ist als der Wurzelballen der Pflanze. Setze die Pflanze hinein und fülle das Loch mit Erde auf. Drücke die Erde leicht an.
4. Bewässern: Gieße die Pflanzen nach dem Auspflanzen gut an.
5. Schutz vor Schnecken: Schütze die jungen Pflanzen vor Schneckenfraß. Du kannst Schneckenkragen verwenden oder die Pflanzen mit Schneckenkorn schützen.
6. Mulchen: Mulche den Boden um die Pflanzen herum mit Stroh oder Rasenschnitt. Das hält die Feuchtigkeit im Boden und unterdrückt Unkraut.
Phase 5: Ernte – Der Lohn deiner Mühe
Nach all der Arbeit ist es endlich soweit: Die Paprika sind reif und können geerntet werden!
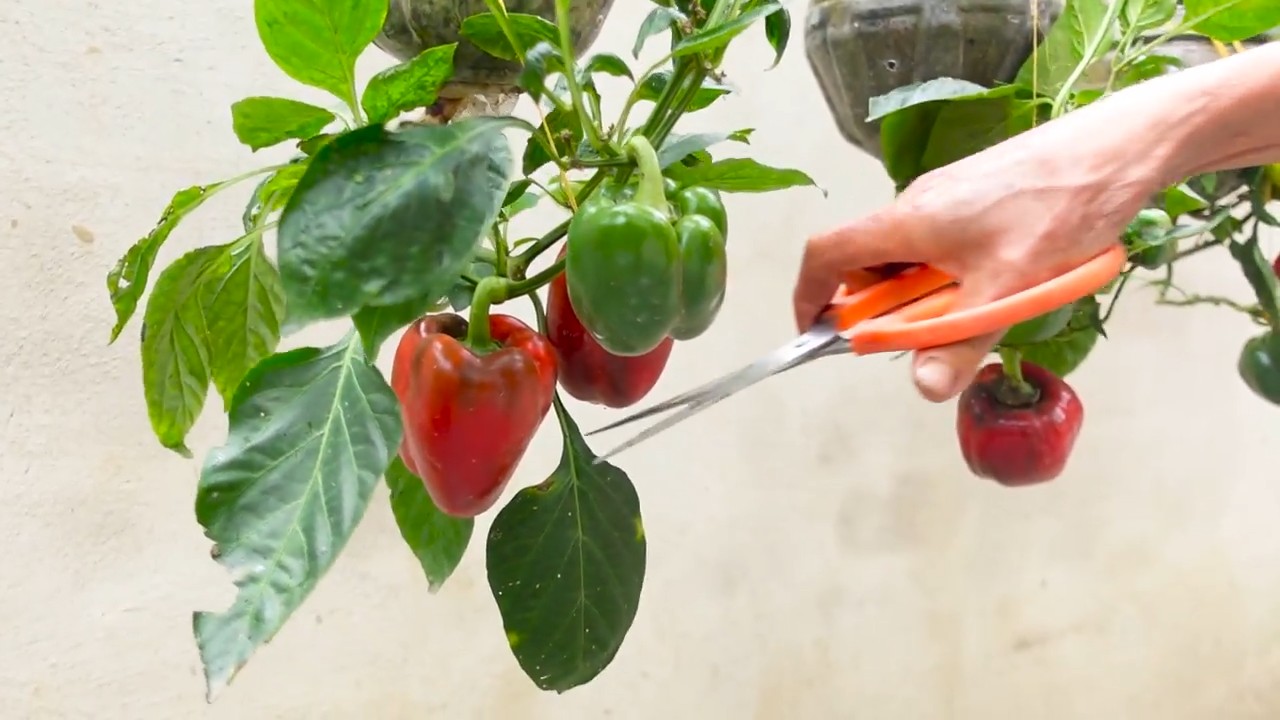
1. Der richtige Zeitpunkt: Die Paprika sind reif, wenn sie ihre endgültige Farbe erreicht haben und sich leicht vom Stiel lösen lassen.
2. Ernten: Schneide die Paprika mit einem scharfen Messer oder einer Schere vom Stiel ab.
3. Lagerung: Frische Paprika halten sich im Kühlschrank etwa 1-2 Wochen. Du kannst sie auch einfrieren oder einlegen.
Zusätzliche Tipps für eine erfolgreiche Paprika-Ernte
* Regelmäßiges Gießen: Achte darauf, dass die Pflanzen ausreichend Wasser bekommen, besonders während der Blütezeit und Fruchtbildung.
* Schutz vor Schädlingen und Krankheiten: Kontrolliere die Pflanzen regelmäßig auf Schädlinge und
Conclusion
So, there you have it! Growing your own colorful bell peppers from seed isn’t just a fun project; it’s a gateway to fresher, more flavorful, and vibrant meals. Forget the often bland, mass-produced peppers from the grocery store. With a little patience and our simple DIY trick, you can cultivate a rainbow of bell peppers right in your own backyard or even on your balcony.
Why is this a must-try? Because it puts you in control. You choose the varieties, ensuring you get the exact sweetness, heat level, and color you desire. You know exactly what goes into your peppers – no hidden pesticides or questionable growing practices. Plus, there’s an undeniable satisfaction in nurturing a plant from a tiny seed to a bountiful harvest. Imagine the pride you’ll feel serving a dish featuring peppers you grew yourself!
But the benefits don’t stop there. Growing your own peppers is also incredibly cost-effective. A single packet of seeds can yield dozens of plants, far exceeding the cost of buying peppers individually. And let’s not forget the environmental impact. By growing your own, you’re reducing your carbon footprint associated with transportation and packaging.
Ready to take your pepper game to the next level? Consider these variations:
* Experiment with different varieties: From the classic red and green to the vibrant yellow, orange, purple, and even chocolate, the world of bell peppers is surprisingly diverse. Try a few different types to find your favorites.
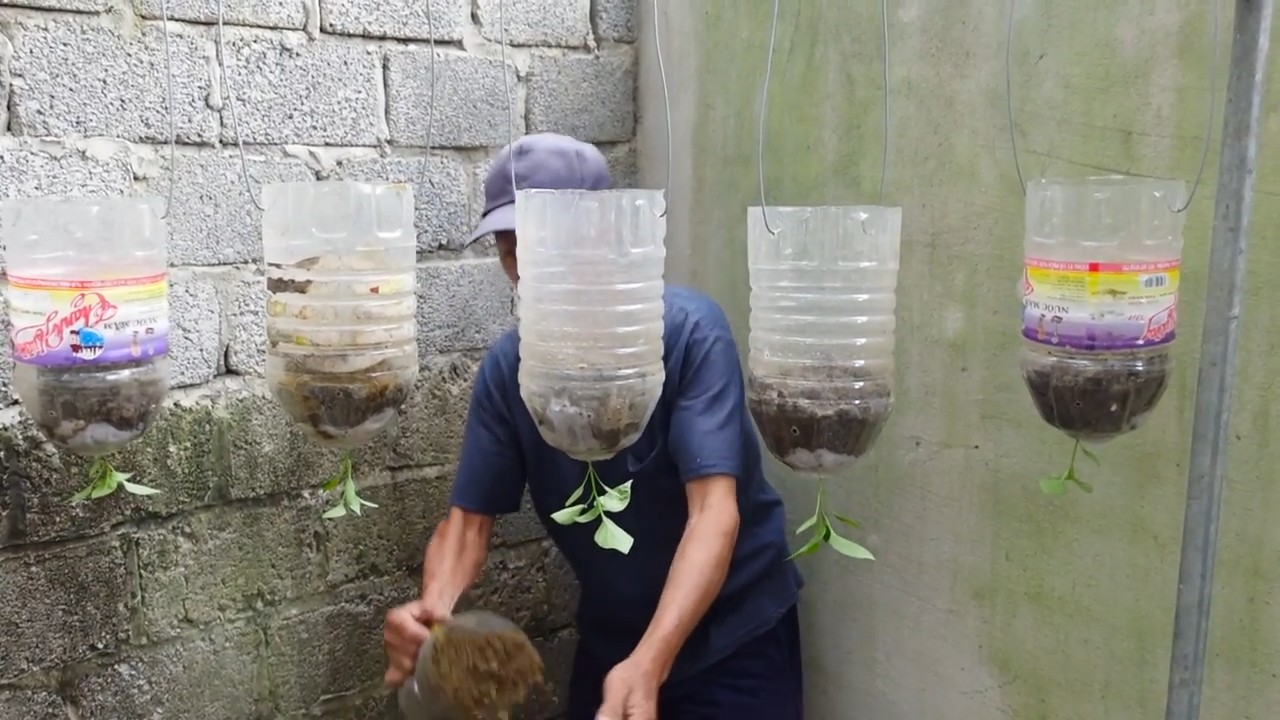
* Grow in containers: Don’t have a garden? No problem! Bell peppers thrive in containers, making them perfect for apartment dwellers or those with limited space. Just be sure to choose a pot that’s at least 12 inches in diameter and provide plenty of sunlight.
* Try companion planting: Basil, tomatoes, and carrots are all excellent companions for bell peppers. Planting them together can help deter pests and improve overall growth.
* Preserve your harvest: When you have a bumper crop, don’t let those peppers go to waste! You can freeze them, pickle them, or even dry them for later use.
This DIY trick for growing colorful bell peppers is more than just a gardening project; it’s an investment in your health, your taste buds, and your connection to nature. It’s a chance to learn, to experiment, and to create something truly special.
So, what are you waiting for? Grab a packet of seeds, follow our simple steps, and get ready to experience the joy of growing your own colorful bell peppers. We’re confident that you’ll be amazed by the results.
We can’t wait to hear about your experiences! Share your photos, tips, and questions in the comments below. Let’s create a community of passionate pepper growers and inspire others to embrace the joys of homegrown goodness. Happy gardening!
Frequently Asked Questions (FAQ)
What is the best time to start bell pepper seeds indoors?
The ideal time to start your bell pepper seeds indoors is typically 6-8 weeks before the last expected frost in your area. This allows the seedlings to develop a strong root system before being transplanted outdoors. Check your local weather forecasts and gardening resources to determine the average last frost date for your region. Starting too early can result in leggy, weak seedlings, while starting too late may delay your harvest.
How much sunlight do bell pepper plants need?
Bell peppers are sun-loving plants and require at least 6-8 hours of direct sunlight per day to thrive. Insufficient sunlight can lead to stunted growth, reduced fruit production, and smaller, less flavorful peppers. When choosing a location for your bell pepper plants, select a spot that receives full sun throughout the day. If you’re growing peppers indoors, supplement with grow lights if necessary.
What type of soil is best for growing bell peppers?
Bell peppers prefer well-draining, fertile soil that is rich in organic matter. A slightly acidic to neutral pH (around 6.0-7.0) is ideal. Amend your soil with compost, aged manure, or other organic materials to improve drainage, fertility, and water retention. Avoid heavy clay soils, as they can become waterlogged and hinder root development.
How often should I water my bell pepper plants?
Water your bell pepper plants regularly, especially during hot, dry weather. Aim to keep the soil consistently moist but not waterlogged. Water deeply at the base of the plant, avoiding wetting the foliage, which can increase the risk of fungal diseases. Check the soil moisture regularly by sticking your finger about an inch into the soil. If it feels dry, it’s time to water.
What are some common pests and diseases that affect bell peppers?
Bell peppers can be susceptible to various pests and diseases, including aphids, whiteflies, spider mites, blossom-end rot, and fungal diseases like powdery mildew. Regularly inspect your plants for signs of infestation or disease. Use organic pest control methods, such as insecticidal soap or neem oil, to control pests. Ensure good air circulation and avoid overwatering to prevent fungal diseases. Blossom-end rot is often caused by calcium deficiency, so amend your soil with calcium-rich amendments or use a calcium spray.
How do I prevent blossom-end rot in my bell peppers?
Blossom-end rot, a common problem in bell peppers, is caused by a calcium deficiency in the developing fruit. While the soil may contain enough calcium, the plant may not be able to absorb it properly due to inconsistent watering or other factors. To prevent blossom-end rot, ensure consistent watering, especially during fruit development. Amend your soil with calcium-rich amendments like bone meal or crushed eggshells before planting. You can also use a calcium spray specifically formulated for vegetables.
When should I harvest my bell peppers?
Bell peppers can be harvested at any stage of maturity, depending on your preference. Green bell peppers are typically harvested when they are firm, smooth, and have reached their full size. Colored bell peppers (red, yellow, orange) are harvested when they have fully ripened and developed their characteristic color. The longer you leave the peppers on the plant, the sweeter they will become. Use a sharp knife or pruning shears to cut the peppers from the plant, leaving a short stem attached.
Can I save seeds from my homegrown bell peppers?
Yes, you can save seeds from your homegrown bell peppers, but keep in mind that hybrid varieties may not produce true-to-type offspring. To save seeds, allow the peppers to fully ripen on the plant until they are soft and slightly wrinkled. Cut the pepper open and remove the seeds. Rinse the seeds thoroughly and spread them out on a paper towel to dry completely. Store the dried seeds in an airtight container in a cool, dark place.
My bell pepper plants are producing flowers but no fruit. What could be the problem?
Several factors can contribute to a lack of fruit production in bell pepper plants. These include:
* Insufficient pollination: Bell peppers are self-pollinating, but they may need help from wind or insects to transfer pollen. Gently shake the plants or use a small brush to transfer pollen from one flower to another.
* High temperatures: Extreme heat can inhibit fruit set. Provide shade during the hottest part of the day.
* Nutrient deficiencies: Ensure your plants are receiving adequate nutrients, especially phosphorus and potassium.
* Stress: Stress from drought, pests, or diseases can also prevent fruit production. Address any underlying issues to improve plant health.
Are there any specific fertilizer recommendations for bell peppers?
Bell peppers benefit from regular fertilization throughout the growing season. Use a balanced fertilizer with a higher phosphorus and potassium content than nitrogen. Follow the instructions on the fertilizer label for application rates and frequency. You can also supplement with organic fertilizers like compost tea or fish emulsion. Avoid over-fertilizing, as this can lead to excessive foliage growth at the expense of fruit production.
Leave a Comment