
Container Watermelon Harvest: The moment you’ve been waiting for is finally here! After weeks (or even months!) of nurturing your little watermelon vine in its container, it’s time to reap the rewards of your labor. But how do you know when that juicy, sweet watermelon is perfectly ripe and ready to be plucked? Don’t worry, I’m here to guide you through the process with some easy-to-follow DIY tricks and tips.
Growing watermelons, even in containers, is a tradition that stretches back centuries. Originating in Africa, watermelons have been cultivated for their refreshing taste and hydrating properties for thousands of years. Ancient Egyptians even depicted watermelons in their art, highlighting their importance as a food source and symbol of abundance. Now, you can bring that same sense of abundance to your own backyard, balcony, or patio!
Let’s be honest, nobody wants to cut into a watermelon only to find it’s pale, tasteless, and disappointing. That’s why knowing the secrets to a successful container watermelon harvest is so crucial. This DIY guide will equip you with the knowledge to identify the telltale signs of ripeness, ensuring that every slice is bursting with flavor. I’ll share my favorite hacks for determining when your watermelon is at its peak, so you can enjoy the sweetest, most satisfying fruit possible. Get ready to impress your friends and family with your homegrown watermelon expertise!
Growing Watermelons in Containers: A Sweet DIY Project!
Hey there, fellow gardening enthusiasts! Ever dreamed of biting into a juicy, homegrown watermelon but thought you didn’t have the space? Well, I’m here to tell you that you absolutely can grow watermelons, even if you only have a balcony or patio! It’s a fun and rewarding DIY project, and I’m going to walk you through every step.
Choosing the Right Watermelon Variety
First things first, not all watermelons are created equal when it comes to container gardening. You’ll want to choose a bush or dwarf variety that’s specifically bred for smaller spaces. These varieties produce smaller melons and have a more compact growth habit.
Here are a few of my favorites:
* Sugar Baby: A classic choice, Sugar Baby watermelons are small, round, and incredibly sweet. They mature quickly, which is a bonus!
* Bush Sugar Baby: As the name suggests, this is a bushier version of the Sugar Baby, making it even more suitable for containers.
* Golden Midget: These adorable little watermelons turn golden yellow when ripe and have a delicious, crisp flesh.
* Tiger Baby: A personal favorite! These have a beautiful striped rind and a sweet, refreshing flavor.
* Yellow Doll: If you prefer yellow-fleshed watermelons, Yellow Doll is a great option for containers.
Gathering Your Supplies
Okay, now that we’ve picked our watermelon variety, let’s gather everything we need. This is where the “DIY” part really kicks in!
Here’s your shopping list:
* A Large Container: This is crucial! You’ll need a container that’s at least 24 inches in diameter and 24 inches deep. The bigger, the better, as watermelons have extensive root systems. A half wine barrel or a large plastic tub works great. Make sure it has drainage holes!
* High-Quality Potting Mix: Don’t skimp on this! Use a well-draining potting mix that’s rich in organic matter. Avoid using garden soil, as it can compact in containers and hinder drainage. I like to amend my potting mix with compost for extra nutrients.
* Water-Soluble Fertilizer: Watermelons are heavy feeders, so you’ll need to fertilize them regularly. Choose a fertilizer that’s specifically formulated for fruits and vegetables.
* Watering Can or Hose: Essential for keeping your watermelon plants hydrated.
* Trellis or Support Structure (Optional): While bush varieties are more compact, they can still benefit from some support, especially as the melons grow larger. A small trellis or tomato cage can help keep the vines off the ground.
* Gardening Gloves: To protect your hands.
* Seeds or Seedlings: Depending on your preference, you can start your watermelons from seed or purchase seedlings from a local nursery.
* Mulch: To help retain moisture and suppress weeds. Straw or wood chips work well.
Planting Your Watermelon
Alright, let’s get our hands dirty! This is where the magic happens.
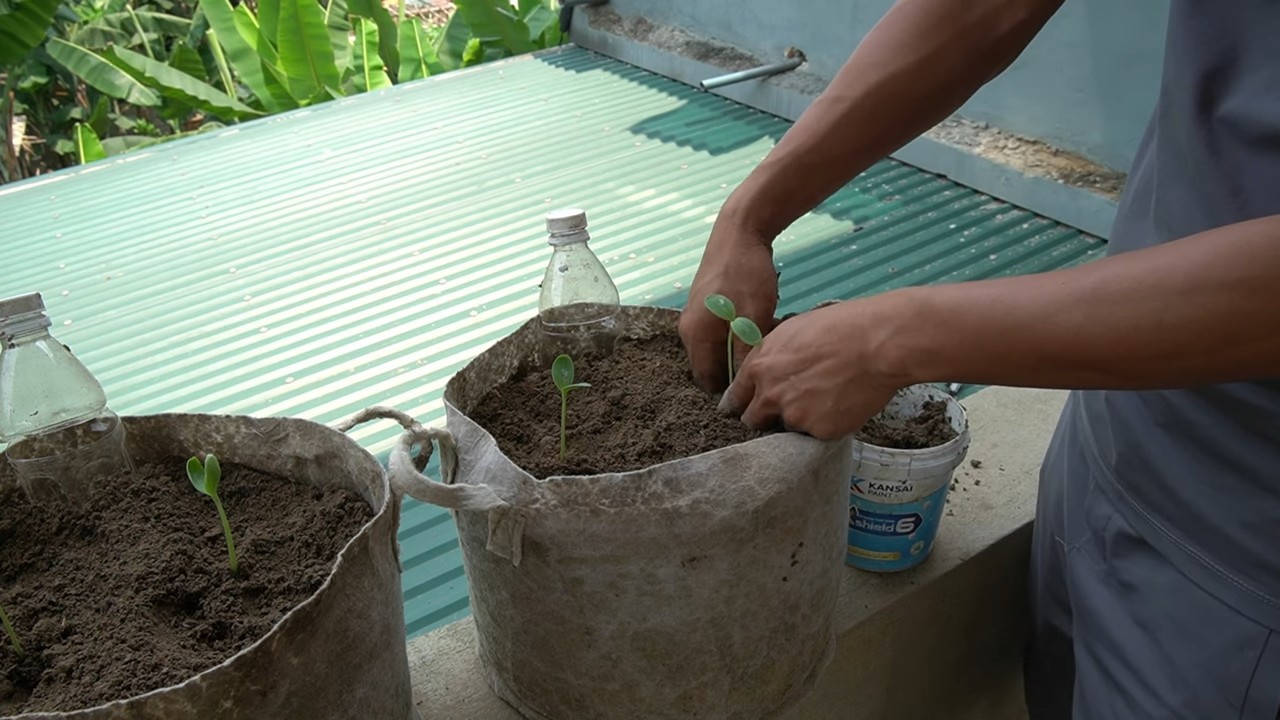
1. Prepare the Container: Make sure your container has adequate drainage holes. If not, drill a few more. Then, fill the container with your high-quality potting mix, leaving a few inches of space at the top.
2. Planting Seeds (If Starting from Seed): Sow the watermelon seeds directly into the potting mix, about 1 inch deep. Plant 2-3 seeds per container, and thin them out to the strongest seedling once they emerge. Keep the soil consistently moist until the seeds germinate, which usually takes about 7-10 days.
3. Planting Seedlings (If Using Seedlings): Gently remove the seedlings from their nursery pots and loosen the roots slightly. Dig a hole in the potting mix that’s large enough to accommodate the root ball. Place the seedling in the hole and backfill with potting mix, gently firming the soil around the base of the plant.
4. Water Thoroughly: After planting, water the watermelon plant thoroughly until the water drains out of the bottom of the container. This helps settle the soil and encourages root growth.
5. Add Mulch: Spread a layer of mulch around the base of the plant to help retain moisture and suppress weeds.
Caring for Your Container Watermelon
Now that your watermelon is planted, it’s time to provide it with the care it needs to thrive. This involves watering, fertilizing, and providing support.
1. Watering: Watermelons need consistent moisture, especially during hot weather. Water deeply and regularly, aiming to keep the soil consistently moist but not waterlogged. Check the soil moisture regularly by sticking your finger into the soil. If the top inch feels dry, it’s time to water. Avoid overhead watering, as this can lead to fungal diseases. Instead, water at the base of the plant.
2. Fertilizing: As I mentioned earlier, watermelons are heavy feeders. Start fertilizing your watermelon plant about 2-3 weeks after planting, using a water-soluble fertilizer that’s specifically formulated for fruits and vegetables. Follow the instructions on the fertilizer package carefully. Fertilize every 2-3 weeks throughout the growing season.
3. Providing Support: While bush varieties are more compact, they can still benefit from some support, especially as the melons grow larger. A small trellis or tomato cage can help keep the vines off the ground and prevent the melons from rotting. Gently train the vines to grow up the trellis or support structure.
4. Pollination: Watermelons need to be pollinated in order to produce fruit. If you’re growing your watermelons outdoors, bees and other pollinators will usually take care of this for you. However, if you’re growing them indoors or if you’re not seeing much bee activity, you may need to hand-pollinate the flowers. To hand-pollinate, use a small paintbrush to transfer pollen from the male flowers to the female flowers. The male flowers have a long, thin stem, while the female flowers have a small, immature watermelon at the base.
5. Pruning (Optional): Some gardeners like to prune their watermelon plants to encourage larger fruit. If you choose to prune, remove any suckers (small shoots that grow from the base of the plant) and any excess vines. You can also pinch off the tips of the vines to encourage branching.
6. Sunlight: Watermelons need at least 6-8 hours of direct sunlight per day to thrive. Make sure your container is placed in a sunny location. If you’re growing your watermelons indoors, you may need to supplement with grow lights.
7. Pest and Disease Control: Keep an eye out for pests and diseases. Common watermelon pests include aphids, squash bugs, and cucumber beetles. Common diseases include powdery mildew and fusarium wilt. If you notice any pests or diseases, take action immediately. You can use organic pest control methods, such as insecticidal soap or neem oil, to control pests. For diseases, you can use a fungicide.
Harvesting Your Watermelon
The moment we’ve all been waiting for! Harvesting your homegrown watermelon is the ultimate reward for all your hard work.
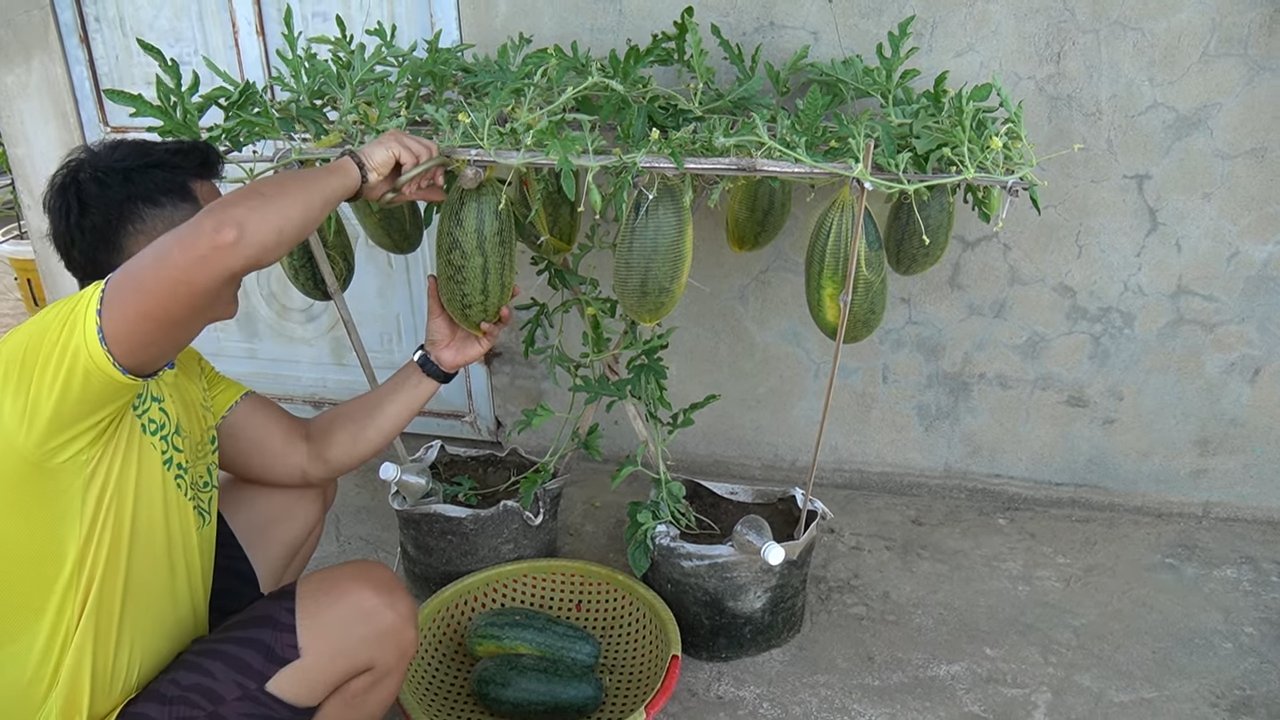
1. Determining Ripeness: Knowing when to harvest your watermelon can be tricky, but here are a few signs to look for:
* The Tendril: The tendril closest to the watermelon stem should be brown and dry.
* The Ground Spot: The spot where the watermelon rests on the ground (the “ground spot”) should be yellow or cream-colored.
* The Thump Test: Give the watermelon a gentle thump. A ripe watermelon will sound hollow.
* Days to Maturity: Check the seed packet or plant tag for the estimated days to maturity. This is a good guideline, but it’s not always accurate.
2. Harvesting: Once you’ve determined that your watermelon is ripe, use a sharp knife to cut it from the vine, leaving a few inches of stem attached.
3. Enjoy! Now it’s time to savor the sweet, juicy flavor of your homegrown watermelon! Cut it open, share it with friends and family, and enjoy the fruits (literally!) of your labor.
Troubleshooting
Even with the best care, you might encounter some challenges along the way. Here are a few common problems and how to address them:
* Yellowing Leaves: This could be a sign of overwatering, underwatering, nutrient deficiency, or disease. Check the soil moisture and adjust your watering accordingly. Fertilize regularly with a balanced fertilizer. If you suspect disease, treat with a fungicide.
* Lack of Fruit: This could be due to poor pollination, lack of sunlight, or nutrient deficiency. Make sure your watermelons are getting enough sunlight and that they are being pollinated properly. Fertilize regularly with a fertilizer that’s high in phosphorus.
* Small Fruit: This could be due
Conclusion
So, there you have it! Growing your own watermelon in a container isn’t just a fun project; it’s a surprisingly achievable way to enjoy the sweet taste of summer, even if you’re short on space. We’ve walked through the key steps, from selecting the right variety and container to providing the necessary support and care. The beauty of this method lies in its accessibility. You don’t need acres of farmland to experience the joy of harvesting your own juicy, red watermelon.
This DIY container watermelon harvest trick is a must-try for several reasons. First and foremost, it allows you to control the growing environment, minimizing the risk of pests and diseases that can plague traditional watermelon patches. Secondly, it’s incredibly rewarding to nurture a plant from seed to fruit, witnessing the miracle of nature unfold right before your eyes. And finally, let’s be honest, there’s nothing quite like the taste of a homegrown watermelon, bursting with flavor and sweetness that store-bought varieties simply can’t match.
But don’t stop there! Experiment with different watermelon varieties to find your personal favorite. Consider trying a yellow or orange-fleshed watermelon for a unique twist. You can also explore companion planting by adding herbs like basil or marigolds to your container to deter pests and attract pollinators. For those in cooler climates, consider using a dark-colored container to absorb more heat and extend the growing season. You can also try using a small greenhouse or cold frame to protect your watermelon plant from frost.
Remember, patience is key. Watermelons take time to mature, so don’t be discouraged if you don’t see results immediately. Keep a close eye on your plant, provide consistent watering and fertilization, and be prepared to offer support as the fruit grows heavier. The anticipation will only make the final harvest that much sweeter.
We are confident that with a little effort and attention, you can successfully grow your own delicious watermelons in containers. So, grab your seeds, prepare your soil, and get ready to embark on this exciting gardening adventure. We encourage you to try this DIY container watermelon harvest trick and share your experiences with us! Post photos of your watermelon plants, share your tips and tricks, and let us know what varieties you’re growing. We can’t wait to see your container watermelon gardens flourish! Happy growing!
Frequently Asked Questions (FAQ)
1. What is the best type of watermelon to grow in a container?
Choosing the right watermelon variety is crucial for success in container gardening. Look for “bush” or “dwarf” varieties that are specifically bred for smaller spaces. These varieties typically produce smaller fruits and have shorter vines, making them more manageable in containers. Some popular choices include ‘Sugar Baby,’ ‘Bush Sugar Baby,’ ‘Golden Midget,’ and ‘Tiger Baby.’ Avoid larger, vining varieties like ‘Charleston Gray’ or ‘Crimson Sweet,’ as they require significantly more space and are not well-suited for containers. Consider the length of your growing season as well. Choose a variety that matures within the timeframe available in your region. Seed catalogs and online resources often provide information on the days to maturity for different watermelon varieties.
2. What size container do I need for growing watermelons?
A large container is essential for growing watermelons successfully. A minimum of 20 gallons is recommended, but a 25-30 gallon container is even better. The container should be wide and deep enough to accommodate the watermelon’s extensive root system. Ensure the container has drainage holes to prevent waterlogging, which can lead to root rot. Consider using a fabric pot, as it allows for better air circulation and drainage. You can also use a plastic or terracotta pot, but make sure it’s sturdy enough to support the weight of the plant and the developing fruit.
3. What kind of soil should I use for container watermelons?
Watermelons need well-draining, nutrient-rich soil to thrive. A good potting mix is essential. Avoid using garden soil, as it can be too heavy and compact in containers. A mix of equal parts potting soil, compost, and perlite or vermiculite is ideal. The compost provides essential nutrients, while the perlite or vermiculite improves drainage and aeration. You can also add a slow-release fertilizer to the soil mix to provide a steady supply of nutrients throughout the growing season. Look for a fertilizer that is specifically formulated for vegetables or fruits.
4. How often should I water my container watermelon plant?
Watermelons are heavy drinkers, especially during hot weather and when the fruit is developing. Water deeply and regularly, ensuring the soil stays consistently moist but not waterlogged. Check the soil moisture daily by sticking your finger about an inch into the soil. If it feels dry, it’s time to water. Water at the base of the plant to avoid wetting the foliage, which can increase the risk of fungal diseases. In hot, sunny weather, you may need to water your container watermelon plant daily or even twice a day.
5. How much sunlight do container watermelons need?
Watermelons need at least 6-8 hours of direct sunlight per day to thrive. Choose a sunny location for your container watermelon plant. If you live in a particularly hot climate, you may need to provide some afternoon shade to prevent the plant from overheating. A south-facing location is ideal, as it provides the most sunlight throughout the day. If you don’t have a sunny spot, you can supplement with grow lights.
6. How do I pollinate my container watermelon plant?
Watermelons require pollination to produce fruit. If you don’t see bees or other pollinators visiting your plant, you may need to hand-pollinate the flowers. To hand-pollinate, use a small paintbrush to transfer pollen from the male flowers to the female flowers. Male flowers have a long, thin stem, while female flowers have a small, immature watermelon at the base. Pollinate in the morning, when the pollen is most viable. You can also attract pollinators to your garden by planting flowers that they love, such as sunflowers, zinnias, and lavender.
7. How do I support the watermelon as it grows?
As the watermelon grows larger, it will need support to prevent the vine from breaking. You can use a trellis, a sling made from fabric, or even a sturdy tomato cage to support the fruit. Make sure the support is strong enough to hold the weight of the watermelon. You can also place the watermelon on a bed of straw or wood chips to prevent it from touching the soil and rotting.
8. How do I know when my container watermelon is ripe?
Determining when a watermelon is ripe can be tricky, but there are a few telltale signs to look for. The tendril closest to the fruit should be brown and dry. The spot where the watermelon rests on the ground (the “ground spot”) should be yellow or cream-colored. The watermelon should also sound hollow when you thump it. If you’re unsure, it’s better to err on the side of caution and wait a few more days. The best way to know for sure is to taste it!
9. Can I grow more than one watermelon plant in a container?
It’s generally best to grow only one watermelon plant per container to ensure it has enough space and resources to thrive. Overcrowding can lead to smaller fruits and increased risk of disease. If you have a very large container (30 gallons or more), you might be able to get away with growing two plants, but be prepared to provide extra care and attention.
10. What are some common problems with container watermelons and how do I fix them?
Some common problems with container watermelons include pests, diseases, and nutrient deficiencies. Pests like aphids and squash bugs can be controlled with insecticidal soap or neem oil. Fungal diseases like powdery mildew can be prevented by providing good air circulation and avoiding overhead watering. Nutrient deficiencies can be addressed by fertilizing regularly with a balanced fertilizer. If you notice any problems, address them promptly to prevent them from spreading.
Leave a Comment