
Cowpea garden growing guide: Ever dreamt of strolling through your backyard, plucking fresh, vibrant cowpeas straight from the vine for a delicious, home-cooked meal? I know I have! It’s more than just a culinary delight; it’s about connecting with nature and enjoying the fruits (or, in this case, legumes!) of your labor. For centuries, cowpeas have been a staple crop in many cultures, particularly in Africa and Asia, providing essential nutrients and playing a vital role in sustainable agriculture. They’re not just tasty; they’re incredibly resilient and beneficial for your garden soil, acting as a natural fertilizer.
But let’s be honest, sometimes gardening can feel a little daunting, right? That’s where this DIY guide comes in! I’m here to share my tried-and-true tips and tricks to help you cultivate a thriving cowpea garden, even if you’re a complete beginner. We’ll cover everything from selecting the perfect seeds to warding off pesky pests, ensuring you have a bountiful harvest. So, ditch the grocery store and get ready to embark on a rewarding gardening adventure. Let’s grow some delicious cowpeas together!
DIY Guide: Bountiful Black-Eyed Pea Harvest in Your Own Garden
Hey garden friends! I love harvesting fresh ingredients directly from my garden, and black-eyed peas (also known as cowpeas) are no exception. Not only are they super delicious, but they are also relatively easy to grow, even if you’re not an experienced gardener. In this guide, I’ll show you step-by-step how to successfully grow your own black-eyed peas and bring in a rich harvest. Let’s get started!
Preparation is Everything: The Right Location and Soil
Before we start planting, it’s important to prepare the ideal location and soil for your black-eyed peas.
- Plenty of Sunshine: Black-eyed peas love the sun! Choose a location that receives at least 6-8 hours of direct sunlight per day.
- Well-Drained Soil: Waterlogging is the enemy! The soil should be well-drained so that water can run off easily. You can improve heavy clay soils with compost, sand, or other organic matter.
- Soil pH: Black-eyed peas prefer a slightly acidic to neutral soil with a pH between 6.0 and 7.0. You can check your soil’s pH with a soil test and adjust it if necessary.
- Loosen the Soil: Before you plant, loosen the soil thoroughly to facilitate root growth. Remove stones, weeds, and other obstacles.
Step-by-Step Guide: Sowing Black-Eyed Peas
Now comes the exciting part: Sowing the black-eyed peas!
- The Right Time: Wait until the danger of frost has passed and the soil has warmed up to at least 18°C (65°F). This is usually in late spring or early summer.
- Direct Sowing or Starting Indoors: You can sow black-eyed peas directly into the garden bed or start them indoors in pots. Direct sowing is easier, but starting them indoors can speed up the harvest a bit.
- Direct Sowing:
- Create rows about 60-90 cm (24-36 inches) apart.
- Sow the seeds about 5-10 cm (2-4 inches) apart in the rows.
- Cover the seeds with about 2-3 cm (1 inch) of soil.
- Water the soil gently.
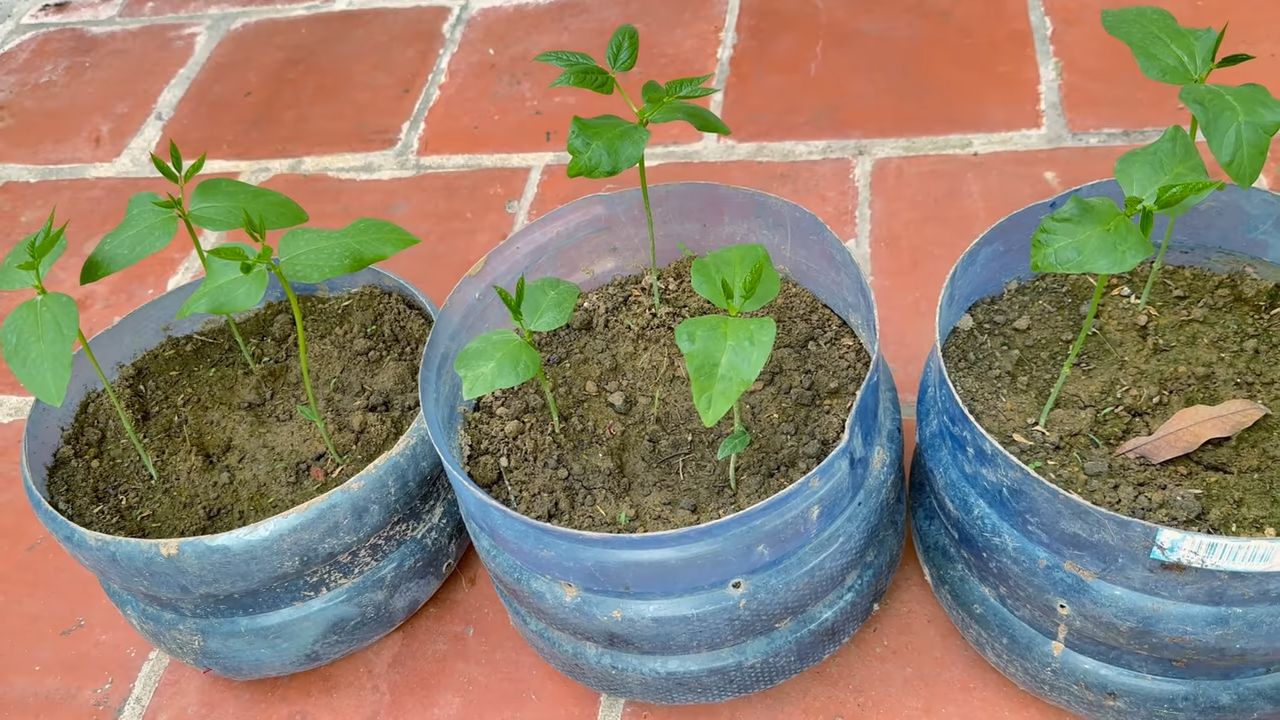
- Starting Indoors:
- Fill small pots with seed starting mix.
- Sow 2-3 seeds per pot.
- Cover the seeds with a thin layer of soil.
- Water the soil gently and place the pots in a warm, bright place.
- Once the seedlings are large enough (about 10-15 cm or 4-6 inches), you can plant them in the garden bed. Be sure to remove them carefully from the pots and not to damage the roots.
- Watering: Keep the soil moist, but not wet, until the seeds germinate.
Easy Care: Watering, Fertilizing, and Support
Black-eyed peas are relatively low-maintenance, but you should keep a few things in mind to get a good harvest.
- Watering: Water the plants regularly, especially during dry periods. Make sure the soil doesn’t dry out, but avoid waterlogging. It’s best to water early in the morning so the leaves can dry during the day.
- Fertilizing: Black-eyed peas are not very demanding, but a light fertilization can promote growth. Use an organic fertilizer or compost. Avoid nitrogen-rich fertilizers, as they promote leaf growth but can inhibit flower formation.
- Weed Control: Keep the bed weed-free to reduce competition for nutrients and water. You can weed by hand or apply a layer of mulch.
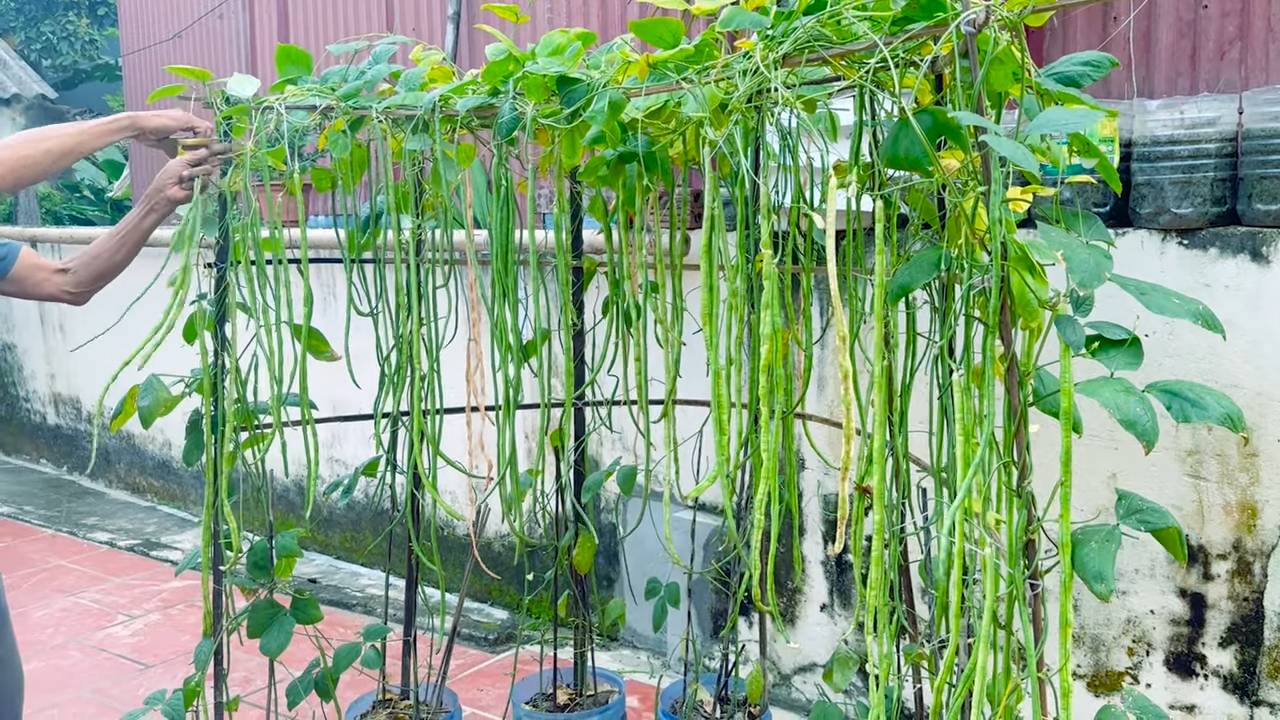
- Support: Many varieties of black-eyed peas are vining and need support, such as a trellis, a fence, or poles. The support helps the plants to grow upright and provides better air circulation for the pods.
- Pests and Diseases: Black-eyed peas are relatively resistant to pests and diseases. Occasionally, aphids or bean beetles may appear. You can combat these with natural methods, e.g., with a jet of water or with neem oil. Watch for signs of fungal diseases, such as powdery mildew. Ensure good air circulation for the plants and remove any affected leaves.
Harvest Time: The Reward for Your Efforts
After about 60-90 days, you can harvest your own black-eyed peas!
- The Right Time: The black-eyed peas are ready when the pods are plump and can be easily detached from the stem. The beans inside the pods should be well-developed but not yet hard.
- Harvesting Method: Gently pick the pods from the plant. You can eat the pods directly or shell the beans and use them fresh or dry them.
- Regular Harvesting: Harvest the pods regularly to encourage the production of new pods.
- Drying: If you want to dry the beans, spread them out on a tray and let them dry in a warm, dry place until they are completely dry. Store the dried beans in an airtight container.
Variety is Key: Find Your Favorite
There are many different varieties of black-eyed peas that differ in size, color, and taste. Here are a few popular varieties:
- ‘Black Eyed Peas’: The classic variety with the black “eyes.”
- ‘Pink Eye Purple Hull’: A variety with pink pods and a mild flavor.
- ‘Whippoorwill’: An old variety with speckled pods and a nutty flavor.
- ‘California Blackeye No. 5’: A high-yielding variety with large, white beans.
Try out different varieties to find your favorite!
Black-Eyed Peas in the Kitchen: Versatile and Delicious
Black-eyed peas are incredibly versatile and can be used in many different dishes. Here are a few ideas:
- Classic: Cooked black-eyed peas with rice and vegetables.
- Salad: Black-eyed pea salad with tomatoes, cucumbers, and onions.
- Soup: Black-eyed pea soup with bacon and vegetables.
- Stew: Black-eyed pea stew with sausages and potatoes.
- Hummus: Black-eyed pea hummus as a dip or spread.
Let your creativity run wild and experiment with different recipes!
Additional Tips for a Successful Harvest
- Crop Rotation: Do not plant black-eyed peas in the same location every year to prevent diseases and pests.
- Soil Improvement: Regularly improve the soil with compost or other organic matter.
- Mulching: Mulch the bed to retain moisture in the soil and suppress weeds.
- Observation: Regularly check your plants for signs of pests or diseases.
With these tips and tricks, nothing stands in the way of a bountiful black-eyed pea harvest! Happy gardening and enjoy your meal!
Conclusion
So, there you have it! A comprehensive guide to successfully growing cowpeas in your own garden. We’ve covered everything from selecting the right variety and preparing your soil to planting, nurturing, and harvesting these delicious and nutritious legumes. But why should you bother with all this effort when you can just buy cowpeas at the store? The answer is simple: freshness, flavor, and control.
Store-bought cowpeas, while convenient, often lack the vibrant flavor and tender texture of freshly harvested ones. Plus, when you grow your own, you know exactly what’s gone into them – no mystery pesticides or questionable farming practices. You’re in complete control of the entire process, ensuring a healthy and sustainable harvest for you and your family.
This DIY cowpea garden guide isn’t just about growing food; it’s about connecting with nature, learning new skills, and enjoying the satisfaction of providing for yourself. Imagine the pride you’ll feel serving a dish made with cowpeas you nurtured from tiny seeds to plump, flavorful beans.
Why is this DIY trick a must-try? Because it empowers you to grow your own healthy food, save money, and enjoy the unparalleled taste of fresh, homegrown cowpeas. It’s a rewarding experience that connects you to the earth and provides a sustainable source of nutrition.
But don’t stop there! Experiment with different varieties of cowpeas to find your favorites. Try planting them as a cover crop to improve your soil. Incorporate them into your favorite recipes, from traditional Southern dishes to innovative vegetarian creations. The possibilities are endless!
Consider these variations to enhance your cowpea growing experience:
* Succession Planting: Plant cowpeas every few weeks to ensure a continuous harvest throughout the growing season.
* Companion Planting: Plant cowpeas alongside corn or sunflowers for natural support and improved growth.
* Vertical Gardening: Train vining cowpea varieties up trellises or fences to save space and create a beautiful green wall.
* Soil Amendments: Experiment with different soil amendments, such as compost or aged manure, to optimize soil fertility and drainage.
* Pest Control: Introduce beneficial insects, such as ladybugs or lacewings, to control common cowpea pests naturally.
We encourage you to take the plunge and start your own cowpea garden today. Don’t be afraid to experiment, learn from your mistakes, and most importantly, have fun! Growing cowpeas is a journey, not a destination.
And once you’ve harvested your bounty, we’d love to hear about your experience. Share your tips, tricks, and favorite recipes in the comments below. Let’s build a community of passionate cowpea growers and inspire others to embrace the joys of homegrown food. Your insights could be invaluable to someone just starting out. So, get your hands dirty, plant some seeds, and discover the magic of growing your own delicious and nutritious cowpeas!
Frequently Asked Questions (FAQ)
Q: How long does it take for cowpeas to mature?
A: Cowpeas typically take between 60 and 90 days to mature, depending on the variety and growing conditions. Some bush varieties may mature slightly faster than vining varieties. Keep a close eye on your plants and harvest the pods when they are plump and filled with beans, but before they start to dry out completely on the vine. Regular harvesting encourages continued production.
Q: What are the best soil conditions for growing cowpeas?
A: Cowpeas thrive in well-drained soil with a pH between 6.0 and 7.0. They are relatively tolerant of poor soil conditions but will benefit from the addition of compost or other organic matter to improve drainage and fertility. Avoid planting cowpeas in heavy clay soil that retains too much moisture. If your soil is compacted, consider tilling or amending it with sand or perlite to improve drainage.
Q: How often should I water my cowpea plants?
A: Cowpeas are relatively drought-tolerant, but they still need regular watering, especially during hot, dry periods. Water deeply and infrequently, allowing the soil to dry out slightly between waterings. Avoid overwatering, as this can lead to root rot. A good rule of thumb is to water when the top inch of soil feels dry to the touch. Mulching around the plants can help retain moisture and reduce the need for frequent watering.
Q: What are some common pests and diseases that affect cowpeas?
A: Common pests that affect cowpeas include aphids, bean beetles, and cowpea curculio. Diseases include fungal diseases like powdery mildew and root rot. Regularly inspect your plants for signs of pests or diseases and take action promptly. Organic pest control methods, such as insecticidal soap or neem oil, can be effective for controlling aphids and bean beetles. Ensure good air circulation around your plants to prevent fungal diseases. Crop rotation and using disease-resistant varieties can also help minimize disease problems.
Q: Can I grow cowpeas in containers?
A: Yes, you can grow cowpeas in containers, especially bush varieties. Choose a large container with good drainage and fill it with a well-draining potting mix. Provide adequate sunlight and water regularly. You may need to fertilize container-grown cowpeas more frequently than those grown in the ground. Consider using a slow-release fertilizer or liquid fertilizer diluted to half strength.
Q: How do I harvest cowpeas?
A: Harvest cowpeas when the pods are plump and filled with beans, but before they start to dry out completely on the vine. Snap the pods off the plant carefully, avoiding damage to the plant. You can shell the beans immediately or allow the pods to dry completely for later use. To shell the beans, simply crack open the pods and remove the beans.
Q: How do I store cowpeas?
A: Freshly shelled cowpeas can be stored in the refrigerator for a few days. For longer storage, you can freeze them. Blanch the beans in boiling water for a few minutes, then cool them in ice water. Drain well and store in freezer bags or containers. Dried cowpeas can be stored in an airtight container in a cool, dry place for up to a year.
Q: Are cowpea leaves edible?
A: Yes, cowpea leaves are edible and are a popular vegetable in many parts of the world. They can be cooked like spinach or other leafy greens. Harvest young, tender leaves for the best flavor.
Q: Can cowpeas be used as a cover crop?
A: Yes, cowpeas are an excellent cover crop. They are a legume, which means they can fix nitrogen in the soil, improving soil fertility. They also provide ground cover, suppressing weeds and preventing soil erosion. Plant cowpeas as a cover crop in the fall or spring and till them into the soil before planting your next crop.
Q: What are some good companion plants for cowpeas?
A: Good companion plants for cowpeas include corn, sunflowers, cucumbers, and squash. Corn and sunflowers provide natural support for vining cowpea varieties. Cucumbers and squash help to suppress weeds and retain moisture in the soil. Avoid planting cowpeas near onions or garlic, as these can inhibit their growth.
Leave a Comment