
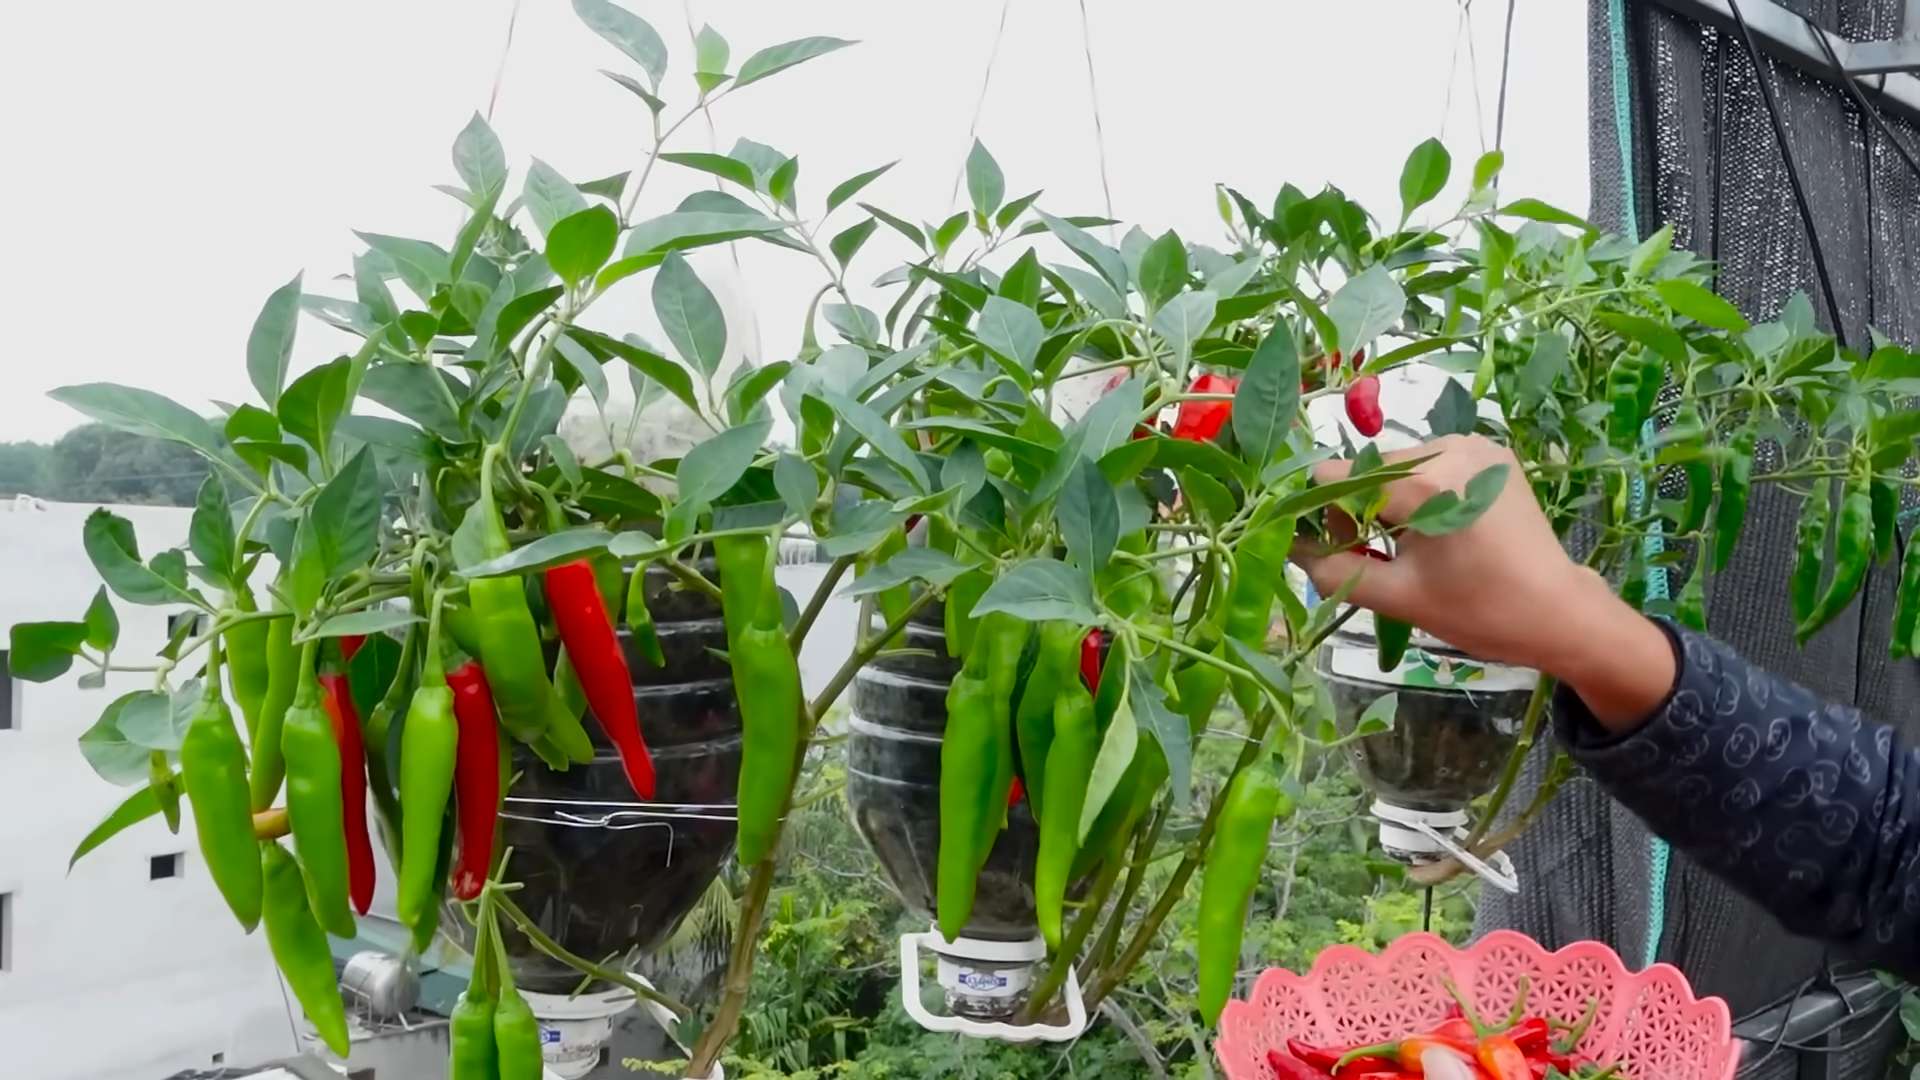
DIY chili plant bottle garden – sounds like a mouthful, right? But trust me, it’s a whole lot easier (and more rewarding!) than it sounds. Imagine plucking fresh, fiery chilies straight from your own upcycled garden, adding a zing to your meals whenever you please. Forget those sad, expensive chilies at the grocery store; we’re talking homegrown goodness, baby!
Humans have been cultivating chilies for thousands of years, dating back to ancient civilizations in South America. These vibrant peppers weren’t just a source of spice; they held cultural and medicinal significance. Now, we’re bringing that tradition into the 21st century with a sustainable twist.
Why do you need this DIY chili plant bottle garden trick in your life? Well, for starters, it’s incredibly space-saving, perfect for apartment dwellers or anyone with a small balcony. Plus, it’s a fantastic way to recycle those plastic bottles that seem to multiply overnight. But most importantly, it gives you control over what you’re eating. No more worrying about pesticides or questionable growing practices. You’ll know exactly where your chilies came from, and you’ll have the satisfaction of growing them yourself. I’m excited to share this simple, effective, and eco-friendly method with you, so let’s get started!
DIY Upside-Down Chili Plant Bottle Garden: A Spicy Project!
Hey there, fellow gardening enthusiasts! I’m super excited to share this fun and surprisingly effective DIY project with you: creating an upside-down chili plant bottle garden. It’s a fantastic way to grow chilies, especially if you’re short on space or just want to try something a little different. Plus, it looks pretty cool hanging around! Let’s get started!
What You’ll Need
Before we dive in, let’s gather all the necessary materials. Trust me, having everything ready beforehand will make the whole process much smoother.
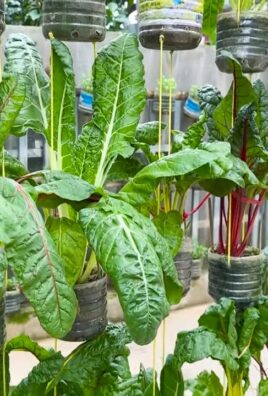
* A sturdy plastic bottle (2-liter soda bottle or similar): The bigger, the better, as it will provide more room for your chili plant’s roots. Make sure it’s clean!
* A healthy chili plant seedling: Choose a variety you love! I personally recommend Jalapeños or Thai chilies for this project, as they tend to thrive in containers.
* Potting mix: Use a good quality potting mix that drains well. Avoid using garden soil, as it can become compacted in containers.
* Scissors or a utility knife: Be careful when using these!
* Duct tape or strong packing tape: For reinforcing the bottle.
* A piece of cloth or coffee filter: To prevent soil from falling out of the bottle’s neck.
* Water: Essential for keeping your chili plant happy.
* Optional: Gloves (to keep your hands clean), a drill (for making drainage holes, if needed), and a hook or rope for hanging.
Preparing the Bottle
Okay, let’s get our hands dirty! The first step is to prepare the bottle to house our chili plant.
1. Clean the bottle thoroughly: Wash the bottle inside and out with soap and water to remove any residue. Rinse it well and let it dry completely. This is crucial to prevent any unwanted bacteria or mold from affecting your plant.
2. Cut the bottle: Using your scissors or utility knife, carefully cut the bottom of the bottle off. You’ll want to cut it about 4-6 inches from the bottom, creating a wide opening. This will be the top of our upside-down planter. Be extra cautious during this step! I always recommend wearing gloves for extra grip and protection.
3. Reinforce the cut edge (Optional but recommended): To prevent the plastic from splitting or cracking, apply duct tape or strong packing tape around the cut edge. This will also make the edge smoother and safer to handle. I find that folding the tape over the edge creates a nice, clean finish.
4. Prepare the bottle cap: This is where our chili plant will emerge! Carefully cut a hole in the center of the bottle cap. The hole should be just large enough to accommodate the stem of your chili plant seedling. You don’t want it too big, or the soil will fall out. A good rule of thumb is to start small and gradually enlarge the hole until it’s the right size.
5. Add drainage holes (Optional): If your bottle doesn’t have any drainage holes, you can drill a few small holes in the sides of the bottle near the neck. This will help prevent the soil from becoming waterlogged. However, be careful not to drill too many holes, as this can cause the soil to dry out too quickly.
Planting Your Chili Seedling
Now for the fun part – planting our chili seedling!
1. Insert the cloth or coffee filter: Place a small piece of cloth or a coffee filter over the hole in the bottle cap. This will act as a barrier to prevent the potting mix from falling out while still allowing water to drain.
2. Carefully insert the chili seedling: Gently thread the stem of your chili seedling through the hole in the bottle cap. Be very careful not to damage the roots. You might need to gently wiggle the seedling to get it through.
3. Secure the seedling: Once the seedling is through the hole, gently pull it down so that the leaves are facing downwards. The roots should be inside the bottle.
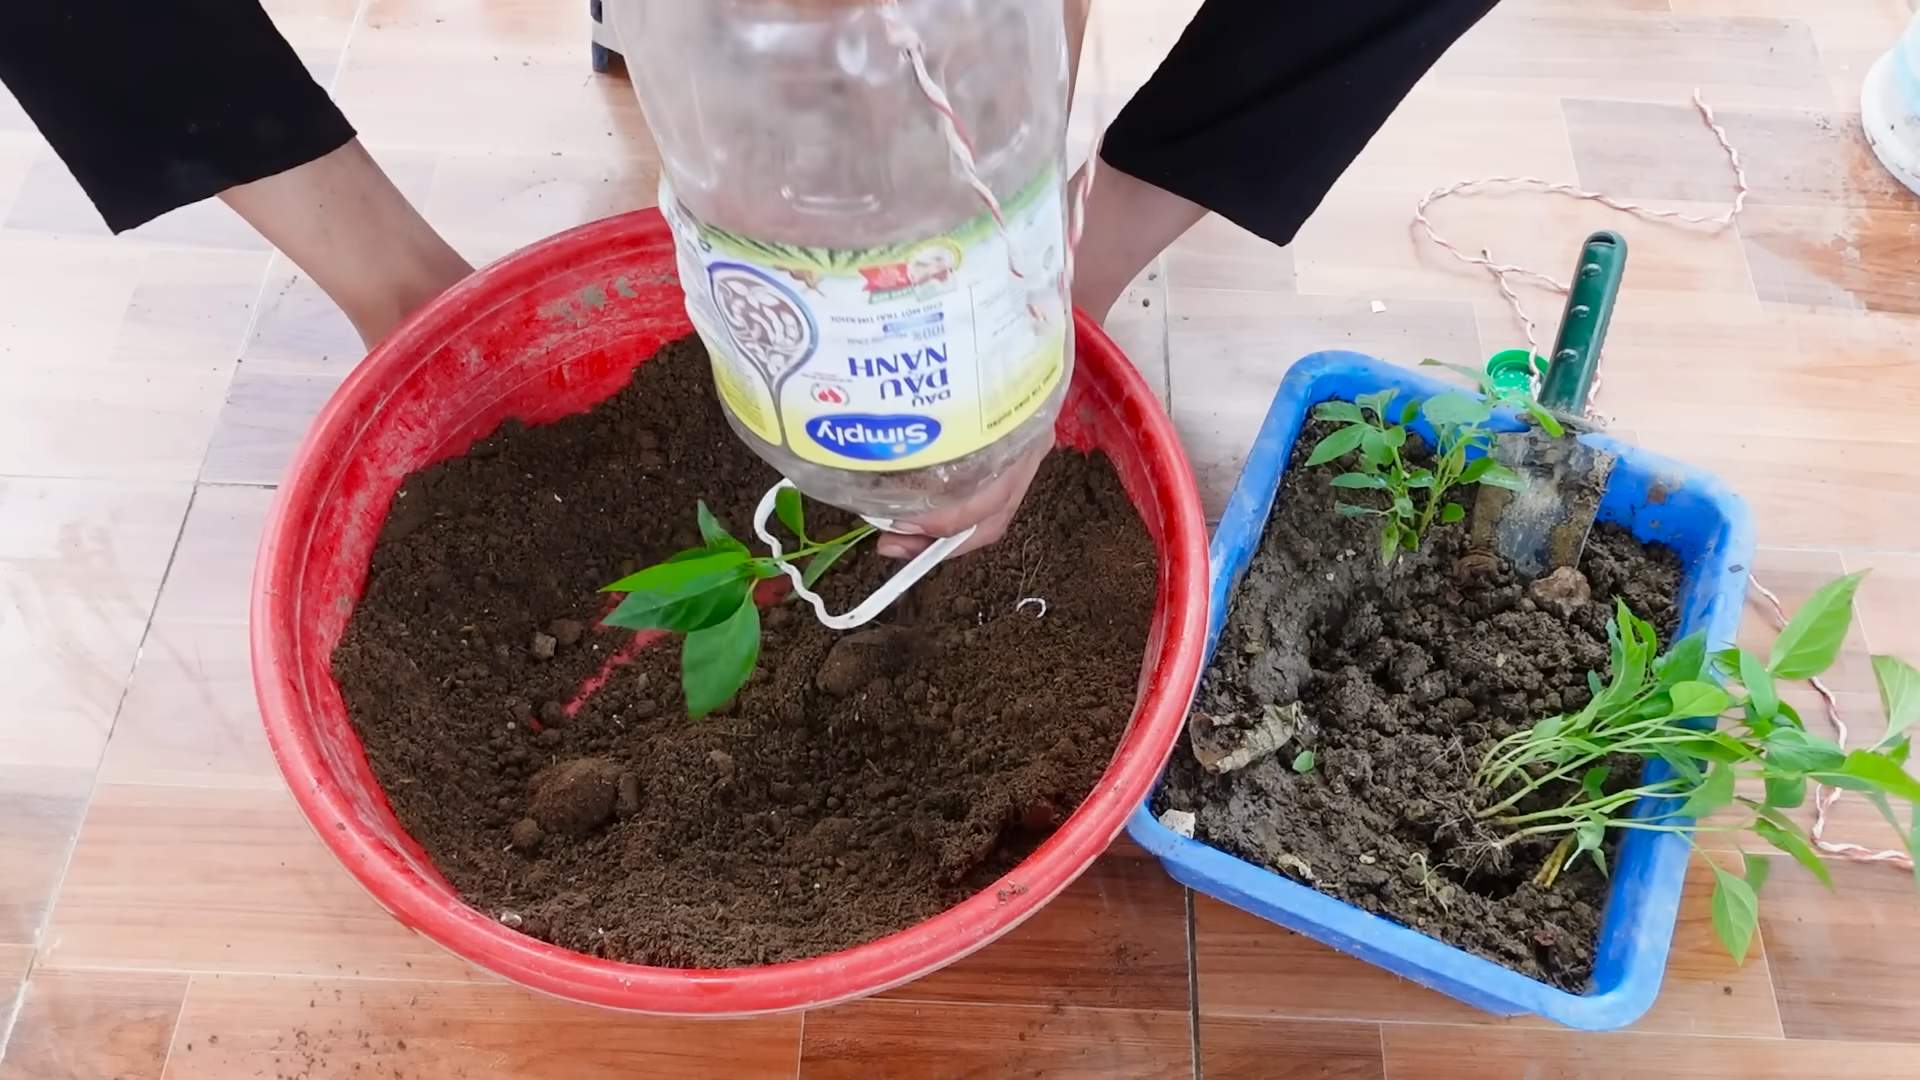
4. Add potting mix: Slowly add potting mix to the bottle, filling it up to the top. Gently tap the bottle to settle the soil and eliminate any air pockets. Make sure the roots of the chili plant are completely covered with soil.
5. Water thoroughly: Once the bottle is filled with potting mix, water the plant thoroughly until water drains out of the drainage holes (if you added them). This will help settle the soil and ensure that the roots are properly hydrated.
Hanging Your Upside-Down Chili Garden
Almost there! Now we need to hang our creation.
1. Attach a hanging mechanism: You can use a hook, rope, or chain to hang your upside-down chili garden. Attach it securely to the neck of the bottle. Make sure the hanging mechanism is strong enough to support the weight of the bottle, soil, and plant. I’ve found that using a sturdy S-hook works well.
2. Choose a sunny location: Hang your upside-down chili garden in a location that receives at least 6-8 hours of sunlight per day. Chilies need plenty of sunlight to thrive. A south-facing balcony or patio is ideal.
3. Hang it up! Carefully hang your upside-down chili garden in your chosen location. Make sure it’s securely attached and won’t fall down.
Caring for Your Upside-Down Chili Plant
Now that your upside-down chili garden is hanging, it’s important to provide proper care to ensure that your chili plant thrives.
1. Water regularly: Water your chili plant regularly, especially during hot and dry weather. Check the soil moisture by sticking your finger into the soil. If the soil feels dry to the touch, it’s time to water. Water thoroughly until water drains out of the drainage holes.
2. Fertilize regularly: Chili plants are heavy feeders and need regular fertilization to produce a good crop of chilies. Use a balanced fertilizer specifically formulated for vegetables. Follow the instructions on the fertilizer package. I like to use a liquid fertilizer diluted in water every two weeks.
3. Pest control: Keep an eye out for pests such as aphids, whiteflies, and spider mites. If you notice any pests, treat them promptly with an appropriate insecticide or organic pest control method. Neem oil is a great organic option.
4. Pruning: Prune your chili plant regularly to encourage bushier growth and more chili production. Pinch off any dead or yellowing leaves. You can also prune the plant to shape it and control its size.
5. Harvesting: Harvest your chilies when they are fully ripe and have reached their desired color. Use scissors or pruning shears to cut the chilies from the plant. Be careful not to damage the plant.
Troubleshooting
Even with the best care, you might encounter some challenges along the way. Here are a few common problems and how to address them:
* Yellowing leaves: This could be a sign of overwatering, underwatering, or nutrient deficiency. Check the soil moisture and adjust your watering schedule accordingly. Fertilize the plant with a balanced fertilizer.
* Dropping leaves: This could be caused by stress, such as sudden changes in temperature or humidity. Make sure your plant is in a stable environment.
* Lack of chili production: This could be due to insufficient sunlight, lack of fertilization, or poor pollination. Make sure your plant is getting enough sunlight and fertilize it regularly. You can also hand-pollinate the flowers by gently shaking the plant or using a small brush to transfer pollen from one flower to another.
* Pest infestations: Treat pest infestations promptly with an appropriate insecticide or organic pest control method.
Tips for Success
Here are a few extra tips to help you succeed with your upside-down chili garden:
* Choose the right chili variety: Some chili varieties are better suited for container gardening than others. Choose a variety that is compact and doesn’t grow too tall.
* Use a good quality potting mix: Avoid using garden soil, as it can become compacted in containers. Use a good quality potting mix that drains well.
* Water regularly: Chili plants need regular watering, especially during hot and dry weather.
* Fertilize regularly: Chili plants are heavy feeders and need regular fertilization to produce a good crop of chilies.
* Provide adequate sunlight: Chili plants need at least 6-8 hours of sunlight per day to thrive.
* Protect from frost: Chili plants are sensitive to frost. If you live in an area with cold winters, bring your upside-down chili garden indoors before the first frost.
* Be patient: It takes time for chili plants to mature and produce chilies. Be patient and don’t give up!
I hope you found this guide helpful! Creating an upside-down chili plant bottle garden is a rewarding and fun project. With a little bit of effort, you can enjoy fresh, homegrown chilies right from your own backyard (
Conclusion
So, there you have it! Transforming a simple plastic bottle into a thriving chili plant garden is not just a fun project; it’s a sustainable, space-saving, and incredibly rewarding way to grow your own fresh chilies. We’ve walked you through each step, from preparing the bottle to nurturing your seedlings, and hopefully, you’re now feeling confident and ready to embark on this exciting gardening adventure.
Why is this DIY chili plant bottle garden a must-try? Firstly, it’s incredibly accessible. You likely already have most of the materials you need lying around your home – plastic bottles, soil, and chili seeds. This makes it a budget-friendly option for anyone looking to add a touch of homegrown goodness to their meals. Secondly, it’s perfect for small spaces. Whether you live in an apartment with a tiny balcony or simply want to maximize your gardening potential, these bottle gardens can be easily hung or placed in sunny spots, bringing a vibrant splash of green to even the most compact environments. Thirdly, it’s a fantastic way to recycle and reduce waste. By repurposing plastic bottles, you’re contributing to a more sustainable lifestyle and giving these materials a new lease on life.
But the benefits don’t stop there. Growing your own chilies allows you to control the entire process, from seed to harvest. You can choose organic soil, avoid harmful pesticides, and ensure that your chilies are bursting with flavor and nutrients. Plus, there’s nothing quite like the satisfaction of picking your own homegrown chilies and adding them to your favorite dishes.
Feeling adventurous? Consider some variations to personalize your DIY chili plant bottle garden. You could experiment with different types of chilies, from mild jalapeños to fiery habaneros. You could also try adding companion plants, such as basil or marigolds, to deter pests and enhance the growth of your chilies. Another fun idea is to paint or decorate your bottles to add a touch of personality to your garden. Get creative and let your imagination run wild!
This DIY chili plant bottle garden is more than just a gardening project; it’s a gateway to a more sustainable, flavorful, and fulfilling lifestyle. It’s a chance to connect with nature, learn new skills, and enjoy the fruits (or rather, chilies) of your labor.
We truly believe that anyone can successfully create their own chili plant bottle garden, regardless of their gardening experience. So, what are you waiting for? Gather your materials, follow our simple steps, and get ready to experience the joy of growing your own chilies.
We’re eager to hear about your experiences! Share your photos, tips, and challenges in the comments below. Let’s create a community of chili-loving gardeners and inspire others to embrace this fantastic DIY project. Don’t forget to tag us in your social media posts using #ChiliBottleGardenDIY – we can’t wait to see your creations! Happy gardening!
Frequently Asked Questions
What type of plastic bottle is best for a chili plant bottle garden?
Ideally, you should use PET (Polyethylene Terephthalate) plastic bottles, as they are widely recyclable and relatively durable. Look for the recycling symbol with the number “1” inside. Avoid using bottles that have contained harsh chemicals or cleaning products, as these may contaminate the soil and harm your plants. Thoroughly wash and rinse the bottles before using them. Two-liter soda bottles or larger water bottles work well, providing ample space for the chili plant’s roots to grow. The thicker the plastic, the better it will withstand the elements, especially if you plan to keep your bottle garden outdoors.
How often should I water my chili plants in a bottle garden?
Watering frequency depends on several factors, including the climate, the type of soil you’re using, and the size of your bottle garden. As a general rule, check the soil moisture level daily. If the top inch of soil feels dry to the touch, it’s time to water. Water thoroughly until excess water drains out of the drainage holes you created. Avoid overwatering, as this can lead to root rot. During hot and dry weather, you may need to water more frequently, possibly even twice a day. In cooler or more humid conditions, you can reduce the watering frequency. A good tip is to use a watering can with a long spout to avoid splashing water on the leaves, which can encourage fungal diseases.
What kind of soil should I use for my chili plant bottle garden?
The best soil for your chili plant bottle garden is a well-draining potting mix. Avoid using garden soil, as it can be too heavy and compact, hindering root growth and drainage. A good potting mix will contain a blend of peat moss, perlite, and vermiculite, which provide excellent drainage and aeration. You can also amend your potting mix with compost or other organic matter to provide additional nutrients. Chili plants prefer slightly acidic soil with a pH between 6.0 and 7.0. You can test the pH of your soil using a soil testing kit and adjust it accordingly.
How much sunlight do chili plants need in a bottle garden?
Chili plants thrive in full sunlight, requiring at least 6-8 hours of direct sunlight per day. Place your bottle garden in a sunny location, such as a south-facing window or a balcony that receives plenty of sunlight. If you don’t have access to enough natural sunlight, you can supplement with grow lights. LED grow lights are a great option, as they are energy-efficient and provide the full spectrum of light that chili plants need to grow. Rotate your bottle garden regularly to ensure that all sides of the plant receive equal sunlight.
How do I fertilize my chili plants in a bottle garden?
Chili plants are heavy feeders and require regular fertilization to produce abundant chilies. Start fertilizing your plants about two weeks after transplanting them into the bottle garden. Use a balanced liquid fertilizer, such as a 10-10-10 or 20-20-20 formula, diluted to half strength. Fertilize every two to three weeks during the growing season. You can also use organic fertilizers, such as compost tea or fish emulsion. Avoid over-fertilizing, as this can burn the roots of your plants. As your plants begin to flower and produce fruit, you can switch to a fertilizer that is higher in phosphorus and potassium, which will promote fruit development.
How do I protect my chili plants from pests and diseases in a bottle garden?
Regularly inspect your chili plants for signs of pests and diseases. Common pests that can affect chili plants include aphids, spider mites, and whiteflies. You can control these pests by spraying your plants with insecticidal soap or neem oil. Diseases that can affect chili plants include fungal diseases, such as powdery mildew and leaf spot. To prevent fungal diseases, ensure good air circulation around your plants and avoid overwatering. If you notice any signs of disease, remove the affected leaves and spray your plants with a fungicide. You can also use companion planting to deter pests. For example, planting basil near your chili plants can help repel aphids.
Can I grow different types of chilies in the same bottle garden?
While it’s possible to grow different types of chilies in the same bottle garden, it’s generally not recommended, especially for beginners. Different chili varieties have different growth habits, watering needs, and nutrient requirements. Growing them together can make it difficult to provide each plant with the optimal conditions it needs to thrive. Additionally, cross-pollination can occur between different chili varieties, resulting in unexpected and potentially undesirable traits in the fruit. If you want to grow multiple chili varieties, it’s best to keep them separated in individual bottle gardens.
How long does it take for chili plants to produce chilies in a bottle garden?
The time it takes for chili plants to produce chilies depends on the variety of chili, the growing conditions, and the overall health of the plant. Generally, it takes about 60-90 days from transplanting seedlings to harvesting mature chilies. Some faster-maturing varieties, such as jalapeños, may produce chilies in as little as 60 days, while slower-maturing varieties, such as habaneros, may take up to 120 days. Provide your plants with optimal growing conditions, including plenty of sunlight, water, and nutrients, to encourage faster fruit production.
What do I do with my chili plants after the growing season?
In warmer climates, chili plants can be perennial and continue to produce chilies for several years. In colder climates, chili plants are typically grown as annuals and will die back after the first frost. If you want to overwinter your chili plants, you can bring them indoors before the first frost and place them in a sunny location. Prune back the plants and reduce watering during the winter months. In the spring, you can transplant them back outdoors or start new plants from seed. Alternatively, you can save the seeds from your chilies and start new plants the following year.
Leave a Comment