
DIY Mop from Old Towels: Tired of spending money on disposable mop heads? I know I was! There’s something incredibly satisfying about breathing new life into old items, and that’s exactly what this project is all about. For generations, resourceful homemakers have found clever ways to repurpose materials, and this DIY mop is a modern take on that timeless tradition.
Before the age of mass-produced cleaning supplies, resourcefulness was key. Think about it – our grandmothers and great-grandmothers used rags, scraps of fabric, and ingenuity to keep their homes sparkling. This DIY mop taps into that spirit, offering a sustainable and budget-friendly alternative to store-bought options. Plus, it’s a fantastic way to reduce waste and give those old towels a new purpose.
Why do you need this DIY mop from old towels in your life? Simple: it saves you money, reduces your environmental impact, and gives you a sense of accomplishment. Let’s face it, cleaning isn’t always the most glamorous task, but knowing you’re doing it in a sustainable and cost-effective way makes it a little bit better. So, grab those old towels, and let’s get started on creating your very own eco-friendly cleaning tool!
DIY Mop from Old Towels: A Budget-Friendly Cleaning Solution
Hey there, fellow DIY enthusiasts! Are you tired of spending money on disposable mop heads or bulky, expensive mops? Well, I’ve got a fantastic solution for you: a DIY mop made from old towels! This project is not only incredibly budget-friendly but also a great way to repurpose those worn-out towels that are just taking up space in your linen closet. Plus, it’s surprisingly effective at cleaning your floors. Let’s get started!
What You’ll Need
Before we dive into the step-by-step instructions, let’s gather all the necessary materials. This will make the process smoother and more efficient.
* **Old Towels:** The star of the show! I recommend using at least 3-4 old towels, depending on their thickness and size. Terry cloth towels work best because of their absorbent nature. You can use bath towels, hand towels, or even old washcloths for smaller areas.
* **Mop Handle:** You’ll need a mop handle to attach your towel mop head to. You can repurpose an old mop handle from a broken mop, purchase a new one from a hardware store, or even use a sturdy broom handle.
* **Bucket:** A bucket is essential for wringing out the mop head.
* **Scissors:** For cutting the towels into the desired shape.
* **Sewing Machine (Optional):** While you can hand-sew the mop head, a sewing machine will make the process much faster and more durable.
* **Thread:** Choose a strong thread that matches the color of your towels.
* **Needle:** If you’re hand-sewing, you’ll need a sturdy needle.
* **Measuring Tape or Ruler:** To ensure accurate measurements.
* **Pins:** To hold the towel layers together while sewing.
* **Elastic Bands (Optional):** These can be used to secure the towel mop head to the handle, especially if you’re not sewing a pocket.
* **Safety Glasses:** To protect your eyes while cutting and sewing.
Creating the Mop Head: Two Methods
I’m going to show you two different methods for creating your towel mop head. The first involves sewing a pocket for the mop handle, while the second uses elastic bands for a quicker, no-sew approach. Choose the method that best suits your skills and preferences.
Method 1: Sewing a Pocket for the Mop Handle
This method creates a more secure and durable mop head that won’t easily slip off the handle.
1. **Prepare the Towels:** Lay your towels flat and stack them on top of each other. Trim any frayed edges or loose threads. If your towels are different sizes, try to arrange them so that the largest towel is on the bottom.
2. **Cut the Towels (Optional):** Depending on the size of your mop handle and the desired size of your mop head, you may need to cut the towels. I usually cut mine into rectangular shapes, about 12-18 inches wide and 24-36 inches long. This size works well for most standard mop handles.
3. Fold the Towels:** Fold the stack of towels in half lengthwise, creating a long, narrow rectangle. This will add extra thickness and absorbency to your mop head.
4. **Sew the Sides:** Using your sewing machine or needle and thread, sew along both long sides of the folded towel stack. This will create a closed tube. Make sure to use a strong stitch, such as a straight stitch or a zigzag stitch, to prevent the seams from unraveling. I usually backstitch at the beginning and end of each seam for added security.
5. **Create the Pocket:** Now, we’ll create the pocket for the mop handle. Fold down one end of the tube by about 4-6 inches, depending on the diameter of your mop handle. This folded-down portion will form the pocket.
6. **Sew the Pocket:** Pin the folded-down portion in place, making sure it’s securely attached to the rest of the tube. Then, sew along both sides of the folded-down portion, creating a pocket that the mop handle can slide into. Again, use a strong stitch and backstitch at the beginning and end of each seam.
7. Reinforce the Pocket (Optional): For extra durability, you can reinforce the pocket by sewing a second row of stitching along the sides. You can also add a few stitches across the bottom of the pocket to prevent the mop handle from tearing through the fabric.
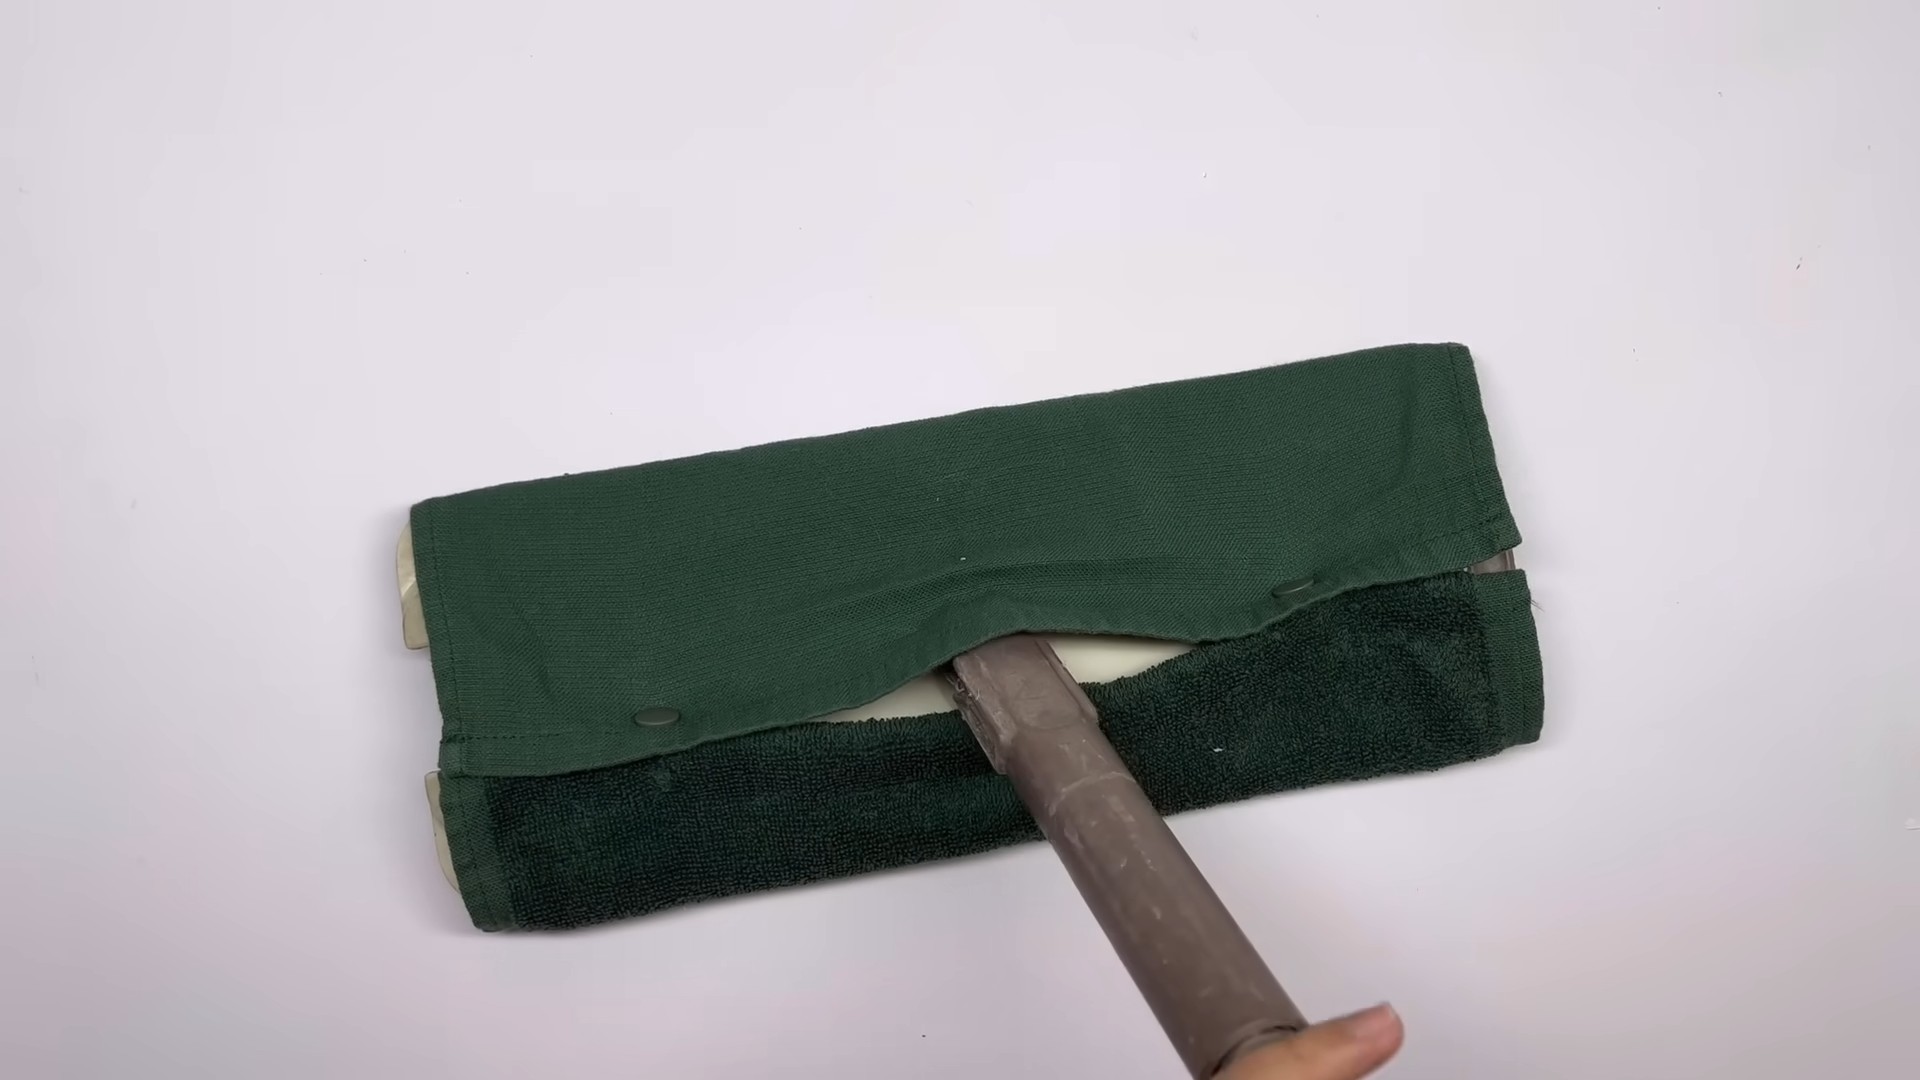
8. Finishing Touches:** Turn the mop head right side out, so the seams are on the inside. Your mop head is now ready to be attached to the handle.
Method 2: Using Elastic Bands (No-Sew)
This method is perfect for those who don’t have a sewing machine or prefer a quicker, no-sew option.
1. **Prepare the Towels:** As with the previous method, start by laying your towels flat and stacking them on top of each other. Trim any frayed edges or loose threads.
2. **Cut the Towels (Optional):** You may need to cut the towels into smaller rectangles, depending on the size of your mop handle and the desired size of your mop head.
3. Stack and Fold:** Stack the towels on top of each other and fold them in half lengthwise.
4. Secure with Elastic Bands:** Now, take your elastic bands and wrap them tightly around the folded towel stack, near the top. You’ll need at least two elastic bands, but you can use more for added security. Make sure the elastic bands are tight enough to hold the towels in place, but not so tight that they cut off circulation.
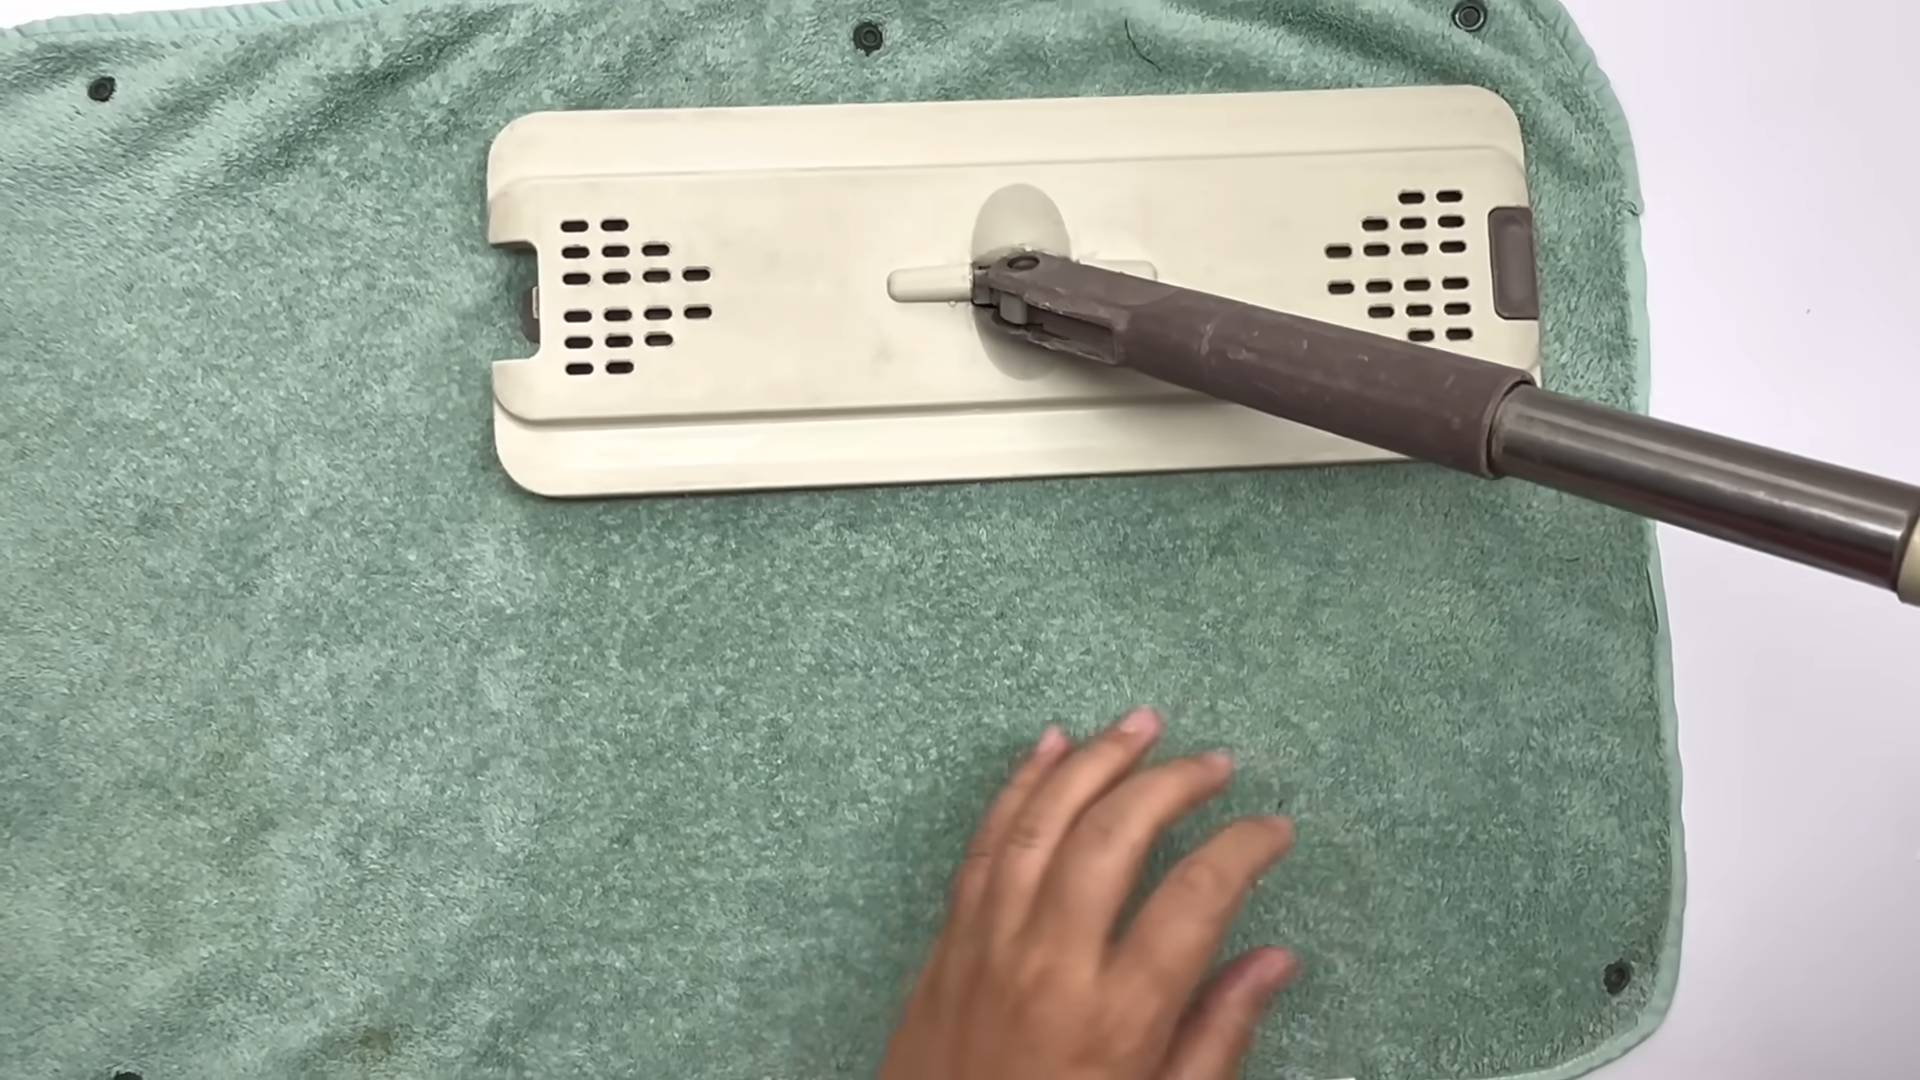
5. Attach to the Mop Handle:** Slide the mop handle through the elastic bands, making sure the towels are evenly distributed around the handle.
6. Adjust and Secure:** Adjust the towels as needed to create a full and absorbent mop head. You may need to add more elastic bands if the towels are slipping or sliding.
Using Your DIY Towel Mop
Now that you’ve created your DIY towel mop, it’s time to put it to the test!
1. **Prepare Your Cleaning Solution:** Fill your bucket with warm water and your favorite cleaning solution. I like to use a mixture of water and vinegar for a natural and effective cleaning solution. You can also add a few drops of essential oil for a pleasant scent.
2. **Dip and Wring:** Dip your towel mop head into the cleaning solution and wring it out thoroughly. You want the mop head to be damp, but not soaking wet.
3. **Mop Your Floors:** Start mopping your floors, using a back-and-forth motion. Be sure to cover all areas, including corners and edges.
4. **Rinse and Repeat:** As the mop head becomes dirty, rinse it out in the bucket of cleaning solution and wring it out again. Repeat this process until your floors are clean.
5. **Dry Your Floors:** Once you’ve finished mopping, allow your floors to air dry. You can also use a clean, dry towel to speed up the drying process.
Caring for Your DIY Towel Mop
To keep your DIY towel mop in good condition, it’s important to clean it properly after each use.
1. **Rinse Thoroughly:** After mopping, rinse the towel mop head thoroughly with clean water to remove any remaining dirt and cleaning solution.
2. **Wash Regularly:** I recommend washing your towel mop head in the washing machine every few uses. Use a gentle cycle and a mild detergent.
3. **Dry Completely:** After washing, dry the towel mop head completely before storing it. You can hang it outside to air dry or put it in the dryer on a low setting.
4. **Replace as Needed:** Over time, the towels will wear out and become less absorbent. When this happens, simply replace them with new old towels.
Benefits of Using a DIY Towel Mop
There are many benefits to using a DIY towel mop:
* **Cost-Effective:** It’s much cheaper than buying disposable mop heads or expensive mops.
* **Eco-Friendly:** It’s a great way to repurpose old towels and reduce waste.
* **Customizable:** You can customize the size and thickness of the mop head to suit your needs.
* **Easy to Clean:** The towel mop head is easy to clean and maintain.
* **Effective:** It’s surprisingly effective at cleaning floors.
So, there you have it! A simple and effective DIY mop made from old towels. I hope you found this tutorial helpful. Happy cleaning!
Conclusion
So, there you have it! Transforming your old towels into a highly effective and eco-friendly DIY mop isn’t just a clever craft project; it’s a game-changer for your cleaning routine. We’ve walked you through the simple steps, highlighting how easy it is to repurpose those forgotten towels into a powerful cleaning tool. But why is this DIY mop a must-try?
Firstly, it’s incredibly cost-effective. Think about it: you’re using materials you already have on hand, saving you money on disposable mop heads or expensive cleaning systems. Secondly, it’s environmentally conscious. By upcycling your old towels, you’re reducing textile waste and contributing to a more sustainable lifestyle. Every time you use your DIY mop, you’re making a small but significant difference. Thirdly, it’s customizable. You control the absorbency and texture of your mop by choosing different types of towels. Got some super absorbent microfiber towels? Perfect for tackling spills! Have some slightly rougher cotton towels? Ideal for scrubbing stubborn dirt.
But the benefits don’t stop there. This DIY mop is also incredibly versatile. Use it on hardwood floors, tile, laminate, or even concrete. The soft texture of the towels ensures that your floors are cleaned gently, without scratching or damaging the surface. Plus, you can easily wash the mop head after each use, ensuring a hygienic and effective clean every time.
Variations and Suggestions:
Want to take your DIY mop to the next level? Here are a few ideas:
* Scented Cleaning: Add a few drops of your favorite essential oil to your cleaning solution for a fresh and invigorating scent. Lavender, lemon, or eucalyptus are all great choices.
* Heavy-Duty Scrubbing: For tougher cleaning jobs, consider attaching a scrub brush to the bottom of your mop head. This will give you extra scrubbing power without damaging your floors.
* Microfiber Magic: If you have a collection of old microfiber cloths, use them to create a super absorbent and effective mop head. Microfiber is known for its ability to trap dirt and grime, leaving your floors sparkling clean.
* Handle Upgrade: While a simple broom handle works perfectly fine, you can also repurpose an old mop handle or even create your own from a sturdy wooden dowel. Get creative and personalize your mop to suit your needs.
* Color Coding: If you have different types of floors in your home, consider using different colored towels for each type. This will help you avoid cross-contamination and ensure that you’re using the right mop head for the job.
We’re confident that once you try this DIY mop, you’ll never go back to store-bought alternatives. It’s economical, eco-friendly, customizable, and incredibly effective. So, gather your old towels, grab your broom handle, and get ready to experience the joy of a sparkling clean home, all thanks to your own ingenuity.
Don’t just take our word for it! We encourage you to try this DIY trick and share your experience with us. Let us know what variations you tried, what cleaning solutions you used, and how your DIY mop performed. We’re eager to hear your feedback and learn from your experiences. Share your photos and stories on social media using #DIYMop #UpcycledCleaning #EcoFriendlyHome. Let’s inspire others to embrace sustainable cleaning practices and transform their old towels into something amazing! Embrace the power of a homemade, sustainable, and effective DIY mop today!
Frequently Asked Questions (FAQ)
What types of towels work best for a DIY mop?
The beauty of this DIY project is its versatility! You can use a wide variety of towels, depending on your cleaning needs and preferences. Old bath towels, hand towels, and even washcloths can be repurposed into a mop head. Microfiber towels are excellent for their absorbency and ability to trap dirt, while cotton towels offer a good balance of absorbency and scrubbing power. Thicker towels will generally provide more absorbency and durability, while thinner towels may be more suitable for delicate surfaces. Experiment with different types of towels to find what works best for your floors and cleaning style. Avoid using towels with loose threads or embellishments that could snag on your floors.
How do I clean the DIY mop head after use?
Cleaning your DIY mop head is essential for maintaining hygiene and ensuring its effectiveness. After each use, remove the mop head from the handle and rinse it thoroughly with warm water. For a deeper clean, you can wash the mop head in your washing machine with your regular laundry. Use a mild detergent and avoid using bleach or fabric softeners, as these can damage the fibers of the towels. Tumble dry on low heat or hang to dry completely before storing. If your mop head is heavily soiled, you can soak it in a solution of warm water and vinegar before washing. This will help to loosen dirt and grime and eliminate odors. Regular cleaning will extend the life of your DIY mop and keep your floors sparkling clean.
Can I use different cleaning solutions with my DIY mop?
Absolutely! One of the advantages of a DIY mop is that you have complete control over the cleaning solutions you use. You can use your favorite store-bought floor cleaner, or you can create your own natural cleaning solutions using ingredients like vinegar, baking soda, and essential oils. For hardwood floors, a mixture of water and vinegar is a safe and effective option. For tile and laminate floors, you can use a stronger cleaning solution with a bit of dish soap. Always test your cleaning solution on a small, inconspicuous area of your floor before using it on the entire surface to ensure that it doesn’t damage the finish. Avoid using harsh chemicals or abrasive cleaners, as these can scratch or dull your floors.
How often should I replace the towels on my DIY mop?
The lifespan of your DIY mop head will depend on how frequently you use it and the types of towels you use. In general, you should replace the towels when they become worn, frayed, or no longer effectively absorb water. If you notice that your mop head is leaving streaks on your floors or is not picking up dirt as well as it used to, it’s time to replace the towels. You can also replace the towels if they become stained or develop an unpleasant odor that cannot be removed with washing. Regularly inspecting your mop head will help you determine when it’s time for a replacement.
Is this DIY mop suitable for all types of floors?
This DIY mop is generally suitable for most types of floors, including hardwood, tile, laminate, and concrete. However, it’s important to consider the specific needs of your flooring and choose the appropriate towels and cleaning solutions accordingly. For delicate hardwood floors, use soft towels and a gentle cleaning solution to avoid scratching or damaging the finish. For tile and laminate floors, you can use more absorbent towels and a stronger cleaning solution. For concrete floors, you may need to use a scrub brush attachment to effectively remove dirt and grime. Always test your mop and cleaning solution on a small, inconspicuous area of your floor before using it on the entire surface to ensure that it doesn’t cause any damage.
What if I don’t have a broom handle? What else can I use?
If you don’t have a broom handle readily available, don’t worry! There are several alternatives you can use to create your DIY mop. An old mop handle is an obvious choice, but you can also use a sturdy wooden dowel, a PVC pipe, or even a long, straight branch from your yard (make sure it’s smooth and free of splinters!). You can also purchase a replacement broom handle from most hardware stores or online retailers. The key is to find something that is long enough to comfortably reach the floor and sturdy enough to withstand the pressure of mopping. Securely attaching the towels to your chosen handle is crucial for ensuring that your DIY mop is effective and easy to use.
How do I prevent the towels from slipping off the mop handle?
Securing the towels to the mop handle is essential for a successful DIY mop. There are several methods you can use to prevent the towels from slipping off. One option is to use strong rubber bands or zip ties to tightly secure the towels around the handle. Another option is to sew the towels together to create a more secure mop head. You can also use a hot glue gun to attach the towels to the handle, but be careful not to use too much glue, as this can make the mop head stiff and difficult to maneuver. Experiment with different methods to find what works best for you and your materials. Regularly check the attachment to ensure that the towels are securely in place and re-secure them as needed.
Leave a Comment