
Soil Free Rosemary Growing: Imagine harvesting fragrant, flavorful rosemary right from your kitchen, without ever getting your hands dirty! Sounds like a dream, right? Well, it’s more achievable than you think! For centuries, humans have cultivated herbs, understanding their culinary and medicinal value. Rosemary, in particular, has a rich history, symbolizing remembrance and fidelity in various cultures. But let’s face it, traditional gardening can be messy, time-consuming, and sometimes, downright frustrating, especially when dealing with finicky plants like rosemary.
That’s where this DIY guide comes in! I’m going to show you a simple, effective, and incredibly clean method for soil free rosemary growing. Whether you’re a seasoned gardener looking to experiment or a complete beginner with limited space, this hack will revolutionize how you grow herbs. Think of it: no more battling soil-borne diseases, no more worrying about drainage, and no more lugging heavy bags of potting mix.
This method is perfect for apartment dwellers, busy individuals, or anyone who wants to enjoy fresh rosemary year-round with minimal effort. Ready to ditch the dirt and embrace a cleaner, easier way to cultivate this amazing herb? Let’s get started!
Growing Rosemary in Water: A Simple DIY Guide
Hey there, fellow plant enthusiasts! Ever thought about growing rosemary without soil? It’s totally doable, and I’m here to walk you through it. This method, often called hydroponics or water propagation, is a fun and surprisingly easy way to expand your rosemary collection or simply enjoy this fragrant herb in a new way. Let’s dive in!
Choosing Your Rosemary Cuttings
First things first, we need to select the right rosemary cuttings. This is crucial for success, so pay close attention!
* Look for Healthy Stems: Choose stems that are vibrant green and free from any signs of disease or pests. Avoid stems that are brown, yellowing, or have spots.
* Semi-Hardwood Cuttings are Best: These are stems that are neither too young and flexible nor too old and woody. They should be firm but still somewhat pliable.
* Length Matters: Aim for cuttings that are about 4-6 inches long. This gives them enough stem to develop roots while still being manageable.
* Take Cuttings in Spring or Early Summer: This is generally the best time for propagation, as the rosemary is actively growing.
* Avoid Flowering Stems: If possible, choose stems that don’t have flowers or buds. The plant will focus its energy on root development rather than flowering.
Preparing Your Rosemary Cuttings
Now that you’ve got your cuttings, let’s get them ready for their water bath!
1. Remove Lower Leaves: Carefully remove the leaves from the bottom 1-2 inches of each cutting. This is important because these submerged leaves will rot and contaminate the water, hindering root growth.
2. Optional: Scrape the Stem: Gently scrape the outer layer of the stem near the bottom with a clean knife or your fingernail. This can encourage root formation. Be careful not to damage the stem too much.
3. Consider Rooting Hormone (Optional): While not strictly necessary, dipping the cut end of the stem in rooting hormone can significantly increase your chances of success. Follow the instructions on the rooting hormone package. I’ve had good results both with and without it, so don’t worry if you don’t have any on hand.
4. Let the Cuttings Callous (Optional): Some gardeners recommend letting the cut ends of the cuttings callous over for a day or two before placing them in water. This helps prevent rot. I’ve skipped this step before and still had success, but it’s something to consider.
Setting Up Your Water Propagation Station
Alright, time to create a cozy home for our rosemary cuttings!
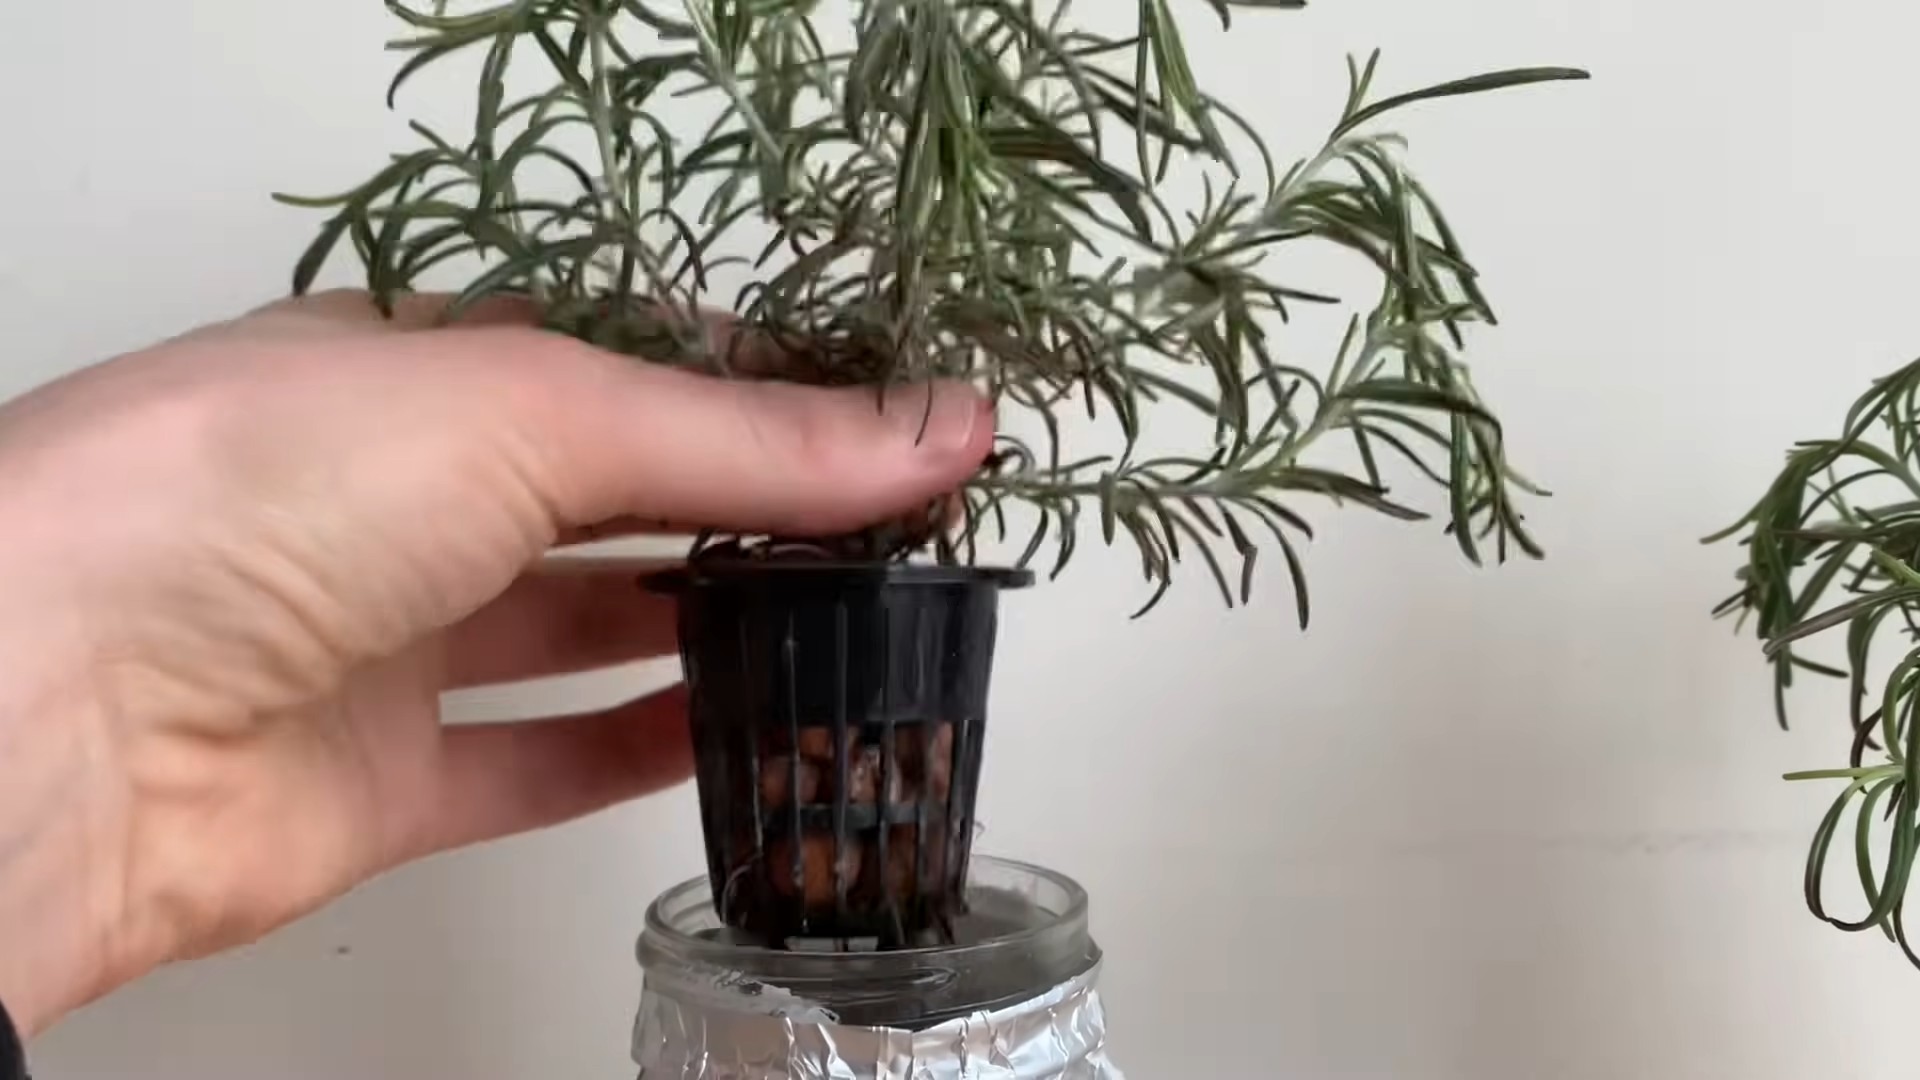
1. Choose a Container: Select a clean glass jar or vase. The container should be narrow enough to support the cuttings but wide enough to allow for good air circulation. I like using mason jars.
2. Use Clean Water: Fill the container with fresh, clean water. Distilled or filtered water is ideal, but tap water that has been left out for 24 hours to allow chlorine to dissipate will also work.
3. Add a Support System (Optional): If your container is too wide and the cuttings are falling over, you can use a piece of cardboard or plastic wrap with holes poked in it to support them. This will keep the leaves from being submerged.
4. Consider Adding a Charcoal Piece: Adding a small piece of activated charcoal to the water can help keep it clean and prevent bacterial growth. You can find activated charcoal at most pet stores (it’s used for aquarium filters).
5. Avoid Direct Sunlight: Place the container in a location that receives bright, indirect sunlight. Direct sunlight can overheat the water and harm the cuttings. A windowsill facing east or west is usually a good choice.
Caring for Your Rosemary Cuttings
This is where the patience comes in! Rooting can take several weeks, so don’t get discouraged if you don’t see results immediately.
1. Change the Water Regularly: Change the water every 2-3 days to keep it fresh and prevent bacterial growth. This is super important!
2. Monitor for Root Growth: Keep an eye on the cuttings for signs of root development. You should start to see small roots emerging from the stem within a few weeks.
3. Be Patient: Rooting can take anywhere from 2 to 6 weeks, depending on the conditions. Don’t give up!
4. Remove Any Rotting Leaves: If any leaves start to rot, remove them immediately to prevent the spread of bacteria.
5. Maintain Humidity (Optional): If the air is very dry, you can increase humidity around the cuttings by misting them lightly with water a few times a day or by placing a plastic bag over the container (making sure to vent it to prevent mold growth).
Transplanting Your Rooted Rosemary Cuttings
Hooray! You’ve got roots! Now it’s time to move your rosemary babies to their new home in soil.
1. Wait for Sufficient Root Growth: Before transplanting, make sure the roots are at least 1-2 inches long. This will give them a better chance of survival.
2. Prepare Your Pot: Choose a pot that is at least 4 inches in diameter and has drainage holes. Rosemary prefers well-draining soil, so use a potting mix specifically formulated for herbs or a mix of potting soil, perlite, and sand.
3. Gently Remove the Cutting: Carefully remove the rooted cutting from the water. Be gentle to avoid damaging the delicate roots.
4. Plant the Cutting: Dig a small hole in the potting mix and gently place the cutting in the hole. Cover the roots with soil and gently firm the soil around the base of the plant.
5. Water Thoroughly: Water the newly planted rosemary cutting thoroughly until water drains out of the drainage holes.
6. Provide Bright, Indirect Sunlight: Place the pot in a location that receives bright, indirect sunlight.
7. Water Regularly: Water the rosemary regularly, allowing the soil to dry out slightly between waterings. Avoid overwatering, as this can lead to root rot.
8. Fertilize Sparingly: Rosemary doesn’t need a lot of fertilizer. You can fertilize it once a month during the growing season with a balanced liquid fertilizer diluted to half strength.
Troubleshooting
Sometimes things don’t go as planned. Here are some common issues you might encounter and how to deal with them:
* Cuttings Rotting: This is usually caused by bacteria in the water. Make sure to change the water regularly and remove any rotting leaves. You can also try adding a small piece of activated charcoal to the water.
* No Root Growth: This could be due to several factors, including poor quality cuttings, insufficient light, or cold temperatures. Make sure you’re using healthy cuttings, providing bright, indirect sunlight, and keeping the cuttings in a warm location. You can also try using rooting hormone.
* Yellowing Leaves: This could be a sign of overwatering or nutrient deficiency. Make sure you’re not overwatering the cuttings and that the water is clean. If the leaves are yellowing after transplanting, try fertilizing with a balanced liquid fertilizer.
* Mold Growth: Mold can sometimes grow on the stems or in the water. This is usually caused by high humidity and poor air circulation. Make sure to provide good air circulation and avoid overwatering. You can also try spraying the cuttings with a fungicide.
Tips for Success
Here are a few extra tips to help you succeed with water propagation:
* Use a Clean Container: Always use a clean container to prevent the spread of bacteria.
* Change the Water Regularly: This is the most important thing you can do to prevent rot and encourage root growth.
* Provide Bright, Indirect Sunlight: Rosemary needs plenty of light to grow, but direct sunlight can overheat the water.
* Be Patient: Rooting can take several weeks, so don’t get discouraged if you don’t see results immediately.
* Experiment: Don’t be afraid to experiment with different techniques and see what works best for you.
Growing rosemary in water is a rewarding and fun project. With a little patience and care, you can easily propagate your own rosemary plants and enjoy this fragrant herb for years to come. Happy growing!

Conclusion
So, there you have it! Growing rosemary without soil might sound like something out of a science fiction novel, but it’s surprisingly simple, incredibly rewarding, and a fantastic way to enjoy fresh herbs year-round. This method, focusing on hydroponics, offers a cleaner, more controlled environment for your rosemary, minimizing the risk of soilborne diseases and pests that can plague traditional gardening.
Why is this soil free rosemary growing trick a must-try? Because it opens up a world of possibilities, especially for those with limited space, poor soil conditions, or simply a desire for a more sustainable and efficient gardening approach. Imagine having a thriving rosemary plant on your kitchen counter, ready to add its fragrant, flavorful leaves to your favorite dishes at a moment’s notice. No more trips to the grocery store for wilted sprigs!
Beyond the convenience, this method allows you to fine-tune the growing conditions, ensuring your rosemary receives the precise nutrients and moisture it needs to flourish. You’ll be amazed at how quickly and vigorously your rosemary grows in a hydroponic setup.
Ready to experiment? Consider these variations to tailor the method to your specific needs and preferences:
* Different Nutrient Solutions: While a general hydroponic nutrient solution works well, you can research specific formulations designed for herbs or even create your own using readily available ingredients. Experiment with different ratios to see what yields the best results for your rosemary.
* Lighting Options: If you don’t have a sunny windowsill, invest in a grow light. LED grow lights are energy-efficient and provide the full spectrum of light your rosemary needs to thrive.
* Container Choices: Get creative with your containers! While mason jars are a popular choice, you can use repurposed plastic bottles, glass vases, or even specialized hydroponic containers. Just ensure the container is clean and opaque to prevent algae growth.
* Propagation Methods: While starting with cuttings is common, you can also try growing rosemary from seeds in a soil-free medium like rockwool or coco coir before transferring them to your hydroponic system.
Don’t be afraid to experiment and adapt the method to suit your unique environment and resources. The beauty of hydroponics is its adaptability and the opportunity to learn and refine your techniques over time.
We wholeheartedly encourage you to give this soil-free rosemary growing method a try. It’s a fun, educational, and ultimately delicious way to connect with nature and enjoy the benefits of fresh, homegrown herbs. Once you’ve experienced the joy of harvesting your own fragrant rosemary, you’ll never look at gardening the same way again.
And most importantly, we want to hear about your experience! Share your successes, challenges, and variations in the comments below. Let’s build a community of soil-free rosemary growers and learn from each other’s experiences. Happy growing!
Frequently Asked Questions (FAQ)
What exactly is hydroponics, and why is it beneficial for growing rosemary?
Hydroponics is a method of growing plants without soil, using mineral nutrient solutions in water. It’s beneficial for rosemary because it allows for precise control over the plant’s environment, ensuring it receives the optimal amount of nutrients, water, and light. This can lead to faster growth, higher yields, and reduced risk of soilborne diseases and pests. Plus, it’s a great option for those with limited space or poor soil conditions.
What kind of nutrient solution should I use for my soil-free rosemary?
A general-purpose hydroponic nutrient solution formulated for herbs or vegetables will work well. Look for a balanced formula containing macronutrients like nitrogen, phosphorus, and potassium, as well as micronutrients like iron, manganese, and zinc. Follow the manufacturer’s instructions for dilution and application. You can find these solutions at most garden centers or online retailers specializing in hydroponics.
How often should I change the nutrient solution?
The frequency of nutrient solution changes depends on the size of your container and the growth rate of your rosemary. As a general rule, change the solution every 2-4 weeks. However, if you notice the solution becoming cloudy or discolored, or if your rosemary shows signs of nutrient deficiency, change it more frequently. Always use fresh, clean water and a properly diluted nutrient solution.
What kind of lighting does rosemary need when grown hydroponically?
Rosemary needs at least 6-8 hours of sunlight per day to thrive. If you don’t have a sunny windowsill, supplement with a grow light. LED grow lights are a great option because they are energy-efficient and provide the full spectrum of light that rosemary needs. Place the grow light about 6-12 inches above the plant.
How do I propagate rosemary cuttings for hydroponics?
Take a 4-6 inch cutting from a healthy rosemary plant, removing the leaves from the bottom inch. Place the cutting in a glass of water, ensuring that the bottom nodes are submerged. Change the water every few days. After a few weeks, roots will begin to form. Once the roots are about an inch long, you can transfer the cutting to your hydroponic system.
Can I use tap water for my hydroponic rosemary?
It depends on the quality of your tap water. If your tap water is heavily chlorinated or contains high levels of minerals, it’s best to use filtered or distilled water. You can also let tap water sit out for 24 hours to allow the chlorine to evaporate. Test your tap water to determine its pH and mineral content before using it for hydroponics.
How do I prevent algae growth in my hydroponic system?
Algae growth can be a problem in hydroponic systems, especially if they are exposed to light. To prevent algae growth, use an opaque container to block light from reaching the nutrient solution. You can also add a small amount of hydrogen peroxide to the solution to kill algae. Regularly clean your container to remove any algae that does form.
My rosemary leaves are turning yellow. What could be the problem?
Yellowing leaves can indicate several problems, including nutrient deficiency, overwatering, or underwatering. Check the pH of your nutrient solution and ensure it’s within the optimal range for rosemary (around 6.0-6.5). Make sure your rosemary is receiving adequate light and that the roots are not sitting in stagnant water. Adjust your watering and nutrient schedule as needed.
How do I harvest rosemary from my hydroponic plant?
Harvest rosemary by snipping off sprigs with clean scissors or pruning shears. Avoid cutting more than one-third of the plant at a time to allow it to continue growing. Harvest rosemary in the morning, after the dew has dried, for the best flavor.
Is soil free rosemary growing really sustainable?
Yes, hydroponics can be a very sustainable method of growing rosemary. It uses less water than traditional soil-based gardening, reduces the need for pesticides and herbicides, and can be done indoors, reducing the carbon footprint associated with transporting herbs from farms to stores. By using recycled materials for your containers and grow lights, you can further enhance the sustainability of your hydroponic rosemary garden.


Leave a Comment