
Easy to grow tasty crops – that’s the dream, isn’t it? Imagine stepping into your backyard and harvesting fresh, flavorful vegetables and herbs, all nurtured by your own hands. Forget those bland, overpriced supermarket offerings! This isn’t just a pipe dream; it’s an achievable reality with a few clever home gardening tricks and DIY hacks. For centuries, humans have cultivated their own food, from ancient Egyptians tending to their vegetable gardens along the Nile to the “Victory Gardens” that sprung up during wartime, demonstrating resilience and self-sufficiency.
But let’s be honest, not everyone has a green thumb, and the thought of battling pests, deciphering soil types, and understanding watering schedules can feel overwhelming. That’s where this article comes in! I’m going to share some of my favorite DIY secrets and simple strategies to help you easy to grow tasty crops, even if you’re a complete beginner. We’ll explore cost-effective solutions, clever space-saving techniques, and natural pest control methods that will transform your garden into a thriving oasis. Get ready to unlock the secrets to a bountiful harvest and enjoy the satisfaction of growing your own delicious, healthy food!
Leckere Ernte leicht selbst anbauen: Dein DIY-Garten-Guide
Hallo Gartenfreunde! Habt ihr auch Lust, frisches Gemüse und Kräuter direkt aus dem eigenen Garten zu ernten? Ich zeige euch, wie ihr mit einfachen Tricks und Kniffen auch ohne grünen Daumen eine reiche Ernte erzielen könnt. Los geht’s!
Die Grundlagen: Was du brauchst
Bevor wir loslegen, hier eine Liste der Dinge, die du für deinen DIY-Garten brauchst:
* Samen oder Jungpflanzen: Wähle Sorten, die in deiner Region gut wachsen und die du gerne isst.
* Gute Erde: Verwende am besten spezielle Pflanzerde oder mische Kompost unter deine Gartenerde.
* Gefäße oder ein Gartenbeet: Je nachdem, wie viel Platz du hast, kannst du Töpfe, Balkonkästen oder ein ganzes Beet nutzen.
* Gießkanne oder Gartenschlauch: Regelmäßiges Gießen ist das A und O.
* Gartengeräte: Eine kleine Schaufel, eine Harke und eventuell eine Gartenschere sind hilfreich.
* Dünger: Organischer Dünger wie Kompost oder Hornspäne versorgt deine Pflanzen mit Nährstoffen.
* Sonniger Standort: Die meisten Gemüsesorten brauchen mindestens 6 Stunden Sonne pro Tag.
Schritt-für-Schritt-Anleitung: Dein eigener Gemüsegarten
1. Standortwahl:
* Suche einen sonnigen Platz für deinen Garten. Achte darauf, dass der Boden gut entwässert ist und nicht zu Staunässe neigt.
* Wenn du einen Balkon hast, wähle einen Standort, der vor starkem Wind geschützt ist.
2. Boden vorbereiten:
* Lockere die Erde mit einer Schaufel auf und entferne Steine und Unkraut.
* Mische Kompost oder Pflanzerde unter die Gartenerde, um sie mit Nährstoffen anzureichern.
* Wenn du Töpfe oder Balkonkästen verwendest, fülle sie mit Pflanzerde.
3. Aussaat oder Pflanzung:
* Aussaat: Befolge die Anweisungen auf der Samenpackung. In der Regel werden die Samen in kleinen Rillen ausgesät und leicht mit Erde bedeckt.
* Pflanzung: Grabe ein Loch, das groß genug für den Wurzelballen der Jungpflanze ist. Setze die Pflanze ein und fülle das Loch mit Erde. Drücke die Erde leicht an.
* Achte auf den richtigen Abstand zwischen den Pflanzen, damit sie genügend Platz zum Wachsen haben.
4. Gießen:
* Gieße deine Pflanzen regelmäßig, besonders bei trockenem Wetter.
* Vermeide Staunässe, da dies zu Wurzelfäule führen kann.
* Gieße am besten morgens oder abends, wenn die Sonne nicht so stark scheint.
5. Düngen:
* Dünge deine Pflanzen regelmäßig mit organischem Dünger.
* Befolge die Anweisungen auf der Düngerpackung.
* Kompost oder Hornspäne sind eine gute Wahl für den ökologischen Gartenbau.
6. Unkraut jäten:
* Entferne regelmäßig Unkraut, damit es deinen Pflanzen nicht die Nährstoffe wegnimmt.
* Jäte am besten, wenn der Boden feucht ist, dann lässt sich das Unkraut leichter entfernen.
7. Schutz vor Schädlingen:
* Beobachte deine Pflanzen regelmäßig auf Schädlinge wie Schnecken, Blattläuse oder Raupen.
* Es gibt viele natürliche Methoden, um Schädlinge zu bekämpfen, z.B. mit Brennnesseljauche oder Nützlingen.
* Schneckenkragen um empfindliche Pflanzen können helfen, sie vor Schneckenfraß zu schützen.
8. Ernten:
* Ernte dein Gemüse und deine Kräuter, sobald sie reif sind.
* Regelmäßiges Ernten fördert das Wachstum neuer Früchte.
* Genieße deine frische Ernte!
Spezialtipps für Anfänger
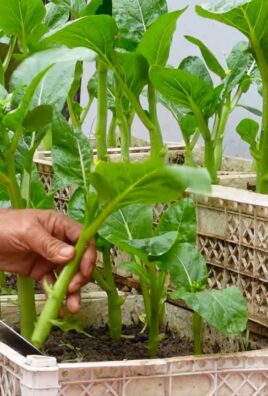
* Einfache Gemüsesorten für den Anfang: Salat, Radieschen, Zucchini, Tomaten (im Topf), Kräuter (Petersilie, Schnittlauch, Basilikum). Diese Sorten sind relativ pflegeleicht und bringen schnell Erfolgserlebnisse.
* Hochbeet bauen: Ein Hochbeet ist ideal für alle, die sich das Bücken beim Gärtnern sparen wollen. Außerdem erwärmt sich die Erde im Hochbeet schneller, was das Wachstum der Pflanzen fördert. Du kannst ein Hochbeet selber bauen oder fertig kaufen.
* Vertikaler Garten: Wenn du wenig Platz hast, ist ein vertikaler Garten eine tolle Lösung. Du kannst Pflanzen in hängenden Töpfen, an einer Rankhilfe oder in einer vertikalen Wand bepflanzen.
* Mischkultur: Pflanze verschiedene Gemüsesorten nebeneinander, die sich gegenseitig unterstützen. Zum Beispiel vertragen sich Tomaten und Basilikum sehr gut.
* Mulchen: Bedecke den Boden um deine Pflanzen mit Mulchmaterial wie Stroh, Rasenschnitt oder Holzhackschnitzel. Das hält den Boden feucht, unterdrückt Unkraut und schützt die Pflanzen vor Temperaturschwankungen.
Gemüseanbau im Detail: Lieblingssorten und ihre Bedürfnisse
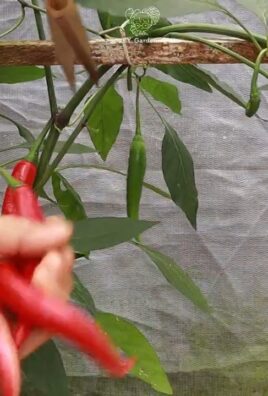
Tomaten: Sonnenanbeter mit Durst
Tomaten sind der Klassiker im Gemüsegarten. Sie lieben die Sonne und brauchen regelmäßige Wassergaben.
1. Sortenwahl: Es gibt unzählige Tomatensorten, von kleinen Cherrytomaten bis hin zu großen Fleischtomaten. Wähle eine Sorte, die dir schmeckt und die für dein Klima geeignet ist.
2. Aussaat: Tomaten werden am besten im Haus vorgezogen. Säe die Samen im März oder April in kleine Töpfe.
3. Pflanzung: Pflanze die Tomatenpflanzen nach den Eisheiligen (Mitte Mai) ins Freie.
4. Pflege: Tomaten brauchen viel Sonne und Wasser. Dünge sie regelmäßig mit Tomatendünger. Entferne regelmäßig die Seitentriebe (Ausgeizen), damit die Pflanzen mehr Kraft in die Früchte stecken.
5. Stützen: Tomatenpflanzen brauchen eine Stütze, z.B. einen Stab oder eine Rankhilfe.
6. Ernte: Ernte die Tomaten, sobald sie rot und reif sind.
Zucchini: Schnellwachser mit großem Hunger
Zucchini sind sehr einfach anzubauen und liefern eine reiche Ernte.
1. Sortenwahl: Es gibt grüne, gelbe und gestreifte Zucchinisorten.
2. Aussaat: Zucchini können direkt ins Freie gesät werden, sobald keine Frostgefahr mehr besteht.
3. Pflanzung: Wenn du Zucchini vorziehen möchtest, säe die Samen im April in kleine Töpfe. Pflanze die Jungpflanzen nach den Eisheiligen ins Freie.
4. Pflege: Zucchini brauchen viel Sonne, Wasser und Dünger.
5. Ernte: Ernte die Zucchini, sobald sie eine Größe von ca. 20 cm erreicht haben. Regelmäßiges Ernten fördert die Bildung neuer Früchte.
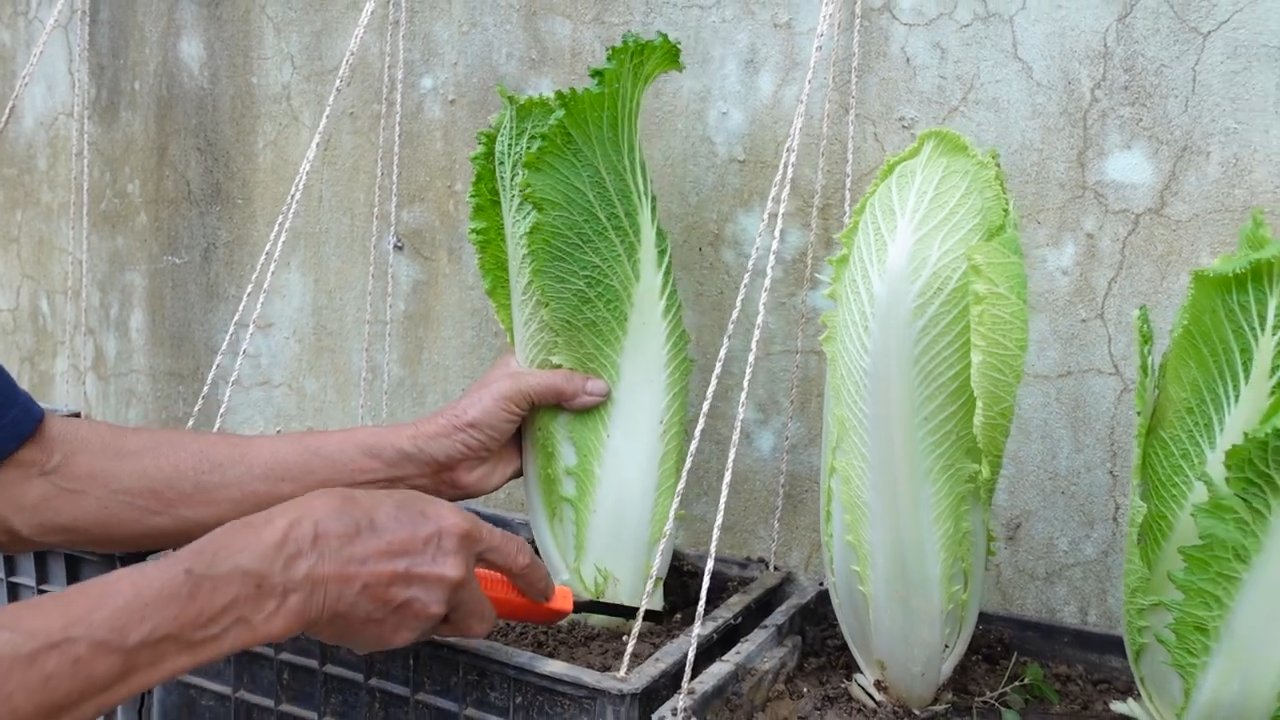
Salat: Knackig und frisch
Salat ist ein dankbares Gemüse, das schnell wächst und einfach anzubauen ist.
1. Sortenwahl: Es gibt verschiedene Salatsorten, wie Kopfsalat, Pflücksalat, Römersalat und Feldsalat.
2. Aussaat: Salat kann direkt ins Freie gesät werden oder im Haus vorgezogen werden.
3. Pflanzung: Pflanze die Salatpflanzen in einem Abstand von ca. 20 cm.
4. Pflege: Salat braucht regelmäßige Wassergaben.
5. Ernte: Ernte den Salat, sobald er die gewünschte Größe erreicht hat. Pflücksalat kann mehrmals geerntet werden.
Kräuter: Aromatischer Genuss
Kräuter sind ein Muss für jeden Hobbygärtner. Sie sind einfach anzubauen und verleihen deinen Gerichten das gewisse Etwas.
1. Sortenwahl: Beliebte Kräuter sind Petersilie, Schnittlauch, Basilikum, Rosmarin,

Conclusion
So, there you have it! This simple yet effective DIY trick for creating nutrient-rich soil is a game-changer for anyone looking to cultivate a thriving garden and easy to grow tasty crops. Forget expensive store-bought fertilizers and complicated soil amendments. This method is not only budget-friendly and environmentally conscious, but it also empowers you to take control of your garden’s health from the ground up.
The beauty of this DIY soil enrichment technique lies in its adaptability. Feel free to experiment with different ratios of ingredients based on the specific needs of your plants. For example, if you’re growing leafy greens, consider adding a bit more nitrogen-rich material like coffee grounds or grass clippings. If you’re focusing on root vegetables, a slightly higher proportion of phosphorus-rich bone meal or rock phosphate might be beneficial.
Don’t be afraid to get creative! You can also incorporate other readily available organic materials like crushed eggshells for calcium, banana peels for potassium, or even finely chopped seaweed for a boost of micronutrients. The possibilities are endless, and the more you experiment, the better you’ll understand what works best for your garden and your specific plants.
This DIY approach isn’t just about saving money; it’s about fostering a deeper connection with your garden and understanding the intricate relationship between soil health and plant growth. By creating your own nutrient-rich soil, you’re not just feeding your plants; you’re building a sustainable ecosystem that will support healthy growth for years to come.
We wholeheartedly encourage you to give this DIY trick a try. Whether you’re a seasoned gardener or just starting out, you’ll be amazed at the difference it can make in the vitality and yield of your crops. Remember, the key is to start small, observe your plants closely, and adjust your approach as needed.
Once you’ve experienced the magic of this DIY soil enrichment method, we’d love to hear about your results! Share your experiences, tips, and variations in the comments below. Let’s build a community of gardeners who are passionate about creating healthy, thriving gardens using simple, sustainable techniques. Together, we can unlock the secrets to abundant harvests and enjoy the satisfaction of growing our own delicious, nutrient-rich food. So, get your hands dirty, embrace the process, and prepare to be amazed by the power of this simple DIY trick! Happy gardening!
Frequently Asked Questions (FAQ)
What exactly is this DIY trick for?
This DIY trick is a method for creating nutrient-rich soil using readily available organic materials. It’s designed to improve soil fertility, promote healthy plant growth, and ultimately help you grow more abundant and easy to grow tasty crops. It’s a cost-effective and environmentally friendly alternative to store-bought fertilizers and soil amendments.
What are the main ingredients I need for this DIY soil enrichment?
While the specific ingredients can be adjusted based on your needs and available resources, the core components typically include:
* **A base material:** This could be compost, topsoil, or even a mix of both.
* **Nitrogen-rich materials:** Examples include coffee grounds, grass clippings, aged manure, or vegetable scraps.
* **Phosphorus-rich materials:** Options include bone meal, rock phosphate, or even banana peels.
* **Potassium-rich materials:** Wood ash, banana peels, or greensand are good sources.
* **Optional amendments:** Crushed eggshells for calcium, Epsom salts for magnesium, or seaweed for micronutrients.
How do I determine the right ratio of ingredients?
The ideal ratio depends on the specific needs of your plants and the existing condition of your soil. A general guideline is to aim for a balanced mix of nitrogen, phosphorus, and potassium. Start with equal parts of your base material and a blend of the other ingredients. Observe your plants closely and adjust the ratios based on their growth and appearance. If they’re looking pale or stunted, they may need more nitrogen. If they’re not flowering or fruiting well, they may need more phosphorus.
How long does it take for this DIY soil to be ready for planting?
The time it takes for the soil to be ready depends on the decomposition rate of the organic materials. Ideally, you should allow the mixture to compost for several weeks or even months before planting. This allows the nutrients to become more readily available to the plants. However, if you’re in a hurry, you can still use the mixture after a shorter period, but be sure to monitor your plants closely and supplement with additional nutrients if needed.
Can I use this DIY soil for all types of plants?
This DIY soil is generally suitable for a wide range of plants, but some plants have specific soil requirements. For example, acid-loving plants like blueberries and azaleas prefer a lower pH, so you may need to amend the soil with sulfur or peat moss. Research the specific needs of your plants and adjust the soil mixture accordingly.
Is it safe to use coffee grounds in my garden?
Yes, coffee grounds are a valuable addition to your garden soil. They are rich in nitrogen and other nutrients, and they can also help improve soil drainage and aeration. However, it’s important to use them in moderation, as excessive amounts can make the soil too acidic.
Can I use this DIY soil in containers?
Yes, this DIY soil can be used in containers, but it’s important to ensure that the container has adequate drainage. You may also need to add some perlite or vermiculite to improve drainage and aeration.
What if I don’t have access to all of the recommended ingredients?
Don’t worry if you can’t find all of the recommended ingredients. The beauty of this DIY trick is that it’s adaptable. Use what you have available and focus on creating a balanced mix of nutrients. Even a simple mixture of compost and topsoil can be a significant improvement over poor-quality soil.
How do I know if my DIY soil is working?
The best way to tell if your DIY soil is working is to observe your plants closely. Look for signs of healthy growth, such as vibrant green leaves, strong stems, and abundant flowers or fruits. If your plants are thriving, then your DIY soil is doing its job.
What are some common mistakes to avoid when making DIY soil?
Some common mistakes to avoid include:
* Using too much of one ingredient, which can create an imbalance of nutrients.
* Using fresh manure, which can burn plant roots.
* Not allowing the mixture to compost properly, which can make the nutrients less available to plants.
* Ignoring the specific needs of your plants.
How often should I replenish the nutrients in my DIY soil?
The frequency of nutrient replenishment depends on the type of plants you’re growing and the overall health of your soil. As a general rule, you should replenish the nutrients every few months or whenever you notice signs of nutrient deficiency in your plants. You can do this by adding more compost, fertilizer, or other organic amendments.
Where can I learn more about soil health and DIY gardening techniques?
There are many resources available online and in libraries that can provide you with more information about soil health and DIY gardening techniques. Some good places to start include your local extension office, gardening websites, and books on organic gardening.
Leave a Comment